之前学习的时候一直没有写笔记,这次是来把Shiro的笔记全部补回来的。之前写过一个Shiro从0到1,但是感觉还是总结的很少。
这一次从零开始。
Shiro的简介
Shiro现在是比较火的一个安全框架了,还有很多安全框架,比如Spring Security等等,说是安全框架,也可以说成是权限管理框架。
权限管理可以实现对用户的访问系统的控制,比如说/Admin/UserList,这个路由访问的是用户管理的页面,如果没有权限控制的话,如果谁都可以访问的话,那不就成了未授权访问了。
Shiro的组成(核心架构)
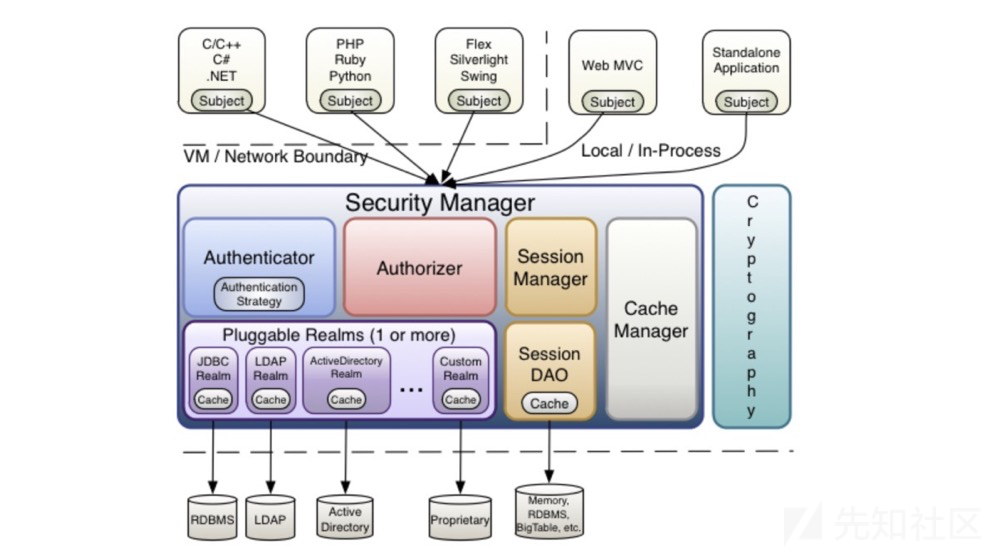
以上这张图是Shiro官网的一个架构图,接下来一一介绍这几个是什么意思:
Subject
Subject不难理解,他其实就是一个主体,也可以说是当前应用程序,又可以说是当前用户。总的来说Subject代表当前用户或者当前程序。
在Shiro中Subject是一个接口,他定义了很多认证授权的方法。
什么是认证? 认证就是判断你这个用户是不是合法用户,他是一个过程,可以理解为是一个认证的过程。
什么是授权?授权其实就是你认证成功之后,你的权限能访问系统的那些资源,当我们身份认证通过后需要分配权限决定你可以访问那些资源。
SecurityManage
SecurityManage从名字我们可以看出它是安全管理器,当我们的Subject去认证的时候,需要通过SecurityManage安全管理器来负责认证和授权,可以理解为SecurityManage安全管理器就是干认证和授权这些事情的。而SecurityManage安全管理器又要通过Authenticator认证器进行认证,通过Authorizer授权器进行授权,通过SessionManag会话管理器进行会话管理,有没有发现他就相当于一个中介,他来接收这些事情,而干这些事情的不是他来做的,而是后面这些什么会话管理器,授权器这些来做的。
Authenticator
Authenticator即为认证器,我们上面也说了SecurityManage安全管理器中途转发过来,然后由我们的认证器来进行身份认证。但是我们认证的数据从哪来?那就用到了Realm,Realm从数据库中去获取到用户信息,然后认证器来做身份认证。
Authorizer
Authorizer即为我们的授权器,那我们通过认证器认证权限之后,我们是不是得通过授权器来判断这个用户身份有什么权限,他可以访问那些资源。
Realm
Realm他是一个领域,其实相当于数据源,比如我们在身份认证的时候我们是不是得调用认证器,通过认证器,我们需要从Realm中获取到用户的数据,比如用户的数据在MYSQL数据库,那么Realm就需要从MYSQL数据库中去获取到用户的信息,然后来做身份认证。可以理解Realm相当于一个数据库。但是在Realm中也有一些认证授权相关的操作。
SessionManager
SessionManager是一个会话管理器,,shiro框架定义了一套会话管理, 它不依赖web容器的session,所以shiro可以使用在非web 应用上,也可以将分布式应用的会话集中在一点管理,此 特性可使它实现单点登录。
SessionDAO
SessionDAO其实就是会话,比如要将Session存储到数据库,那么可以通过jdbc来存储到数据库。
Shiro中的认证
身份信息
Principal身份信息,你可以理解为是一个用户名,或者邮箱,具有标识类的信息。
凭据信息
credential凭据信息,你可以理解为是一个密码或者证书。
认证流程
通过我们前面的理解,Shiro基本的认证流程就是:
当我们的用户去认证的时候,用户携带我们的身份信息,凭据信息,也就是我们的用户名和密码,Shiro会将我们的用户名和密码封装成一个Token,然后通过安全管理器,安全管理器去调用认证器,认证器去调用我们的Realm去获取数据,然后进行比对,如果对比成功的话,那么就认证成功了,否则认证失败。
认证举例
引入依赖
<dependency>
  <groupId>org.apache.shiro</groupId>
  <artifactId>shiro-core</artifactId>
  <version>1.5.3</version>
</dependency>
Shiro配置文件
这个配置文件代表的是你的用户名或者密码,到时候如果和其他框架整合的话需要创建ShiroConfig。这里测试的话就直接将用户名和密码写死了。这个文件创建在resource目录下。名称为shiro.ini
[users]
relaysec=123456
测试代码:
package com.powernode;

import org.apache.shiro.SecurityUtils;
import org.apache.shiro.authc.IncorrectCredentialsException;
import org.apache.shiro.authc.UnknownAccountException;
import org.apache.shiro.authc.UsernamePasswordToken;
import org.apache.shiro.mgt.DefaultSecurityManager;
import org.apache.shiro.realm.text.IniRealm;
import org.apache.shiro.subject.Subject;

public class ShiroDemo {
    public static void main(String[] args) {
        //1.创建安全管理器对象
        DefaultSecurityManager securityManager = new DefaultSecurityManager();

        //2.给安全管理器设置realm
        securityManager.setRealm(new IniRealm("classpath:shiro.ini"));

        //3.SecurityUtils 给全局安全工具类设置安全管理器
        SecurityUtils.setSecurityManager(securityManager);

        //4.关键对象 subject 主体
        Subject subject = SecurityUtils.getSubject();


        //5.创建令牌
        UsernamePasswordToken token = new UsernamePasswordToken("relaysec","123456");

        try{
            subject.login(token);//用户认证
            System.out.println("登录成功");
        }catch (UnknownAccountException e){
            e.printStackTrace();
            System.out.println("认证失败: 用户名不存在~");
        }catch (IncorrectCredentialsException e){
            e.printStackTrace();
            System.out.println("认证失败: 密码错误~");
        }

    }
}

Shiro认证源码分析
用户名认证
我们在login这里下断点,跟进去。虽然我们调用的是Subject的login方法。但是可以看到他实际调用的是我们安全管理器的login方法,这里传进去两个值,第一个this就是我们的自身类,第二个值的话就是我们的token,我们这个token里面包含着我们的用户名和密码,在上面测试程序可以看到,在new UsernamePasswordToken将我们的用户名和密码传递了进去。所以我们跟进去login方法。

来到login方法,发现调用到了DefaultSecurityManager的login方法,就是我们上面new的安全管理器,在这里调用authenticate方法,我们跟进去。
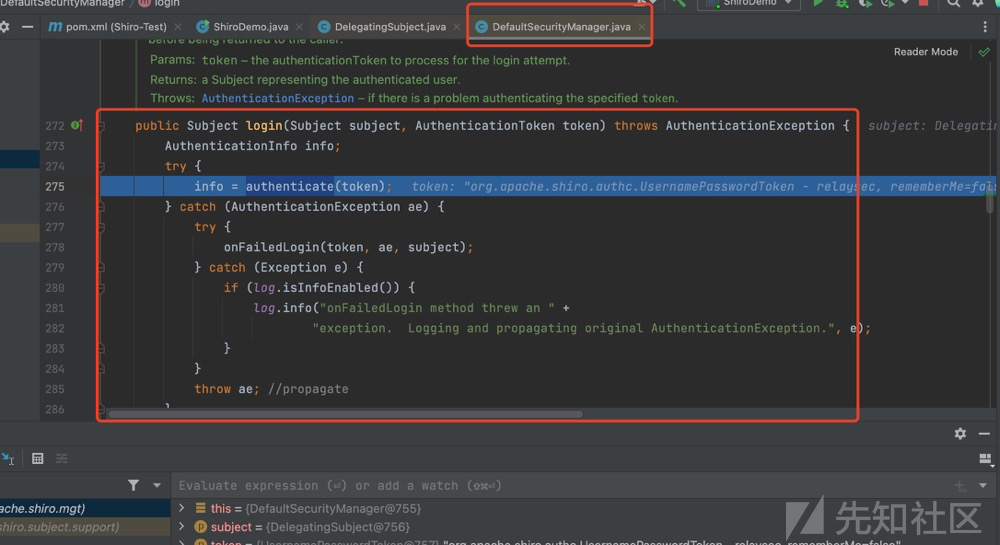
来到authenticate方法,发现他调用的是authenticator的authenticate方法,Authenticator是不是我们的认证器啊,所以他调用了我们认证的authenticate方法,我们跟进去。

来到authenticate方法,首先判断我们的token是否为null,如果为null的话就会抛出异常。
然后调用doAuthenticate方法,可以发现如果返回的信息info为null的话,他就会抛出异常,我们跟进去doAuthenticate方法。

来到doAuthenticate方法,调用getRealms方法,拿到我们所有的域,里面包含我们的用户名和密码,接着进行if判断,判断我们的realm的size是否等1,我们进入if,接着调用doSingleRealmAuthentication方法。

来到doSingleRealmAuthentication方法,首先进行判断我们的realm是否支持token,然后调用我们realm的getAuthenticationInfo方法,我们跟进去。

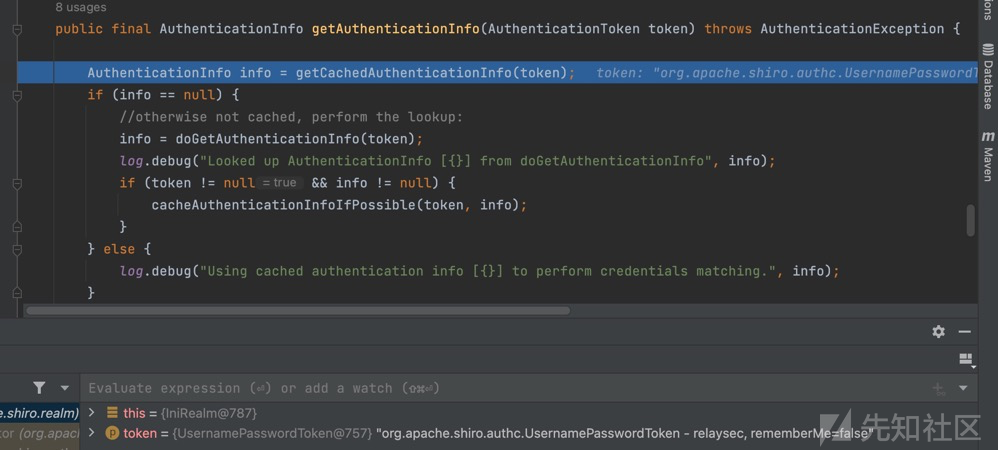
来到getAuthenticationInfo方法,首先调用getCachedAuthenticationInfo方法,从缓存中拿我们的信息,我们是没有配置缓存管理器的,第一次访问是没有缓存的,所以我们进入if,调用doGetAuthenticationInfo方法,跟进去。
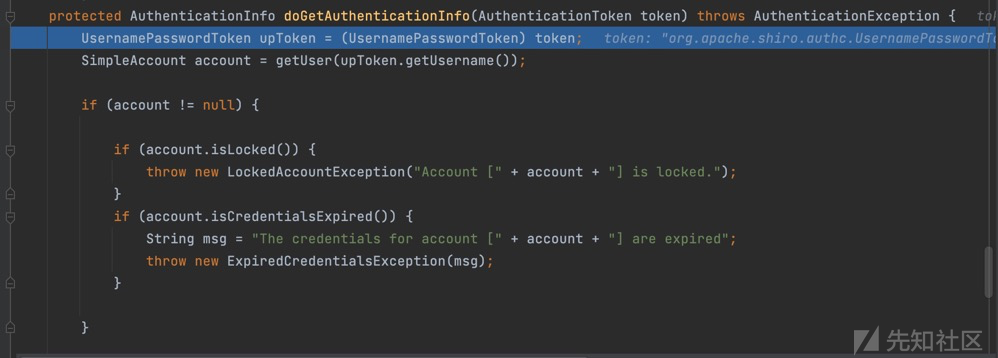
来到doGetAuthenticationInfo方法,这里首先将我们的token强制转换为UsernamePasswordToken,然后调用getUser方法,根据我们传入的token中的用户名调用getUser去获取用户。我们跟进去。
来到getUser方法,此时我们的username就是我们的传入的用户名。最后通过get方法获取到我们的用户名。

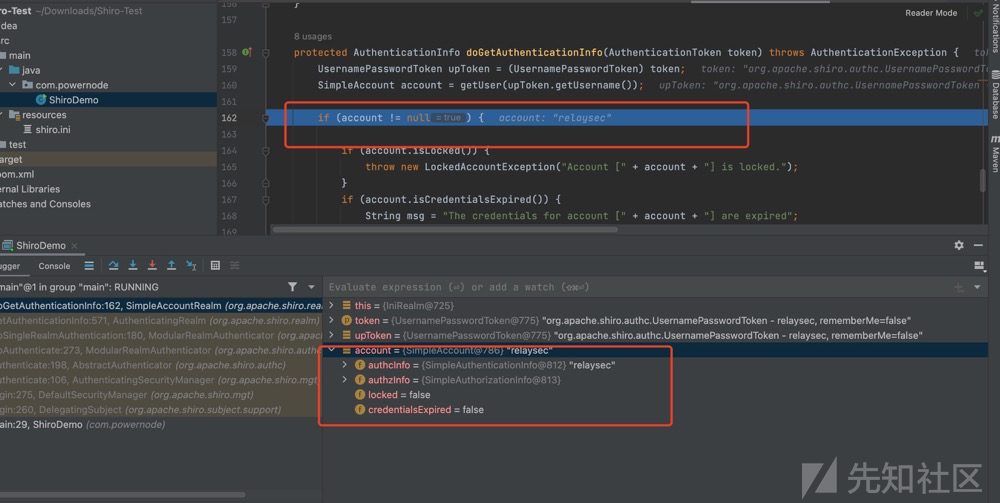
回到doGetAuthenticationInfo方法,可以看到此时返回的account就是我们的用户名。然后进行判断如果account不为空的话,进入到if,然后判断我们的account是否加锁了,然后调用isCredentialsExpired方法判断你的密码是否过期。我们没有加锁也没有做过期的处理,所以到这里用户名的处理就结束了。我们可以发现真正用户名的处理是在SimpleAccountRealm的doGetAuthenticationInfo方法中实现的。最后返回account,我们返回上一个方法。
密码认证
返回到getAuthenticationInfo方法,这里首先判断我们的token不等于并且返回的info不等于null的话,调用cacheAuthenticationInfoIfPossible方法,默认会给我们加一个缓存。然后我们继续往下走。

继续判断info如果不等于null的话,他会调用assertCredentialsMatch方法,判断我们token中的密码和info中的密码是否一致,我们跟进去。

来到assertCredentialsMatch方法。
首先获取我们的密码匹配器,然后判断我们的密码匹配器如果不等于null的话,调用doCredentialsMatch方法进行密码匹配,跟进去。

来到doCredentialsMatch方法,最后通过equals进行比对,这是默认的密码匹配器。如果我们的密码加密过,加盐过,他还会有其他的操作。

Shiro中的授权
授权
授权上面也说过了,其实就是用户通过认证之后,你拥有那些权限,你可以访问那些资源。对于没有权限访问的资源是无法访问的。
授权流程
当我们的用户去认证的时候,用户携带我们的身份信息,凭据信息,也就是我们的用户名和密码,Shiro会将我们的用户名和密码封装成一个Token,然后通过安全管理器,安全管理器去调用认证器,认证器去调用我们的Realm去获取数据,然后进行比对,如果对比成功的话,那么就认证成功了,否则认证失败。
上面是我们的认证流程,当我们认证成功之后,登入系统之后,判断是否对访问的资源有操作权限,如果有操作权限那么就可以访问,如果没有操作权限,那么就不能访问。
Springboot整合shiro
引入依赖
首先创建一个springboot的项目,引入maven依赖:
这里要注意的是我们引入的shiro依赖不能是springboot里面的,要引入单独的。
<?xml version="1.0" encoding="UTF-8"?>
<project xmlns="http://maven.apache.org/POM/4.0.0" xmlns:xsi="http://www.w3.org/2001/XMLSchema-instance"
         xsi:schemaLocation="http://maven.apache.org/POM/4.0.0 https://maven.apache.org/xsd/maven-4.0.0.xsd">
    <modelVersion>4.0.0</modelVersion>
    <parent>
        <groupId>org.springframework.boot</groupId>
        <artifactId>spring-boot-starter-parent</artifactId>
       <version>2.7.6</version>
        <relativePath/> <!-- lookup parent from repository -->
    </parent>
    <packaging>war</packaging>
    <groupId>com.powernode</groupId>
    <artifactId>shiro-boot-shiro</artifactId>
    <version>0.0.1-SNAPSHOT</version>
    <name>shiro-boot-shiro</name>
    <description>shiro-boot-shiro</description>
    <properties>
        <java.version>1.8</java.version>
    </properties>
    <dependencies>
        <dependency>
            <groupId>org.springframework.boot</groupId>
            <artifactId>spring-boot-starter-web</artifactId>
        </dependency>

        <dependency>
            <groupId>org.springframework.boot</groupId>
            <artifactId>spring-boot-devtools</artifactId>
            <scope>runtime</scope>
            <optional>true</optional>
        </dependency>

        <dependency>
            <groupId>org.apache.tomcat</groupId>
            <artifactId>tomcat-juli</artifactId>
            <version>8.5.23</version>
        </dependency>

        <dependency>
            <groupId>org.projectlombok</groupId>
            <artifactId>lombok</artifactId>
            <optional>true</optional>
        </dependency>
        <dependency>
            <groupId>org.springframework.boot</groupId>
            <artifactId>spring-boot-starter-test</artifactId>
            <scope>test</scope>
        </dependency>

        <!--引入JSP解析依赖-->
        <dependency>
            <groupId>org.apache.tomcat.embed</groupId>
            <artifactId>tomcat-embed-jasper</artifactId>
        </dependency>
        <dependency>
            <groupId>jstl</groupId>
            <artifactId>jstl</artifactId>
            <version>1.2</version>
        </dependency>

        <!--引入shiro整合Springboot依赖-->
        <!--CVE-2020-1957 Shiro <= 1.5.1-->
        <dependency>
            <groupId>org.apache.shiro</groupId>
            <artifactId>shiro-web</artifactId>
            <version>1.4.2</version>
        </dependency>
<!--        <dependency>-->
<!--            <groupId>org.apache.shiro</groupId>-->
<!--            <artifactId>shiro-spring</artifactId>-->
<!--            <version>1.4.2</version>-->
<!--        </dependency>-->
        <!--CVE-2020-11989 shiro < 1.5.3-->
<!--        <dependency>-->
<!--            <groupId>org.apache.shiro</groupId>-->
<!--            <artifactId>shiro-web</artifactId>-->
<!--            <version>1.4.2</version>-->
<!--        </dependency>-->
<!--        <dependency>-->
<!--            <groupId>org.apache.shiro</groupId>-->
<!--            <artifactId>shiro-spring</artifactId>-->
<!--            <version>1.4.2</version>-->
<!--        </dependency>-->

<!--        <dependency>-->
<!--            <groupId>org.apache.shiro</groupId>-->
<!--            <artifactId>shiro-spring</artifactId>-->
<!--            <version>1.5.3</version>-->
<!--        </dependency>-->
<!--        <dependency>-->
<!--            <groupId>org.apache.shiro</groupId>-->
<!--            <artifactId>shiro-web</artifactId>-->
<!--            <version>1.5.3</version>-->
<!--        </dependency>-->

        <dependency>
            <groupId>org.apache.shiro</groupId>
            <artifactId>shiro-web</artifactId>
            <version>1.7.0</version>
        </dependency>
        <dependency>
            <groupId>org.apache.shiro</groupId>
            <artifactId>shiro-spring</artifactId>
            <version>1.7.0</version>
        </dependency>
    </dependencies>

    <build>
        <plugins>
            <plugin>
                <groupId>org.springframework.boot</groupId>
                <artifactId>spring-boot-maven-plugin</artifactId>
                <version>2.5.0</version>
                <configuration>
                    <excludes>
                        <exclude>
                            <groupId>org.projectlombok</groupId>
                            <artifactId>lombok</artifactId>
                        </exclude>
                    </excludes>
                </configuration>
            </plugin>
        </plugins>
    </build>

</project>
创建ShiroConfig.java
1.创建ShiroFilter
ShiroFilterFactoryBean shiroFilterFactoryBean = new ShiroFilterFactoryBean();
//给filter设置安全管理器
shiroFilterFactoryBean.setSecurityManager(defaultWebSecurityManager);

//配置系统受限资源
//配置系统公共资源
Map<String,String> map = new HashMap<String,String>();
                map.put("/admin/**","anon");//authc 请求这个资源需要认证和授权
        map.put("/admin/users","authc");
        map.put("/demo/**","anon");
        map.put("/index.jsp","authc");
        map.put("/hello/*", "authc");
   map.put("/toJsonList/*","authc");
        //默认认证界面路径---当认证不通过时跳转
        shiroFilterFactoryBean.setLoginUrl("/login.jsp");
        shiroFilterFactoryBean.setFilterChainDefinitionMap(map);

        return shiroFilterFactoryBean;
2.创建安全管理器
@Bean
public DefaultWebSecurityManager getDefaultWebSecurityManager(Realm realm){
    DefaultWebSecurityManager defaultWebSecurityManager = new DefaultWebSecurityManager();
    //给安全管理器设置
    defaultWebSecurityManager.setRealm(realm);

    return defaultWebSecurityManager;
}
3.创建自定义的Realm
//3.创建自定义realm
@Bean
public Realm getRealm(){
    CustomerRealm customerRealm = new CustomerRealm();

    return customerRealm;
}
4.自定义的Realm
package com.powernode.shirobootshiro.realm;
import org.apache.shiro.authc.AuthenticationException;
import org.apache.shiro.authc.AuthenticationInfo;
import org.apache.shiro.authc.AuthenticationToken;
import org.apache.shiro.authc.SimpleAuthenticationInfo;
import org.apache.shiro.authz.AuthorizationInfo;
import org.apache.shiro.authz.SimpleAuthorizationInfo;
import org.apache.shiro.realm.AuthorizingRealm;
import org.apache.shiro.subject.PrincipalCollection;
import org.springframework.util.CollectionUtils;
import org.springframework.util.ObjectUtils;

import java.util.List;


//自定义realm
public class CustomerRealm extends AuthorizingRealm {

    @Override
    protected AuthorizationInfo doGetAuthorizationInfo(PrincipalCollection principals) {
        return null;
    }

    @Override
    protected AuthenticationInfo doGetAuthenticationInfo(AuthenticationToken token) throws AuthenticationException {

        System.out.println("=============");

        //从传过来的token获取到的用户名
        String principal = (String) token.getPrincipal();
        System.out.println("用户名"+principal);

        //假设是从数据库获得的 用户名,密码
        String password_db="123";
        String username_db="zhangsan";

        if (username_db.equals(principal)){
//            SimpleAuthenticationInfo simpleAuthenticationInfo =
            return new SimpleAuthenticationInfo(principal,"123", this.getName());
        }

        return null;
    }
}
测试:
这是一个测试jsp,我们在shiroConfig文件中配置了那些资源我们可以访问,那些资源我们不能访问,就是这几行代码,这里map的key值代表的是我们的资源,map的value值代表的是我们的权限,authc代表我们是需要认证和授权的,anon代表我们不需要认证和授权,接下来我们再聊Shiro的绕过,其实代码审计去审的就是shiroConfig文件,看他的jar包,以及ShiroConfig配置文件。
Map<String,String> map = new HashMap<String,String>();
                map.put("/admin/**","anon");//authc 请求这个资源需要认证和授权
        map.put("/admin/users","authc");
        map.put("/demo/**","anon");
        map.put("/index.jsp","authc");
        map.put("/hello/*", "authc");
   map.put("/toJsonList/*","authc");
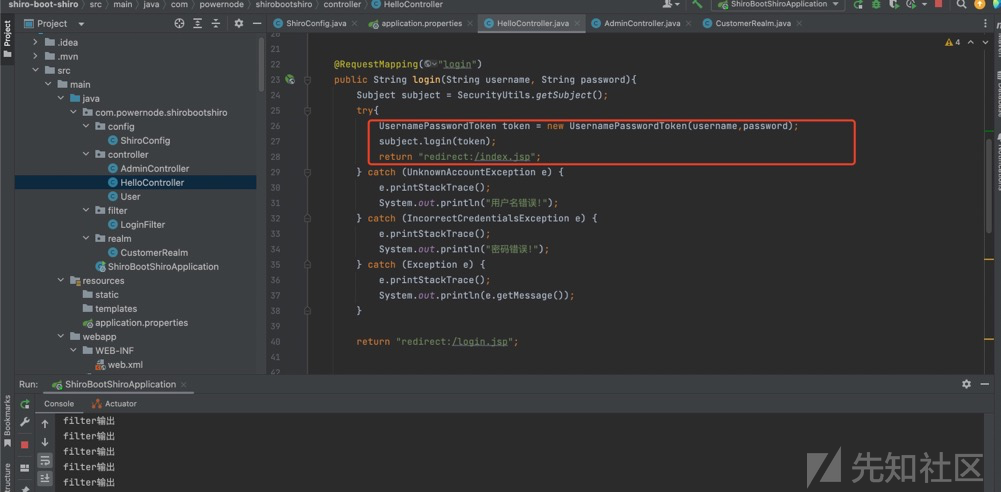
我们这里写了一个登录的controller,登录成功之后转发到index.jsp,否则直接转发到login.jsp文件。
Shiro过滤的流程
在PathMatchingFilterChainResolver类中的getChain方法对我们请求的资源进行了过滤,那么是怎么调用到getChain的呢?当一个请求到达Tomcat时,Tomcat以责任链的形式调用了一系列Filter,OncePerRequestFilter就是众多Filter中的一个。它所实现的doFilter方法调用了自身的抽象方法doFilterInternal。
PathMatchingFilterChainResolver.getChain就是被在doFilterInternal中被一步步调用的调用的。
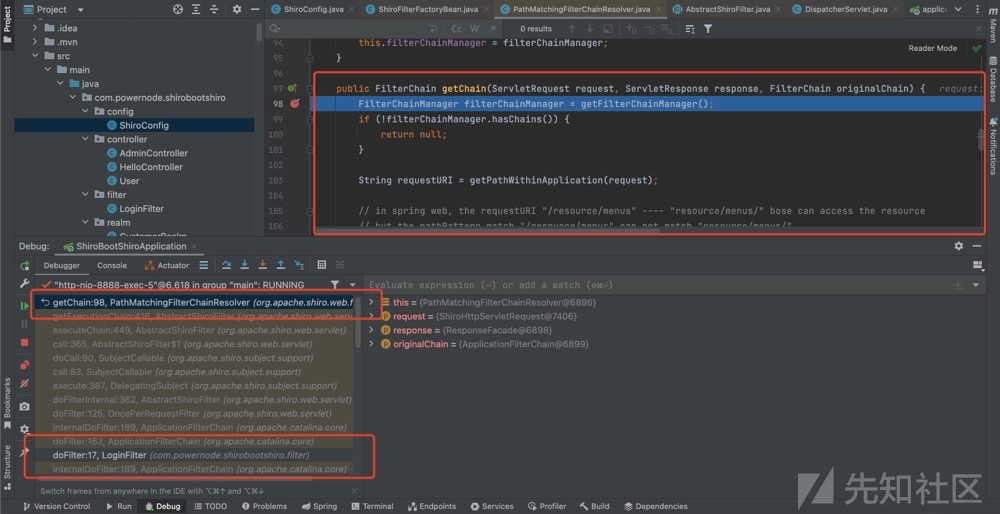
来到getchain方法,首先调用getFilterChainManager方法获取过滤器,然后接着调用getPathWithinApplication方法来获取请求路径,我们跟进去。

来到getPathWithinApplication方法,这里又调用了一个工具类WebUtils的getPathWithinApplication方法,跟进去。

来到getPathWithinApplication方法,这里调用了getServletPath方法,我们跟进去。

来到getServletPath方法,首先在request域中查找 javax.servlet.include.servlet_path,接下来判断如果不等于null的话那么就直接返回,如果等于null的话就调用valueOrEmpty方法。我们这里是查找不到的,所以跟进valueOrEmpty方法。最后返回的就是我们的请求路径。

回到getPathWithinApplication方法,我们返回的值是/admin/users,然后调用getPathinfo,getPathinfo方法返回的值是空的,所以拼接起来还是/admin/users,然后调用normalize方法,然后调用removeSemicolon方法,跟进去。
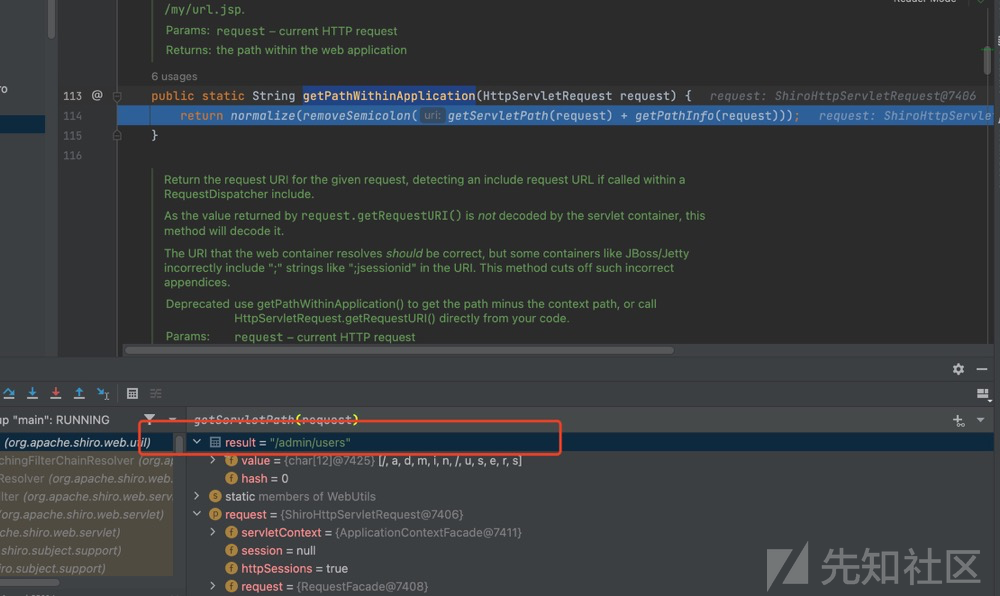
来到removeSemicolon方法,这里首先将我们传进去的路径调用indexOf方法,如果我们的字符串里面有 ; 号的话,那就返回第一个索引。明显我们是没有的,所以返回-1,接下来判断如果不等于-1的话,直接返回uri,如果等于-1的话,那么就从分号开始截取后面的值然后返回。

跟进normalize方法,继续跟进normalize方法,normailze方法会进行一系列的判断,此时的path就是我们请求的路径,首先判断是否为null,然后把path赋值给了normalized变量,紧接着判断replaceBackSlash是否为true,他是false,所以我们不用管,继续往下,判断路径里面是否有/. 如果有的话直接返回 / ,下面大家可以自己看下,我这里就不多说了。走完normalize方法之后,我们返回到getChain方法。
private static String normalize(String path, boolean replaceBackSlash) {

    if (path == null)
        return null;

    // Create a place for the normalized path
    String normalized = path;

    if (replaceBackSlash && normalized.indexOf('\\') >= 0)
        normalized = normalized.replace('\\', '/');

    if (normalized.equals("/."))
        return "/";

    // Add a leading "/" if necessary
    if (!normalized.startsWith("/"))
        normalized = "/" + normalized;

    // Resolve occurrences of "//" in the normalized path
    while (true) {
        int index = normalized.indexOf("//");
        if (index < 0)
            break;
        normalized = normalized.substring(0, index) +
                normalized.substring(index + 1);
    }

    // Resolve occurrences of "/./" in the normalized path
    while (true) {
        int index = normalized.indexOf("/./");
        if (index < 0)
            break;
        normalized = normalized.substring(0, index) +
                normalized.substring(index + 2);
    }

    // Resolve occurrences of "/../" in the normalized path
    while (true) {
        int index = normalized.indexOf("/../");
        if (index < 0)
            break;
        if (index == 0)
            return (null);  // Trying to go outside our context
        int index2 = normalized.lastIndexOf('/', index - 1);
        normalized = normalized.substring(0, index2) +
                normalized.substring(index + 3);
    }

    // Return the normalized path that we have completed
    return (normalized);

}
回到getChain方法,首先判断我们的url路径不等于null的话并且DEFAULT_PATH_SEPARATOR,这个其实是一个 "/" ,他判断我们的url里面是否存在 /,然后判断我们的url结尾是不是/ 显现不是的,跳过if。

来到下一个if,首先他通过调用getChainNames方法,获取到我们设置的权限访问的资源路径,然后进行匹配。首先判断是否为null,然后判断里面是否包含,最后判断结尾是否是 / 。跳出if。

来到下一个if,接着继续循环判断。
因为我们在map中的第一个写的就是/admin/users,所以他匹配上了,最后调用proxy代理方法进行处理。

Shiro绕过漏洞分析
CVE-2020-1957
在复现和分析之前,首先说一下环境的问题,如果你的Springboot版本过高的话,那么可能会复现不成功,因为在Shiro层面绕过之后,SpringBoot也需要解析路径的,所以如果你的Springboot版本过高的话,可能是复现不成功的。并且不能使用Springboot集成的shiro吗,那样子也有可能导致复现不成功。
环境:Springboot:2.2.6.RELEAS
<groupId>org.springframework.boot</groupId>
 <artifactId>spring-boot-starter-parent</artifactId>
<version>2.2.6.RELEASE</version>
Shiro版本:1.5.0
<dependency>
    <groupId>org.apache.shiro</groupId>
    <artifactId>shiro-web</artifactId>
    <version>1.5.0</version>
</dependency>
<dependency>
    <groupId>org.apache.shiro</groupId>
    <artifactId>shiro-spring</artifactId>
    <version>1.5.0</version>
</dependency>
ShiroConfig配置:
LinkedHashMap<String, String> map = new LinkedHashMap<String, String>();
        map.put("/login","anon");//anon 设置为公共资源  放行资源放在下面
//        map.put("/user/register","anon");//anon 设置为公共资源  放行资源放在下面
//        map.put("/register.jsp","anon");//anon 设置为公共资源  放行资源放在下面
//        map.put("/user/getImage","anon");
        map.put("/doLogin", "anon");
        map.put("/demo/**","anon");
        map.put("/unauth", "user");
        map.put("/admin/*","authc");

        //默认认证界面路径---当认证不通过时跳转
        shiroFilterFactoryBean.setLoginUrl("/login.jsp");
        shiroFilterFactoryBean.setFilterChainDefinitionMap(map);

        return shiroFilterFactoryBean;
Controller:
绕过方式: /demo/..;/admin/index

复现:

漏洞分析:
首先我们定位到PathMatchingFilterChainResolver类的getchain方法,这个方法是处理过滤的,前面也说过了。
首先调用getPathWithinApplication方法获取路径,跟进去。

来到getPathWithinApplication方法,继续跟进WebUtils的getPathWithinApplication方法。
首先getContextPath方法获取工程路径,调用getRequestUri获取访问路径,跟进去getRequestUri方法,

来到getRequestUri方法,首先从域中获取,获取不到的话,调用getRequestURI方法获取路径,获取的就是我们访问的//demo/..;/admin/users 这个路径,然后调用decodeAndCleanUriString方法进行处理。我们跟进去。

来到decodeAndCleanUriString方法,通过indexOf方法,因为我们的路径中存在分号,所以他获取到的位置是第9个,
然后判断如果不等于-1的话,调用substring方法进行字符串截取,从0到9 包前不包后 ,也就是说分号不需要截取,截取出来的字符串就是//demo/..。然后返回上一个方法。

来到normalize方法,这里进行了字符的替换,
替换反斜线
替换 // 为 /
替换 /./ 为 /
替换 /../ 为 /
然后返回。
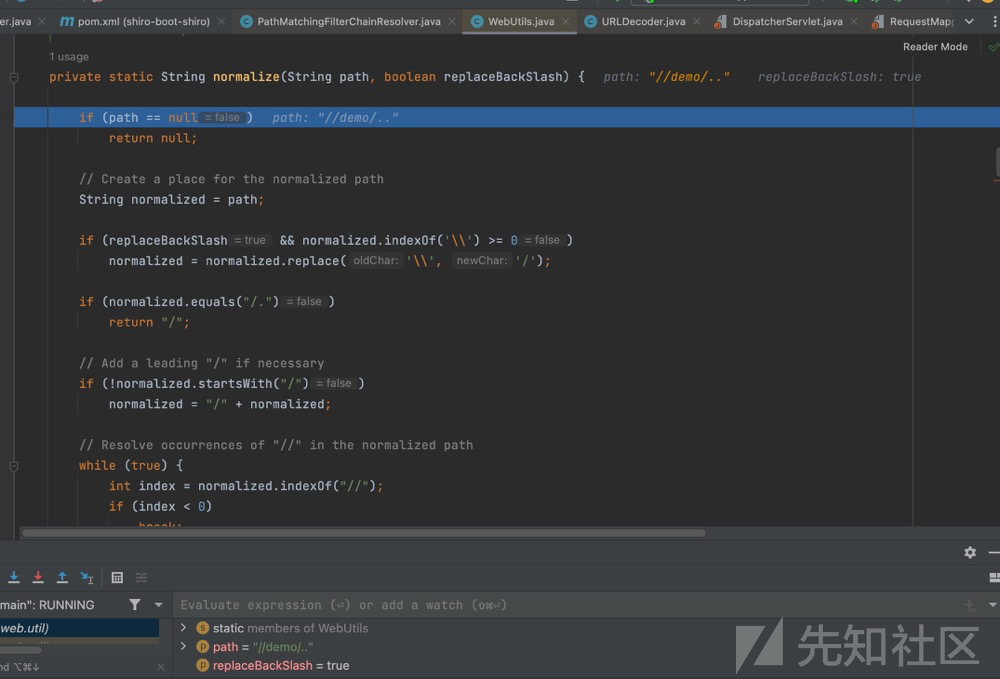
回到getChain方法,首先判断如果url不等于null并且他的最后一位是 / 的话,进行字符串截取然后赋值,我们拿到的字符串路径是/demo/.. 所以往下走。
然后循环遍历我们的map中的内容,就是我们在Shiroconfig中写的那些过滤的内容,然后进行一一匹配,最后匹配到/demo/**的时候,然后调用proxy方法,我们跟进去。

来到proxy方法,首先调用getChain方法获取到请求路径对应的过滤器,然后调用过滤器的proxy方法,来到proxy方法。

来到proxy方法,首先创建了一个ProxiedFilterChain对象,这个对象是一个代理对象。

基本上到这里我们的原始请求就会进入到 springboot中. springboot对于每一个进入的request请求也会有自己的处理方式,找到自己所对应的controller。
我们定位到Spring处理请求的地方。 我们跟进去getPathWithinApplication方法。
org.springframework.web.util.UrlPathHelper#getPathWithinServletMapping

来到getPathWithinApplication方法,调用getContextPath方法获取到工程路径,调用getRequestUri获取访问路径,我们跟进getRequestUri方法。

来到decodeAndCleanUriString方法,跟进removeSemicolonContent方法。

首先获取到分号的位置,然后while循环如果不等于-1的话,然后进行字符串截取,将我们的分号截取掉 然后返回的路径就是//demo..
回到decodeAndCleanUriString方法,调用decodeRequestString进行decode解码,然后调用getSanitizedPath方法进行过滤 //
然后返回。
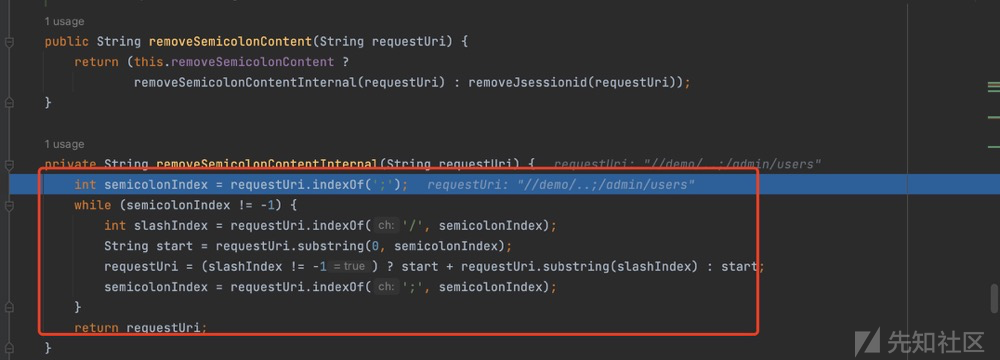
回到getPathWithinApplication方法,可以发现我们的分号已经被去掉了。
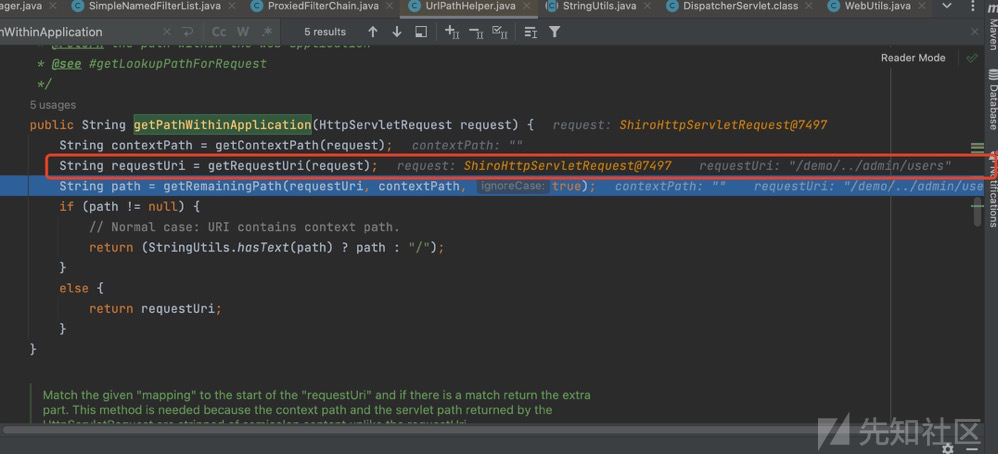
到这里基本上的流程就结束了,可以发现在Spring中会过滤分号,而在Shiro中不会。导致权限绕过。

 转载
转载
 分享
分享
