
分析
构建一个web
version: "3.3"

services:
  web:
    image: php:8.0-apache
    ports:
      - "18080:80"
    volumes:
      - ./fake:/var/www/html
    environment:
      - APACHE_DOCUMENT_ROOT=/var/www/html
docker简单构建一个web容器,使用apache+php,fake目录用来后期欺骗测试
Wappalyzer识别如下:
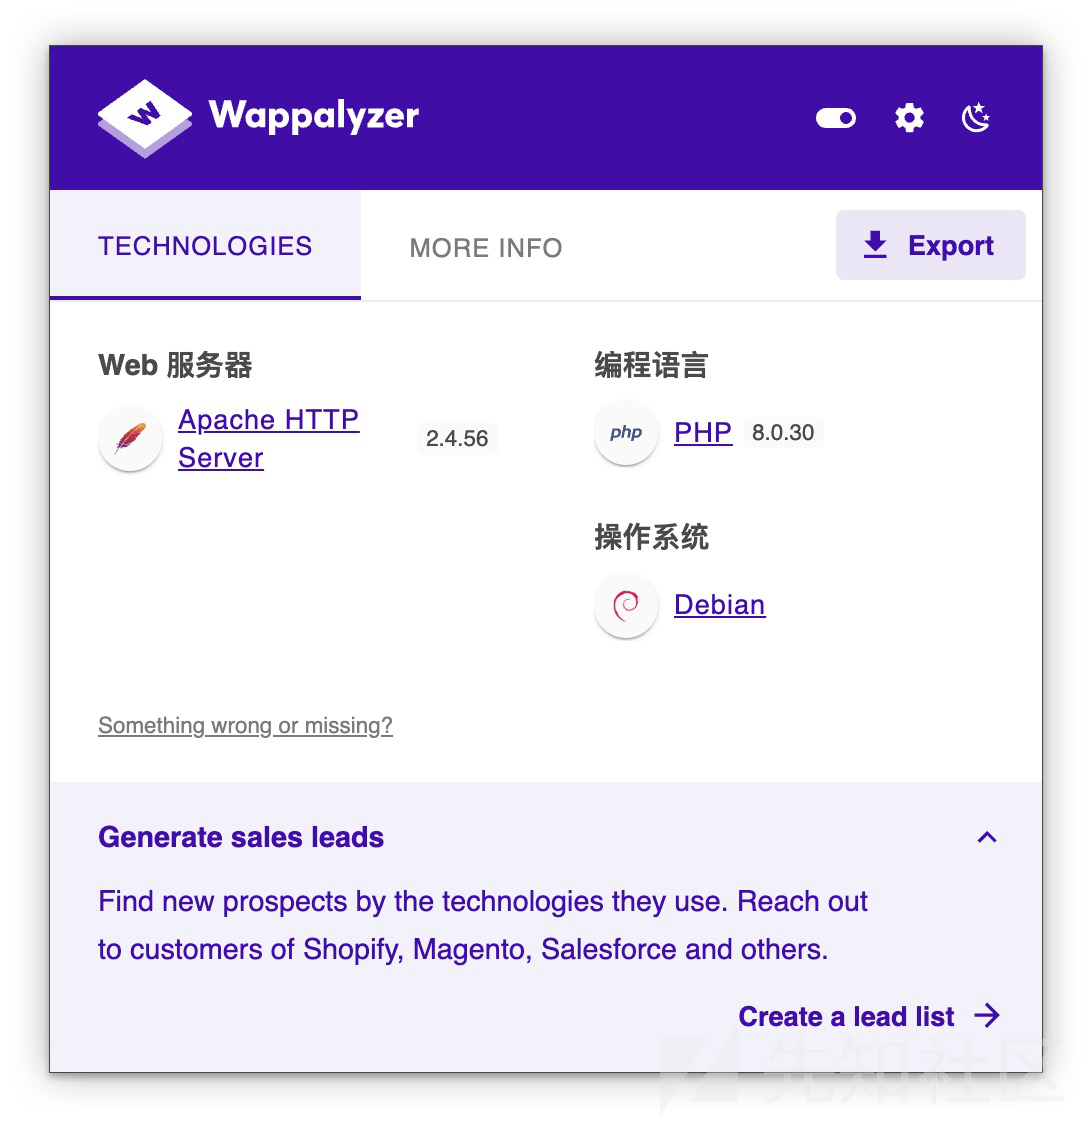
Web服务器和编程语言的指纹基本上来自response header或者网页内容主体,没什么特别的
js和dom的分析比较特殊,我们树藤摸瓜,先简单分析一下源代码
不知何故 Wappalyzer已经删除了删除了开源项目
我们可以在谷歌应用商店安装插件然后到安装目录去直接进行分析
也可以下载crx文件重命名为zip后解压 Wappalyzer crx
源码分析
Chrome插件存放目录一般位于/Chrome/Default/Extensions/,在插件管理页面,我们可以看到Wappalyzer插件ID
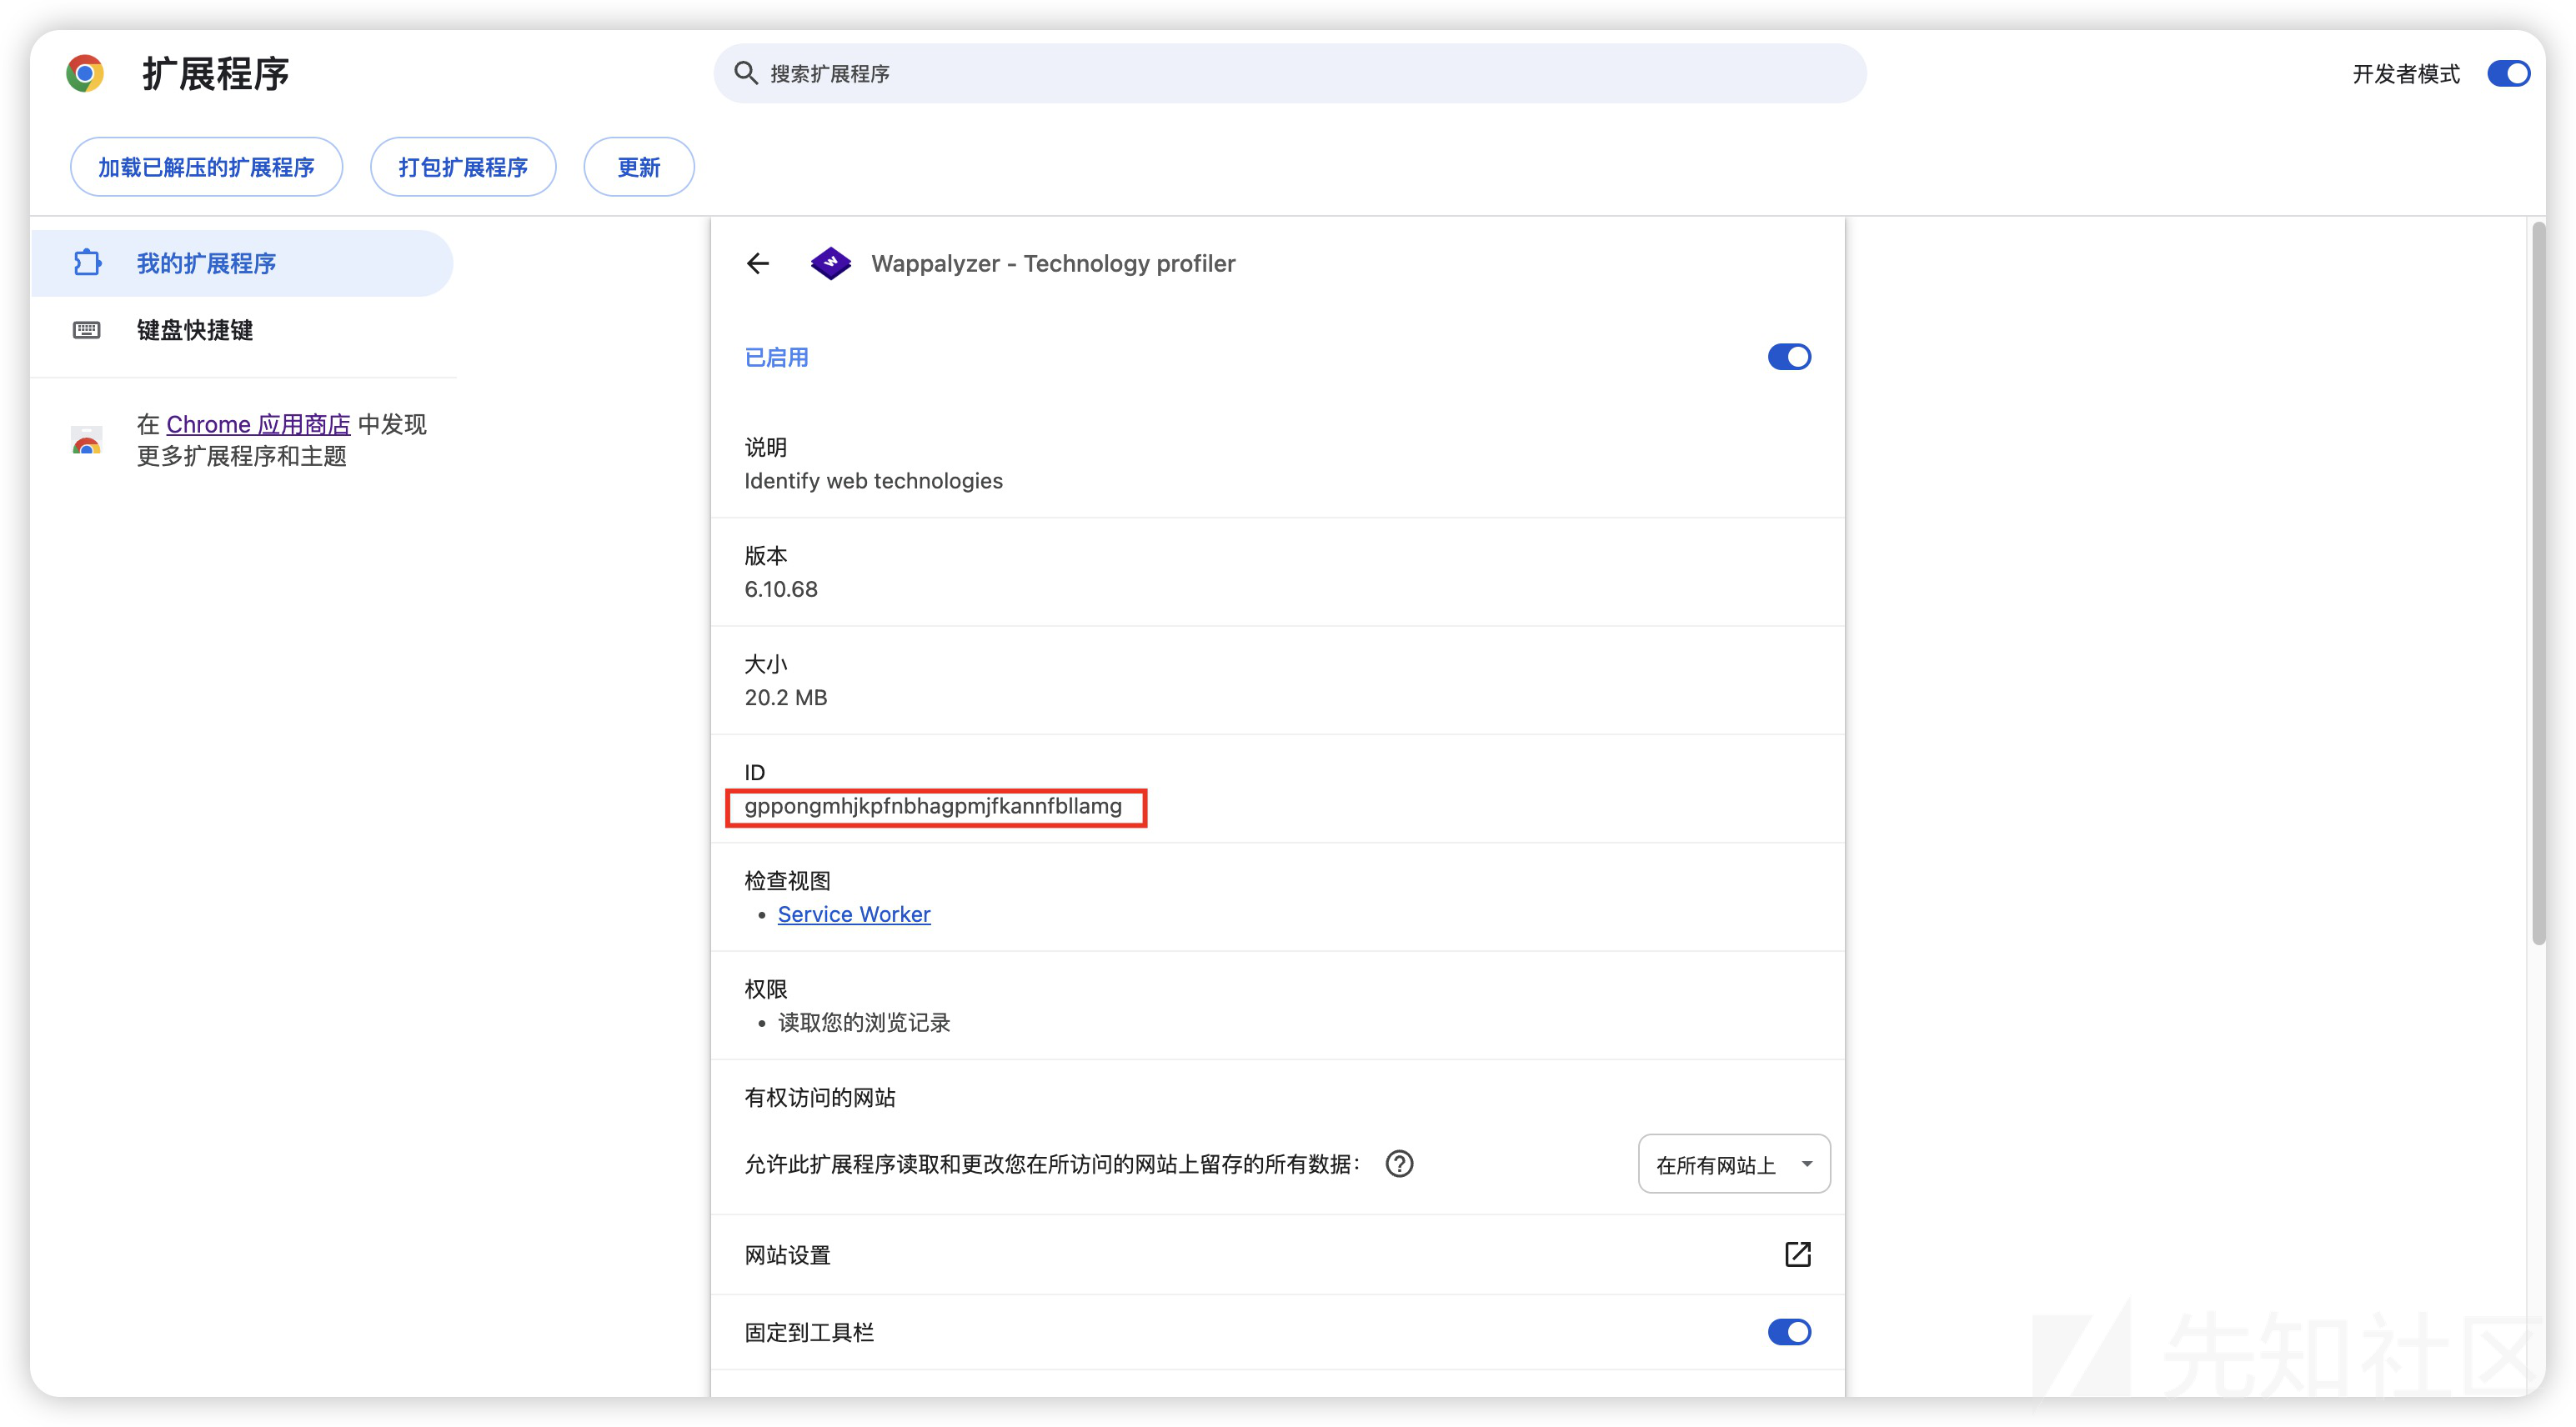
到插件目录下访问对应ID,下面存放的就是插件的源代码,目录结构如下:
目录:
-
_locales:这个目录包含插件的本地化文件。每个支持的语言都有自己的子目录,用于存放翻译后的字符串资源,使插件能够支持多种语言。
-
_metadata:这个目录通常用于存储插件的元数据,比如Chrome Web Store的验证文件等。
-
css:存放插件使用的CSS样式文件的目录。
-
html:包含插件用到的HTML文件,例如插件的选项页面、弹出页面等。
-
images:存放插件使用的图片资源。
-
js:存放插件的JavaScript脚本文件,这些脚本负责插件的大部分功能实现。
-
technologies:这个目录可能包含与插件所使用的技术或框架相关的文件。
我们重点只需要放在js和technologies目录
文件:
-
manifest-safari.json, manifest-v2.json, manifest-v3.json, manifest.bak.json, manifest.json:这些都是清单文件,描述了插件的基本信息(如版本、名称、权限需求等)。Chrome插件可以支持不同的清单版本,因此可能存在多个不同版本的清单文件。
manifest.json是Chrome插件必须包含的文件,定义了插件的基本信息和行为。 -
manifest.fingerprint:用于安全或版本控制的指纹信息文件。
-
schema.json:用于定义插件的一些配置或数据结构的模式。
-
categories.json:用于定义插件相关的类别信息,这个文件不是所有插件都会有,具体内容依插件的功能和设计而定。
-
groups.json:这个文件可能用于定义插件内部的一些逻辑分组信息,具体内容取决于插件的设计。
这里只需要关注manifest.json清单文件
js注入实现功能的插件过多会影响我们的分析,我们只打开Wappalyzer在无痕模式下的使用权限,在无痕模式下打开web来开始分析
我们先来了解一下Chrome插件的执行大概执行流程
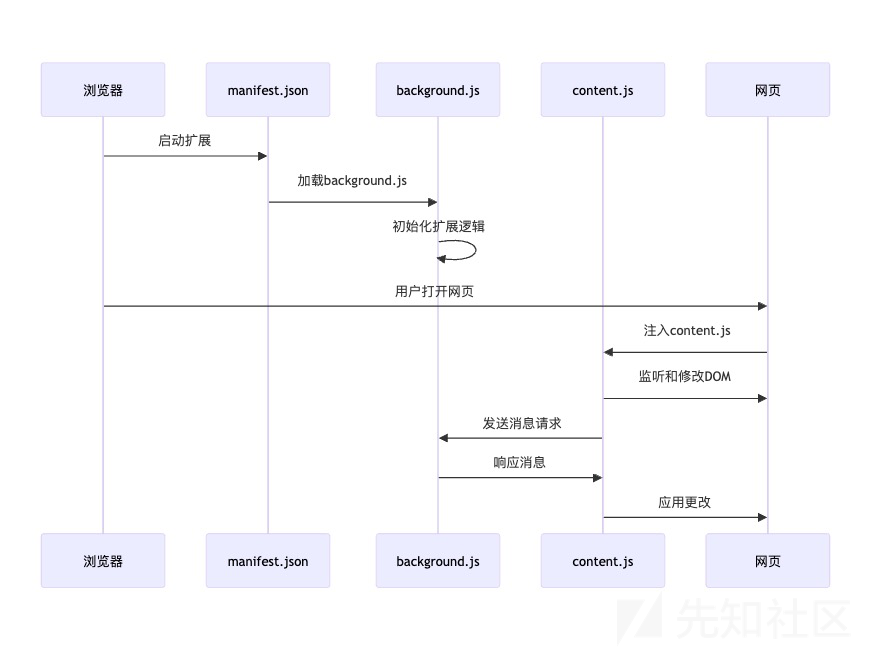
扩展加载的过程中会阅读manifest.json清单文件,浏览器会执行background.js和content.js
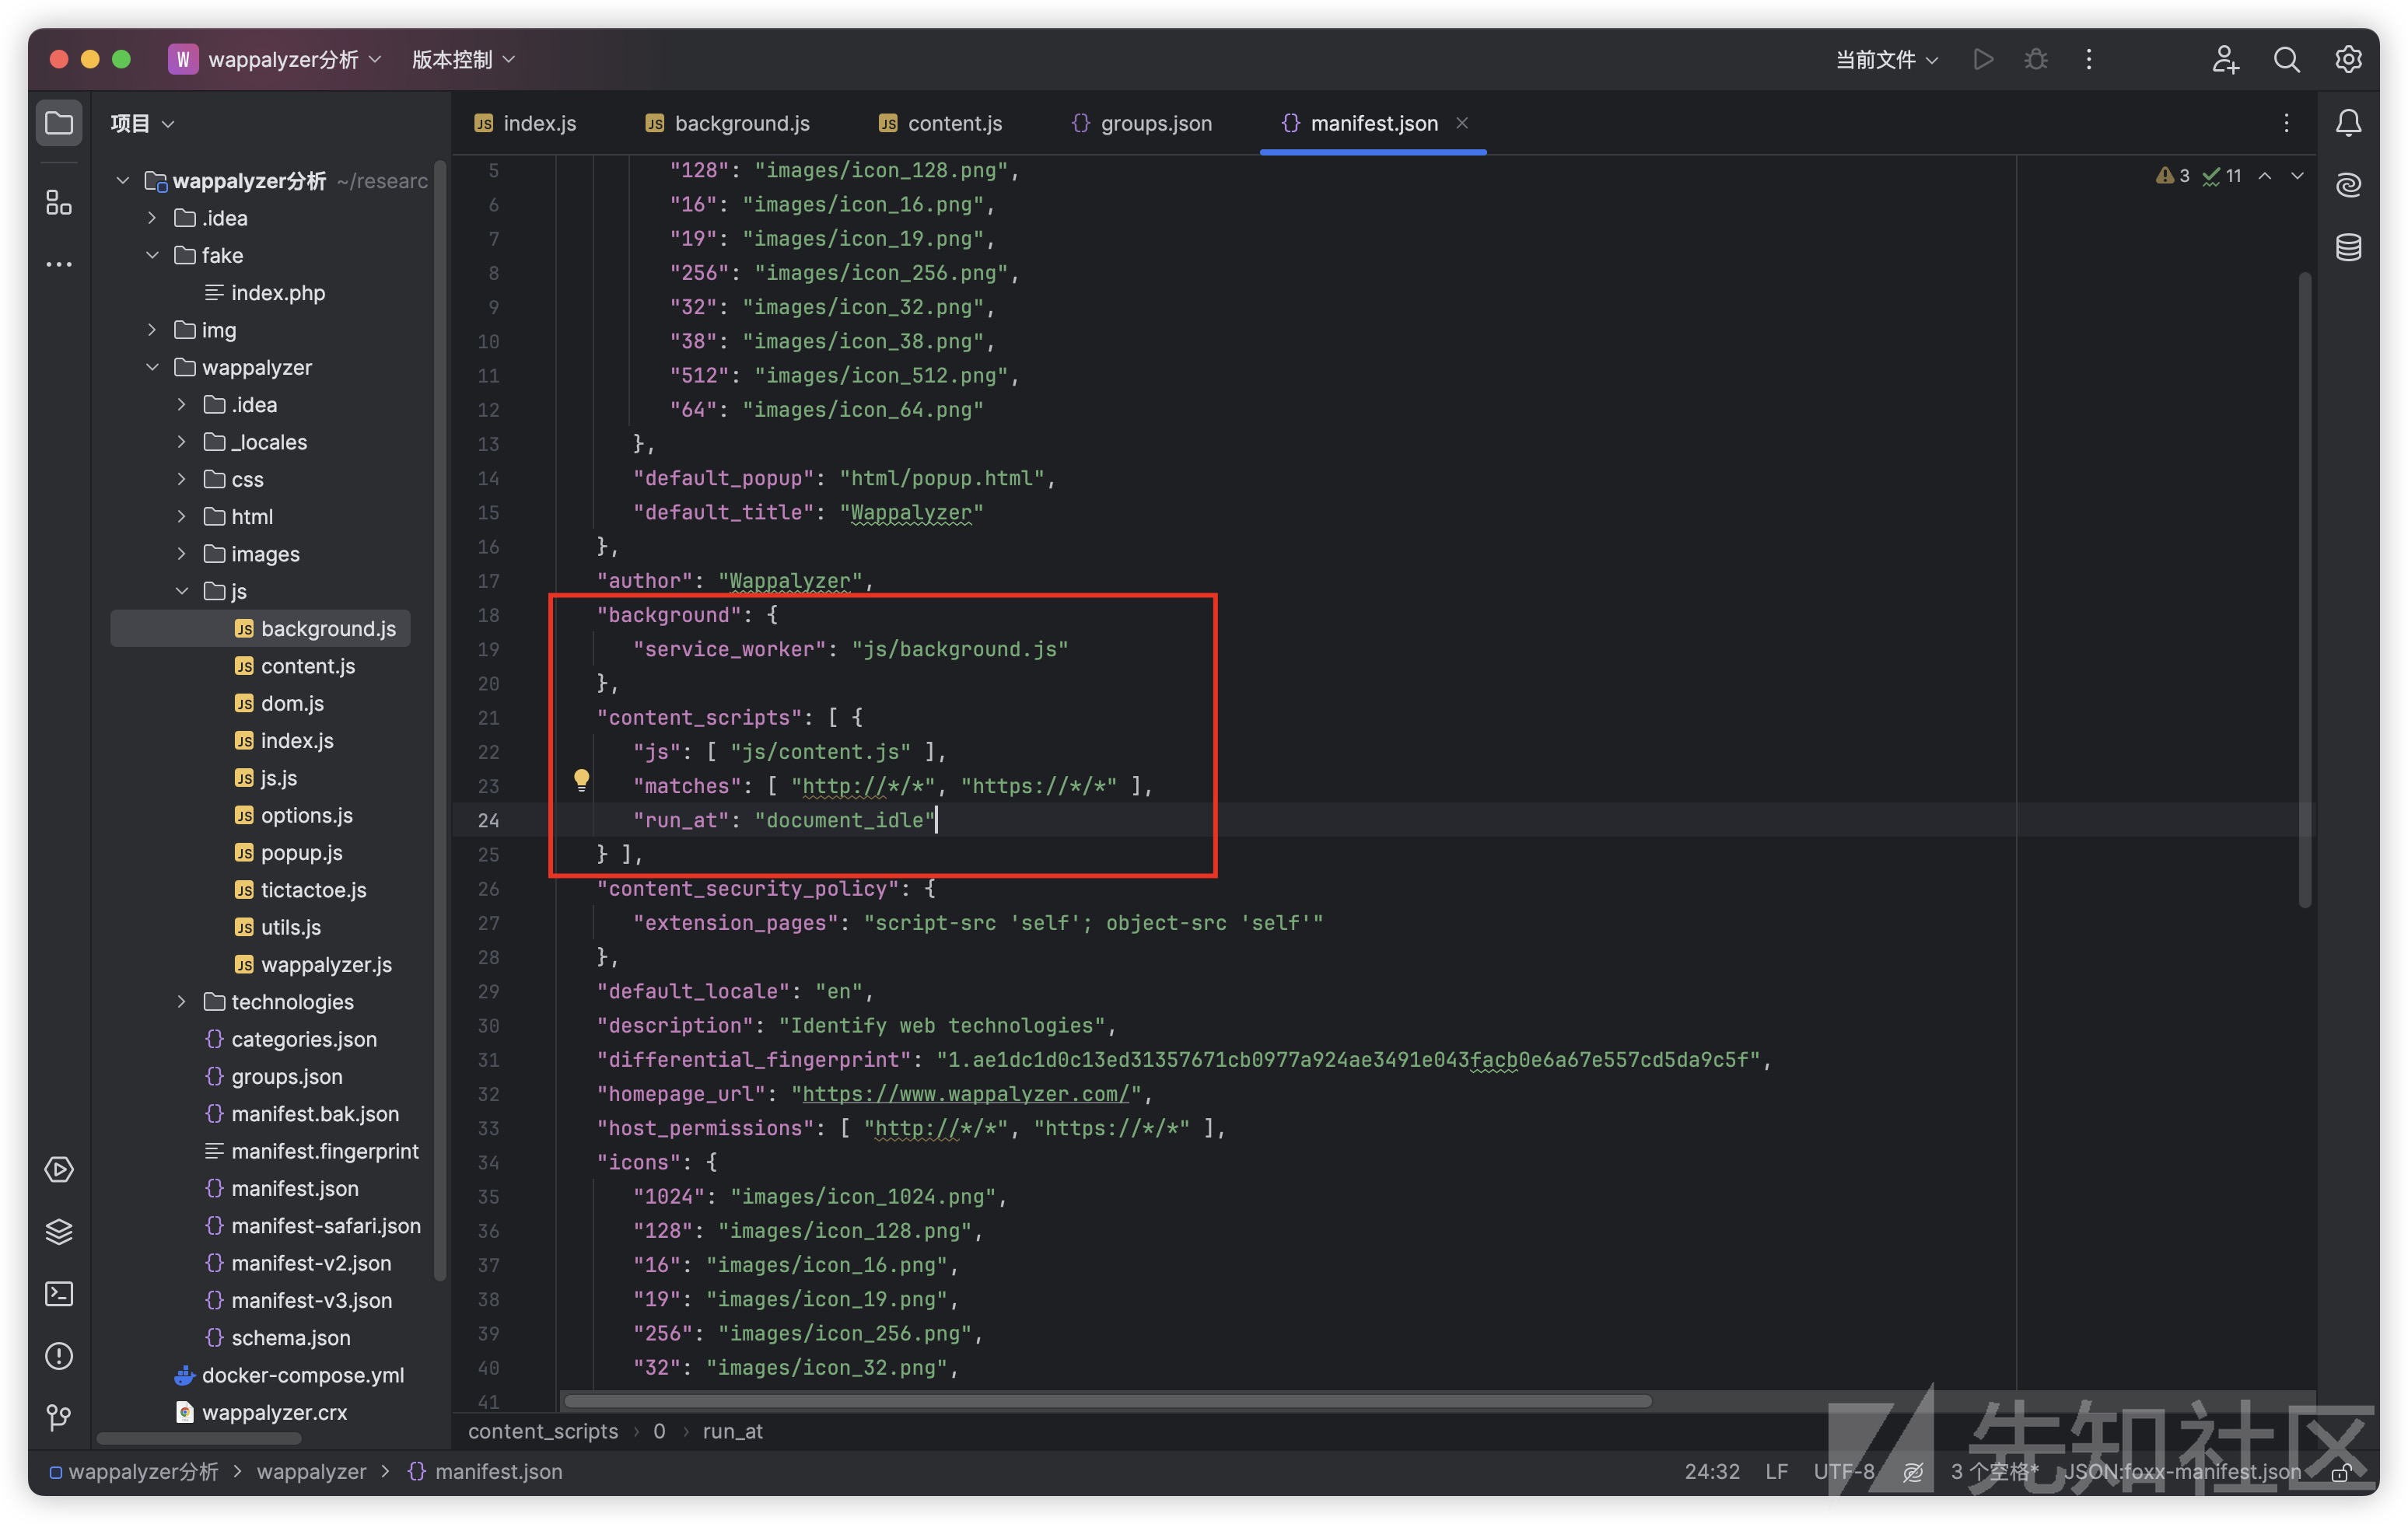
background.js的代码很简单,通过importScripts这个全局函数引入了wappalyzer.js、utils.js、index.js
importScripts(chrome.runtime.getURL('js/wappalyzer.js'))
importScripts(chrome.runtime.getURL('js/utils.js'))
importScripts(chrome.runtime.getURL('js/index.js'))a
核心层 - wappalyzer.js
其中的toArray函数用于将传入的任何值都以数组形式返回 数据处理好后交给benchmark相关的函数进行性能监测相关的操作
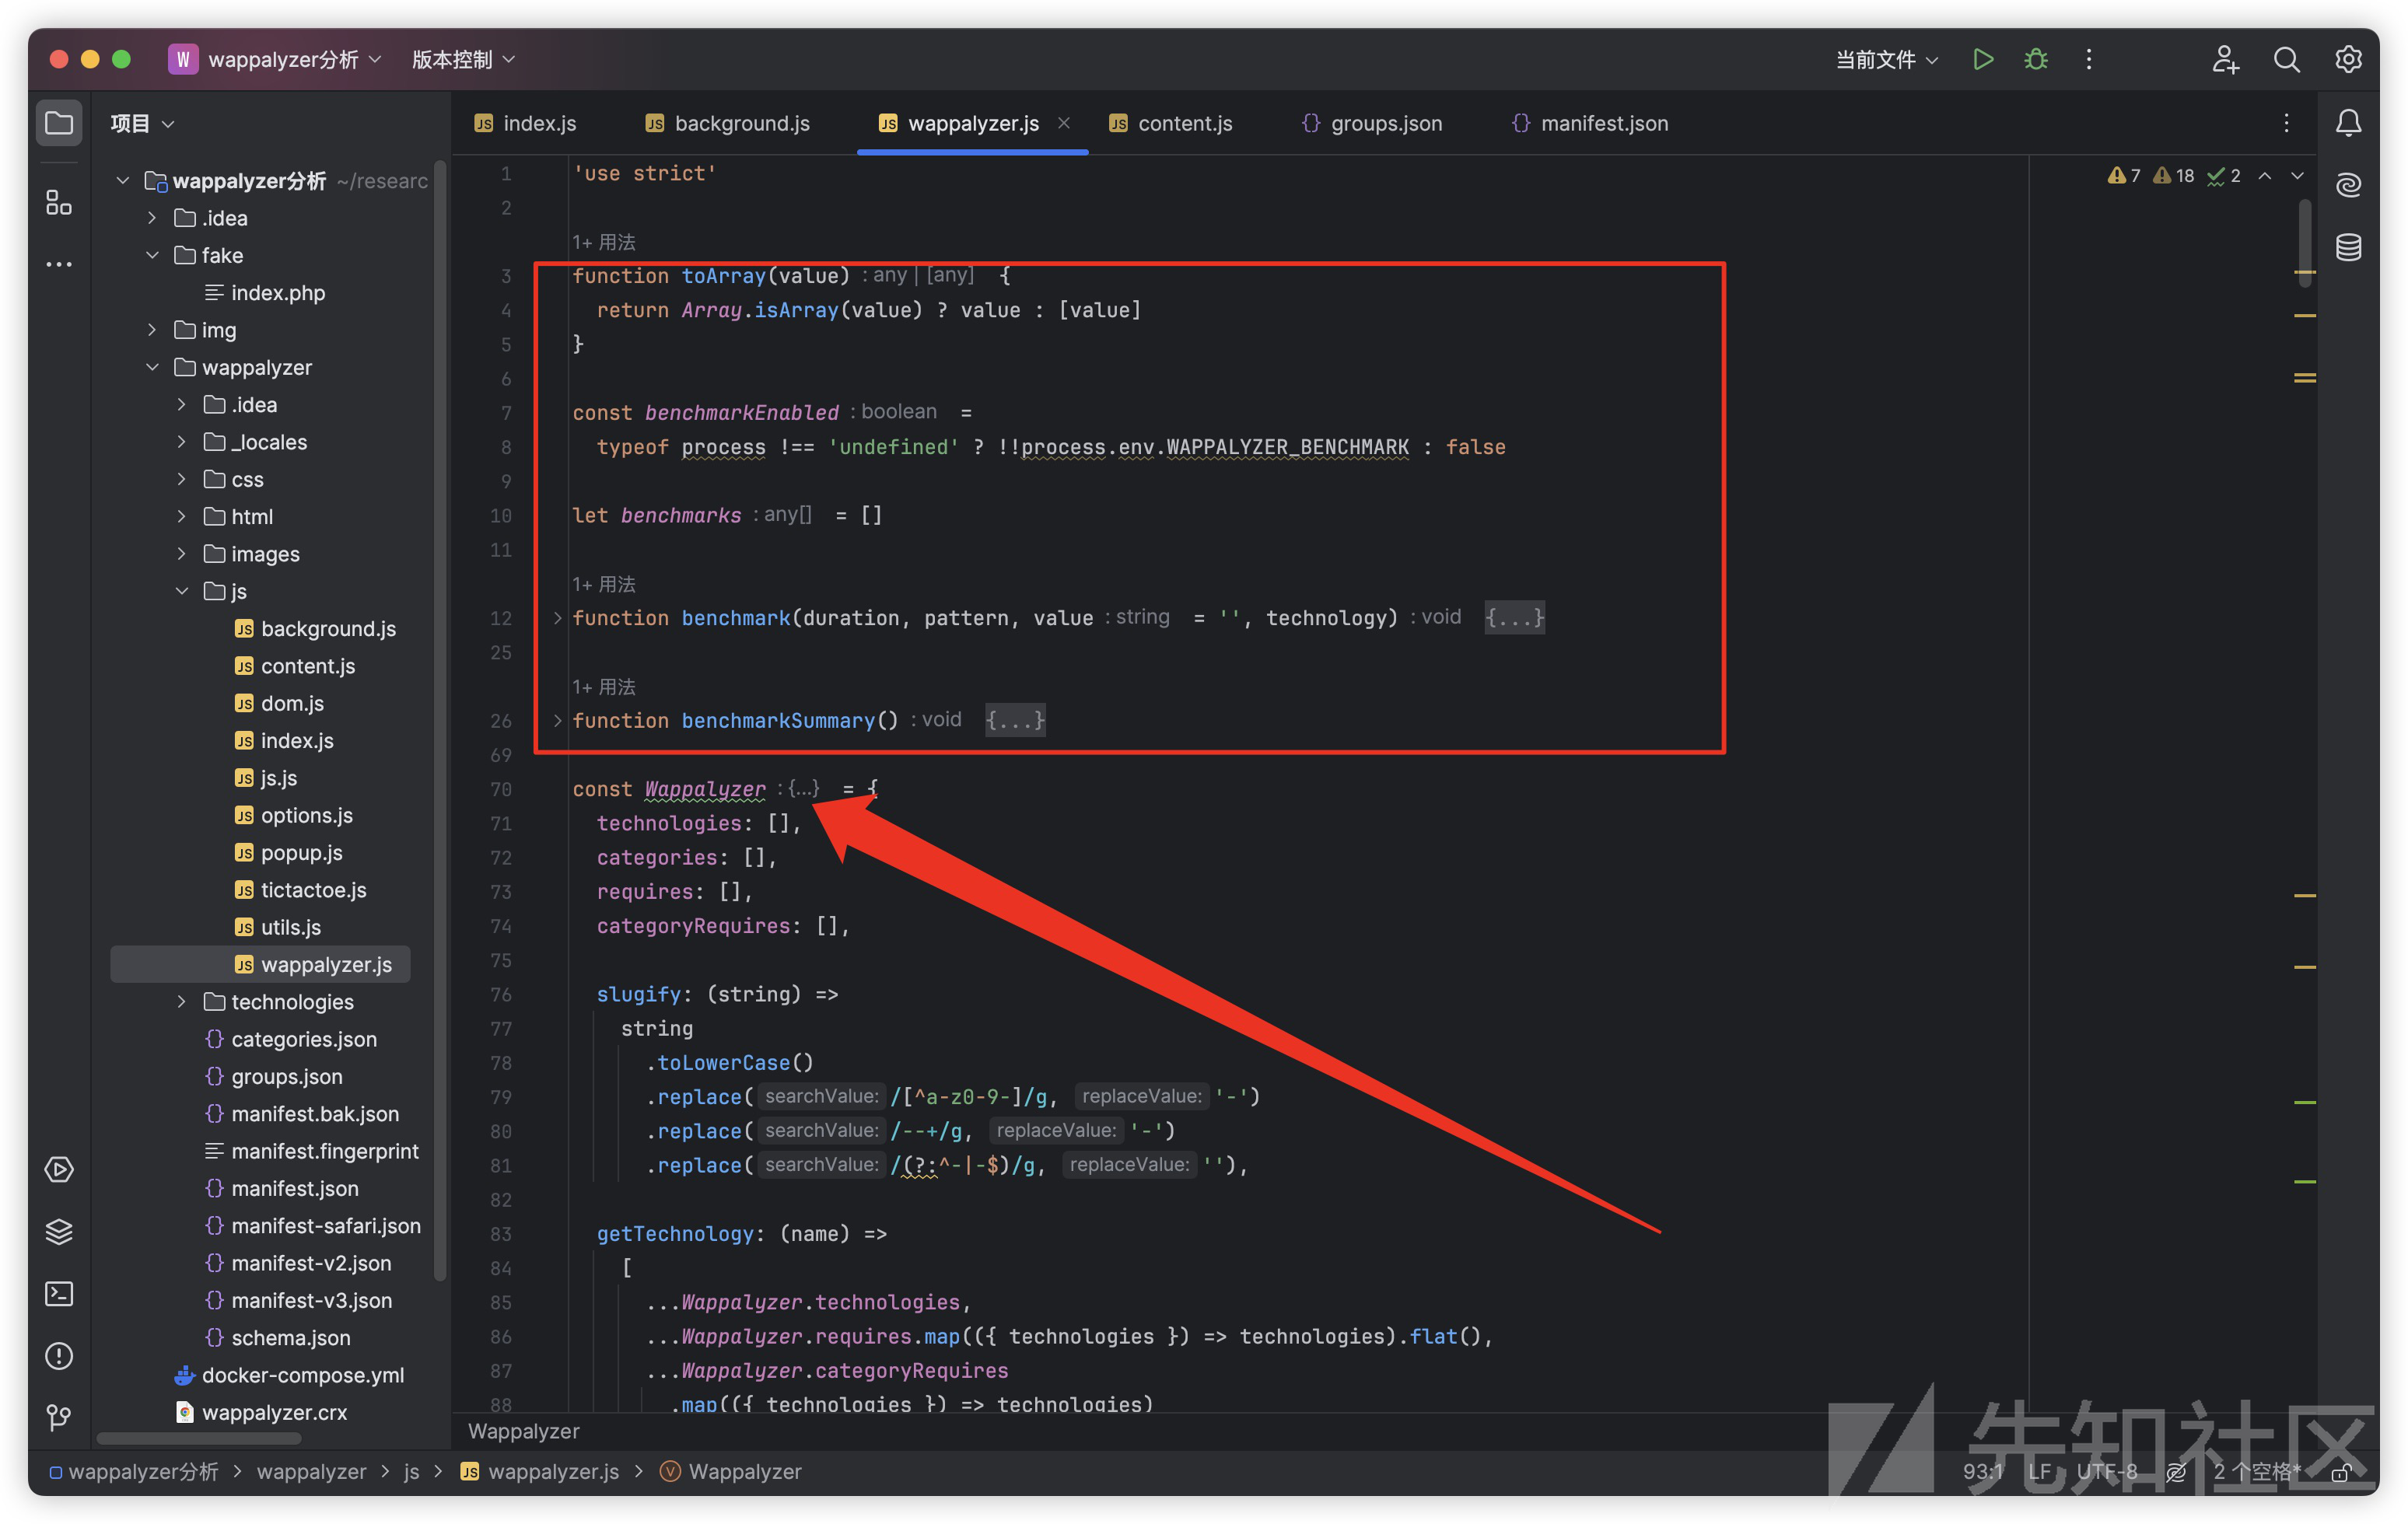
我们重点关注Wappalyzer对象,这是核心功能的集合,我们拆解一下其中的函数和变量
slugify
slugify函数,用于将输入的字符转换为slug,即SEO友好的字符
slugify: (string) =>
    string
      .toLowerCase()
      .replace(/[^a-z0-9-]/g, '-')
      .replace(/--+/g, '-')
      .replace(/(?:^-|-$)/g, ''),
getTechnology
getTechnology函数,用于从Wappalyzer的指纹库中查找对应技术的详细信息
getTechnology: (name) =>
  [
    ...Wappalyzer.technologies,
    ...Wappalyzer.requires.map(({ technologies }) => technologies).flat(),
    ...Wappalyzer.categoryRequires
      .map(({ technologies }) => technologies)
      .flat(),
  ].find(({ name: _name }) => name === _name),
analyze
analyze函数 ,它是Wappalyzer的主要分析入口
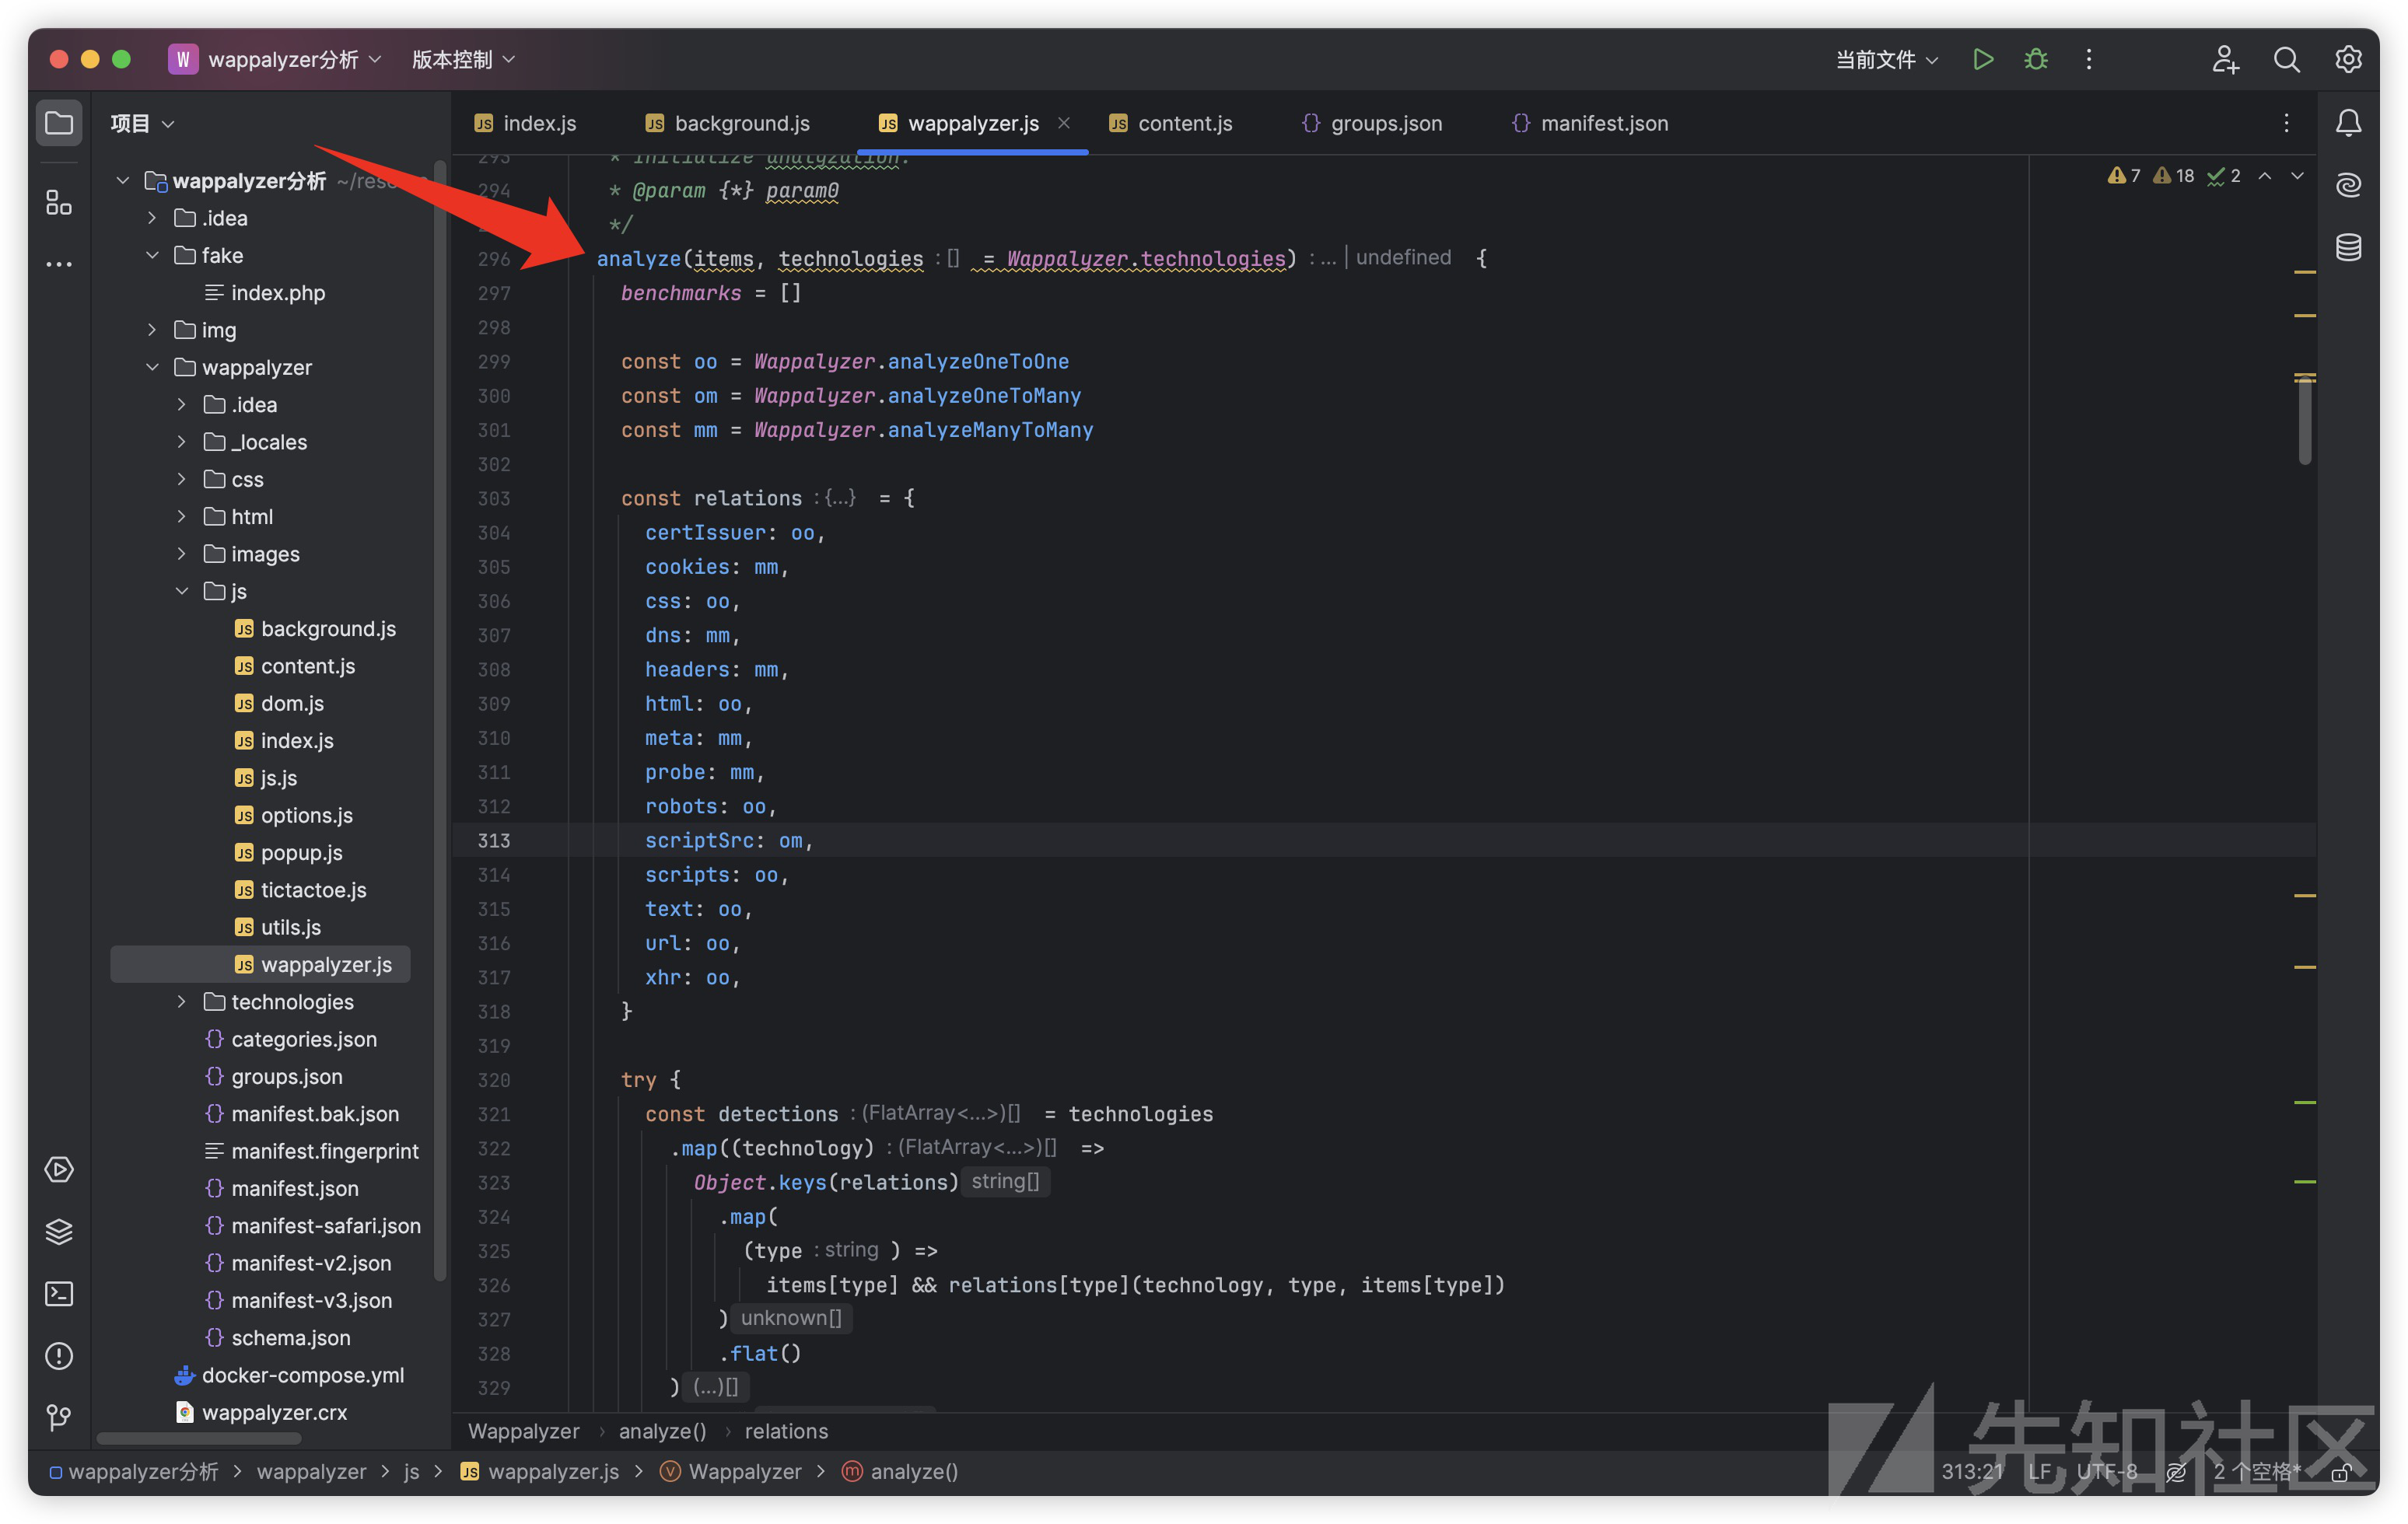
在这个函数最开始,通过benchmarks = []清空了代码最开始的性能监测结果,然后定义了不同类型的分析方法:
const oo = Wappalyzer.analyzeOneToOne
    const om = Wappalyzer.analyzeOneToMany
    const mm = Wappalyzer.analyzeManyToMany
定义了一对一、一对多和多对多的分析方法,下面的relations定义了分析方法和不同网页数据的关系,这可以指导analyze函数如何根据网页的不同特征来应用不同的分析策略。
const relations = {
      certIssuer: oo,
      cookies: mm,
      css: oo,
      dns: mm,
      headers: mm,
      html: oo,
      meta: mm,
      probe: mm,
      robots: oo,
      scriptSrc: om,
      scripts: oo,
      text: oo,
      url: oo,
      xhr: oo,
    }
下面的其他函数就基本都是定义了技术的分类要求和隐含关系,整个过程相当于在初始化
工具层 - utils.js
这个文件主要定义了一些工具函数,代码比较长,简单看一下
'use strict'
/* eslint-env browser */
/* globals chrome */

// 为Manifest v2版本的Chrome扩展提供兼容性处理
if (chrome.runtime.getManifest().manifest_version === 2) {
  chrome.action = chrome.browserAction
}

const Utils = {
  // 根据运行时URL判断浏览器类型
  agent: '判断浏览器类型并返回',

  // 将基于回调的API调用转换为基于Promise的调用,以简化异步操作
  promisify: '将回调风格的异步操作转换为Promise风格',

  // 打开新的浏览器标签页
  open: '在浏览器中打开新的标签页',

  // 从本地存储中获取选项值,如果不存在则返回默认值
  getOption: '从本地存储获取指定选项的值',

  // 将值保存到本地存储中
  setOption: '将指定选项的值保存到本地存储',

  // 应用国际化,更新文档中的文本为当前语言的翻译
  i18n: '自动将带有data-i18n属性的元素内容替换为国际化的文本',

  // 向扩展的其他部分发送消息,并处理响应
  sendMessage: '发送消息给扩展的其他部分,并等待响应',

  // 对glob模式的字符串进行转义
  globEscape: '对字符串中的特殊字符进行转义,以在glob模式中使用',
}
入口层 - index.js
这个文件通过上面两个文件中的wappalyzer和utils对象完成了扩展程序的初始化,定义了一些匹配技术栈的具体实现方式
这里我们只查看指纹匹配部分的代码
从这个文件191行开始有了analyze*系列函数,我们一个个来看
首先定义了一个代理函数,它直接调用Wappalyzer中的analyze方法
analyze(...args) {
    return analyze(...args)
  },
analyzeJs
analyzeJs函数用于接受一个url和JavaScript对象数组,以及Wapplyzer中analyze方法里定义的技术需求和类别需求
analyzeJs(url, js, requires, categoryRequires) {
    const technologies =
      getRequiredTechnologies(requires, categoryRequires) ||
      Wappalyzer.technologies

    return Driver.onDetect(
      url,
      js
        .map(({ name, chain, value }) => {
          const technology = technologies.find(
            ({ name: _name }) => name === _name
          )

          return technology
            ? analyzeManyToMany(technology, 'js', { [chain]: [value] })
            : []
        })
        .flat()
    )
  },
函数首先确定需要分析的技术集合,然后针对每个JavaScript对象(包含技术名称、链式调用路径和值),寻找与之匹配的技术。如果找到匹配的技术,会使用analyzeManyToMany方法进行深入分析,也就是多对多。
最后将匹配的技术通过Driver.OnDect方法进行处理,这个方法会去除重复的检测结果,并更新每项检测的最后访问 URL 和根路径标志。接下来,它解析检测结果以解决技术之间的依赖关系,并可能触发对需要的技术的进一步分析。
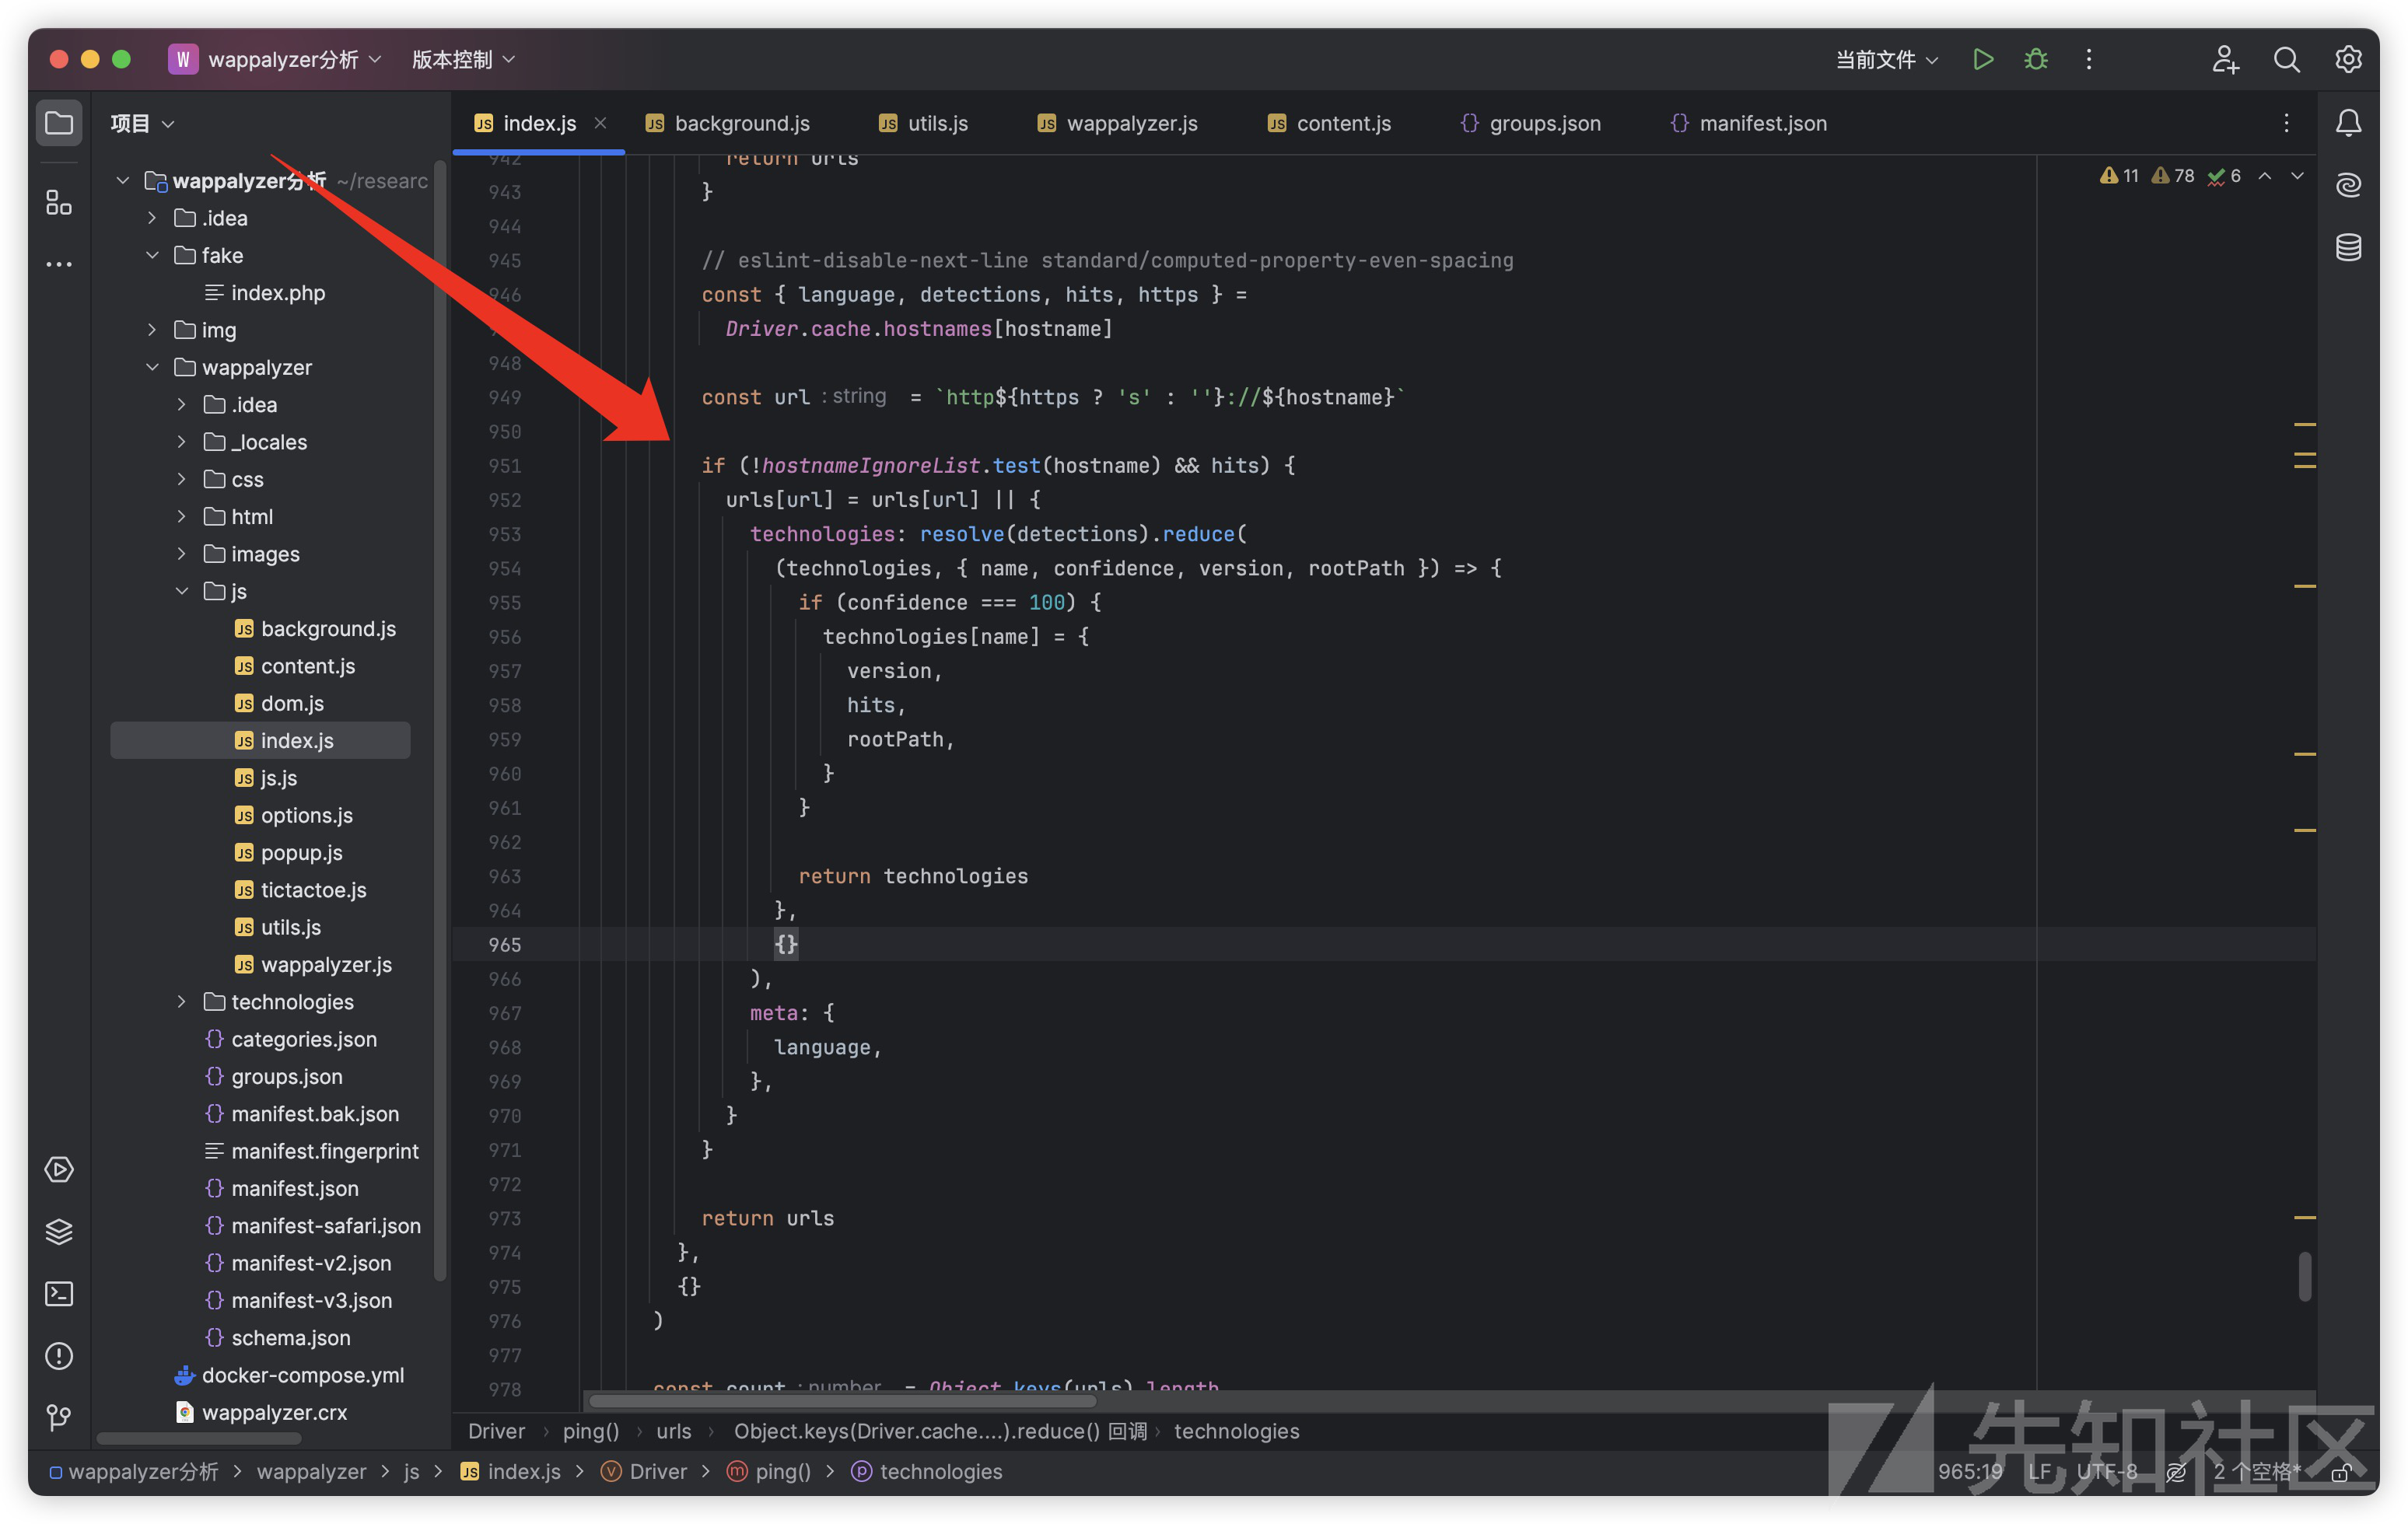
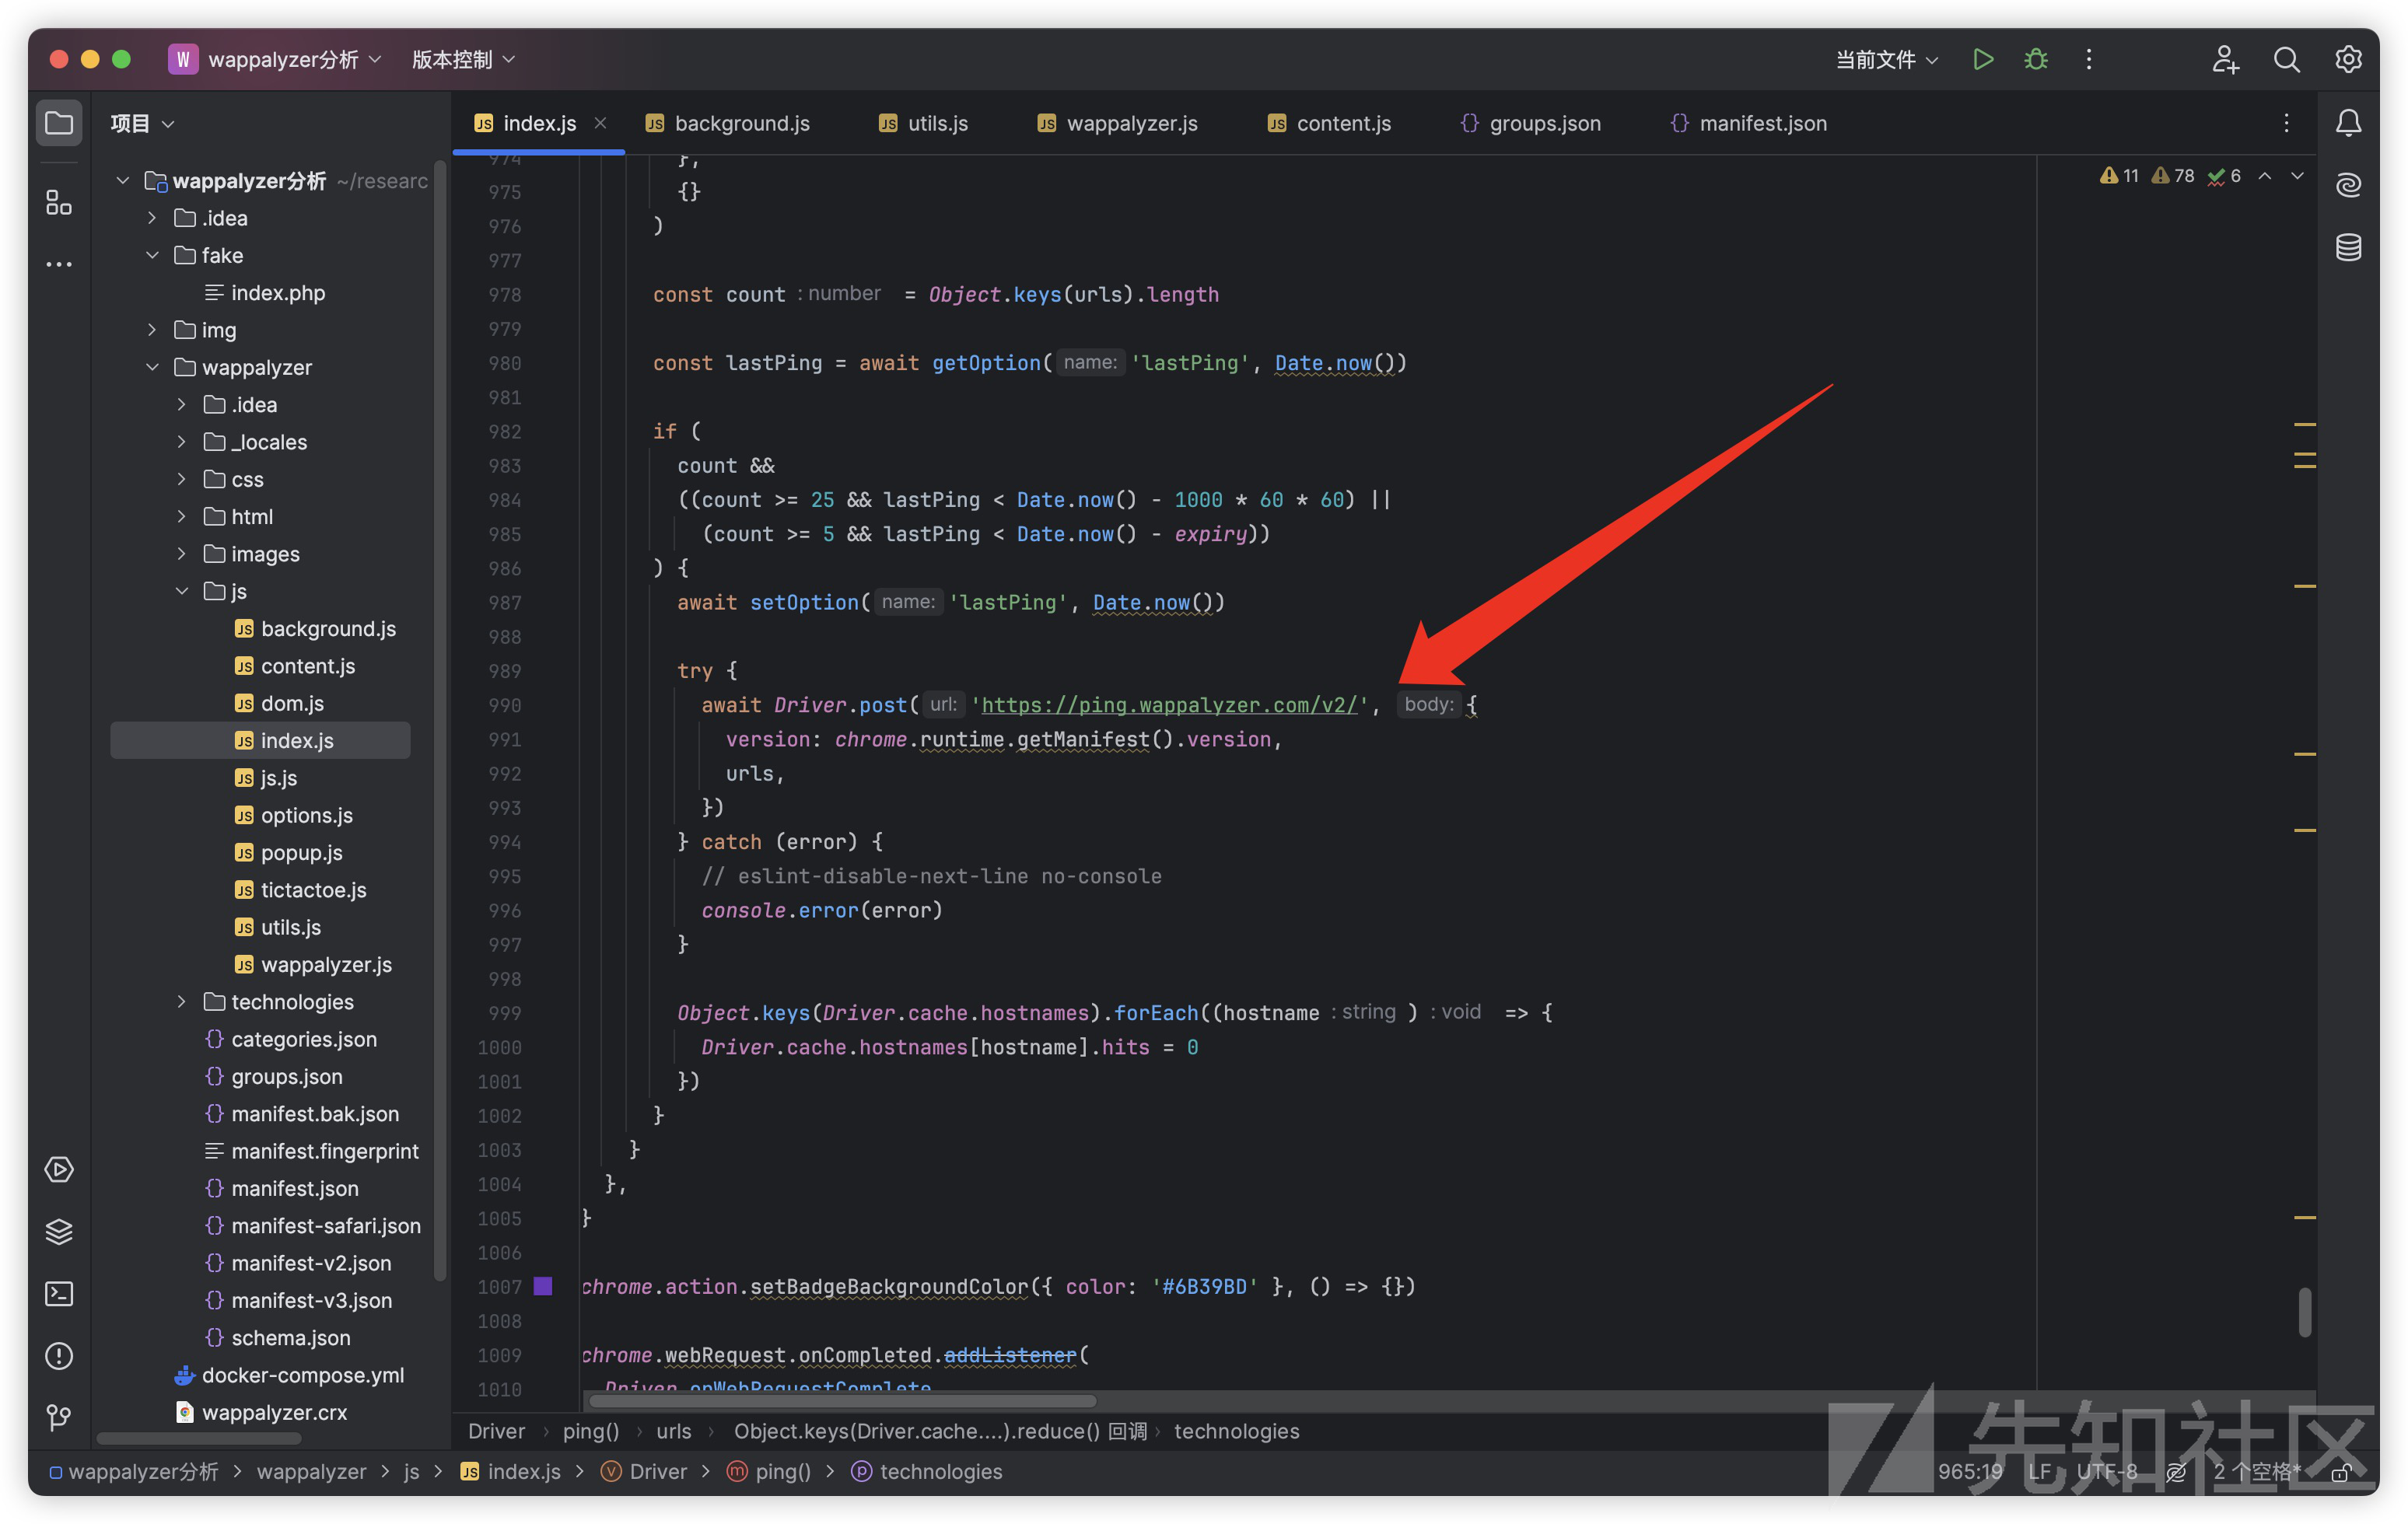
这里发现OnDect方法中有一个ping函数,这个函数用于发送匿名化数据帮助Wappalyzer改善服务
async ping() {
    const tracking = await getOption('tracking', true)
    const termsAccepted =
      agent === 'chrome' || (await getOption('termsAccepted', false))

    if (tracking && termsAccepted) {
      const urls = Object.keys(Driver.cache.hostnames).reduce(
        (urls, hostname) => {
          if (Object.keys(urls).length >= 25) {
            return urls
          }

          // eslint-disable-next-line standard/computed-property-even-spacing
          const { language, detections, hits, https } =
            Driver.cache.hostnames[hostname]

          const url = `http${https ? 's' : ''}://${hostname}`

          if (!hostnameIgnoreList.test(hostname) && hits) {
            urls[url] = urls[url] || {
              technologies: resolve(detections).reduce(
                (technologies, { name, confidence, version, rootPath }) => {
                  if (confidence === 100) {
                    technologies[name] = {
                      version,
                      hits,
                      rootPath,
                    }
                  }

                  return technologies
                },
                {}
              ),
              meta: {
                language,
              },
            }
          }

          return urls
        },
        {}
      )

      const count = Object.keys(urls).length

      const lastPing = await getOption('lastPing', Date.now())

      if (
        count &&
        ((count >= 25 && lastPing < Date.now() - 1000 * 60 * 60) ||
          (count >= 5 && lastPing < Date.now() - expiry))
      ) {
        await setOption('lastPing', Date.now())

        try {
          await Driver.post('https://ping.wappalyzer.com/v2/', {
            version: chrome.runtime.getManifest().version,
            urls,
          })
        } catch (error) {
          // eslint-disable-next-line no-console
          console.error(error)
        }

        Object.keys(Driver.cache.hostnames).forEach((hostname) => {
          Driver.cache.hostnames[hostname].hits = 0
        })
      }
    }
  }
它会首先检测用户是否接受了相关条款,当然 这个条款是默认接受了的
在数据脱敏后会发送到Wappalyzer服务器
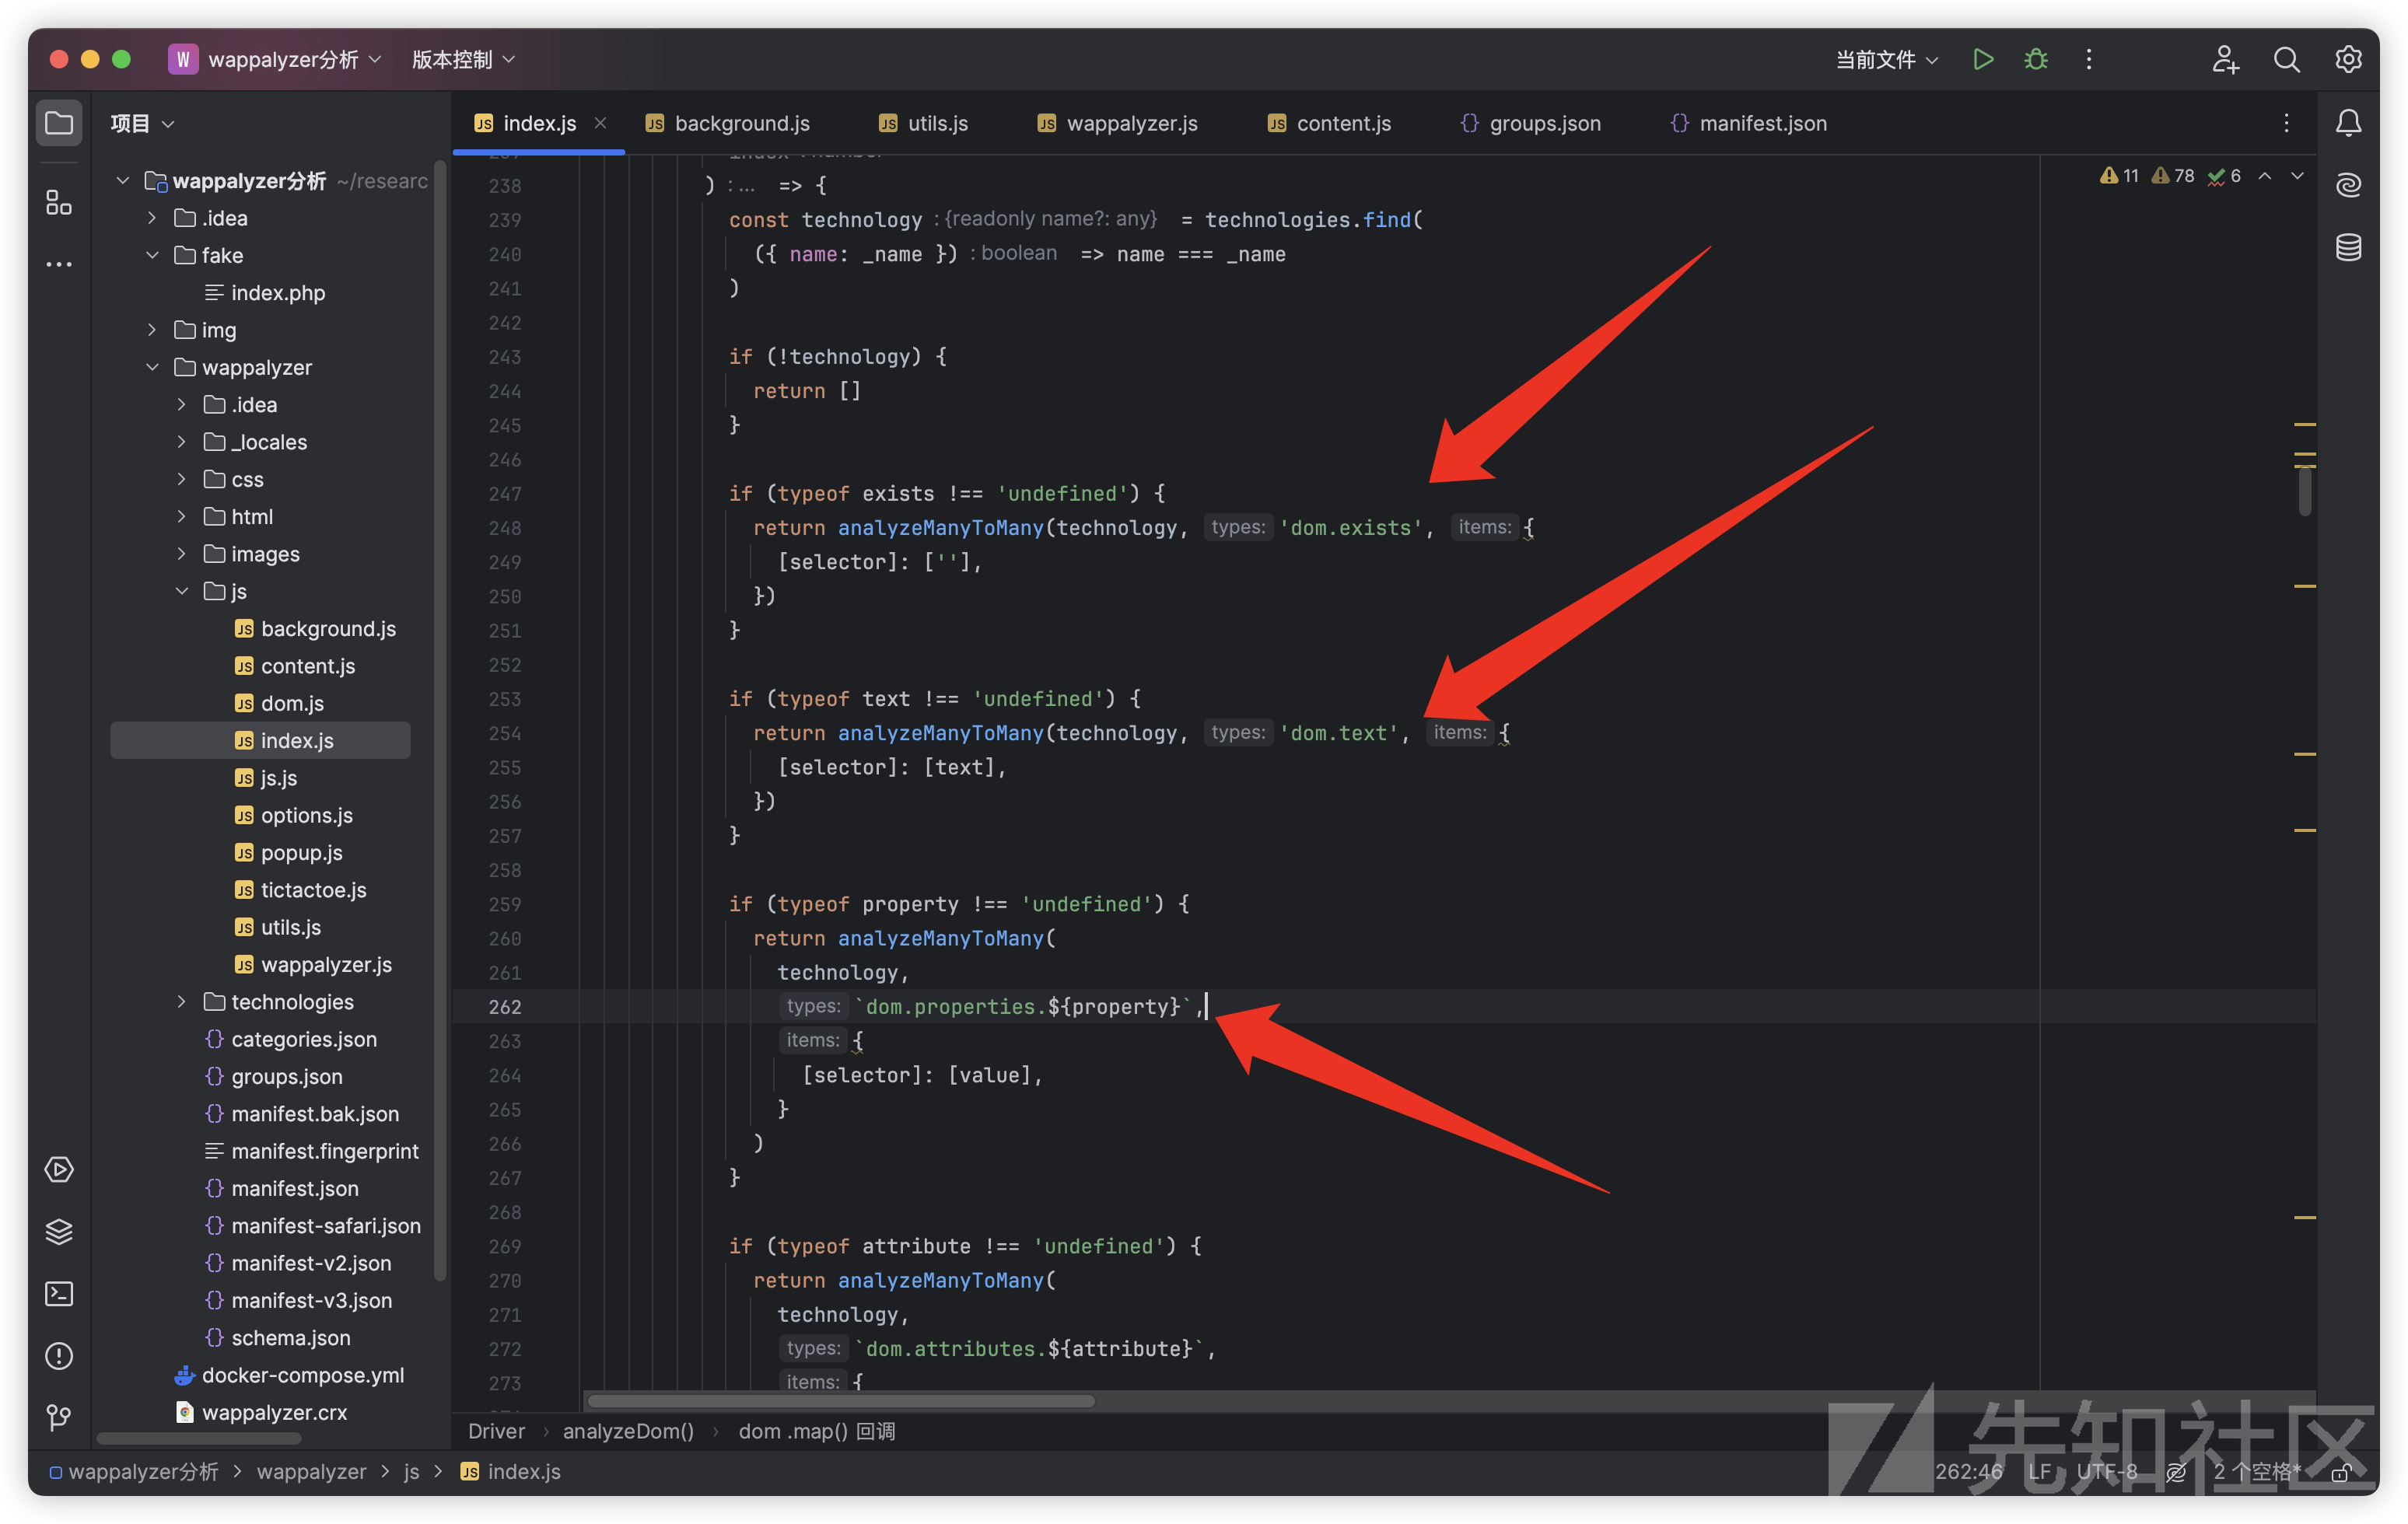
analyzeDom
这个函数通过分析Dom节点来识别所使用的技术,使用的是Wappalyzer对象中定义的analyzeManyToMany多对多方式
主要提取了元素存在性、文本内容、属性值这三个Dom特征,最后也交给了Driver.OnDect方法进行处理
loadTechnologies
这个异步函数用于处理技术和类别数据
async loadTechnologies() {
    try {
      const categories = await (
        await fetch(chrome.runtime.getURL('categories.json'))
      ).json()

      let technologies = {}

      for (const index of Array(27).keys()) {
        const character = index ? String.fromCharCode(index + 96) : '_'

        technologies = {
          ...technologies,
          ...(await (
            await fetch(chrome.runtime.getURL(`technologies/${character}.json`))
          ).json()),
        }
      }

      Object.keys(technologies).forEach((name) => {
        delete technologies[name].description
        delete technologies[name].cpe
        delete technologies[name].pricing
        delete technologies[name].website
      })

      setTechnologies(technologies)
      setCategories(categories)
    } catch (error) {
      Driver.error(error)
    }
  }
通过categories.json文件获取类别数据后通过json()方法将相应体转换为JavaScript对象
try {
      const categories = await (
        await fetch(chrome.runtime.getURL('categories.json'))
      ).json()
初始化technologies对象,通过Array(27).keys()生成的序列加载technologies文件夹中的所有json文件
let technologies = {}

      for (const index of Array(27).keys()) {
        const character = index ? String.fromCharCode(index + 96) : '_'

        technologies = {
          ...technologies,
          ...(await (
            await fetch(chrome.runtime.getURL(`technologies/${character}.json`))
          ).json()),
        }
      }
加载了所有技术数据合并到technologies对象后移除了description、cpe、pricing、website这些不需要的属性来精简数据
Object.keys(technologies).forEach((name) => {
        delete technologies[name].description
        delete technologies[name].cpe
        delete technologies[name].pricing
        delete technologies[name].website
      }
chrome执行完background.js后就来到了content.js,我们来进行分析
内容脚本层 - content.js
inject
function inject(src, id, message) {
  return new Promise((resolve) => {
    // Inject a script tag into the page to access methods of the window object
    const script = document.createElement('script')

    script.onload = () => {
      const onMessage = ({ data }) => {
        if (!data.wappalyzer || !data.wappalyzer[id]) {
          return
        }

        window.removeEventListener('message', onMessage)

        resolve(data.wappalyzer[id])

        script.remove()
      }

      window.addEventListener('message', onMessage)

      window.postMessage({
        wappalyzer: message,
      })
    }

    script.setAttribute('src', chrome.runtime.getURL(src))

    document.body.appendChild(script)
  })
}
我们发现这里通过windows对象添加了一个message事件监听器,用于接收postMessage发送的消息,在处理完成后会通过removeEventListener移除监听器
getJs
getJs函数中调用了inject函数向网页中注入了js.js文件,并传递了technologies对象,这个对象包含了技术列表
function getJs(technologies) {
  return inject('js/js.js', 'js', {
    technologies: technologies
      .filter(({ js }) => Object.keys(js).length)
      .map(({ name, js }) => ({ name, chains: Object.keys(js) })),
  })
}
传递的technologies对象使用filter筛选了那些没有js属性或者js属性为空的技术
getDom
代码有点长,整体就是其中调用inject函数向网页注入了dom.js文件并传递了technologies对象
async function getDom(technologies) {
  // 筛选出定义了dom属性的技术,并为每个技术保留其名称和dom对象
  const _technologies = '筛选并映射技术列表,只包含定义了DOM属性的技术';

  // 调用inject函数注入js/dom.js,并传递特定的技术列表到页面中
  // 这个过程允许在页面上执行js/dom.js脚本,该脚本根据传入的技术分析DOM
  return [
    ...(await '调用inject函数,将js/dom.js注入到页面,并传递包含DOM属性的技术列表'),
    ...'直接在当前页面上分析DOM元素,根据传入的技术规则收集信息',
  ]
}
它会通过传入的technologies对象分析DOM元素匹配Web技术
其中类似getJs函数,也去筛选掉了不包含dom属性的技术
那么我们顺藤摸瓜,看看js.js和dom.js都干了什么
js.js
这个脚本被注入到网页中实现的内容比较简单,就是通过technologies对象识别网页所使用的技术绕后通过postMessage函数返回给content.js
它首先会通过onMessage监听信息,插件后台会通过postMessage的方式传到前端,前端进行指纹匹配后再通过postMessage传回后台
/* eslint-env browser */

;(function () {
  try {
    const onMessage = ({ data }) => {
      if (!data.wappalyzer || !data.wappalyzer.technologies) {
        return
      }

      const { technologies } = data.wappalyzer

      postMessage({
        wappalyzer: {
          js: technologies.reduce((technologies, { name, chains }) => {
            chains.forEach((chain, index) => {
              const value = chain
                .split('.')
                .reduce(
                  (value, method) =>
                    value &&
                    value instanceof Object &&
                    Object.prototype.hasOwnProperty.call(value, method)
                      ? value[method]
                      : '__UNDEFINED__',
                  window
                )

              if (value !== '__UNDEFINED__') {
                technologies.push({
                  name,
                  chain,
                  value:
                    typeof value === 'string' || typeof value === 'number'
                      ? value
                      : !!value,
                })
              }
            })

            return technologies
          }, []),
        },
      })
    }

    addEventListener('message', onMessage, { once: true })
  } catch (e) {
    // Fail quietly
  }
})()
dom.js
这个脚本通过分析网页DOM结构寻找与特定技术相关的DOM元素然后通过postMessage返回给content.js,监听和匹配逻辑与js.js无异
/* eslint-env browser */

;(function () {
  try {
    const onMessage = ({ data }) => {
      if (!data.wappalyzer || !data.wappalyzer.technologies) {
        return
      }

      const { technologies } = data.wappalyzer

      const toScalar = (value) =>
        typeof value === 'string' || typeof value === 'number' ? value : !!value

      removeEventListener('message', onMessage)

      postMessage({
        wappalyzer: {
          dom: technologies.reduce((technologies, { name, dom }) => {
            try {
              Object.keys(dom).forEach((selector) => {
                let nodes = []

                try {
                  nodes = document.querySelectorAll(selector)
                } catch (error) {
                  // Continue
                }

                if (!nodes.length) {
                  return
                }

                nodes.forEach((node) => {
                  dom[selector].forEach(({ properties }) => {
                    if (properties) {
                      Object.keys(properties).forEach((property) => {
                        if (
                          Object.prototype.hasOwnProperty.call(node, property)
                        ) {
                          const value = node[property]

                          if (typeof value !== 'undefined') {
                            technologies.push({
                              name,
                              selector,
                              property,
                              value: toScalar(value),
                            })
                          }
                        }
                      })
                    }
                  })
                })
              })
            } catch (error) {
              // Fail quietly
            }

            return technologies
          }, []),
        },
      })
    }

    addEventListener('message', onMessage)
  } catch (e) {
    // Fail quietly
  }
})()
伪造思路
Hook
要实现Wappalyzer的欺骗,我们就要利用hook技术来修改执行流程中的某个函数
比如在流水线的某个环节,我们想加入一个检查站来检测产品质量,但你不想停下整个流水线或改变其它环节的工作
Hook就像是在流水线上加入这样一个检查站的方式,它让你能在不干扰原有流程的情况下,加入自己的检测或修改步骤。
target function
根据我们在源码分析中一开始分析的chrome加载插件流程,其中content.js被注入到了网页中
那我们我们通过hook content.js中的函数就可以实现欺骗

内容脚本层content.js中的inject函数就十分合适,这里我们可以有若干种hook思路
function inject(src, id, message) {
  return new Promise((resolve) => {
    // Inject a script tag into the page to access methods of the window object
    const script = document.createElement('script')

    script.onload = () => {
      const onMessage = ({ data }) => {
        if (!data.wappalyzer || !data.wappalyzer[id]) {
          return
        }

        window.removeEventListener('message', onMessage)

        resolve(data.wappalyzer[id])

        script.remove()
      }

      window.addEventListener('message', onMessage)

      window.postMessage({
        wappalyzer: message,
      })
    }

    script.setAttribute('src', chrome.runtime.getURL(src))

    document.body.appendChild(script)
  })
}
脚本通过windows对象addEventListener添加message监听器,每次接收完postMessage传递的消息后就执行removeEventListener
那我我们就可以通过劫持addEventListener或removeEventListener来实现hook,在这个过程中伪造指纹通过postMessage传递
在js.js中我们看看postMessage发送的指纹格式
postMessage({
        wappalyzer: {
          js: technologies.reduce((technologies, { name, chains }) => {
            chains.forEach((chain, index) => {
              const value = chain
                .split('.')
                .reduce(
                  (value, method) =>
                    value &&
                    value instanceof Object &&
                    Object.prototype.hasOwnProperty.call(value, method)
                      ? value[method]
                      : '__UNDEFINED__',
                  window
                )

              if (value !== '__UNDEFINED__') {
                technologies.push({
                  name,
                  chain,
                  value:
                    typeof value === 'string' || typeof value === 'number'
                      ? value
                      : !!value,
                })
              }
            })

            return technologies
          }, []),
        },
      }
参数是一个对象,其中包含了wappalyzer属性,而wappalyzer属性本身又是一个对象,包含了js属性
其中包含了name、chain、value这三个参数
name:技术名称,通过遍历technologies数组获得
chains:接收一个字符串,表示尝试访问的技术原型链,指定了以window开头
value:属性链最终指向的值(版本号)这个值的处理方式如下:
- 如果最终值是字符串或数字,直接使用该值。
- 如果最终值是其他类型(如对象、数组等),则转换为布尔值
true(只要存在且不是字符串或数字,就认为技术存在)。 - 如果属性链在某个点断开(即,无法找到下一个属性或方法),则这个技术不会被包含在最终的数组中。
但是这里value其实有被过滤 暂时没找到是哪个位置进行的过滤 暂时无法写入一些有趣的字符 (mo60)
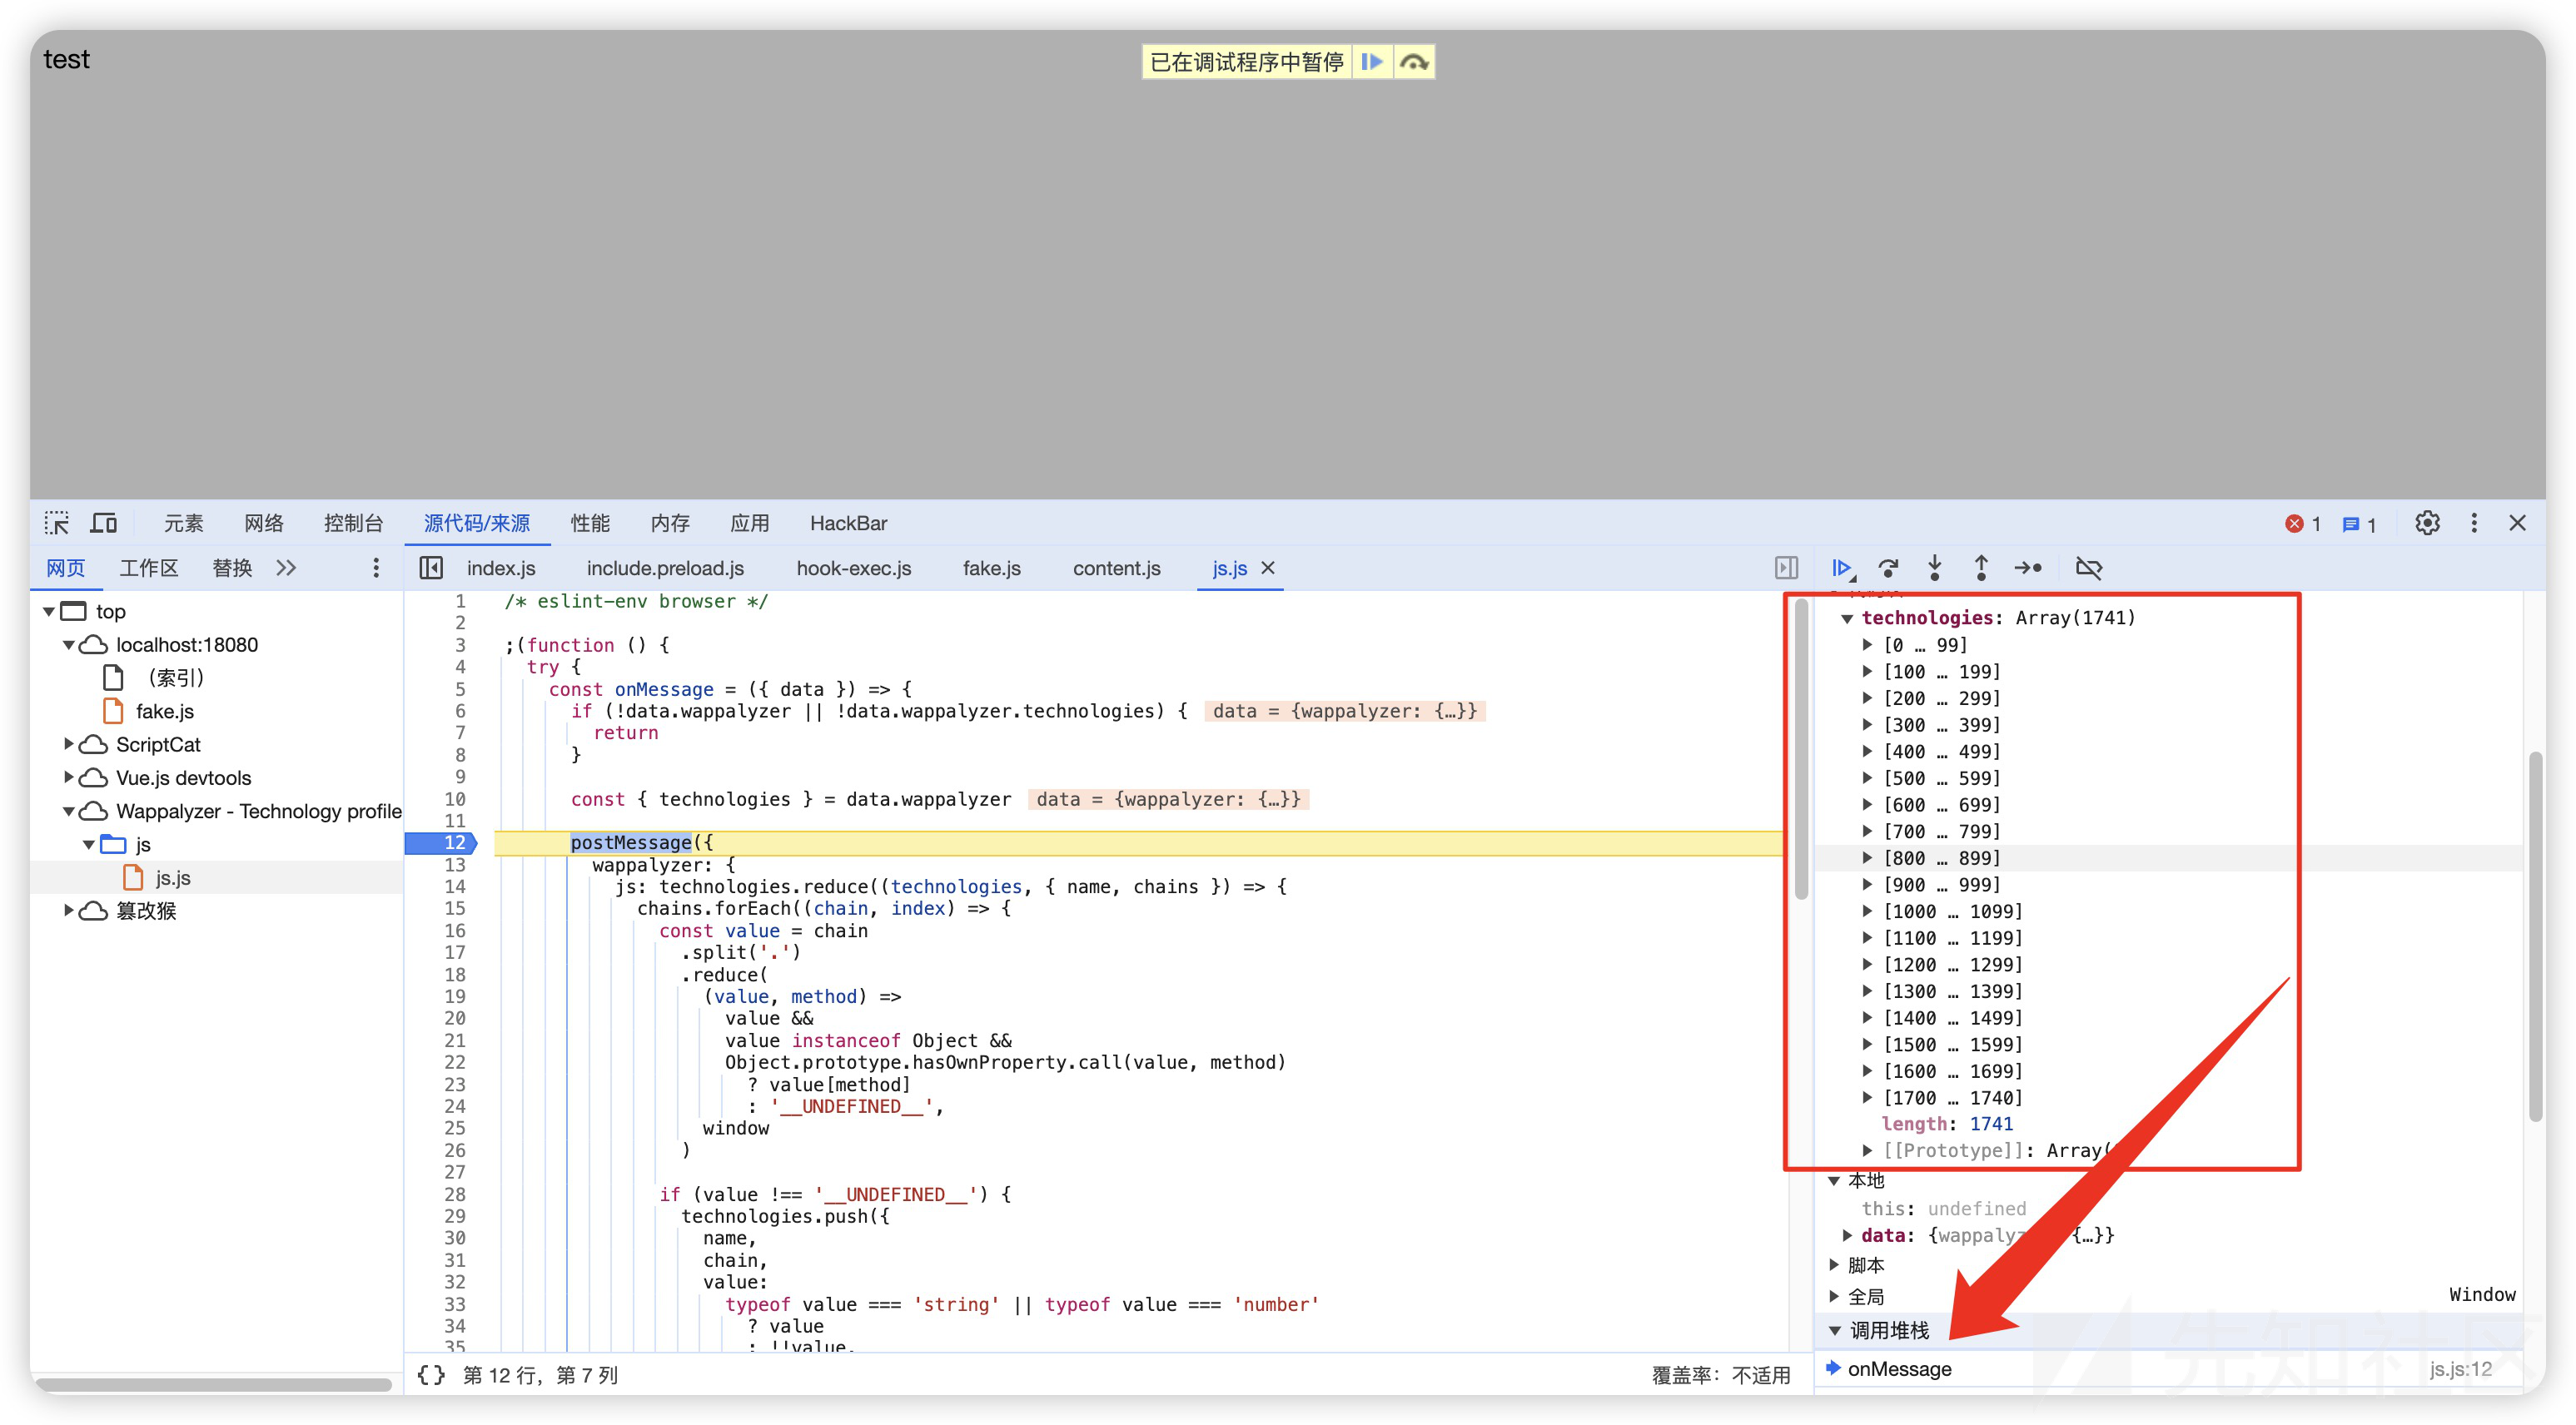
打个断点也能清晰的看到数据结构
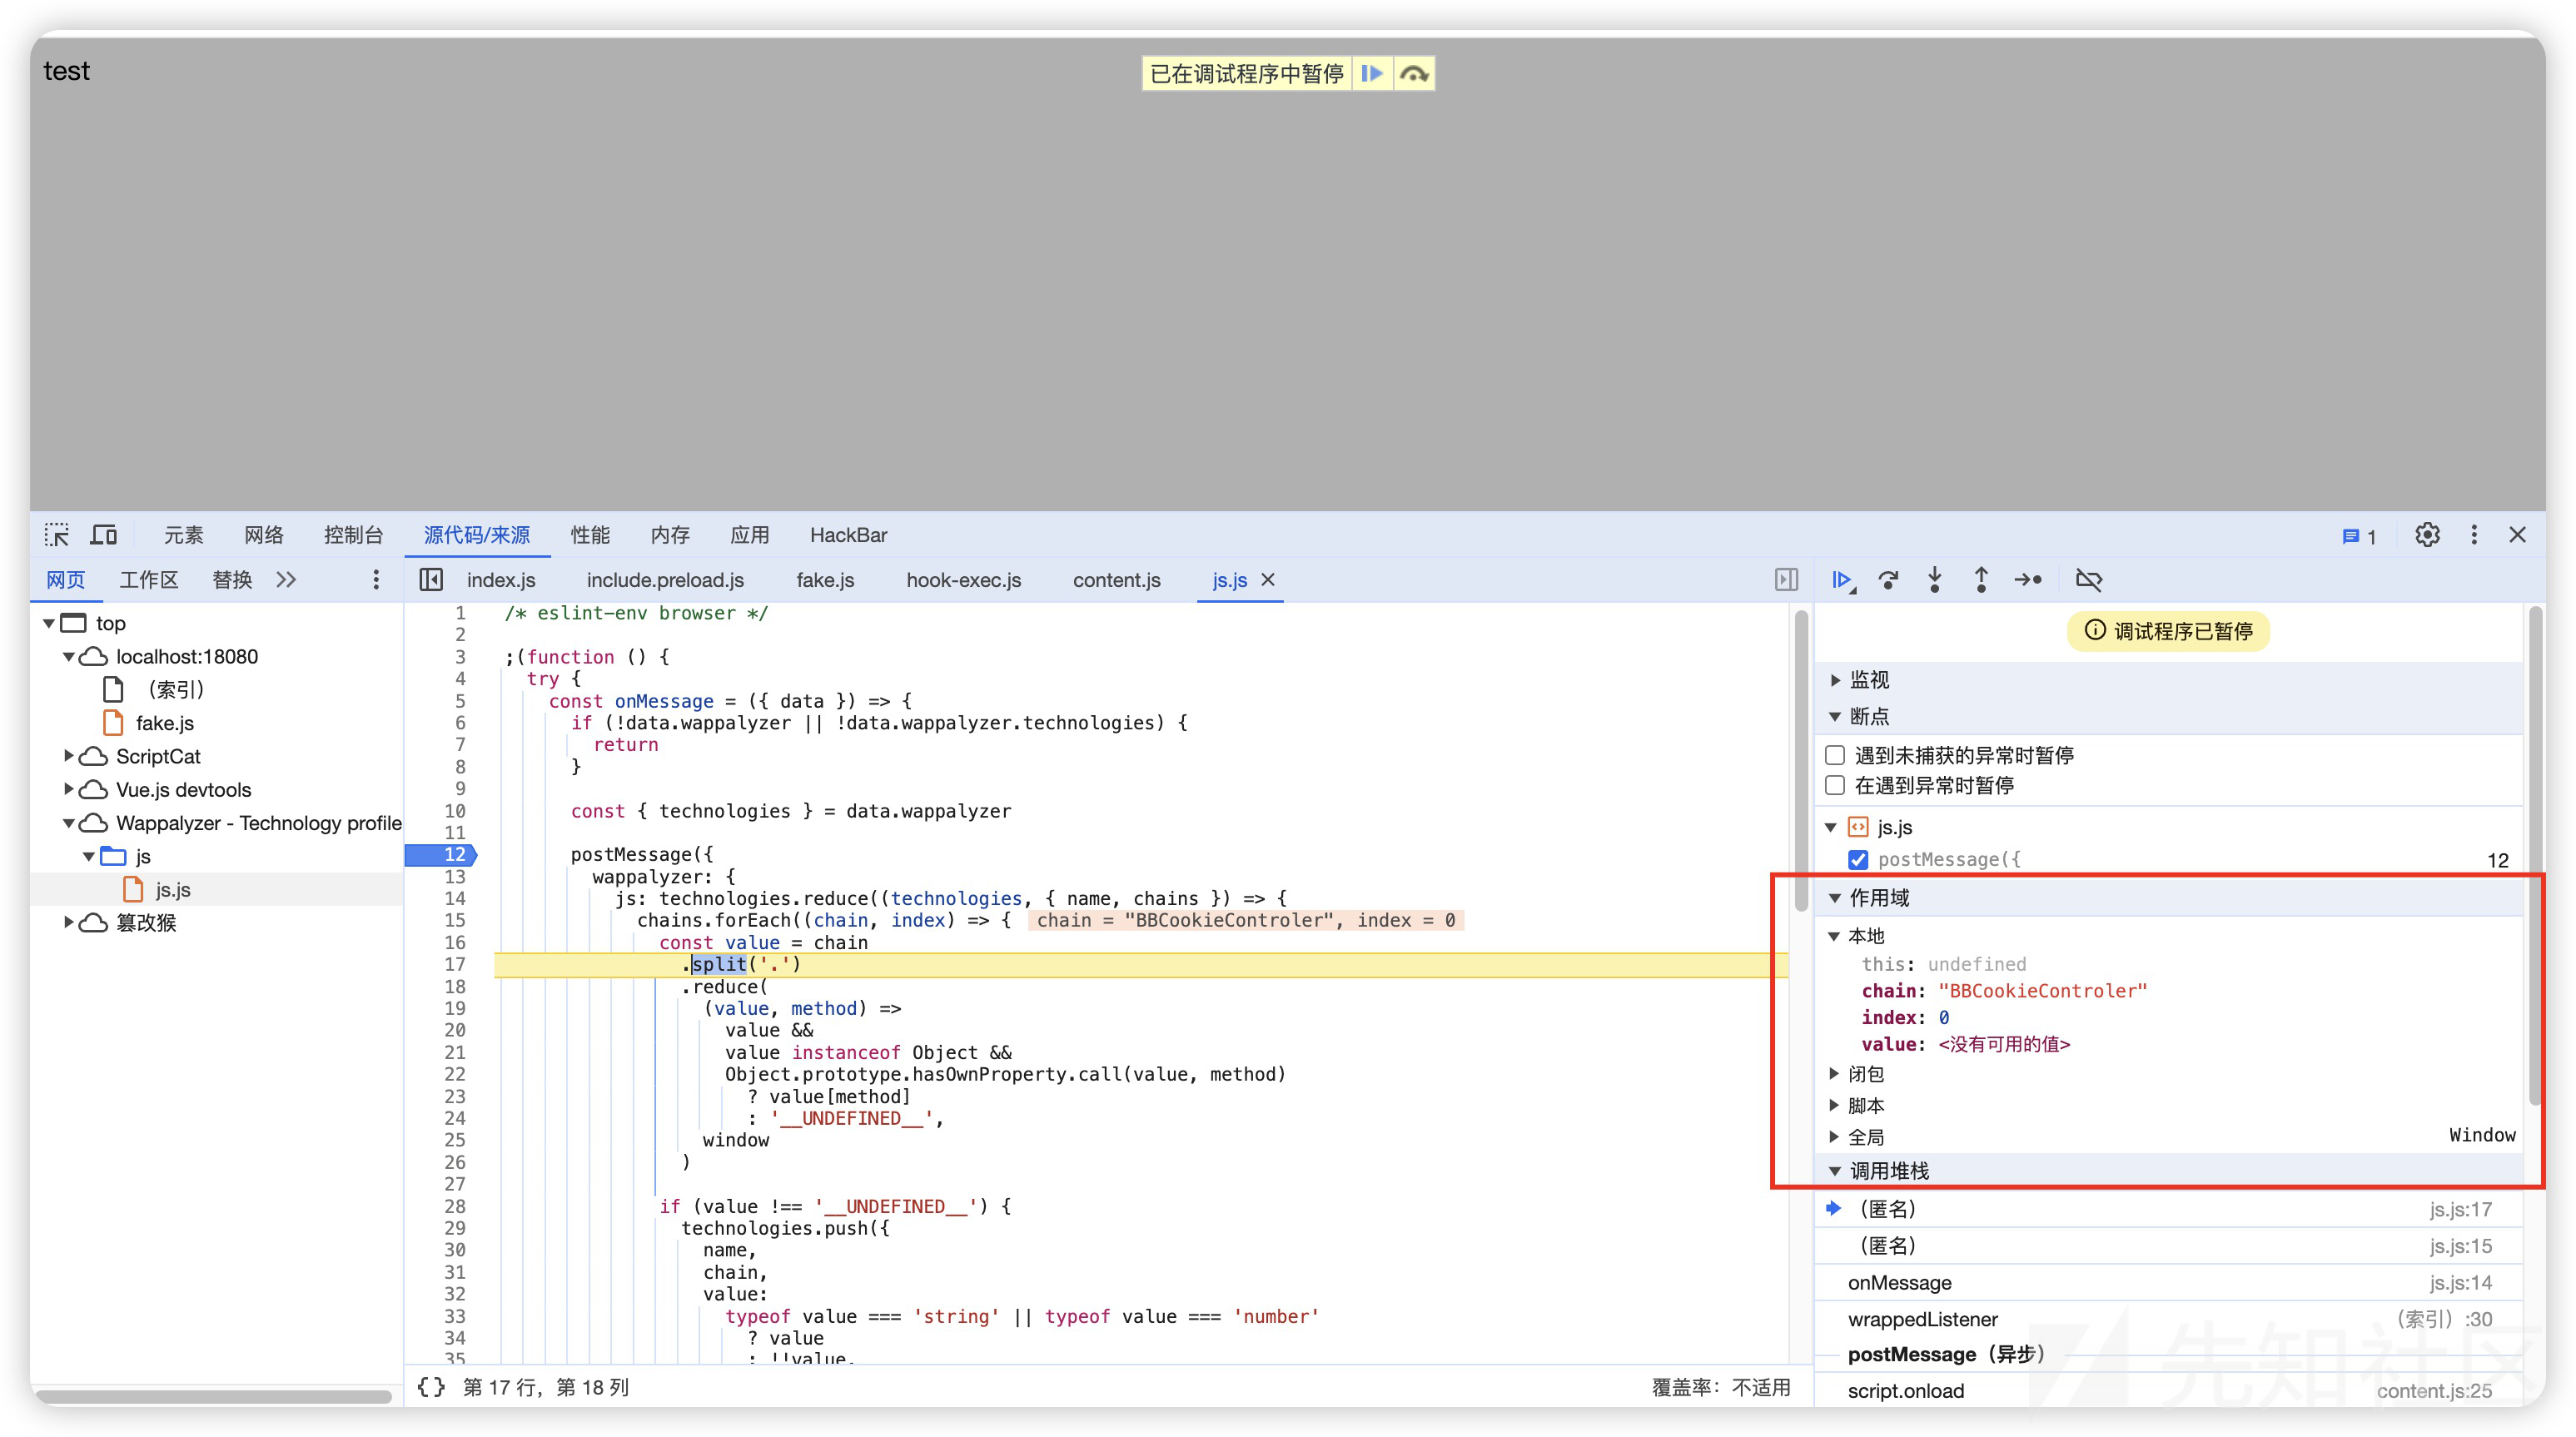
同样能看到technologies来源于onMessage消息
雏形
Hook
<script>
    (function() {
        const originalAddEventListener = window.addEventListener;
        window.addEventListener = function(type, listener, options) {
            if (type === "message") {
                const wrappedListener = function(event) {
                    if (event.data && event.data.wappalyzer) {
                        console.log("Wappalyzer message intercepted", event.data);
                        const poc = () => {
                            postMessage({
                                wappalyzer: {
                                    js: [
                                    // 这里插入伪造的指纹
                                    ],
                                },
                            });
                        };
                    }
                    // 调用原始listener
                    return listener.apply(this, arguments);
                };
                return originalAddEventListener.call(this, type, wrappedListener, options);
            }
            return originalAddEventListener.apply(this, arguments);
        };
    })();
</script>
数据处理
读取technologies目录下所有json文件 实现content.js中getJs筛选技术的功能
getDom的实现方法页到的应用会不太一样 实际中可能结合蜜罐等需求伪造相应指纹
我们通过Python来实现
import os # 读文件
import json # json操作
从文件加载技术数据
def load_technologies(directory):
    characters = ['_'] + [chr(i) for i in range(ord('a'), ord('z') + 1)]
    all_technologies = {}

    for character in characters:
        file_path = os.path.join(directory, f"{character}.json")
        if os.path.exists(file_path):
            with open(file_path, 'r') as file:
                data = json.load(file)
                all_technologies.update(data)

    return all_technologies
筛选js技术 其中value的值我们直接硬编码true 由于technologies/*.json中某个技术可能存在多个chain 我们只取第一个
只提取name、chain、value字段
def filter_technologies(technologies):
    js_technologies = []

    for name, details in technologies.items():
        if "js" in details and details["js"]:
            first_chain = list(details["js"].keys())[0]
            js_technologies.append({
                "name": name,
                "chain": first_chain,
                "value": True
            })

    return js_technologies
调用主逻辑 数据清洗后写入文件
def main():
    technologies_directory = "./technologies"
    loaded_technologies = load_technologies(technologies_directory)
    js_technologies, dom_technologies = filter_technologies(loaded_technologies)

    with open('js.json', 'w') as f:
        json.dump(js_technologies, f, indent=4)

if __name__ == "__main__":
    main()
写入后js.json长这样
[
    {
        "name": "2B Advice",
        "chain": "BBCookieControler",
        "value": true
    },
    {
        "name": "33Across",
        "chain": "Tynt",
        "value": true
    },
    {
        "name": "4-Tell",
        "chain": "_4TellBoost",
        "value": true
    },
    {
        "name": "51.LA",
        "chain": "LA.config.ck",
        "value": true
    },
  ...
  ]
Response指纹伪造
这里的伪造方法比较简单,以一个朋友的博客为例
Wappalyzer识别为WordPress 4.7.24 实际上用的是typecho
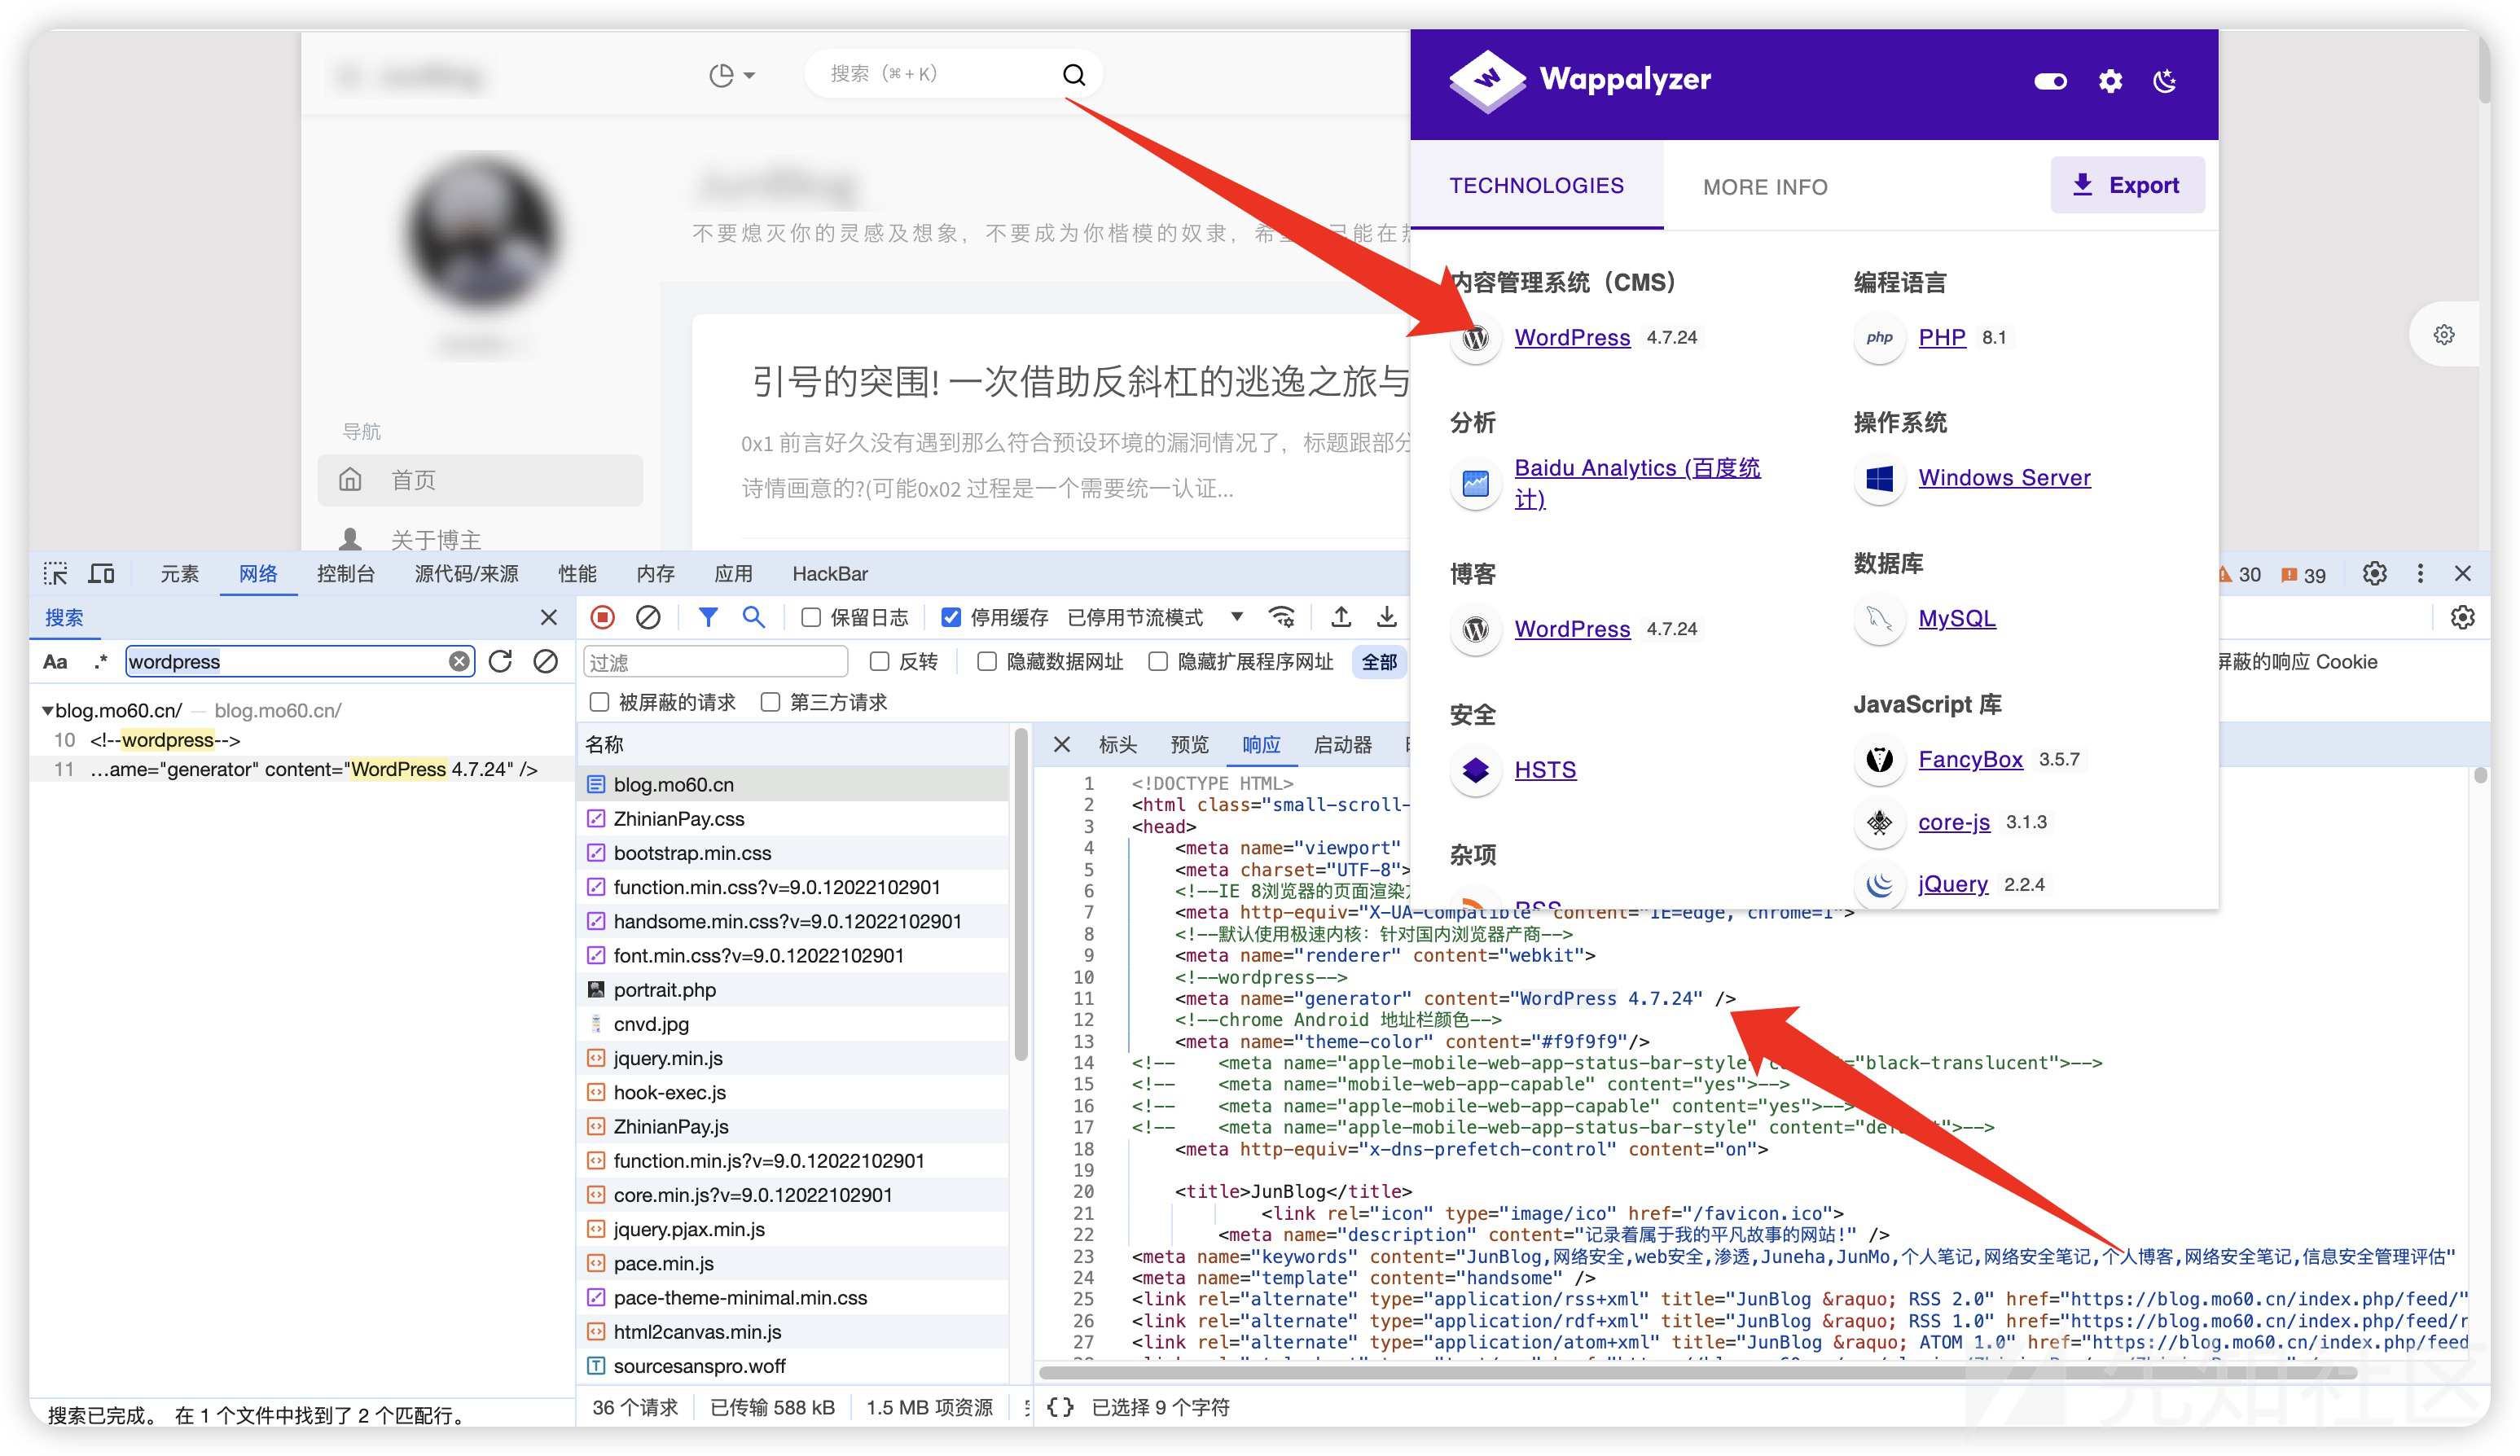
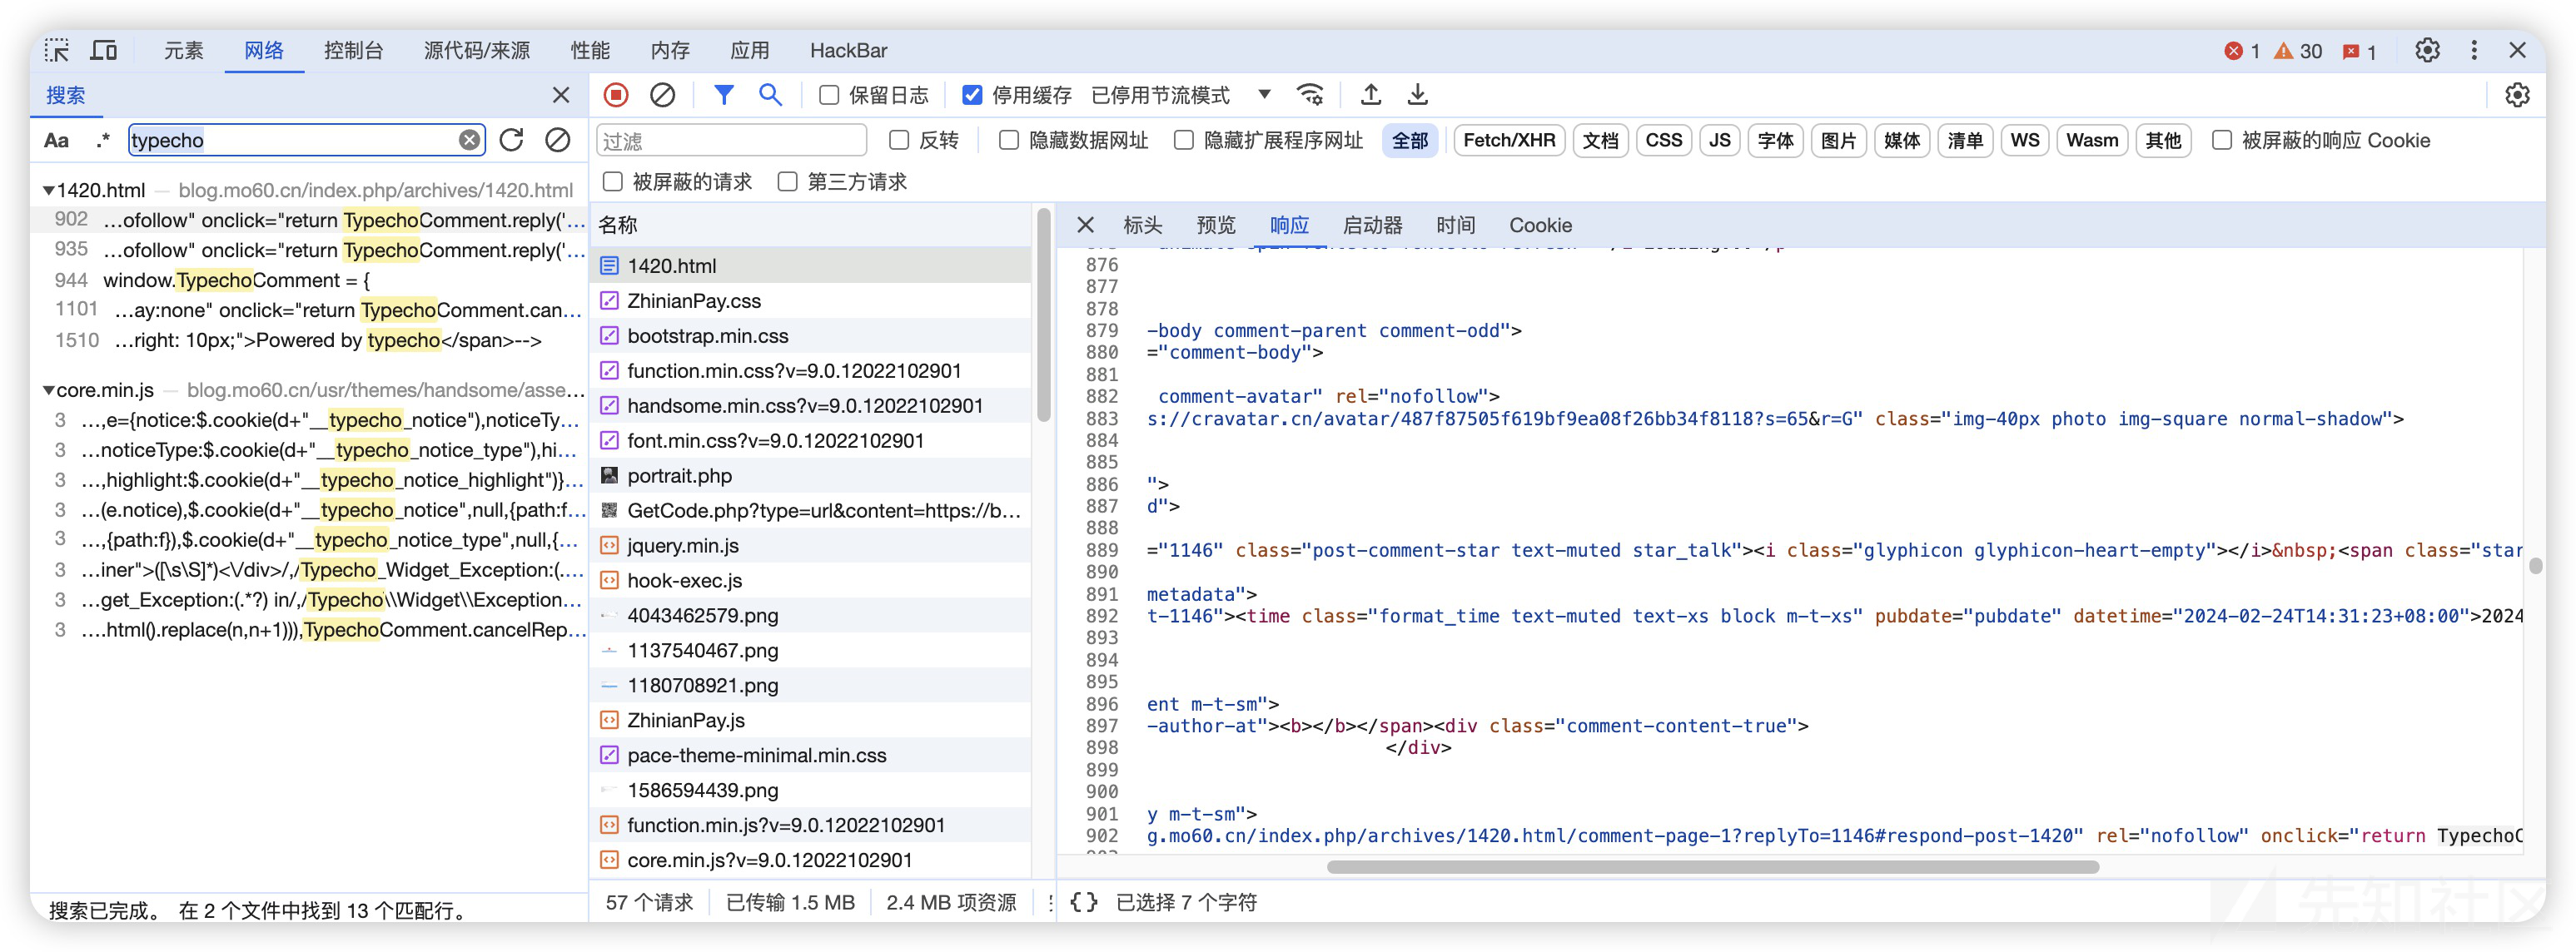
这种伪造只需要在html中写一个generator
<meta name="generator" content="WordPress 4.7.24" />
Js指纹伪造
在html中调用fake.js 其中也需要预先注入脚本 不过可以先不写入指纹数据
<html>
<head><title>fake fingerprint</title><script  src="fake.js" async></script></head>
<body>
<script>
    (function() {
        const originalAddEventListener = window.addEventListener;

        window.addEventListener = function(type, listener, options) {
            if (type === "message") {
                const wrappedListener = function(event) {
                    if (event.data && event.data.wappalyzer) {
                        console.log("Wappalyzer message intercepted", event.data);
                        const poc = () => {
                            postMessage({
                                wappalyzer: {
                                    js: [

                                    ],
                                },
                            });
                        };
                    }
                    return listener.apply(this, arguments);
                };
                return originalAddEventListener.call(this, type, wrappedListener, options);
            }
            return originalAddEventListener.apply(this, arguments);
        };
    })();
</script>
<?php
echo "test";
?>

</body>
</html>
fake.js 这里我们先少写几个指纹
// hook removeEventListener


let rel = removeEventListener;
removeEventListener = (name, func, opt) => {
    if (
        name === "message" &&
        func &&
        func.toString().includes("wappalyzer.technologies") !== -1 &&
        func.toString().includes("removeEventListener") !== -1 &&
        func.toString().includes("__UNDEFINED__") !== -1 &&
        func.toString().includes("postMessage") !== -1
    ) {
        poc();
        rel(name, func, opt);
    } else {
        rel(name, func, opt);
    }
};

const poc = () => {
    postMessage({
        wappalyzer: {
            js: [
                {name: "Zipify Pages", chain: "ZipifyPages", value: true},
                {name: "Zipteams", chain: "ZipteamsWidget", value: true},
                {name: "Zmags Creator", chain: "__zmags", value: true},
                {name: "Zoey", chain: "Zoey.module", value: true},
                {name: "Zoho PageSense", chain: "$pagesense", value: true},
                {name: "Zoko", chain: "__zoko_app_version", value: true},
                {name: "Zone.js", chain: "Zone.root", value: true},
                {name: "Zonos", chain: "Zonos", value: true},
                {name: "Zotabox", chain: "Zotabox", value: true}
            ],
        },
    });
};
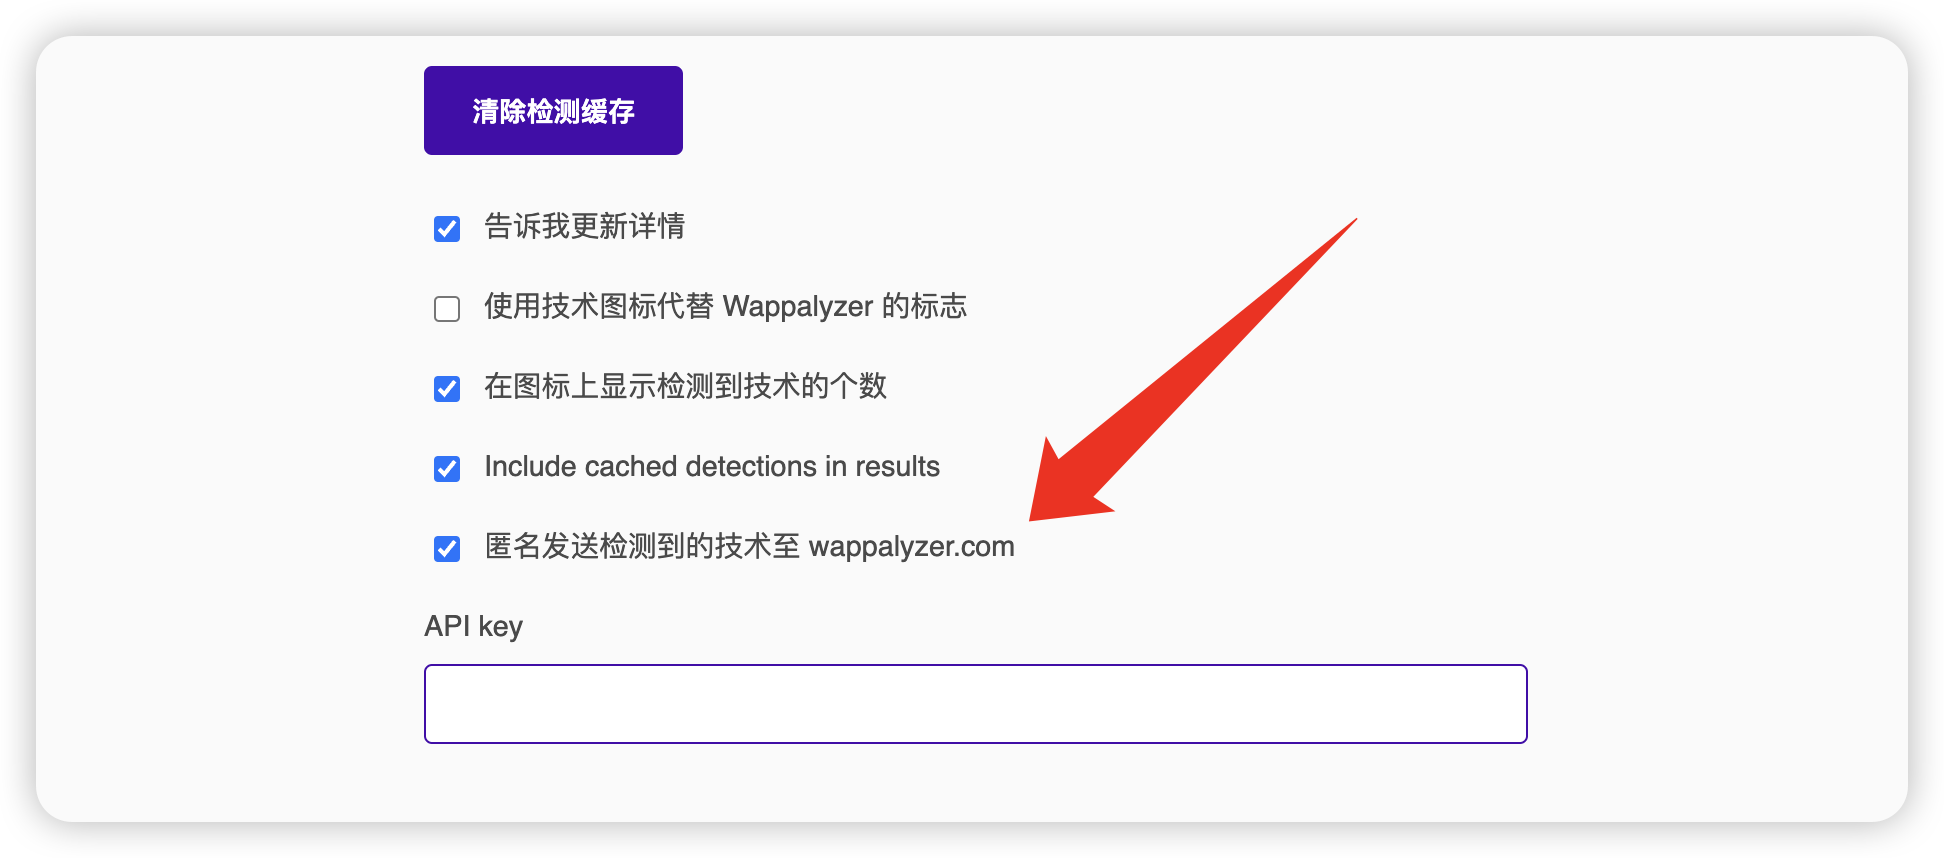
测试的时候记得清除Wappalyzer缓存
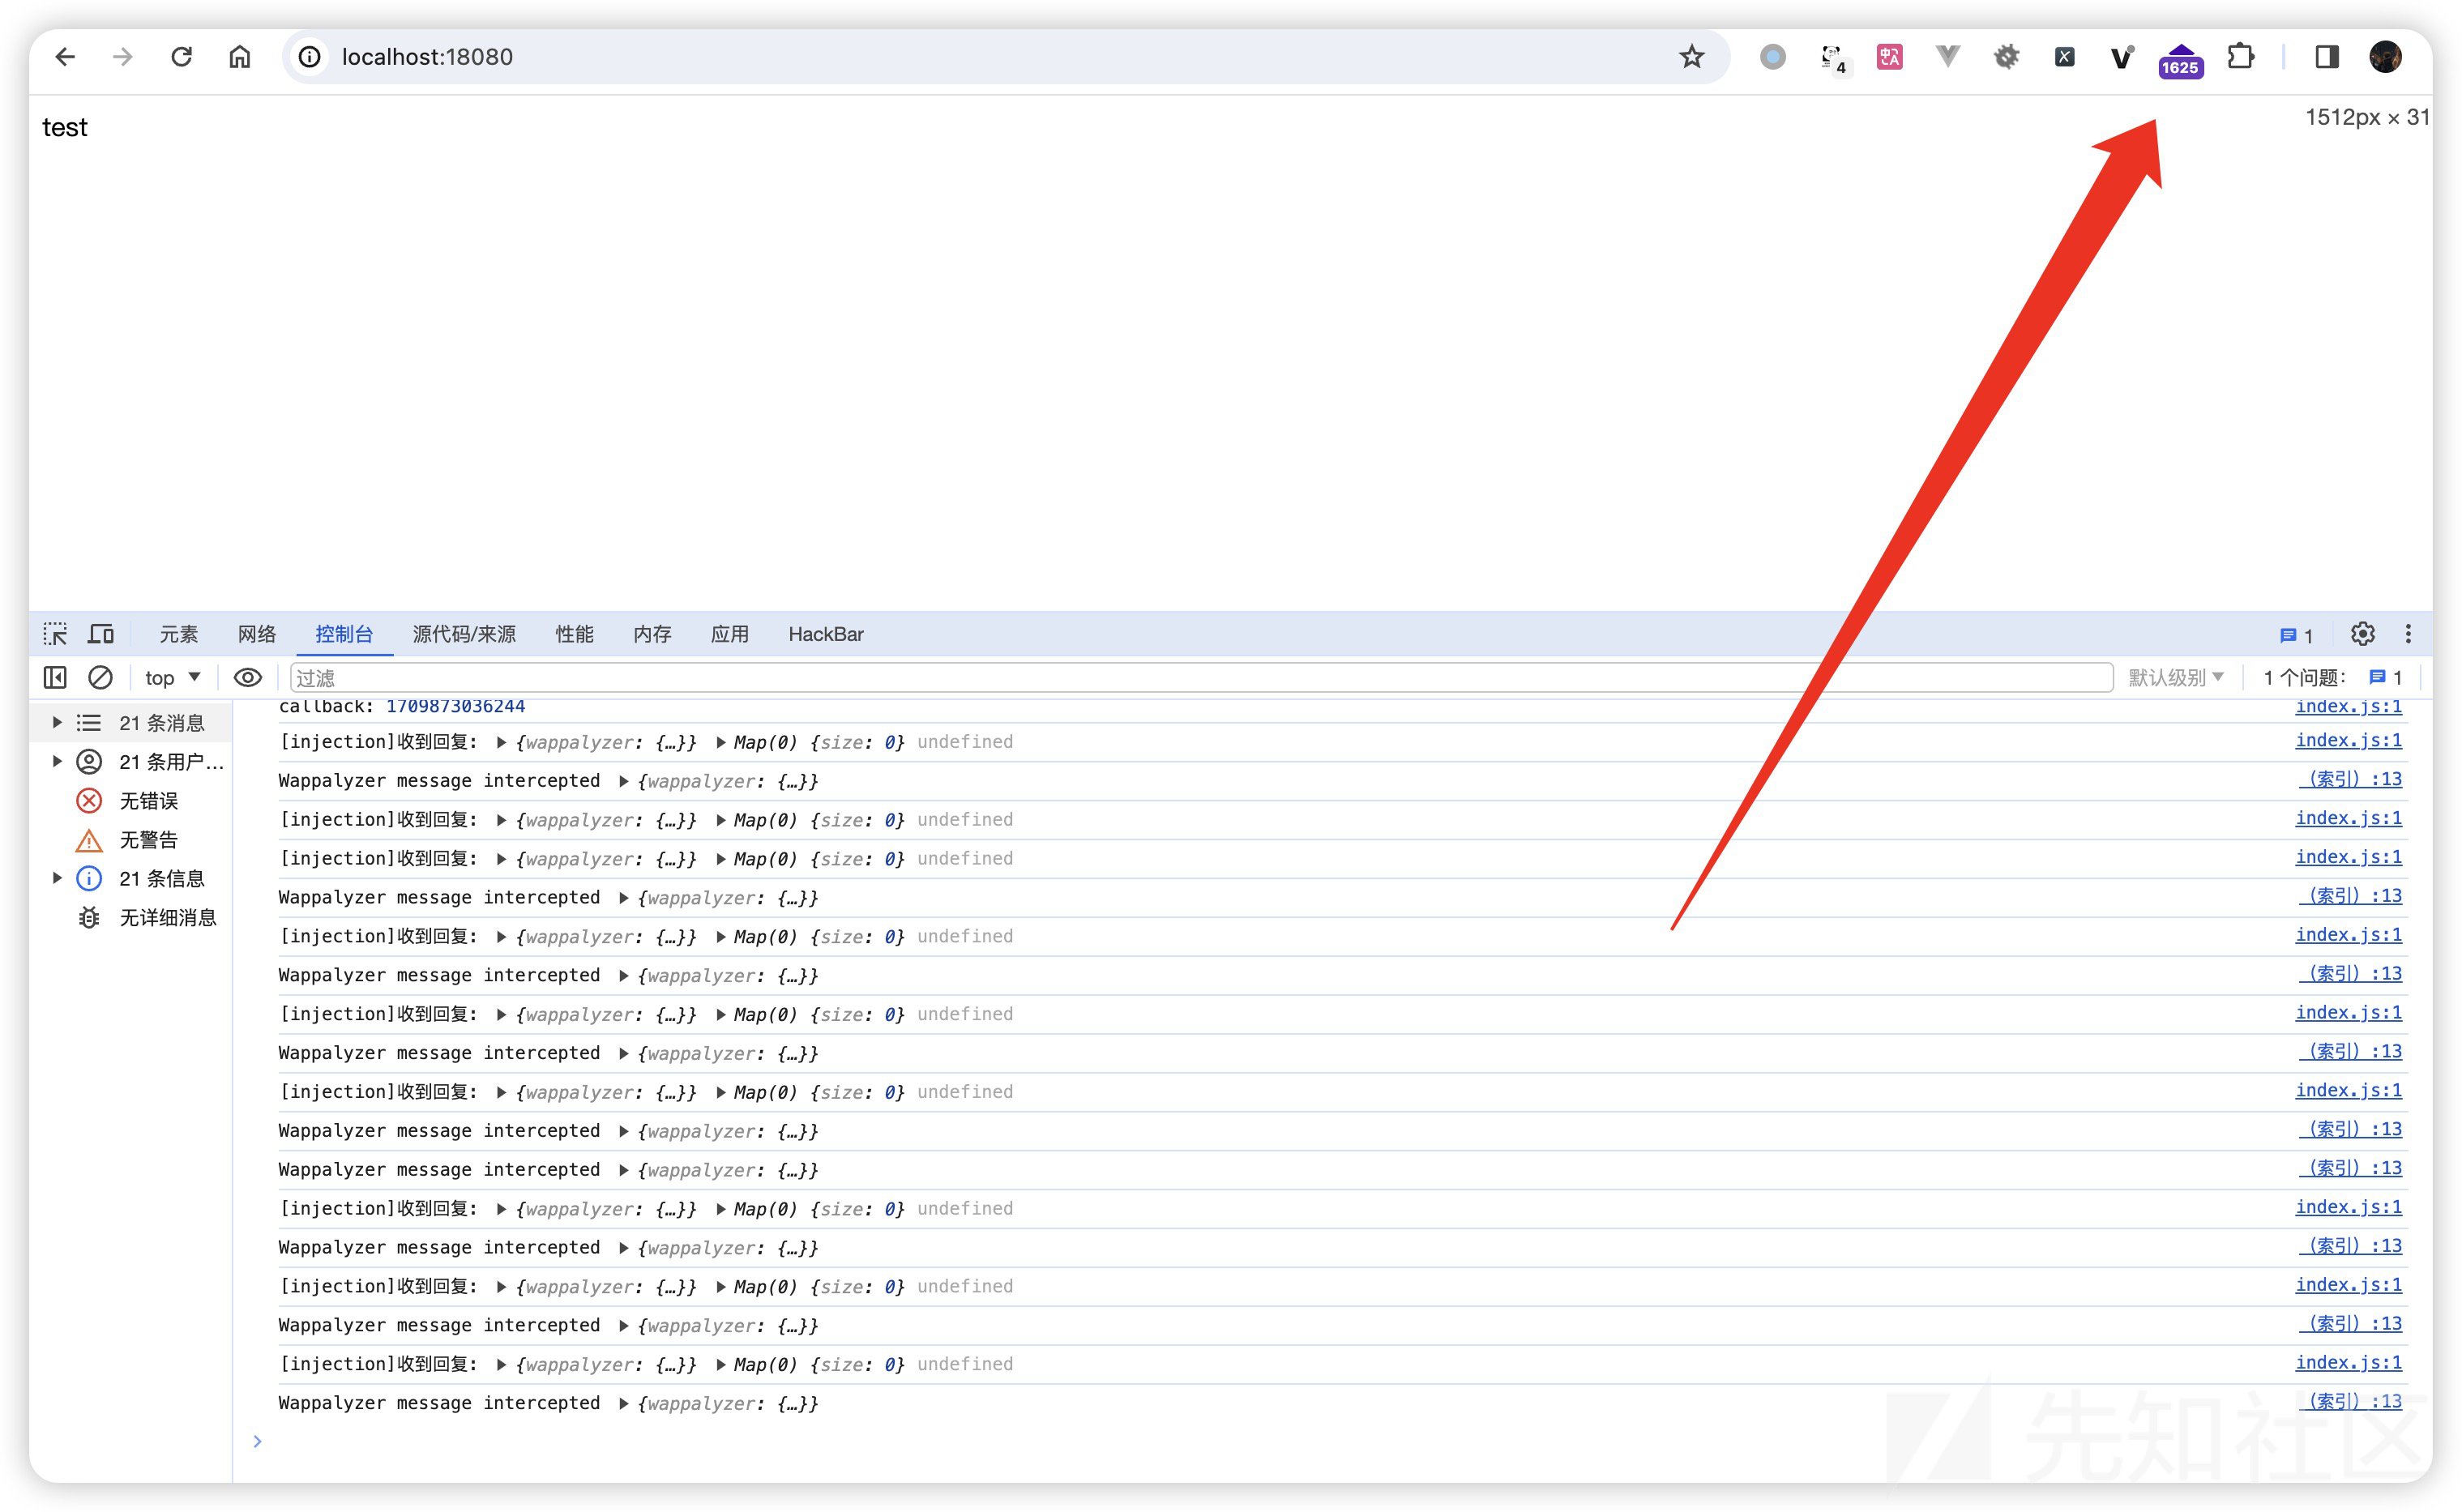
伪造效果如下:

也可以添加全部指纹 混淆视听
Dom指纹伪造
异曲同工
Self Xss
// hook addEventListener
let rel = addEventListener;
addEventListener = (name, func, opt) => {
  if (
    name === "message" &&
    func &&
    func.toString().includes("wappalyzer.technologies") !== -1 &&
    func.toString().includes("removeEventListener") !== -1 &&
    func.toString().includes("__UNDEFINED__") !== -1 &&
    func.toString().includes("postMessage") !== -1
  ) {
    rel(name, func, opt);
    poc();
  } else {
    rel(name, func, opt);
  }
};

window.bad = {
  get xss() {
    alert("xss!");
  },
};

const poc = () => {
  postMessage({
    wappalyzer: {
      technologies: [
        {
          name: "xss",
          chains: ["bad.xss"],
        },
      ],
    },
  });
};

絮叨
本文用到的代码只是一个示例,在实际中可以参考我的上一篇文章 JavaScript混淆防护与调试技术探析 对代码进行混淆
指纹部分代码也可以通过cdn引入 让代码更简洁
 转载
转载
 分享
分享

-
-
-
-
-
-
-
-
-
-
-
-
-
-
-
-
-
-
-
-
-
