西南赛区数信杯应急响应
门户网站
SSH 配置(check)
禁用密码登录:
PasswordAuthentication no确保启用公钥认证:
PubkeyAuthentication yes
chmod 700 /root/.ssh
chmod 600 /root/.ssh/authorized_keys
chown root:root /root/.ssh
chown root:root /root/.ssh/authorized_keys
restart sshd
Apache
修改 <Directory />
<Directory />
    Options FollowSymLinks
    AllowOverride None
    Require all denied
</Directory>
把Options FollowSymLinks删掉
版本号
grep -r "ServerTokens" /etc/apache2/
root@d7f81b8b07c5:/etc/apache2# grep -r "ServerTokens" /etc/apache2/
/etc/apache2/conf-available/security.conf:# ServerTokens
/etc/apache2/conf-available/security.conf:#ServerTokens Minimal
/etc/apache2/conf-available/security.conf:ServerTokens OS
/etc/apache2/conf-available/security.conf:#ServerTokens Full
/etc/apache2/apache2.conf:ServerTokens Prod
#ServerTokens Minimal
#ServerTokens OS
#ServerTokens Full
修改为
ServerTokens Prod
重启systemctl restart apache2
mysql
在 MySQL 中,运行以下命令以查找 binlog 相关的信息:
SHOW BINARY LOGS;这将列出所有的二进制日志文件。确保 binlog.000004 包含所需的记录。
使用 mysqlbinlog 工具来读取 binlog.000004 文件中的所有更改。可以通过以下命令提取内容:
mysqlbinlog /path/to/binlog.000004 --start-position=0 > recovery.sql将生成的 recovery.sql 文件中的内容导入到 MySQL 数据库中:
mysql -u your_username -p your_database < recovery.sql恢复
SELECT * FROM pre_user_balance;
OA 系统
web 服务地址:http://10.10.10.12:80 ssh(22 端口) 账户密码:root/f6fffd40: 1.redis 加固(check) 任务描述:服务器被入侵了,管理员发现黑客通过 redis 未授权访问攻击了服务器,请修复服务器中以下问题任务目标:修复 redis 未授权访问问题,并给 redis 加一个验证密码,该密码需要设置为6b95fa87。
vim /etc/redis/redis.conf
然后将 # requirepass foobared 改为 requirepass 6b95fa87,最后重启 redis 服务即可
2.webshelll 分析(check) (SOVELED) 任务描述:寻找攻击者留下的 webshell 任务目标:找到 webshell 路径并删除
直接查找文件中带eval函数的php文件,命令
find . -name "*.php" -exec grep -l "eval(" {} \\;
结果是error.php文件,直接删除
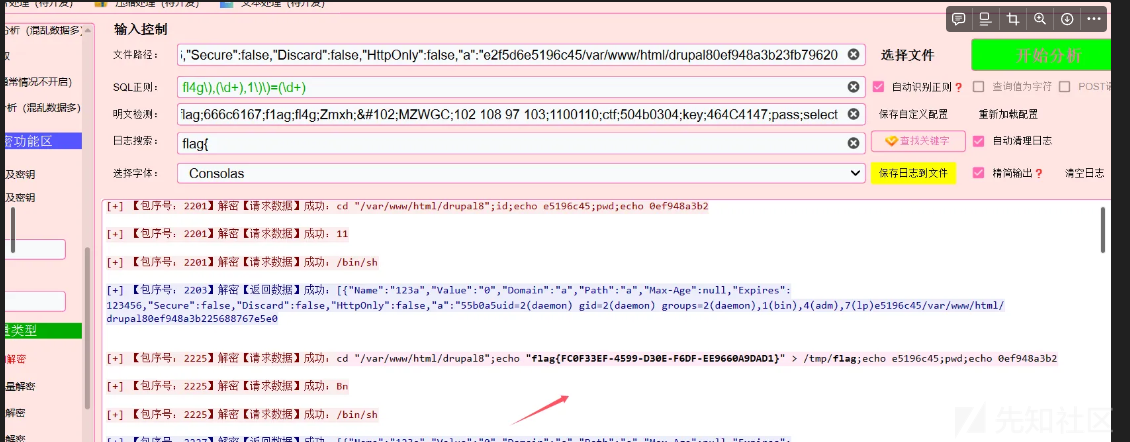
3.蚁剑流量分析(flag) 任务描述:对攻击者进行溯源 任务目标:提交攻击者所窃取的机密信息
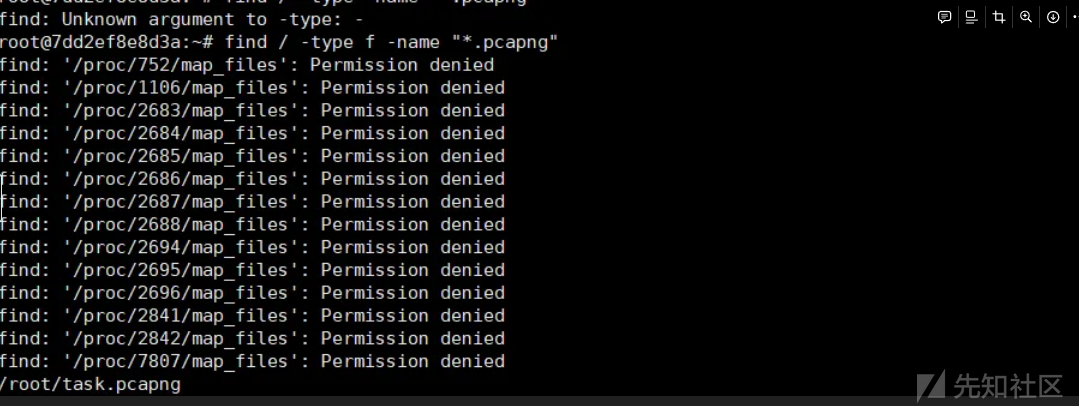
查找流量文件

用工具一把梭了

后门发现(flag) 任务描述:寻找并分析攻击者留下的恶意后门 任务目标:找到攻击者的 ip+端口,提交格式为 flag{ip:端口}
查找所有端口,发现有一个可疑端口
显示ip为
121.13.2.33:5432
5.后门清除(check) 任务描述:寻找并清除攻击者留下的恶意后门 任务目标:清除恶意后门
直接kill掉可疑的端口
6.文件解密(flag) 任务描述:攻击者使用勒索病毒将数据库导出的 sql 文件进行加密,并且删除了原数据库。任务目标:根据在攻击者机器找到的勒索病毒,解密还原 sql 文件,并找到其中的flag。7.数据库恢复(check) 任务描述:根据还原的 sql 文件,进行恢复数据库 任务目标:恢复数据库
即时协作服务器
hsqldb 数据迁移 mysql(check)
首先启动mysql
service mysql status

service mysql start
创建 MySQL 数据库: 首先,登录 MySQL 并创建一个新的数据库,以及一个用户 pdx,密码为 Li4444555635!:
sql复制代码CREATE DATABASE openfire_db;
CREATE USER 'pdx'@'localhost' IDENTIFIED BY 'Li4444555635!';
GRANT ALL PRIVILEGES ON openfire_db.* TO 'pdx'@'localhost';
FLUSH PRIVILEGES;
修改配置文件
<jive>
  <adminConsole>
    <port>12335</port>
    <securePort>9091</securePort>
  </adminConsole>
  <locale>zh_CN</locale>
  <connectionProvider>
    <className>org.jivesoftware.database.DefaultConnectionProvider</className>
  </connectionProvider>
  <database>
    <defaultProvider>
      <driver>com.mysql.cj.jdbc.Driver</driver>
      <serverURL>jdbc:mysql://localhost:3306/openfire_db?useSSL=false&serverTimezone=UTC</serverURL>
      <username>pdx</username>
      <password>Li4444555635!</password>
      <testSQL>select 1</testSQL>
      <testBeforeUse>true</testBeforeUse>
      <testAfterUse>true</testAfterUse>
      <minConnections>5</minConnections>
      <maxConnections>25</maxConnections>
      <connectionTimeout>1.0</connectionTimeout>
    </defaultProvider>
  </database>
  <setup>true</setup>
</jive>
启动 HSQLDB 服务器
java -cp /home/user/openfire/lib/hsqldb-2.4.1.jar org.hsqldb.Server --database.0 file:mydb --dbname.0 mydb
然后连接我们的服务
java -cp /home/user/openfire/lib/hsqldb-2.4.1.jar org.hsqldb.cmdline.SqlTool --url jdbc:hsqldb:hsql://localhost/mydb --user SA --password '' --sql "SELECT * FROM ofUser" > backup_ofUser.csv
这个命令会将 ofUser 表的数据导出到 backup_ofUser.csv 文件中。请根据需要调整数据库的 URL、用户名和密码。
LOAD DATA LOCAL INFILE '/path/to/backup_ofUser.csv' INTO TABLE ofUser
FIELDS TERMINATED BY ',' LINES TERMINATED BY '\n';

LOAD DATA LOCAL INFILE '/path/to/backup_ofGroupUser.csv' INTO TABLE ofGroupUser
FIELDS TERMINATED BY ',' LINES TERMINATED BY '\n';
输入一下的内容验证
SELECT * FROM ofUser LIMIT 10;
SELECT * FROM ofGroupUser LIMIT 10;
身份认证绕过漏洞修复(check)
找到配置文件
root@16bb35eba610:/# find / -name "openfire.xml"
/home/user/openfire/conf/openfire.xml
读取文件内容修改端口
root@16bb35eba610:/# cat  /home/user/openfire/conf/openfire.xml
<?xml version="1.0" encoding="UTF-8"?>

<!--
    This file stores bootstrap properties needed by Openfire.
    Property names must be in the format: "prop.name.is.blah=value"
    That will be stored as:
        <prop>
            <name>
                <is>
                    <blah>value</blah>
                </is>
            </name>
        </prop>

    Most properties are stored in the Openfire database. A
    property viewer and editor is included in the admin console.
-->
<!-- root element, all properties must be under this element -->
<jive>
  <adminConsole>
    <!-- Disable either port by setting the value to -1 -->
    <port>9090</port>
    <securePort>9091</securePort>
  </adminConsole>
  <locale>zh_CN</locale>
  <!-- Network settings. By default, Openfire will bind to all network interfaces.
      Alternatively, you can specify a specific network interfaces that the server
      will listen on. For example, 127.0.0.1. This setting is generally only useful
       on multi-homed servers. -->
  <!--
    <network>
        <interface></interface>
    </network>
    -->
  <!--
        One time token to gain temporary access to the admin console.
    -->
  <!--
    <oneTimeAccessToken>secretToken</oneTimeAccessToken>
    -->
  <connectionProvider>
    <className>org.jivesoftware.database.EmbeddedConnectionProvider</className>
  </connectionProvider>
  <setup>true</setup>
  <fqdn>5f3dfcc60c8a</fqdn>
</jive>
发现没有一些命令
只能echo覆盖
root@16bb35eba610:/# echo '<?xml version="1.0" encoding="UTF-8"?>
> <jive>
>   <adminConsole>
>     <port>12335</port>
>     <securePort>9091</securePort>
>   </adminConsole>
>   <locale>zh_CN</locale>
>   <connectionProvider>
>     <className>org.jivesoftware.database.EmbeddedConnectionProvider</className>
>   </connectionProvider>
>   <setup>true</setup>
>   <fqdn>5f3dfcc60c8a</fqdn>
> </jive>' > /home/user/openfire/conf/openfire.xml

<jive>
  <adminConsole>
    <port>12335</port>
    <securePort>9091</securePort>
  </adminConsole>
  <locale>zh_CN</locale>
  <connectionProvider>
    <className>org.jivesoftware.database.DefaultConnectionProvider</className>
  </connectionProvider>
  <database>
    <defaultProvider>
      <driver>com.mysql.cj.jdbc.Driver</driver>
      <serverURL>jdbc:mysql://localhost:3306/openfire_db?useSSL=false&serverTimezone=UTC</serverURL>
      <username>pdx</username>
      <password>Li4444555635!</password>
      <testSQL>select 1</testSQL>
      <testBeforeUse>true</testBeforeUse>
      <testAfterUse>true</testAfterUse>
      <minConnections>5</minConnections>
      <maxConnections>25</maxConnections>
      <connectionTimeout>1.0</connectionTimeout>
    </defaultProvider>
  </database>
  <setup>true</setup>
</jive>
然后重启服务
发现resatrt命令都没有
停止 Openfire
首先,运行以下命令停止 Openfire:
sudo /home/user/openfire/bin/openfire stop- 启动 Openfire
然后,使用以下命令重新启动 Openfire:
sudo /home/user/openfire/bin/openfire start
图片水印
import cv2
import numpy as np
import matplotlib.pyplot as plt

def add_salt_and_pepper_noise(image):
    amount = 0.04  # 设置添加的噪声占原始图像的比例
    s_vs_p = 0.5  # 设置噪声中salt和pepper的比例

    noise_attacked_image = np.copy(image)
    # 设置添加的salt噪声的数量
    num_salt = np.ceil(amount * s_vs_p * image.size)
    # 设置添加噪声的坐标位置
    coords = [np.random.randint(0, i - 1, int(num_salt)) for i in image.shape]
    # 添加salt噪声
    noise_attacked_image[tuple(coords)] = 255

    # 设置添加的pepper噪声的数量
    num_salt = np.ceil(amount * (1 - s_vs_p) * image.size)
    # 设置添加噪声的坐标位置
    coords = [np.random.randint(0, i - 1, int(num_salt)) for i in image.shape]
    # 添加pepper噪声
    noise_attacked_image[tuple(coords)] = 0

    return noise_attacked_image

# 读取图片
image = cv2.imread("embedded.png")
image = image[:, :, [2, 1, 0]]  # 转换为RGB格式

# 添加盐和胡椒噪声
noise_attacked_image = add_salt_and_pepper_noise(image)

# 保存添加了噪声后的图像
plt.imsave("embedded1.png", noise_attacked_image)
邮件服务器
下载/home目录下的文件,只有curl命令可用
curl -F "file=@/home/2024-09-05_12-03-51.pcapng" <http://106.53.212.184:6666>
服务器上搭建接收文件的服务
import http.server
import socketserver
import cgi
import tarfile
import os

PORT = 6666

class CustomHTTPRequestHandler(http.server.SimpleHTTPRequestHandler):
    def do_POST(self):
        # Parse the form data posted
        form = cgi.FieldStorage(
            fp=self.rfile,
            headers=self.headers,
            environ={'REQUEST_METHOD': 'POST'}
        )

        # Extract file information
        if 'file1' in form:
            file_item = form['file1']
            if file_item.file:
                # Define file path to save the uploaded tar file in the current directory
                file_path = file_item.filename

                # Write the tar file to the current directory
                with open(file_path, 'wb') as output_file:
                    output_file.write(file_item.file.read())

                # Check if the file is a tar file and extract it
                if tarfile.is_tarfile(file_path):
                    with tarfile.open(file_path, 'r') as tar:
                        tar.extractall(path="./")  # Extract all files to current directory

                    self.send_response(200)
                    self.end_headers()
                    self.wfile.write(b"Tar file uploaded and extracted successfully")
                else:
                    os.remove(file_path)  # Remove the file if it's not a valid tar
                    self.send_error(400, "Uploaded file is not a valid tar file")
            else:
                self.send_error(400, "No file uploaded")
        else:
            self.send_error(400, "No file uploaded")

if __name__ == "__main__":
    with socketserver.TCPServer(("", PORT), CustomHTTPRequestHandler) as httpd:
        print(f"Serving on port {PORT}")
        httpd.serve_forever()
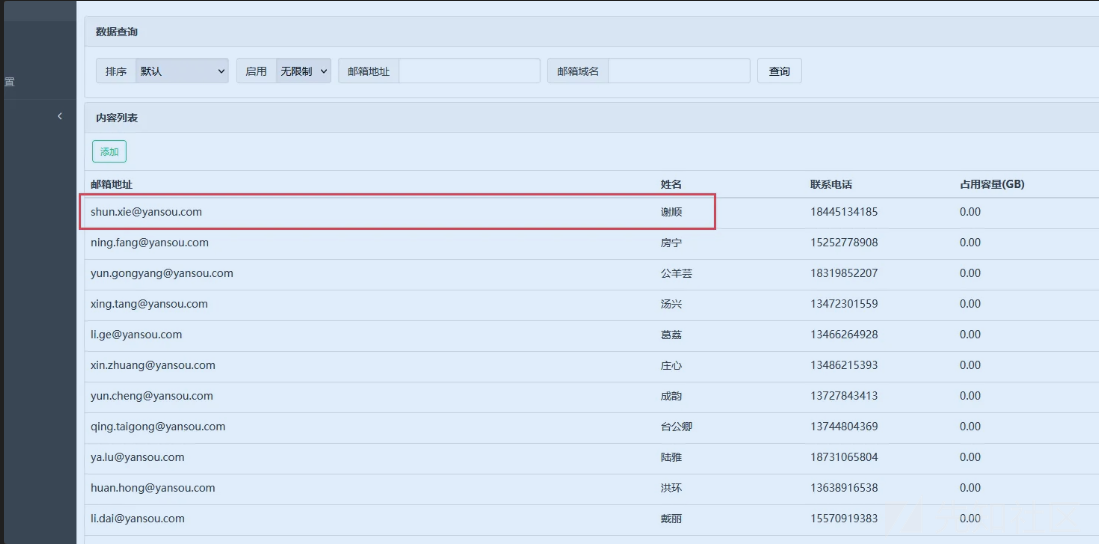
1.冗余邮箱发现(flag) 任务描述:根据/home 目录中提供的员工表,找到冗余的邮箱。 任务目标:提交员工表中不存在邮箱,提交格式为 flag{LiMin@yansou.com},注意名字的首字母为大写。
登录 admin 管理邮件的后台,然后挨个排查附件的员工邮箱中不存在的用户,最后发现

没有谢顺这个员工,提交其邮箱即可,要首字母大写
2.钓鱼邮件发现(flag) 任务描述:寻找可能为钓鱼邮件的邮件。 任务目标:提交钓鱼邮件中的恶意 IP,提交格式为 flag{1.1.1.1}。
3.钓鱼邮件分析溯源(flag) 任务描述:根据找到的钓鱼邮件,溯源出最原始的邮件发出人。 任务目标:提交最原始的邮件发出人,提交格式为 flag{xxx@yansou.com},注意名字的首字母为大写。
4.恶意病毒分析_1(flag) 任务描述:在邮件服务器中的 home 目录还发现了一个病毒文件,请分析该恶意病毒。任务目标:提交恶意病毒中定时任务启动时间,提交格式为 flag{01:22}。
直接把exe文件丢进沙箱分析得到启动时间

5.恶意病毒分析_2(flag) 任务描述:在邮件服务器中的 home 目录还发现了一个病毒文件,请分析该恶意病毒。任务目标:提交恶意病毒自身复制的文件位置,提交格式为 flag{e:\documents\secret}
6.恶意流量分析(flag) 任务描述:集团内部的病毒分析专家对该病毒进行了初步的分析,并且截取到了由恶意病毒发出的流量信息名为:2024-09-05_12-03-51.pcapng。任务目标:分析流量查看该病毒获取的机密信息,并尝试获取用户 Norizen 的密码,提交格式为:flag{password}。
个人文件系统
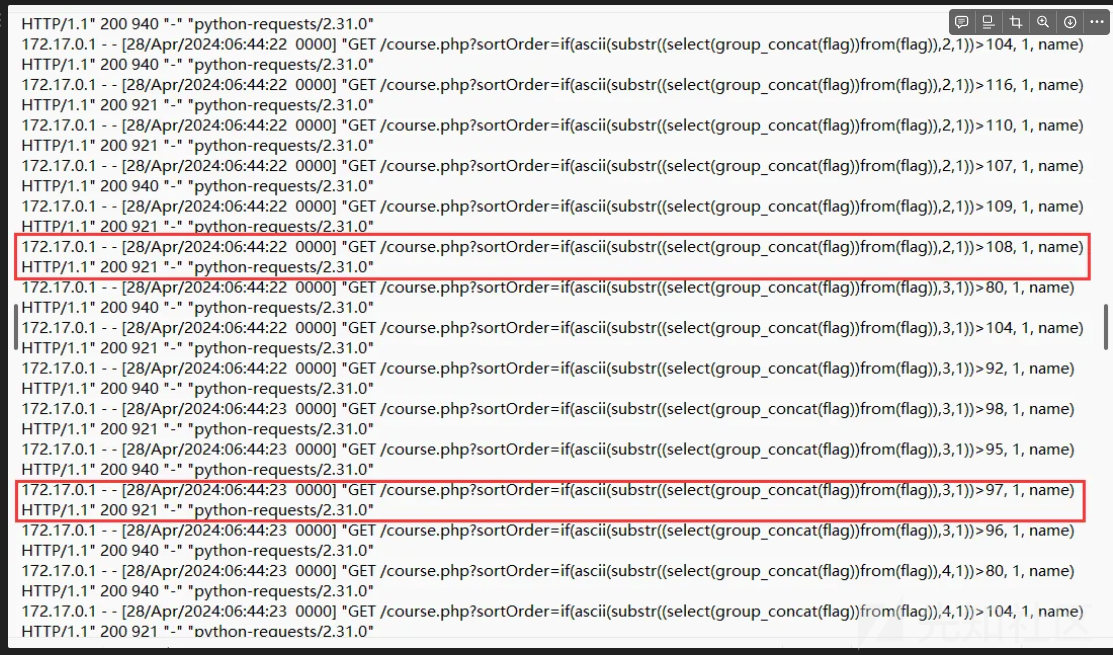
1.nginx 日志分析(flag)
任务描述:需要分析 nginx 日志,找到攻击者盗取的机密信息
任务目标:提交攻击者窃取的机密信息

布尔盲注,找到每个索引最后对应的ascii码值即可,而且回显包的长度为921,回显包为921应该为成功,不知道为啥写的脚本有问题,一直没回显,然后直接手工挨个挨个写了,最后ascii码转字符即可
2.计划任务分析(flag)
任务描述:需要分析攻击者留在系统中的计划任务后门。
任务目标:找到并提交攻击者的 ip+端口,提交格式为 flag{ip:端口}
——————
计划任务,一看就是contrab的利用,然后直接在/etc这里翻目录,在cron.d目录下发现恶意safeline文件,打开就是一个反弹shell的文件,就可以直接得到ip和端口,文件已经删了,flag如下:
flag{8.8.36.233:9001}3.计划任务清除(check)
任务描述:需要清除攻击者留在系统中的计划任务后门。
任务目标:清除计划任务(check)
——————
删除/etc/cron.d的safeline文件即可。
4.sudo 组后门(check)
任务描述:需要分析出 sudo 组中的后门用户。
任务目标:清除 sudo 组中的后门用户。
——————
先看了一下/etc/passwd文件,看到一个h4ck用户,然后直接删除它即可:
sudo userdel username再看/etc/sudoers里面没发现,但是/etc/sudoers.d/README里面有h4ck用户做的维持,删掉即可
5.suid 清除(check)
任务描述:分析出攻击者留在系统中有 suid 的后门程序。
任务目标:清除有 suid 的后门程序。
直接搜索即可:
find / -perm -4000 2>/dev/null
把不安全的suid配置全部删掉即可(zsh等)


 转载
转载
 分享
分享
