第四届网鼎杯半决赛-安全运营挑战赛加固修复Part学习&分析
仅是简单学习分析一下加固修复部分题目
加固修复01
题目描述
加强SSH服务的安全性 为了防止SSH服务被暴力破解攻击,应禁用密码登录并改用密钥认证。 请在Linux服务器上为root用户配置以下公钥以进行验证ssh-ed25519 AAAAC3NzaC1lZDI1NTE5AAAAIEhw/9RBAh4qW36/LZXn80sLIZhq2hAJ7qY9KhzfJ3rW修复步骤
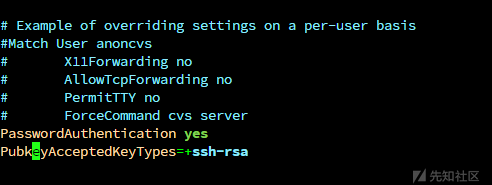
/etc/ssh/sshd_config文件配置相关功能
root@VM-24-4-ubuntu:/etc/ssh# vim sshd_config
sshd_config
#Match User user
    include xxxxx(这是checker相关的不用管)
因此修改为
#Match User root
    PasswordAuthentication no
    include  xxxx
在路径
/root/.ssh/authorized_keys下按照要求修改即可

加固修复02
题目描述
配置Nginx重定向和HSTS 配置Linux服务器的Nginx服务,将所有站点的HTTP请求重定向到HTTPS,并配置严格传输安全策略 (HSTS),以确保客户端与服务器之间的通信安全。修复步骤
nginx.conf文件配置80和443服务代码块
我的Ubuntu vps在/www/server/nginx/conf/nginx.conf
或者在/etc/nginx/nginx.conf
root@VM-24-4-ubuntu:/etc# nginx -t
nginx: the configuration file /www/server/nginx/conf/nginx.conf syntax is ok
nginx: configuration file /www/server/nginx/conf/nginx.conf test is successful
主要其实得关注ssl的证书和私钥文件
server {
    listen 80;
    server_name 这里是ip或者相关的域名;

    # 重定向 HTTP 到 HTTPS
    return 301 https://$host$request_uri;
}

server {
    listen 443 ssl http2;
    server_name 这里是ip或者相关的域名;

    ssl_certificate /etc/letsencrypt/live/your_domain.com/fullchain.pem;  # 证书路径
    ssl_certificate_key /etc/letsencrypt/live/your_domain.com/privkey.pem;  # 私钥路径

    # HSTS 配置
    add_header Strict-Transport-Security "max-age=31536000; includeSubDomains; preload" always;
}
重载配置
sudo systemctl reload nginx加固修复03
题目描述
启用Web应用防火墙 为Nginx服务的默认站点启用ModSecurity Web应用防火墙,并集成OWASP核心规则集(CRS),以防御常 见的Web攻击和漏洞利用。修复步骤
看看防火墙状态
sudo ufw status启用/禁用
sudo ufw enable/disable- ModSecurity 是一个框架,负责监控和过滤 HTTP 流量。
- OWASP CRS 是一套规则集,提供具体的攻击检测逻辑。
- 两者结合时,ModSecurity 使用 CRS 中的规则来检测和阻止恶意请求。
简单概括下的大致配置流程吧
nginx,ModSecurity,连接器都得准备好
nginx.conf配置文件得load_module连接器的模块路径,server块还得打开modsecurity以及指定modsecurity的配置文件路径
而这个modsecurity的配置文件还得include一个owasp的配置
连接器模块路径ngx_http_modsecurity_module.c在连接器里面make install就可以得到ngx_http_modsecurity_module.so
1、 配置nginx,ModelSecurity,nging和ModelSecurity的连接器 这仨
2、 得在nginx.conf文件内加载Nginx ModSecurity
第一行加上
load_module /www/server/nginx/modules/ngx_http_modsecurity_module.so;   #模块路径(这个得从连接器那里cp过来)
3、开启ModSecurity拦截模式
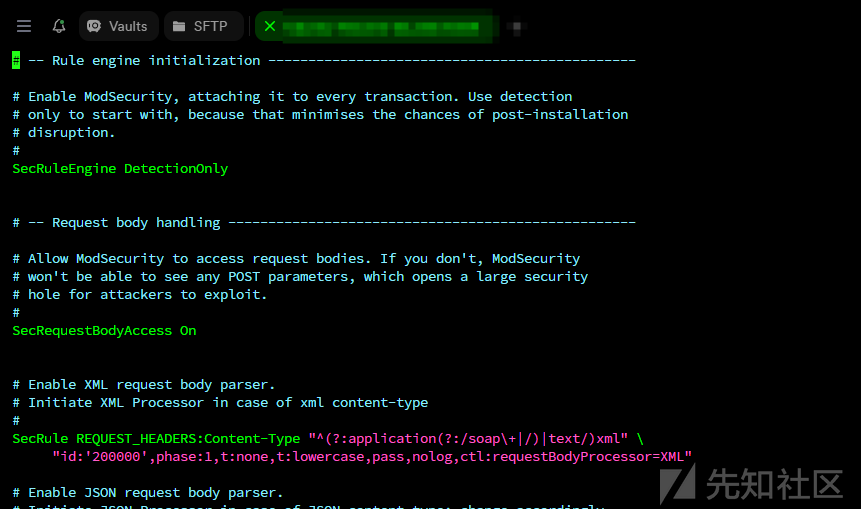
(配置文件内容见https://raw.githubusercontent.com/SpiderLabs/ModSecurity/v3/master/modsecurity.conf-recommended)
把将SecRuleEngine后面的字段改为On即可开启MOdeSecurity防火墙

4、配置owasp核心规则
git clone https://github.com/SpiderLabs/owasp-modsecurity-crs.git
cp -R owasp-modsecurity-crs/rules nginx的conf路由(/www/server/nginx/conf/ )
cp owasp-modsecurity-crs/crs-setup.conf.example /www/server/nginx/conf/crs-setup.conf
vim /www/server/nginx/conf/modsecurity.conf
加入以下两行
include crs-setup.conf
include rules/*.conf5、接着继续修改nginx的配置文件
server块得加上
modsecurity on;
modsecurity_rules_file /www/server/nginx/conf/modsecurity.conf;
6、 验证
nginx -t
systemctl restart nginx
加固修复04
题目描述
加强防火墙策略 配置Linux服务器的防火墙,使其仅允许通过以下端口的访问:22/tcp(SSH)、53/tcp和53/udp (DNS)、80/tcp(HTTP)、443/tcp(HTTPS)。 关闭其他不必要的端口,减少攻击面。修复步骤
root@server:/home/user# sudo ufw allow ssh
Rule added
Rule added (v6)
root@server:/home/user# sudo ufw allow http
Rule added
Rule added (v6)
root@server:/home/user# sudo ufw allow https
Rule added
Rule added (v6)
root@server:/home/user# ufw status
Status: active

To                         Action      From
--                         ------      ----
22/tcp                     ALLOW       Anywhere
80/tcp                     ALLOW       Anywhere
443                        ALLOW       Anywhere
22/tcp (v6)                ALLOW       Anywhere (v6)
80/tcp (v6)                ALLOW       Anywhere (v6)
443 (v6)                   ALLOW       Anywhere (v6)

root@server:/home/user# sudo ufw allow 53/udp
Rule added
Rule added (v6)
root@server:/home/user# sudo ufw allow 53/tcp
Rule added
Rule added (v6)
root@server:/home/user# ufw status
Status: active

To                         Action      From
--                         ------      ----
22/tcp                     ALLOW       Anywhere
80/tcp                     ALLOW       Anywhere
443                        ALLOW       Anywhere
53/udp                     ALLOW       Anywhere
53/tcp                     ALLOW       Anywhere
22/tcp (v6)                ALLOW       Anywhere (v6)
80/tcp (v6)                ALLOW       Anywhere (v6)
443 (v6)                   ALLOW       Anywhere (v6)
53/udp (v6)                ALLOW       Anywhere (v6)
53/tcp (v6)                ALLOW       Anywhere (v6)
加固修复05
题目描述
优化Kubernetes RBAC权限 配置App1应用的Kubernetes RBAC权限,只允许读取App1应用命名空间下所有Pods的信息,防止越权访问 其他命名空间的资源。加固修复06
题目描述
修复Kubernetes服务 使Pods状态为running,确保应用的可用性。加固修复07
题目描述
修复App2应用漏洞 修复App2应用的已知漏洞,并重新部署App2应用,确保其安全性和稳定性
 转载
转载
 分享
分享


没有评论